HADB 2.20
With this driver and app combination, Hubitat Elevation owners can take advantage of devices and integrations running on Home Assistant for use in automations on Hubitat Elevation

Table of contents
- Features
- Compatible Devices
- Requirements
- Installation
- Setup
a. Create an HA Long-Lived Access Token
b. Filter by Type or Search - Advanced options
- Troubleshooting
- Submitting new device support requests
Acknowledgments
- @ymerj for the initial build and ongoing dedication to support the community
- @ogiewon, @tomw, @stephack, @enishoca and many others that have contributed to Home Assistant Device Bridge
Features
![]() Devices from Home Assistant appear in Hubitat Elevation, fully functional and ready for use in Hubitat apps such as Rule Machine
Devices from Home Assistant appear in Hubitat Elevation, fully functional and ready for use in Hubitat apps such as Rule Machine
![]() Virtual devices are not required
Virtual devices are not required
![]() Keep your automations on Hubitat
Keep your automations on Hubitat
![]() No MQTT broker needed
No MQTT broker needed
![]() No additioinal device setup required
No additioinal device setup required
![]() No custom firmware flashing
No custom firmware flashing
Compatible Device Types
Device types that can be imported by Home Assistant Device Bridge
Cover
| Device Type | Generic Component Driver |
|---|---|
| Blind | Generic Component Window Blind |
| Curtain | Generic Component Window Shade |
| Door Control | Generic Component Door Control |
| Garage Door | Generic Component Garage Door Control |
| Shade | Generic Component Window Shade |
Actuators
| Device Type | Generic Component Driver |
|---|---|
| Button | Generic Component Pushable Button |
| Climate | Generic Component Thermostat |
| Device Tracker | Generic Component Contact Sensor |
| Event | Generic Component Event |
| Fan | Generic Component Fan Control |
| Humidifier | Generic Component Humidifier |
| Input Boolean | Generic Component Switch |
| Light | Generic Component Dimmer |
| Lock | Generic Component Lock |
| Media Player | Generic Component Media Player |
| Select | Generic Component Select |
| Siren | Generic Component Siren |
| Switch | Generic Component Switch |
| Text | Generic Component Text |
| Vacuum | Generic Component Vacuum |
| Valve | Generic Component Valve |
Sensors
| Device Type | Generic Component Driver |
|---|---|
| Battery | Generic Component Battery |
| Energy | Generic Component Energy Meter |
| Environment | Generic Component Carbon Dioxide Sensor |
| Environment | Generic Component Gas Detector |
| Environment | Generic Component Radon Sensor |
| Environment | Generic Component Volatile Organic Compounds Sensor |
| Environment | Generic Component PM25 |
| Humidity | Generic Component Humidity Sensor |
| Illuminance | Generic Component Illuminance Sensor |
| Number | Generic Component Number |
| Power | Generic Component Power Meter |
| Pressure | Generic Component Pressure Sensor |
| Temperature | Generic Component Temperature Sensor |
| Time | Generic Component TimeStamp Sensor |
| Voltage | Generic Component Voltage Sensor |
Binary Sensors
| Device Type | Generic Component Driver |
|---|---|
| Door | Generic Component Contact Sensor |
| Garage Door | Generic Component Contact Sensor |
| Lock | Generic Component Contact Sensor |
| Moisture | Generic Component Water Sensor |
| Motion | Generic Component Motion Sensor |
| Moving | Generic Component Acceleration Sensor |
| Occupancy | Generic Component Occupancy Sensor |
| Opening | Generic Component Contact Sensor |
| Presence | Generic Component Presence Sensor |
| Smoke | Generic Component Smoke Detector |
| Vibration | Generic Component Acceleration Sensor |
| Window | Generic Component Contact Sensor |
| After import, devices joined to Home Assistant will be available for control from Hubitat Elevation, and can be used in Hubitat apps and Rule Machine rules, just as you would any other locally joined device. |
|---|
Requirements
-
Hubitat Elevation hub

-
Home Assistant (This isn't difficult to get setup for our goal of simply importing devices)
-
Recommended installation method is to use the community built Hubitat Package Manager
If you prefer, you can manually install Home Assistant Device Bridge driver and app on your Hubitat Elevation hub
NOTE: This driver uses the Generic Component Drivers built into Hubitat Elevation. If the Generic Component Drivers do not exist on Hubitat, you may request a custom driver, but there are no guarantees this will be possible. We therefor must emphasize that specialized or complicated devices may require a more direct solution than this integration was ever intended for.
- IMPORTANT: This integration adds devices from Home Assistant using their Entity ID. If you want Hubitat devices shared with Home Assistant, you should check out the Hubitat Integration from @jason0x43. It does the opposite of this integration and imports Hubitat devices into Home Assistant.
Installation
If you've never installed an app or driver on your hub, it is highly recommended to use Hubitat Package Manager. You can either learn to do that first, or you can simply install the Home Assistant Device Bridge App and Driver.
How to install a custom driver in Hubitat Elevation
How to install a custom app in Hubitat Elevation
Setup
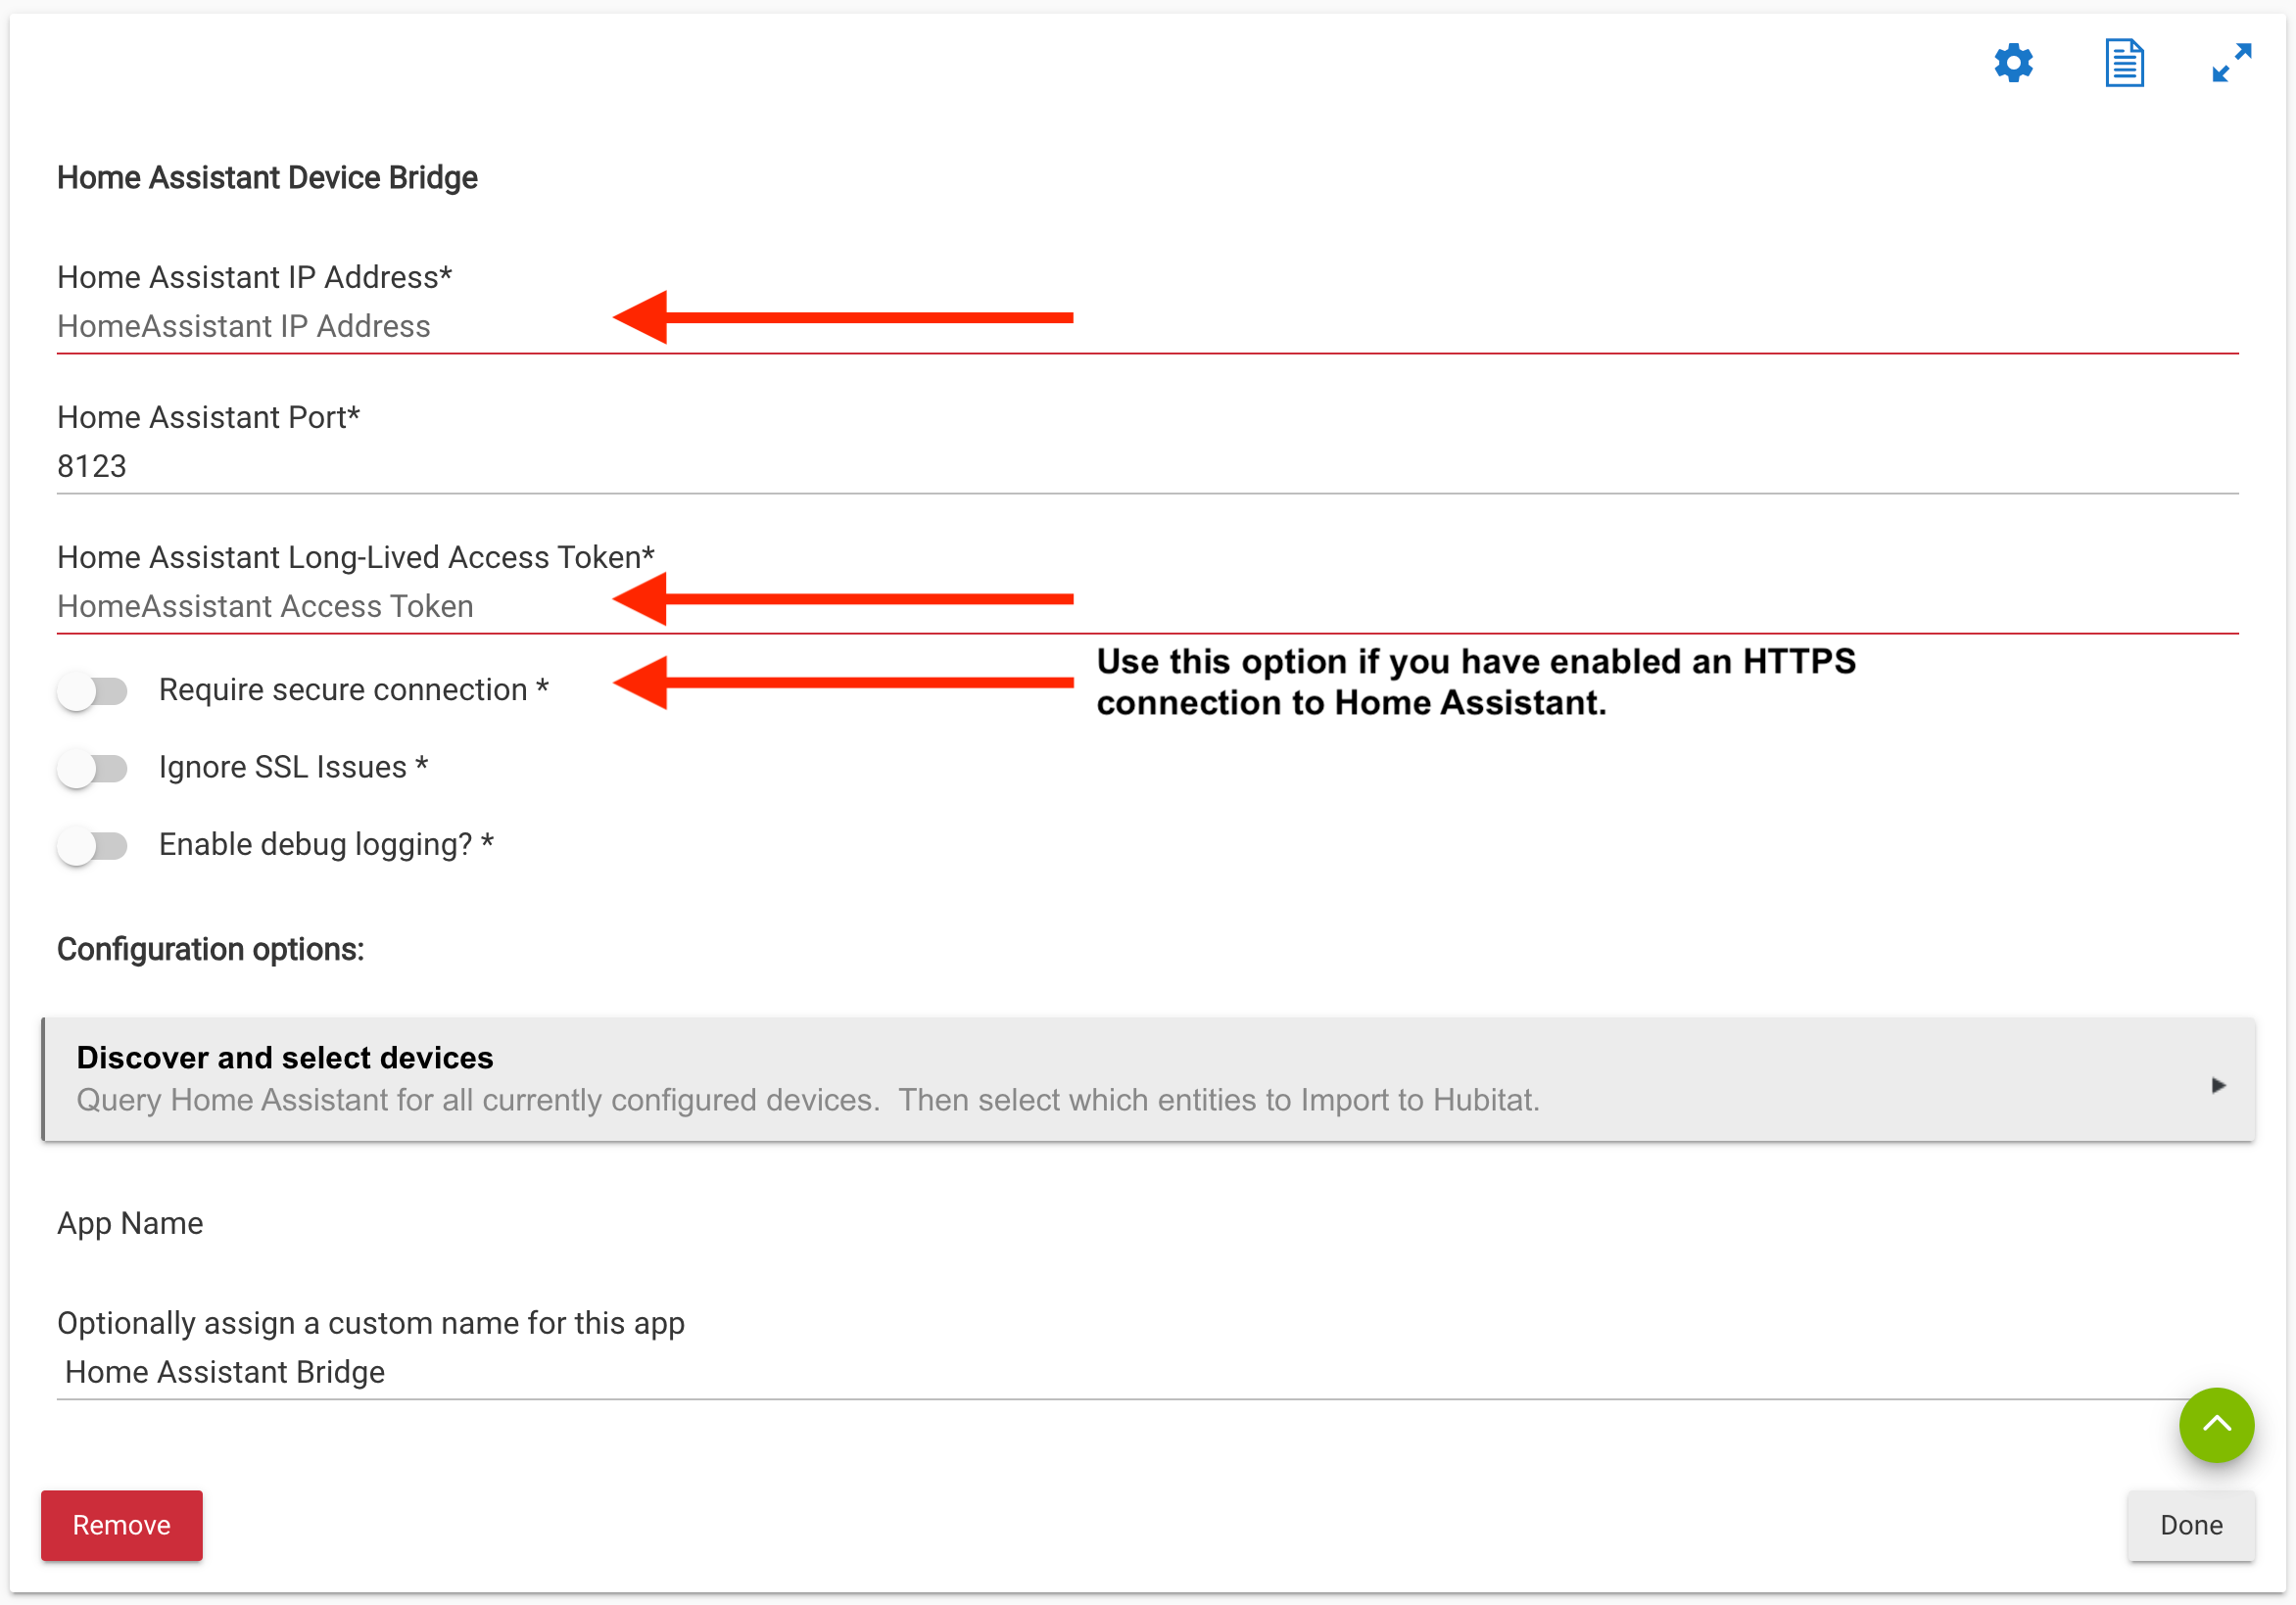
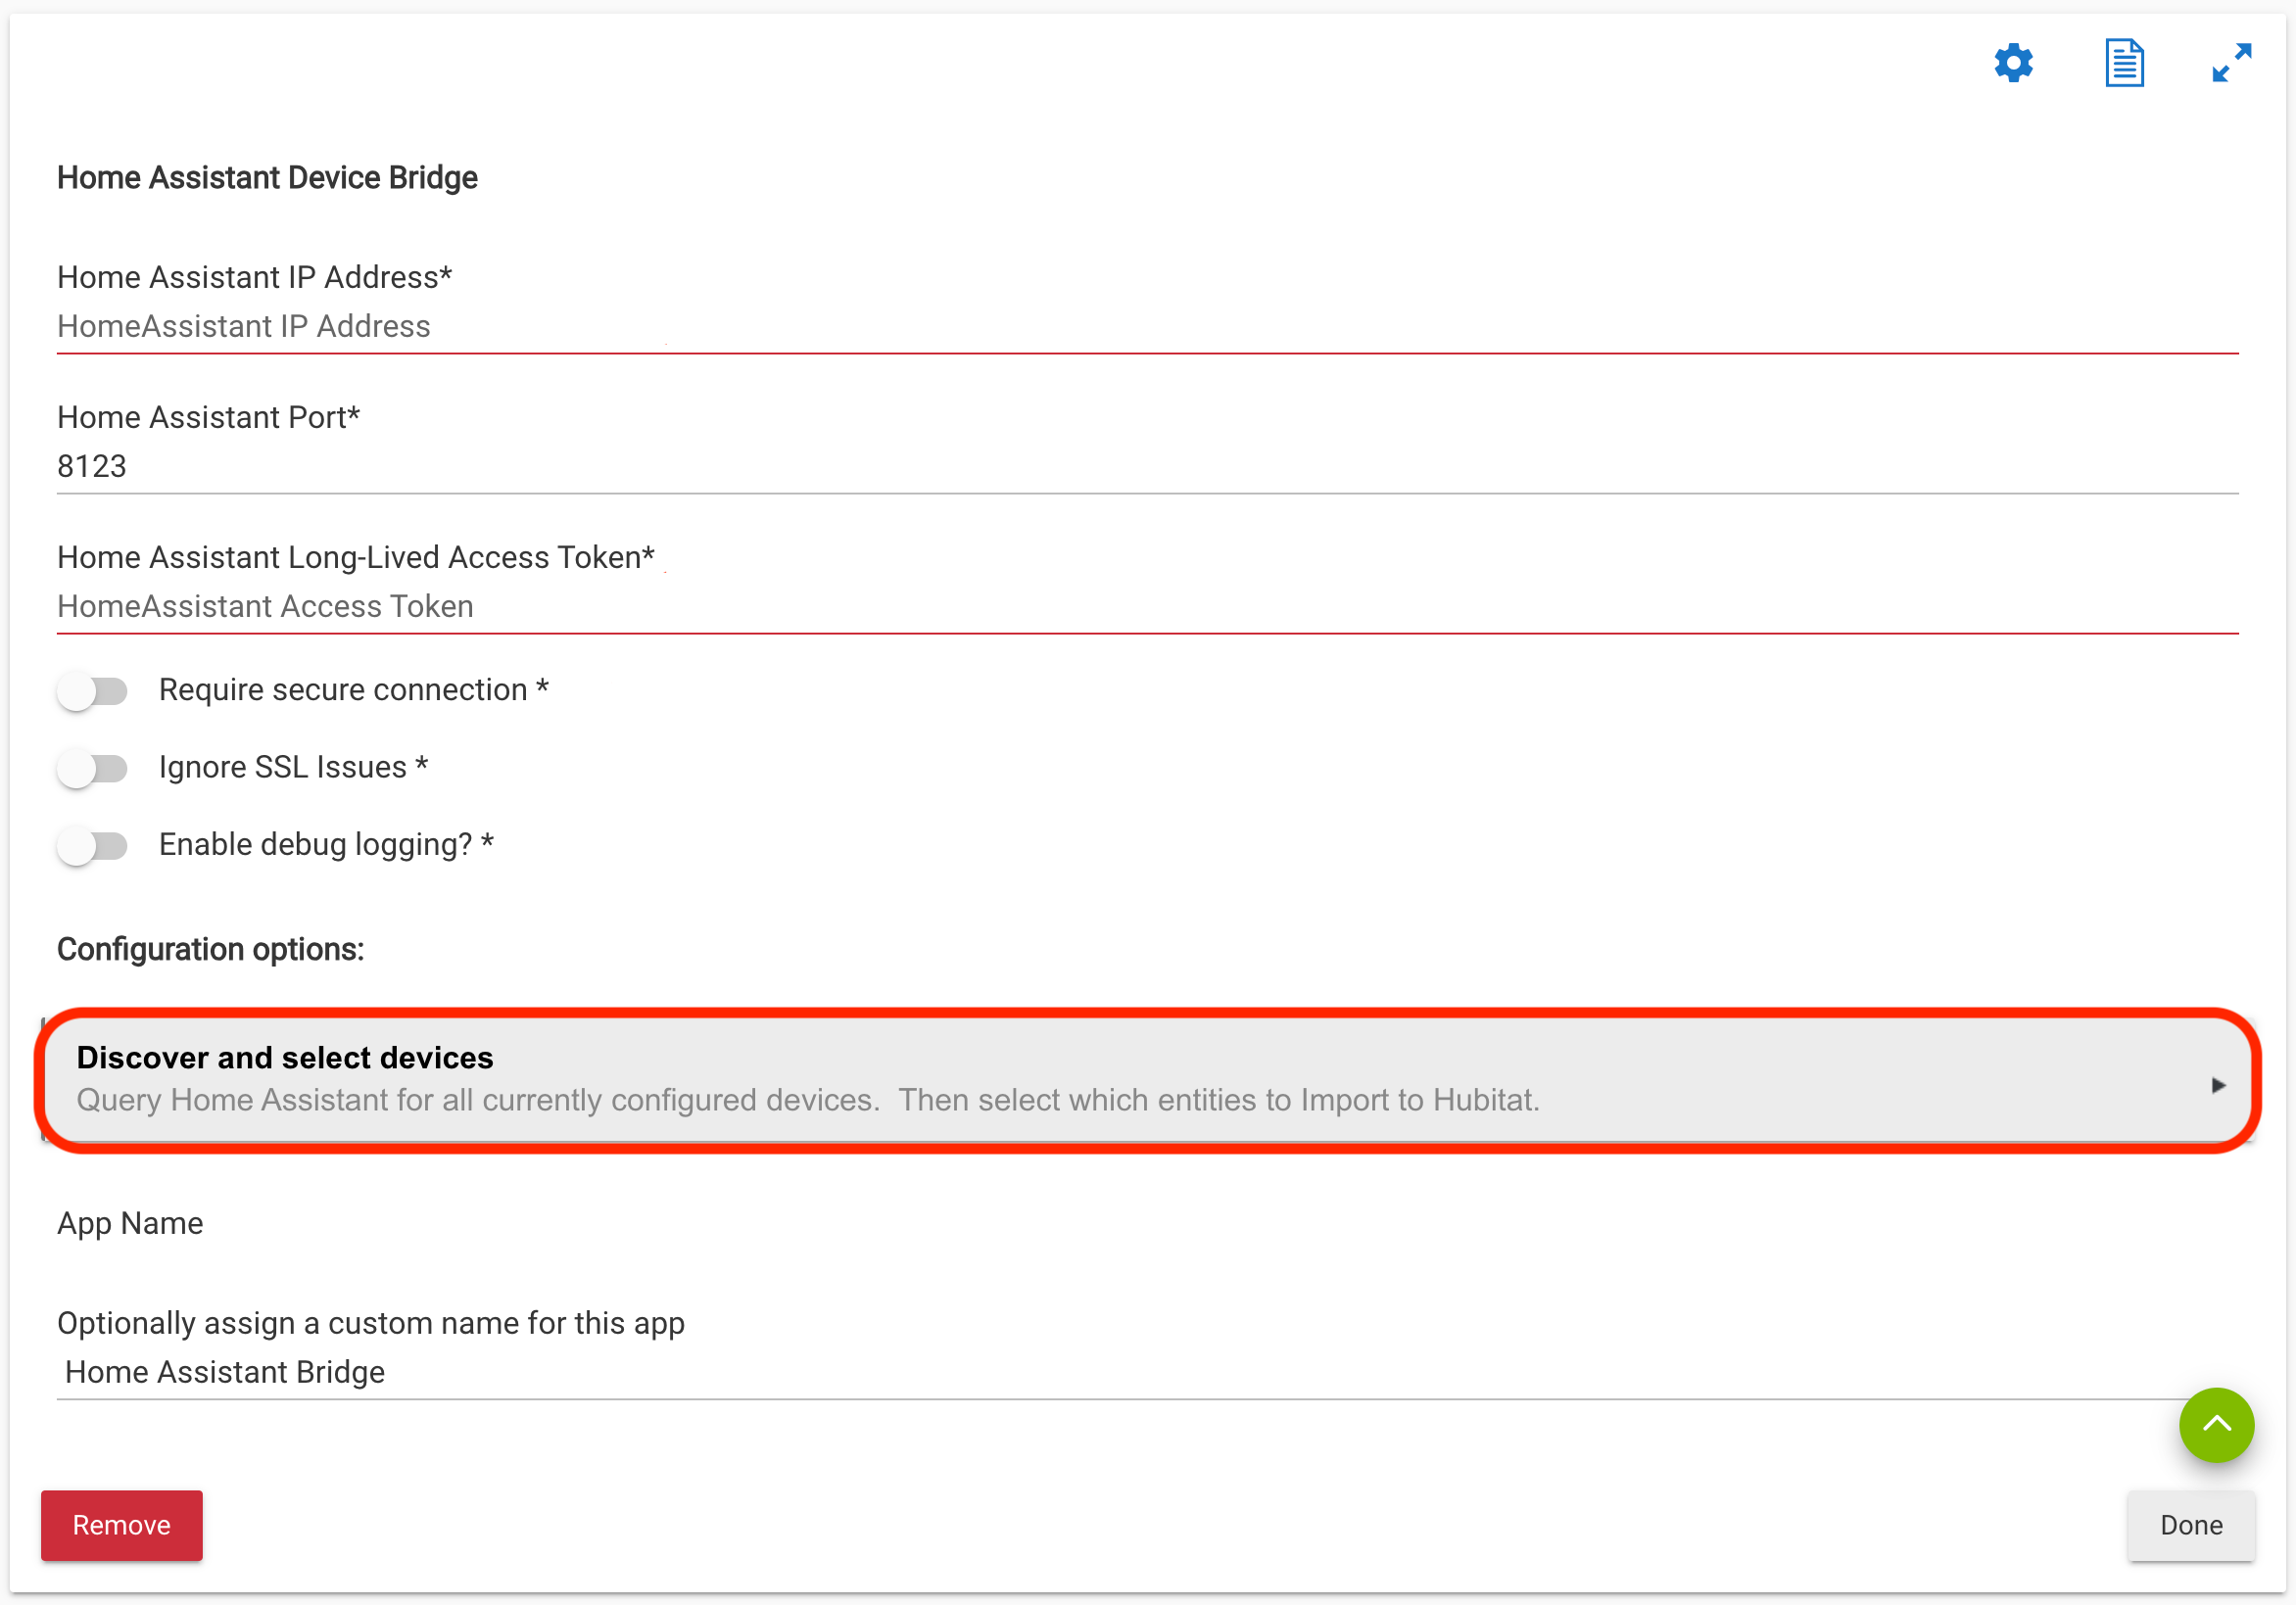
Enter the IP address of Home Assistant and the Long-Lived Access Token (see instruction below)
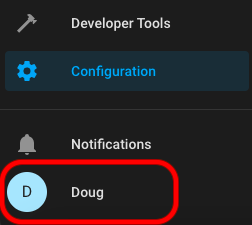
How to create a Long-Lived Access Token on Home Assistant
Press on your user account in Home Assistant
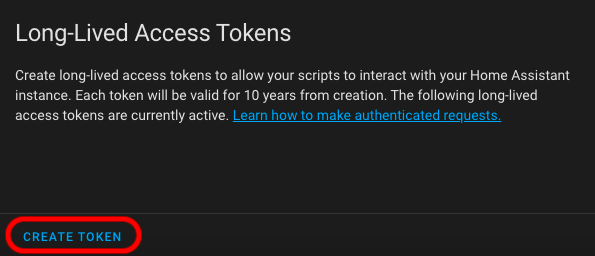
Select the Security tab at the top
Scroll down to the bottom and select CREATE TOKEN
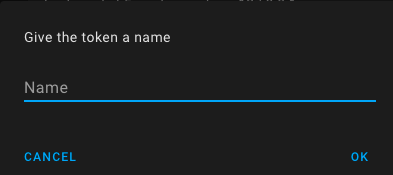
Name your token (This can be any name you want.) and then press OK.
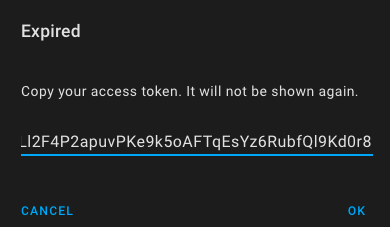
Copy the token. It isn't accessible after creating it, so if you forget to record it somewhere and need it again later, just delete the old one and create a new token for use in Home Assistant Device Bridge.

-
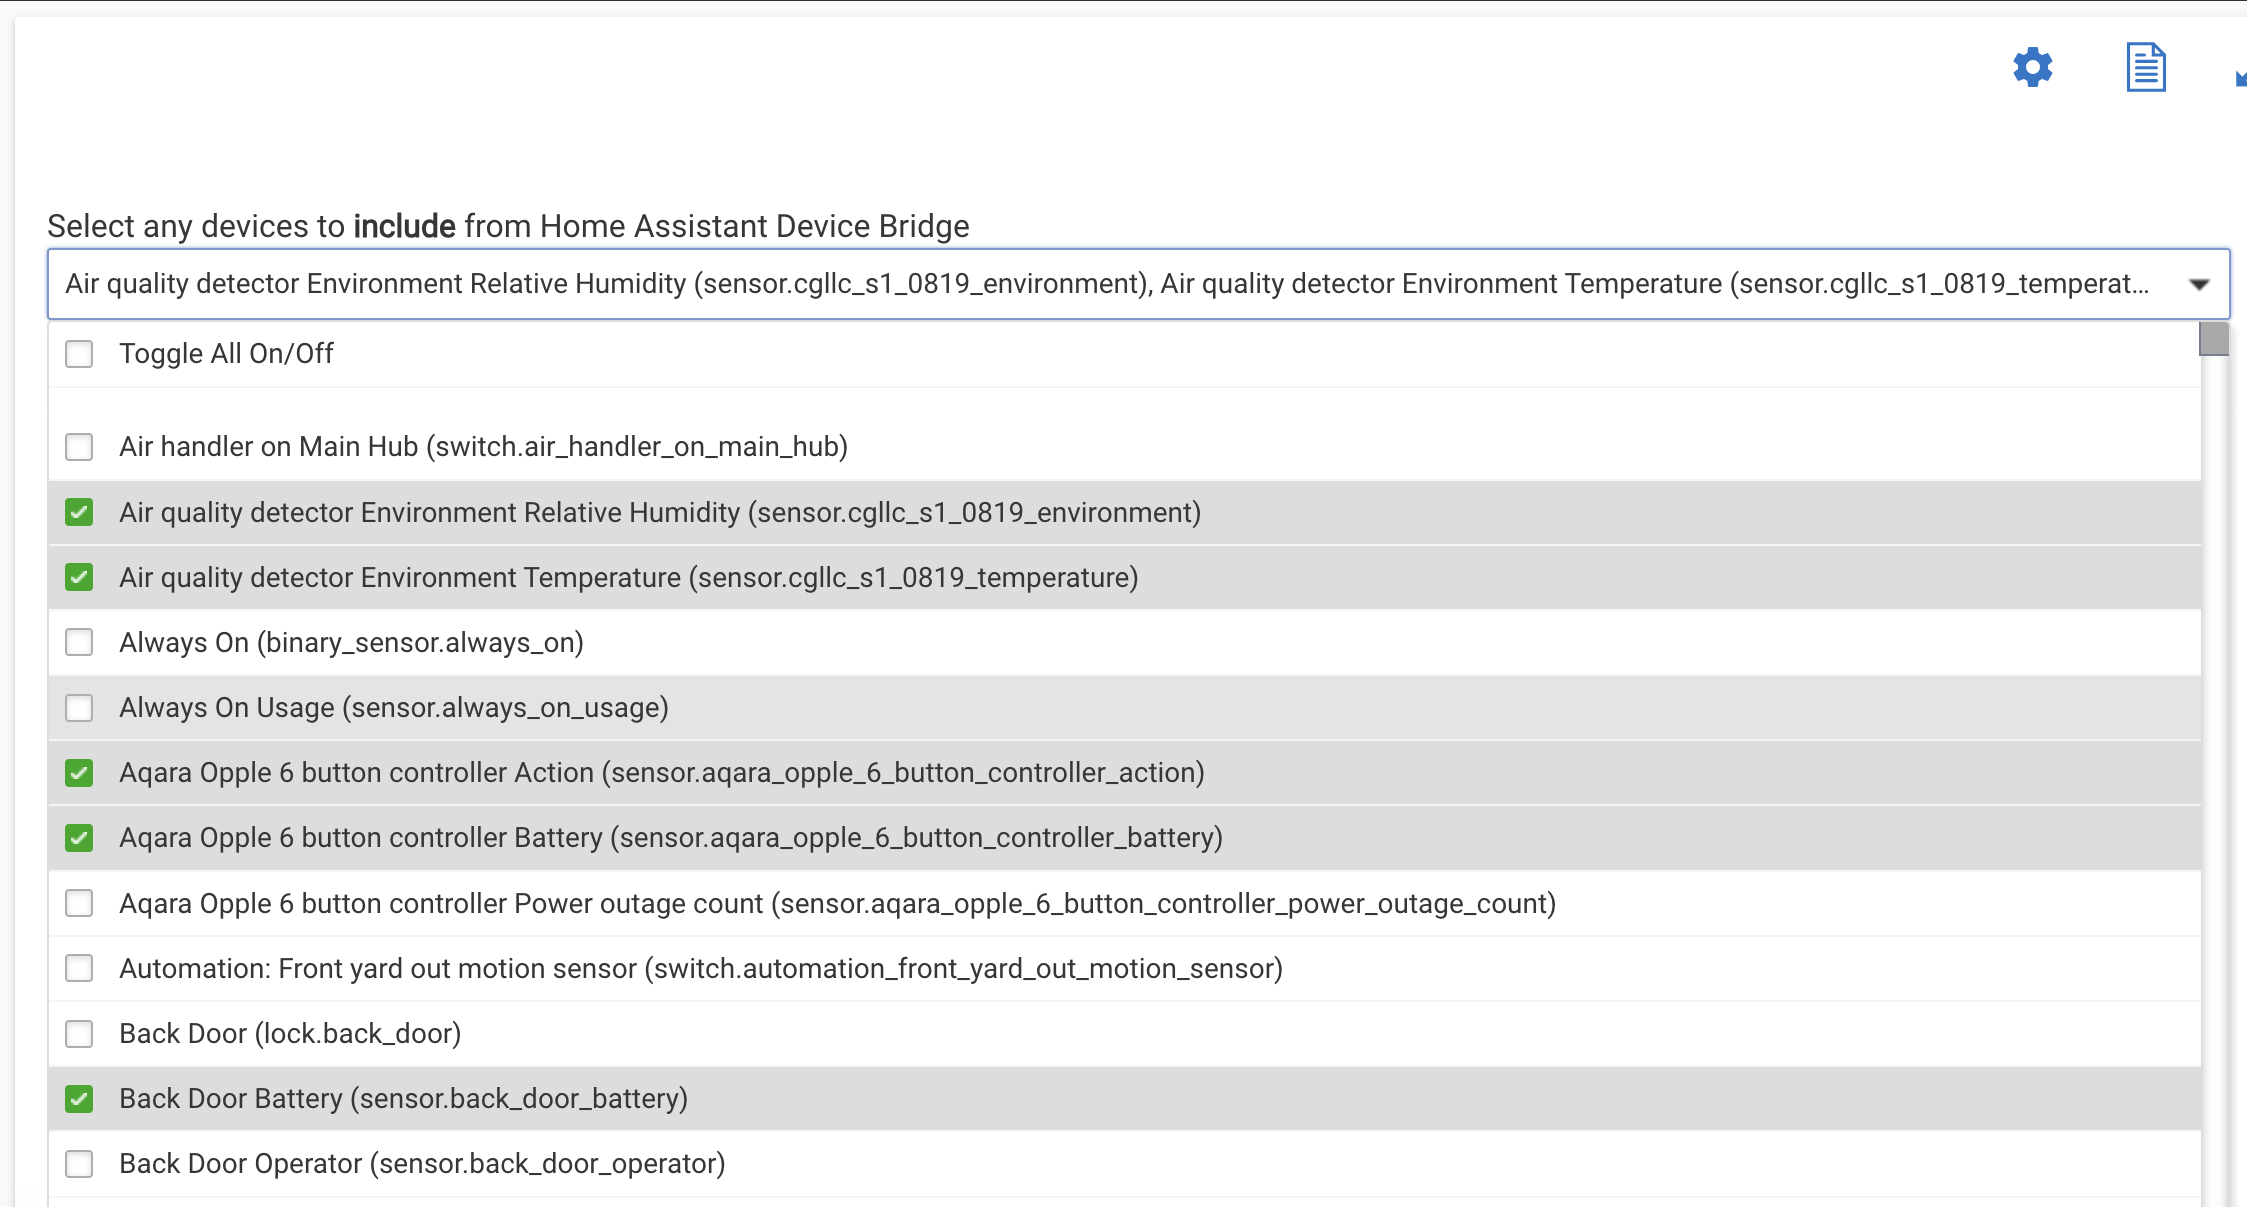
Paste the Long-Lived Access Token in the HADB app where indicated, then press Discover and select devices to poll Home Assistant for a list of compatible entities.
-
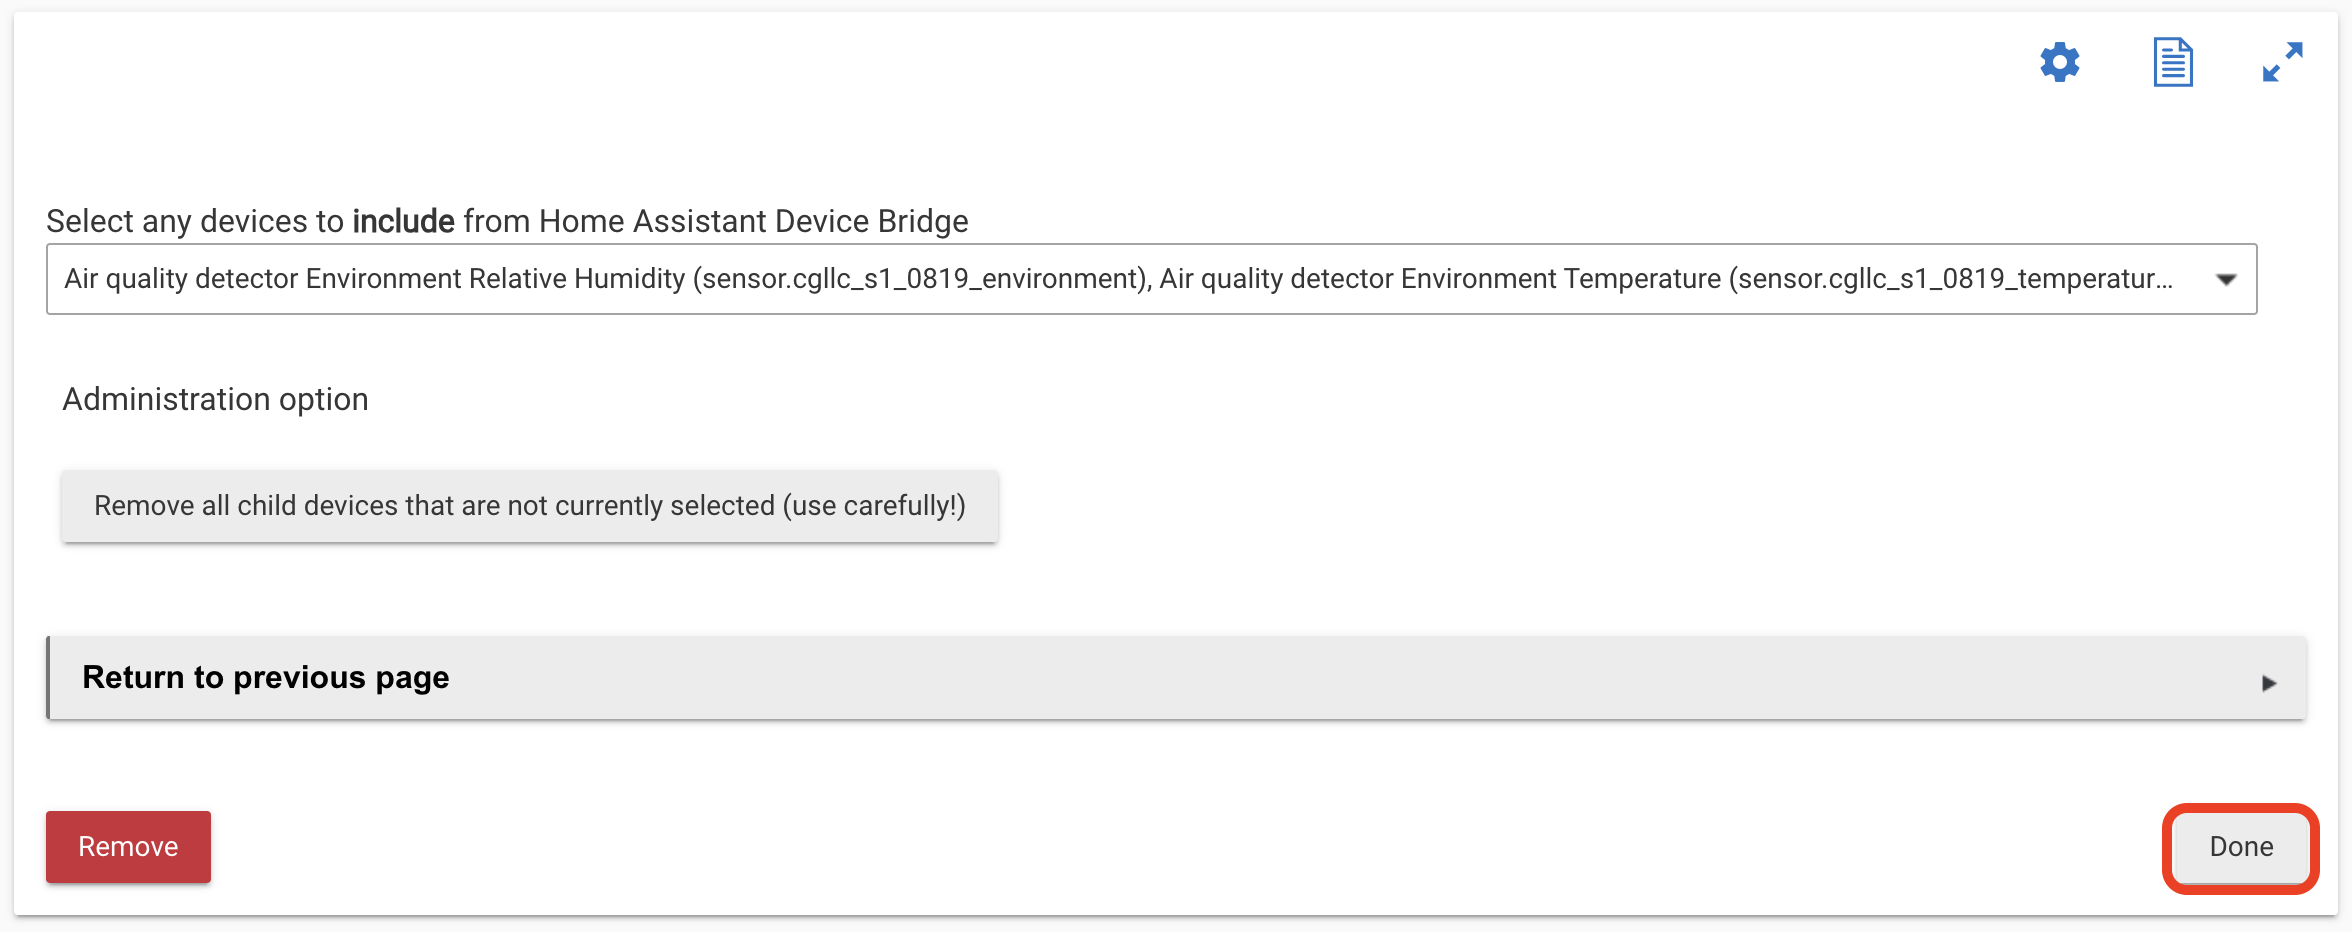
Press Done when finished selecting the devices to ensure the Long-Lived Access Token and the devices selected for import are saved
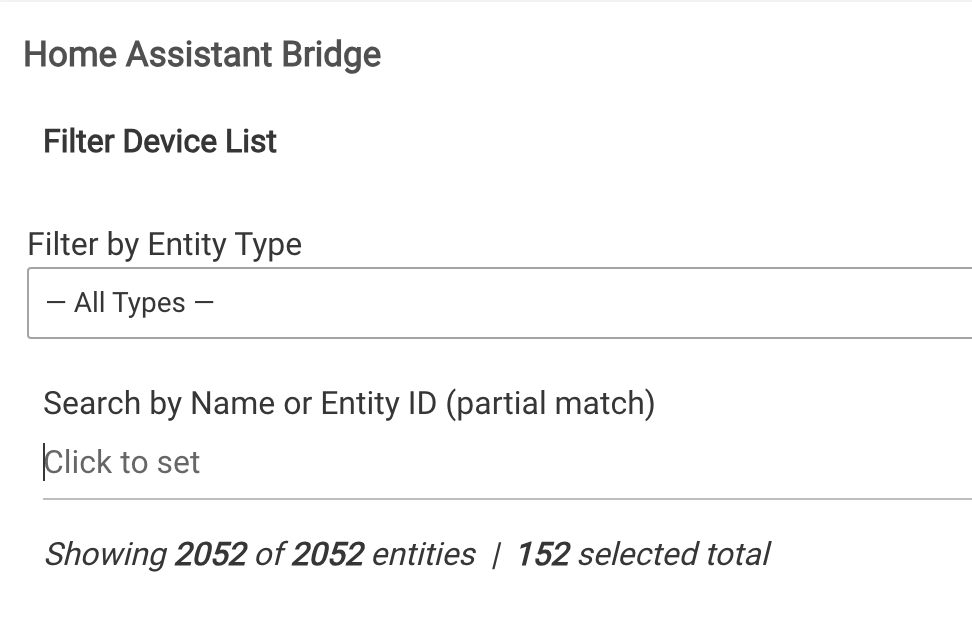
Filter by Type or Search by Entity Name or ID
Starting with HADB 2.20, you can now filter by Entity Type, or use the search field to narrow the results by Name or Entity ID
|
- Confirm and adjust which devices should be imported. You can adjust this later if you make a mistake or change your mind.
- Press Done
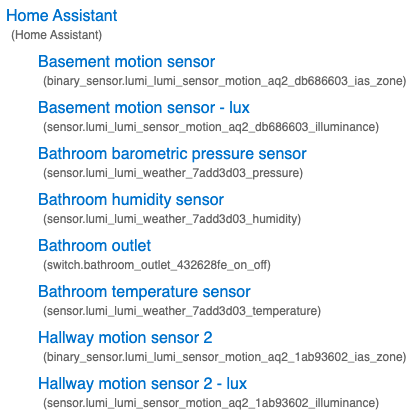
In your list of Hubitat drivers, you will see the Home Assistant Device Bridge parent device (or the custom name you set in the app). When the device state updates on Home Assistant, each compatible entity will create a child device on your Hubitat Elevation hub.
- IMPORTANT: Devices will appear automatically only after a change has occurred to the device you have selected for import to Hubitat.
A device will not be added to the list of child devices under the Home Assistant Device Bridge parent driver, until a change occurs on the device.
- Example: A motion sensor will not appear in the list of devices on Hubitat until it is triggered for the first time after selecting it in the list of available entities from Home Assistant.
- Example of imported child devices (each will appear on first activity after selecting them for Import to Hubitat)
- NOTE: Only devices that currently have the appropriate Generic Component device driver and are also listed as compatible devices will be imported to Hubitat Elevation.
Administration Option
Remove all child devices that are not currently selected (use carefully)
This is a cleanup method. Please use it carefully, as it will remove all of the HADB specific child devices from your Hubitat Elevation hub that are not selected in the list of devices to include.
Troubleshooting
IMPORTANT: Devices will appear automatically when a change occurs the first time after selecting them for import to Hubitat. A device will not be added to the list of child devices under the Home Assistant Device Bridge parent driver, until a change occurs on the device.
Example: A motion sensor will not appear in the list of devices on Hubitat until it is triggered for the first time after selecting it in the list of available entities from Home Assistant.
Submitting new device support requests
IMPORTANT: Home Assistant Device Bridge is intended to support very simple devices and sensors. We therefor must emphasize that specialized or complicated devices may require a more direct solution than this integration was intended for.
- Please enable logging on the parent virtual device
- Actuate your device (i.e. Open and Close, or Turn ON and Turn OFF, etc.).
- Include these debug logs with your request so we can analyze the information sent by Home Assistant through the Home Assistant Device Bridge driver (This information is essential in determining if your requested device can be added to Home Assistant Device Bridge).
 (lost its channel and all my lights, maybe I just overworked it), so I have had to ditch it


 (if and when he gets more!).
 ) pointed me to this. Not that he was holding out or anything.