Just throwing this out there. It may or may not be a help and I'm sure many others will contribute to this thread. Here are a few things to start you off.
Z-wave Devices:
1: You do not need Wink/ST/Vera etc. to exclude your existing z-wave devices. Hubitat can do the exclusion for you. (Make sure you turn off your old hub first!) In most cases this is sufficient before pairing. Sometimes though you may need to factory reset the device. Non Plus z-wave devices may have to be included/excluded near the hub as they won't pair or exclude through a repeating node. In this instance you may need an extra long cable to move your hub closer to exclude your old device and then re include them. Non plus edge devices that are battery powered can be brought to the hub to be excluded and paired. Please read this very well done How To: How to Build a Solid Z-Wave Mesh | Hubitat Documentation
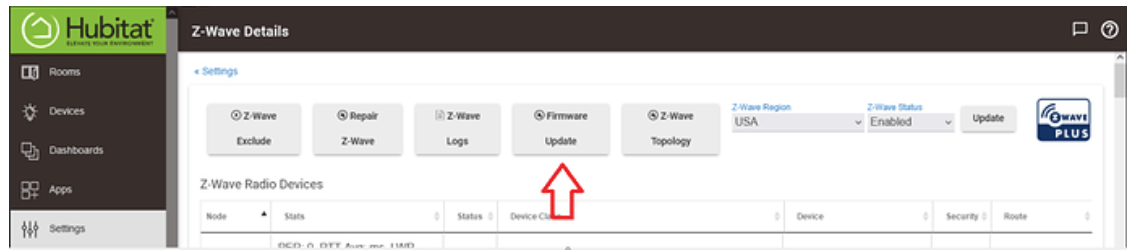
2: Before pairing make sure that your z-wave stack is up to date. Settings>>Z-Wave Details. At the top will be a button that says Z-Wave Firmware Update. Click it. If it's not there you've already been updated. This is separate from the platform update (Which you should also do)
3: One thing you need to be careful of, is if you have a failed Z-Wave pairing, STOP! Check your settings>>z-wave details page. If a ghost was created (you will see nothing in the routing column), it needs to be removed first. If you don't remove it you will start having problems with your mesh including pairing new devices. After removing the ghost, factory reset the device and attempt to pair again. Rinse and repeat. This is one of the biggest keys to having a healthy mesh.
4: Some of your things may be z-wave and not z-wave plus. This may mean some of your switches won't report it's status properly. To address this Hubitat Elevation has a built in app called Z-wave Poller. This will poll the device at set intervals to check it's status. The reason this happened was that Lutron held the patent on pushing status and until that patent expired no one else could use it. So when it expired it became part of Z-Wave plus and all z-wave plus devices report their status'. Another note about z-wave (non plus) is that they are 300 series chips and their max speed is 40kbps while z-wave plus (500/700/800) is 100kbs. So depending on your layout, mains based non plus devices can cause a bottleneck in your mesh though battery ones should not as they are considered edge devices and therefor do not repeat within the mesh.
5: Z-wave locks (especially Schlage) should be paired within 3 feet of the hub. This is because when pairing they go into a low power whisper mode for security. Older Schlage 300 series locks like the fe599 may have problems pairing with the C7/C8,
6: While the new Z-Wave Plus V2 firmware requires running less Z-Wave repair than older versions, if you move devices around, it is good to run an individual repair once the device is placed in its permanent location. Likewise for the hub itself, if you move the hub in a new location, you can run a network wide repair to rebuild the routing tables. Individual node repair is more effective than network wide repair if the nodes are moved around.
7: In a lot of cases you will see your devices want to pair with Security enabled. This can be good or bad in some circumstances. Older devices that only can pair in S0 should most definitely be paired as no security. S0 is extremely chatty and can overwhelm a z-wave mesh. The rule of thumb overall is to pair all devices without any security EXCEPT for Locks and Garage related items. If you have a device that won't pair with no security, you can obtain a z-wave stick and pair it with your Hubitat as a secondary controller and pair the device through the stick with no security. (You then remove the stick)
8: Z-wave Long Range.
Only available on C8 and C8 Pro.
Any Z-wave LR devices need to be paired via Smart Start.
Note: 2 Problematic devices are the Zooz 4-in-1 and the Zooz zen-25 double plug. The 4-in-1 sensor needs to be paired to the C7/C8 hub with no security as it will crusg a mesh. This needs to be done with a z-wave stick paired to hubitat as a secondary controller. Then zen-25 has a power reporting issue and overwhelms meshes. Power reporting needs to be turned off.
For detailed pairing for LR, please see this thread.
Zigbee Stuff
1: All zigbee devices will have to be factory reset before pairing with Hubitat.
2: Ge Link, Hue, Cree bulbs etc are ZLL bulbs. They should be kept on a separate hub mesh than zigbee devices such as sensors or what have you because ZLL make very bad repeaters. The exception to this are Sengled bulbs (they do not repeat) or Zigbee 3.0 bulbs. The solution in general is to move these ZLL bulbs to a Hue bridge or another Hubitat with just those on that hubs mesh. Hubitat can still control them ![]()
Please read this well done How To: How to Build a Solid Zigbee Mesh - Hubitat Documentation
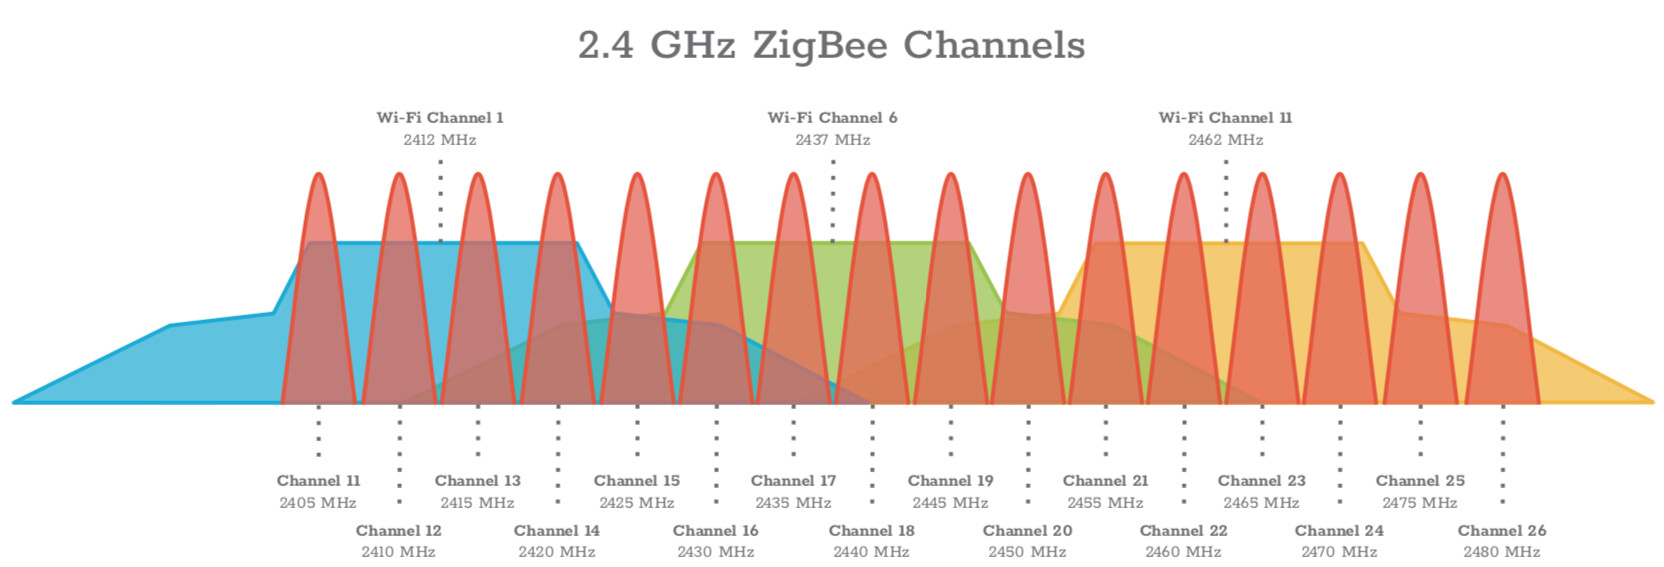
3: Zigbee runs on the same frequency as Wifi and therefor is subject to wifi interference. It's best practice to keep zigbee and wifi away from eachother as far as possible. Every zigbee hub needs to be on it's on frequency or devices could start dropping off the mesh. Follow the below diagram as a rule of thumb. IE. Wifi on 1 or 6 and Zigbee on 20 (note: 20 Seems to be problematic in some areas, recommend 25)
Note: During pairing some find it easier to do standard zigee/z-wave pairing instead of by manufacturer or device type.
Lutron Caseta.
1: In order to integrate your Lutron Caseta devices, you will need the Pro hub 2. (Lutron Part num L-BDGPRO2-WH). The regular Lutron hub won't work as Hubitat uses Telnet protocol to communicate with Lutron. This is lightning fast!
See here: Lutron Integrator - Hubitat Documentation
Apple HomeKit Hubitat can integrate with Apple Homekit. You simply expose to homekit devices from hubitat. For Hubitat to control Homekit devices, you would use virtual switches. Setting up Homekit is easy. HomeKit Integration | Hubitat Documentation
WebCore: WebCore is now available as part of the Hubitat Platform. This will allow ST users who have spent a lot of time building pistons to move them over to Hubitat easily.
TCP/IP Static IP: If for any reason the hub cannot get to the internet after setting a static ip on it, change the DNS to 1.1.1.1 and you should be in business.
If you cannot get to the hub itself after setting a static ip, press the reset button on the bottom of the hub for 7 seconds. (It is the only round hole out of all the square ones. Use a toothpick or paperclicp). This will ONLY reset the network settings back to defaults (DHCP).
It is recommended that you set a DHCP reservation in your router for the hub.
Shutting down the hub: When Shutting down the hub, it is best practice to do it from the hubs interface menu. Shutting down by disconnecting power is not recommended as it can lead to database corruption in the hub and a restore from backup could be necessary.
Backing up: Any time you are making changes to your hub it is a good idea to backup. This way if you make a mistake, a restore is just a few clicks away. Local backups are done around 2:am by default but timing may be changed or a manual backup may be initiated and downloaded to your pc. Cloud backups are available with the Hubitat Protection Plan.
Read the tutorials and watch the videos and ASK LOTS OF QUESTIONS
https://docs.hubitat.com/index.php?title=Documentation
Install Hubitat Package Manager.
This is a great way to install community supported drivers and apps without having to always deal with code. See here [RELEASE] Hubitat Package Manager (HPM) -- HubitatCommunity
Note: Hubitat Package Manager is a community initiative that aims at helping users to get started with custom apps and custom drivers.
While Hubitat Elevation doesn't require any programing skills, custom apps and drivers that are created and supported by the Hubitat Community, add value by enabling integrations and additional features that have not been tested by Hubitat engineers.
**Voice Assistant integrations: Google and Echo are supported for voice control via built in apps. It is recommended that you set a reserved IP in your router's DHCP settings for these devices. If these assistants have devices (such as wifi based devices) attached to them that cannot be connected directly connected to hubitat, do not fear! Chances are they can be controlled indirectly by hubitat. The process is simple. 1st create a virtual switch on Hubitat for the device on google/echo you want to control. (IE Kitchen Light). Expose this virtual switch(s) to google/echo via the hubitat integration. Run discovery on google/echo so the assistant is aware of the switch. Then create a routine on your assistant to do something when it sees that switch on or off. So the flow is: Hubitat Rule turns virtual switch on>>Assistant sees that virtual switch is on>>Assistant does routine based on the status of the switch it sees on.. So if you have a Fan connected to your google/echo, the hubitat virtual switch can turn it on or off.
An issue that may come up after voice assistant integrations is that you may have a device turn on/off or rule fire without you asking for it at some strange random times. When setting up Alexa you want to go in and disable HUNCHES. These are enabled on Alexa by default and can cause erratic behavior with the assistant.
POE: Hubitat doesn't not have POE (Power Over Ethernet) built in but you may use a POE splitter for either the c5/c7/c8. Be aware though there has been problems using these adapters powered by a Unifi switch causing z-wave on the C8 to be unstable. (C5/C7 is unaffected). If you are using a Unifi POE switch, please use the supplied power adapter.
Questions: Ask lots of questions!!!!!! The community is here to help and is very welcoming. You will also find a lot of interaction from Hubitat staff here as well. They are a fantastic resource.
Hubitat Support: For warranty, orders, returns, etc. visit support.hubitat.com.
Welcome!!