Since Xbee devices were taking the Xiaomi devices - are they pairing / staying connected for you? thread off track and info is scattered between here and the SmartThings forum.
I figured I would create a thread for everything Xbee related.
You can display Xbee zigbee network scans as a graph like this
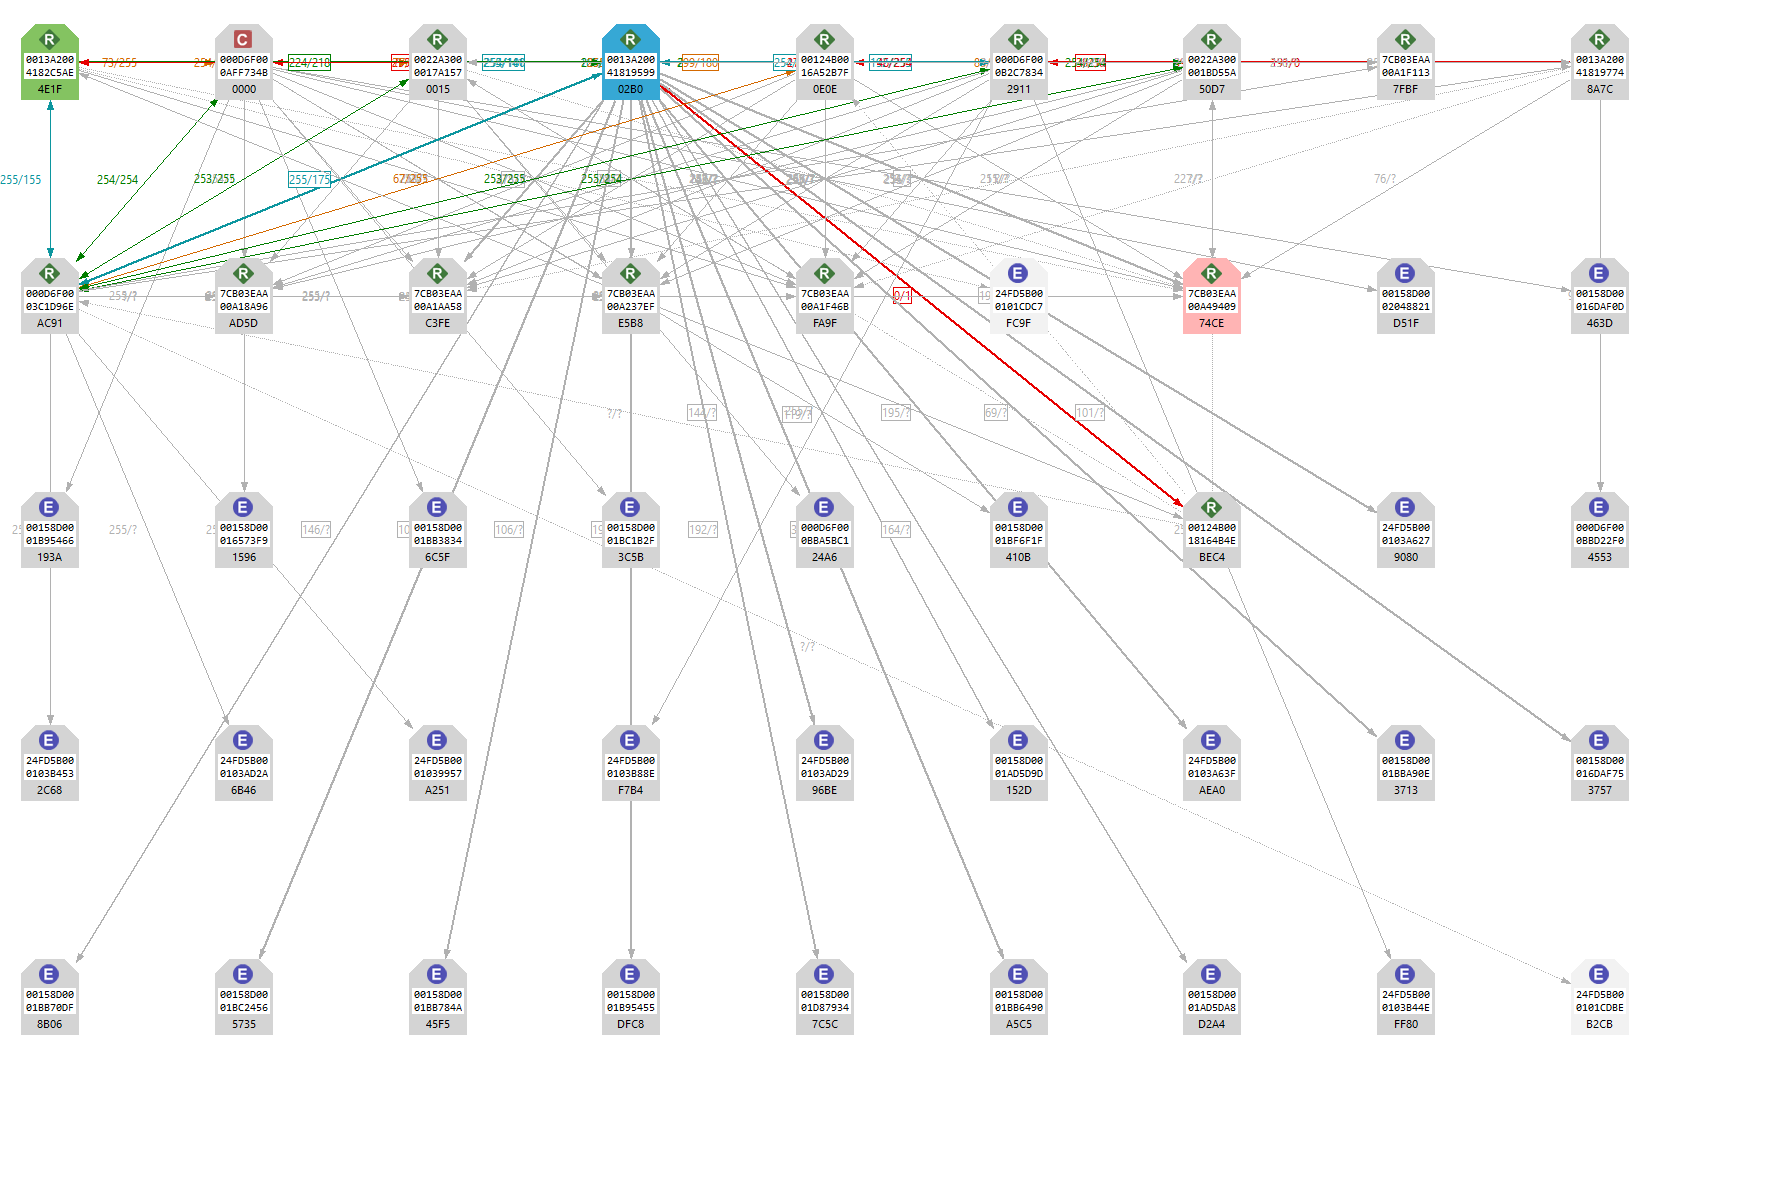
or a table like this

These are great little devices to use as routers to extend your network and for mapping out your zigbee network.
They have made my Xiaomi devices stable routing through them and have extended my SmartThings arrival sensor range.
-
They can be used as a router and mapping device to route 12-20 (depending on xbee model) other devices through them if using "Xbee3 router settings" verses a standard plug which can usually only do around 6.
-
They can also be used as an arrival/presence device if using "End point settings" and @dan.t "micro python code" in the same way SmartThings arrival sensors work just with much better range.
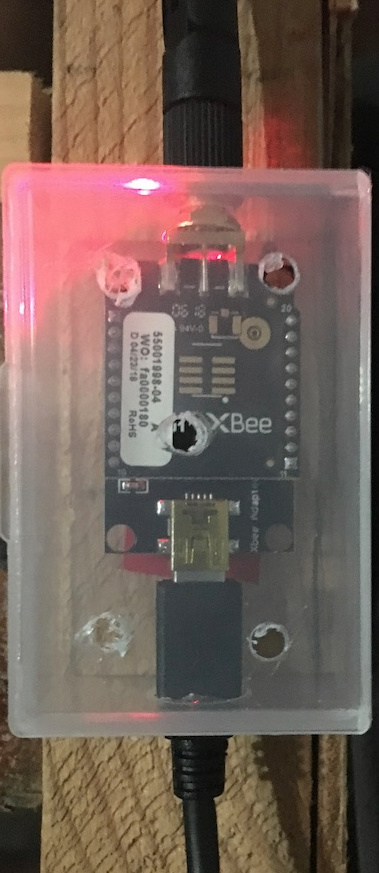
I plug one of these into my vehicle usb port so they only power on when the vehicle is running to open my garage door when my vehicle arrives or as a safety feature if the vehicle starts in the garage with the garage doors closed.
**I try keep this first post up to date with the latest info**
Ok here is a simple overview to setting up Xbee3
I found Zigbee channel 20 to work the best for all Zigbee devices
9 easy steps ( you only have to make 3 manual edits KY, ID, and NI ):
1. Purchase:
- xbee3 pro XB3-24Z8ST (antenna required)
or
XB3-24Z8PT (no antenna required) - XBEE THT GROVE DEV BOARD
- use an old router wifi antenna or buy one like these wifi antennas
(smaller ones work fine as well)
2. download and install
-
Xbee3 router settings (most people will want this one)
Updated using firmware version 1013 (firmware 1010 works but firmware 1012 does not work)
(most people will want this one it can also be used as an arrival sensor if used carefully you do not want to route any other devices through an arrival sensor)
or
End point settings (will not route other devices only used for arrival sensor mode)
updated using firmware version 100D (note firmware 1010, 1012, and 1013 do NOT work for end devices) -
micro python code (they are the same just different reporting times, both named Main.py so save them to separate folders)
60 second reporting (default I use this for router settings)
or
10 second reporting (I use this for arrival sensor)
(mainly used for end device arrival sensor you might not want it reporting this often) -
[Xbee3 updated 01/08/2020 DH] mods by @JasonJoel and NoWon Xbee3 DH with logging, battery replacement mod, extended timeout
-
mods by @rsjaffe Xbee3_presence_battery_temperature DH and micropython
(note: micropython is required)(download them and save them to the Hubitat "drivers code" as a "new driver" )
3. Hubitat settings
Go to your Hubitat settings page and select "Zigbee Details" on that page you should see " Extended Pan ID: XXXXXXXXXXXXX" X being your Pan ID number copy it.
4. Attach your Xbee3 pro and DEV board to your computer and start XTCU s/w
- select the top left corner + (add radio module) select your com port and set the baud rate to 115200 and uncheck "the radio module is programmable" (you would think it should be checked but it is not).
- Select the new radio module in the left column and select "Update" (firmware)
- product family should be XB3-24
- function set should be Diji Xbee3 Zigbee 3.0 TH
- - firmware version select the one that says (Newest)
firmware 1012 doesn't work use firmware 1010 - now select update and update the Xbee3 firmware
- Select "Default" and "yes" then select "write"
(to ensure all settings not used are set to default) - Select "Profile" and "Apply configuration profile"
selecting the "Xbee3 router profile" file
or
the "Xbee3 End Device settings profile_100D-end device" - In XTCU you can find these settings easily by typing them in the magnifying glass at the top right (example type in Ky or ID)
- paste your Hubitat Zigbee settings Pan ID number in the XTCU ID
- ensure KY is set to 5a6967426565416c6c69616e63653039
- ensure JV is set to 1
- select a NI name
- (if adding more than 1 Xbee you must change each Xbee NI value to a different name for the identifier)
- now select "Write"
5. Load the micro python code
(firmware updates WILL corrupt the micro python code you may have to do this step again if you update the firmware in the future)
In XTCU at the top of the page now select
- "Tools"
- "File system manager"
- "open" (you will have to format it the first time)
- In the left column you will have to find where you downloaded either the 60 second or 10 second "Main.py" file
- drag that "Main.py" file to the right column (not into one of the folders)
- Select "Closed"
- Push the reset button on the Dev Board or power off then back on the Xbee3
6. Pair the Xbee3 to Hubitat
- place Hubitat in Zigbee pairing mode
- reset or power cycle the Xbee3
- It should appear as a device save it with a name
7. Change DH type
- Go to the new device you just saved and change the DH type to XBee Presence
- select save device
- select and save preferences
- select configure
8. Hubitat logs
Check the log to make sure there are no errors for this device and it is reporting a battery mV every 60 or 10 seconds depending on which micro python code you loaded.
If you see errors in the logs remove the device from Hubitat and redo this from step 2.
9. Go back to XTCU
- change JV to 0 and select write
(to disable after pairing to the hub to keep the Xbee on the same channel after power cycling)
10. Done!
**************************************************************************
Below is older more detailed info:
@eduardo pointed out some older but good Xbee info on youtube
First change your hub zigbee away from channel 25-26 (see below)
I found channel 20 worked best for me.
You should also move your 2.4 wifi channel on your router away from channel 20 just to keep any interference on your zigbee mesh down.
I use the xbee3 XB3-24Z8ST RP SMA antenna and XB3-24Z8PT (pcb antenna already built in)
I bought direct from Digikey (which I would recommend) or mouser
There are lots of different styles regardless which one you get make sure it is a zigbee not a 802.15.4 they are terrible at having both in their description but 802.15.4 will not work. basically the zigbee version have a Z in their model number.
RP-SMA antennas are just like the 2.4 wifi ones off your routers.
you will also need a usb adapter board to program the xbee and to optionally power it.
I preferred the digikey Grove USB board part number 602-1979-ND
(note surface mount xbee will require a surface mount usb board not this one)
another cheap Xbee adapter option that works from Ebay
Not recommended now due to missing a reset button
May have issues with initial programming and does not have a reset button for programming.
Better to use as just a power source.
Ebay Xbee USb adapter arrived after about 2 months and it appears to work fine with my Xbee3, not bad for $2.62 US.
you will need a mini usb cable for it instead of a micro usb cable.
Note: when writing settings to your Xbee to be careful to not use the scroll wheel on the mouse it grabs the wrong settings sometimes
I would still recommend using an Xbee3 router with the Xbee3 end device but it appears to work without it.
If you add a Xbee3 router device and power cycle the Xbee3 end device it will jump over to the Xbee3 router
downloadable Xbee3 config files below
You will have to input the ID info (extended pan ID) from your Hubitat zigbee info when you load the file below
Xbee3 end device (use the newer file in the summary at the top of the post)
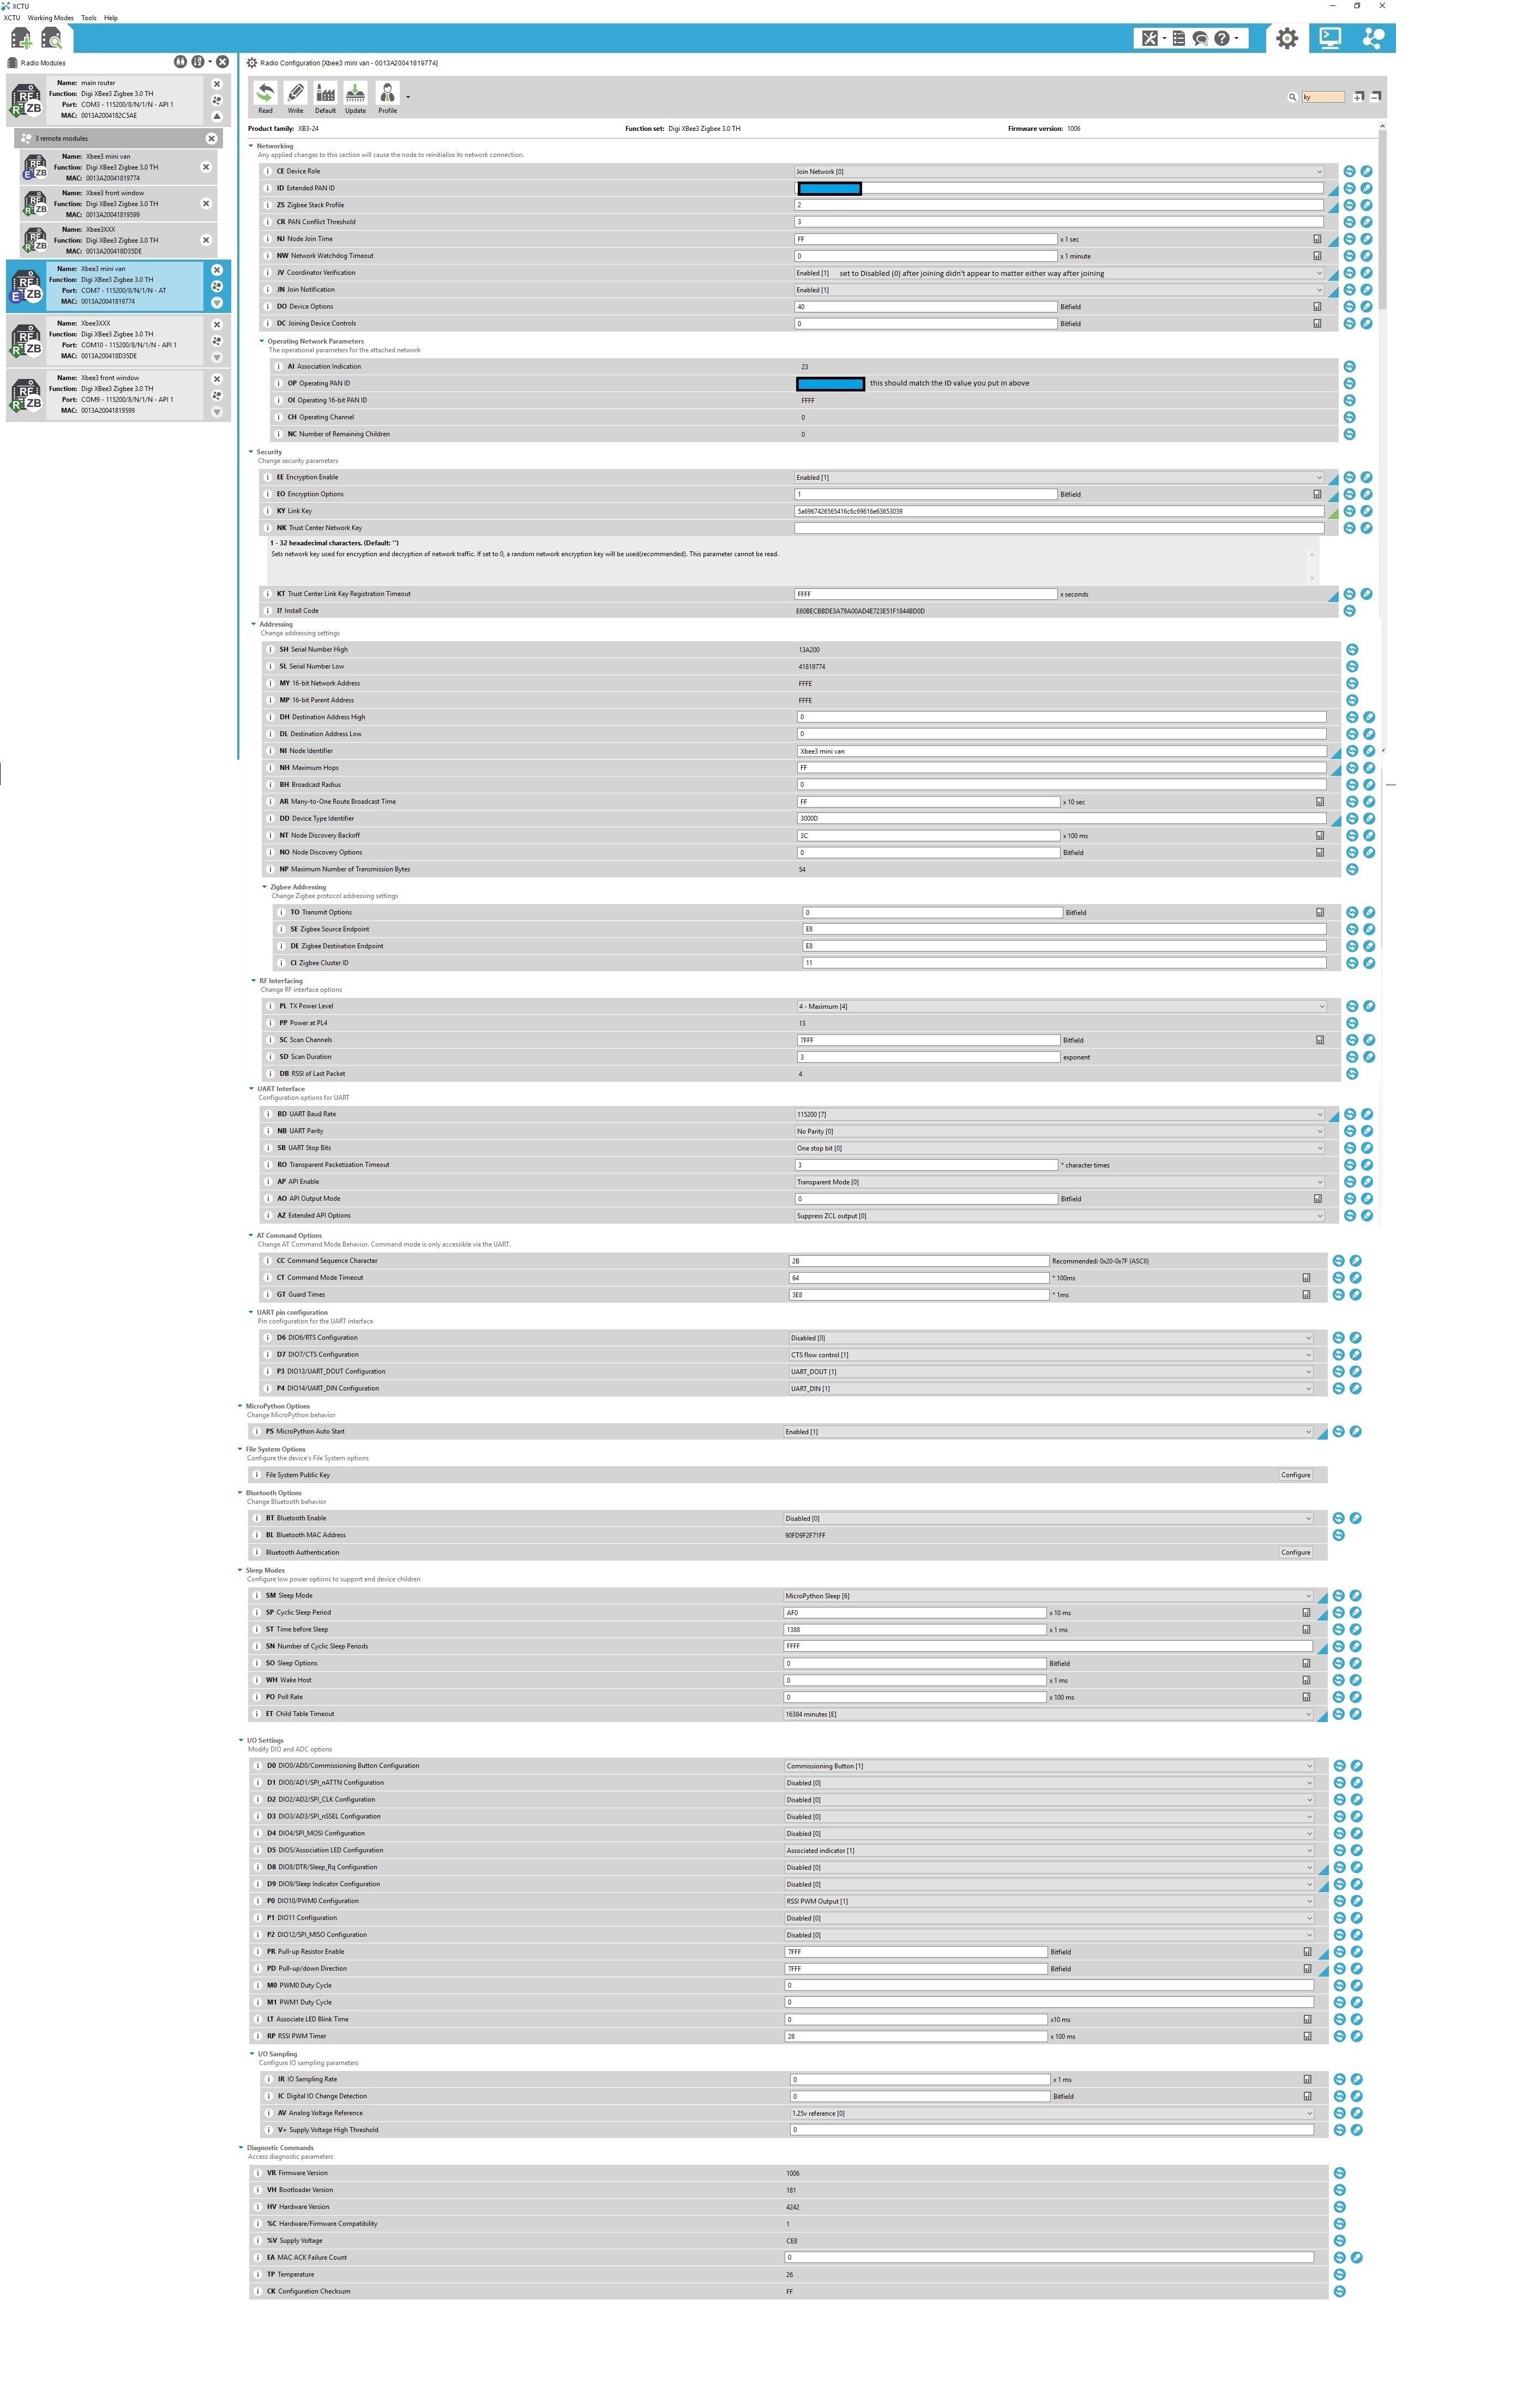
You will have to input the ID (extended pan ID) info from your Hubitat zigbee info when you load the file below
Xbee3 router (use the newer file in the summary at the top of the post)
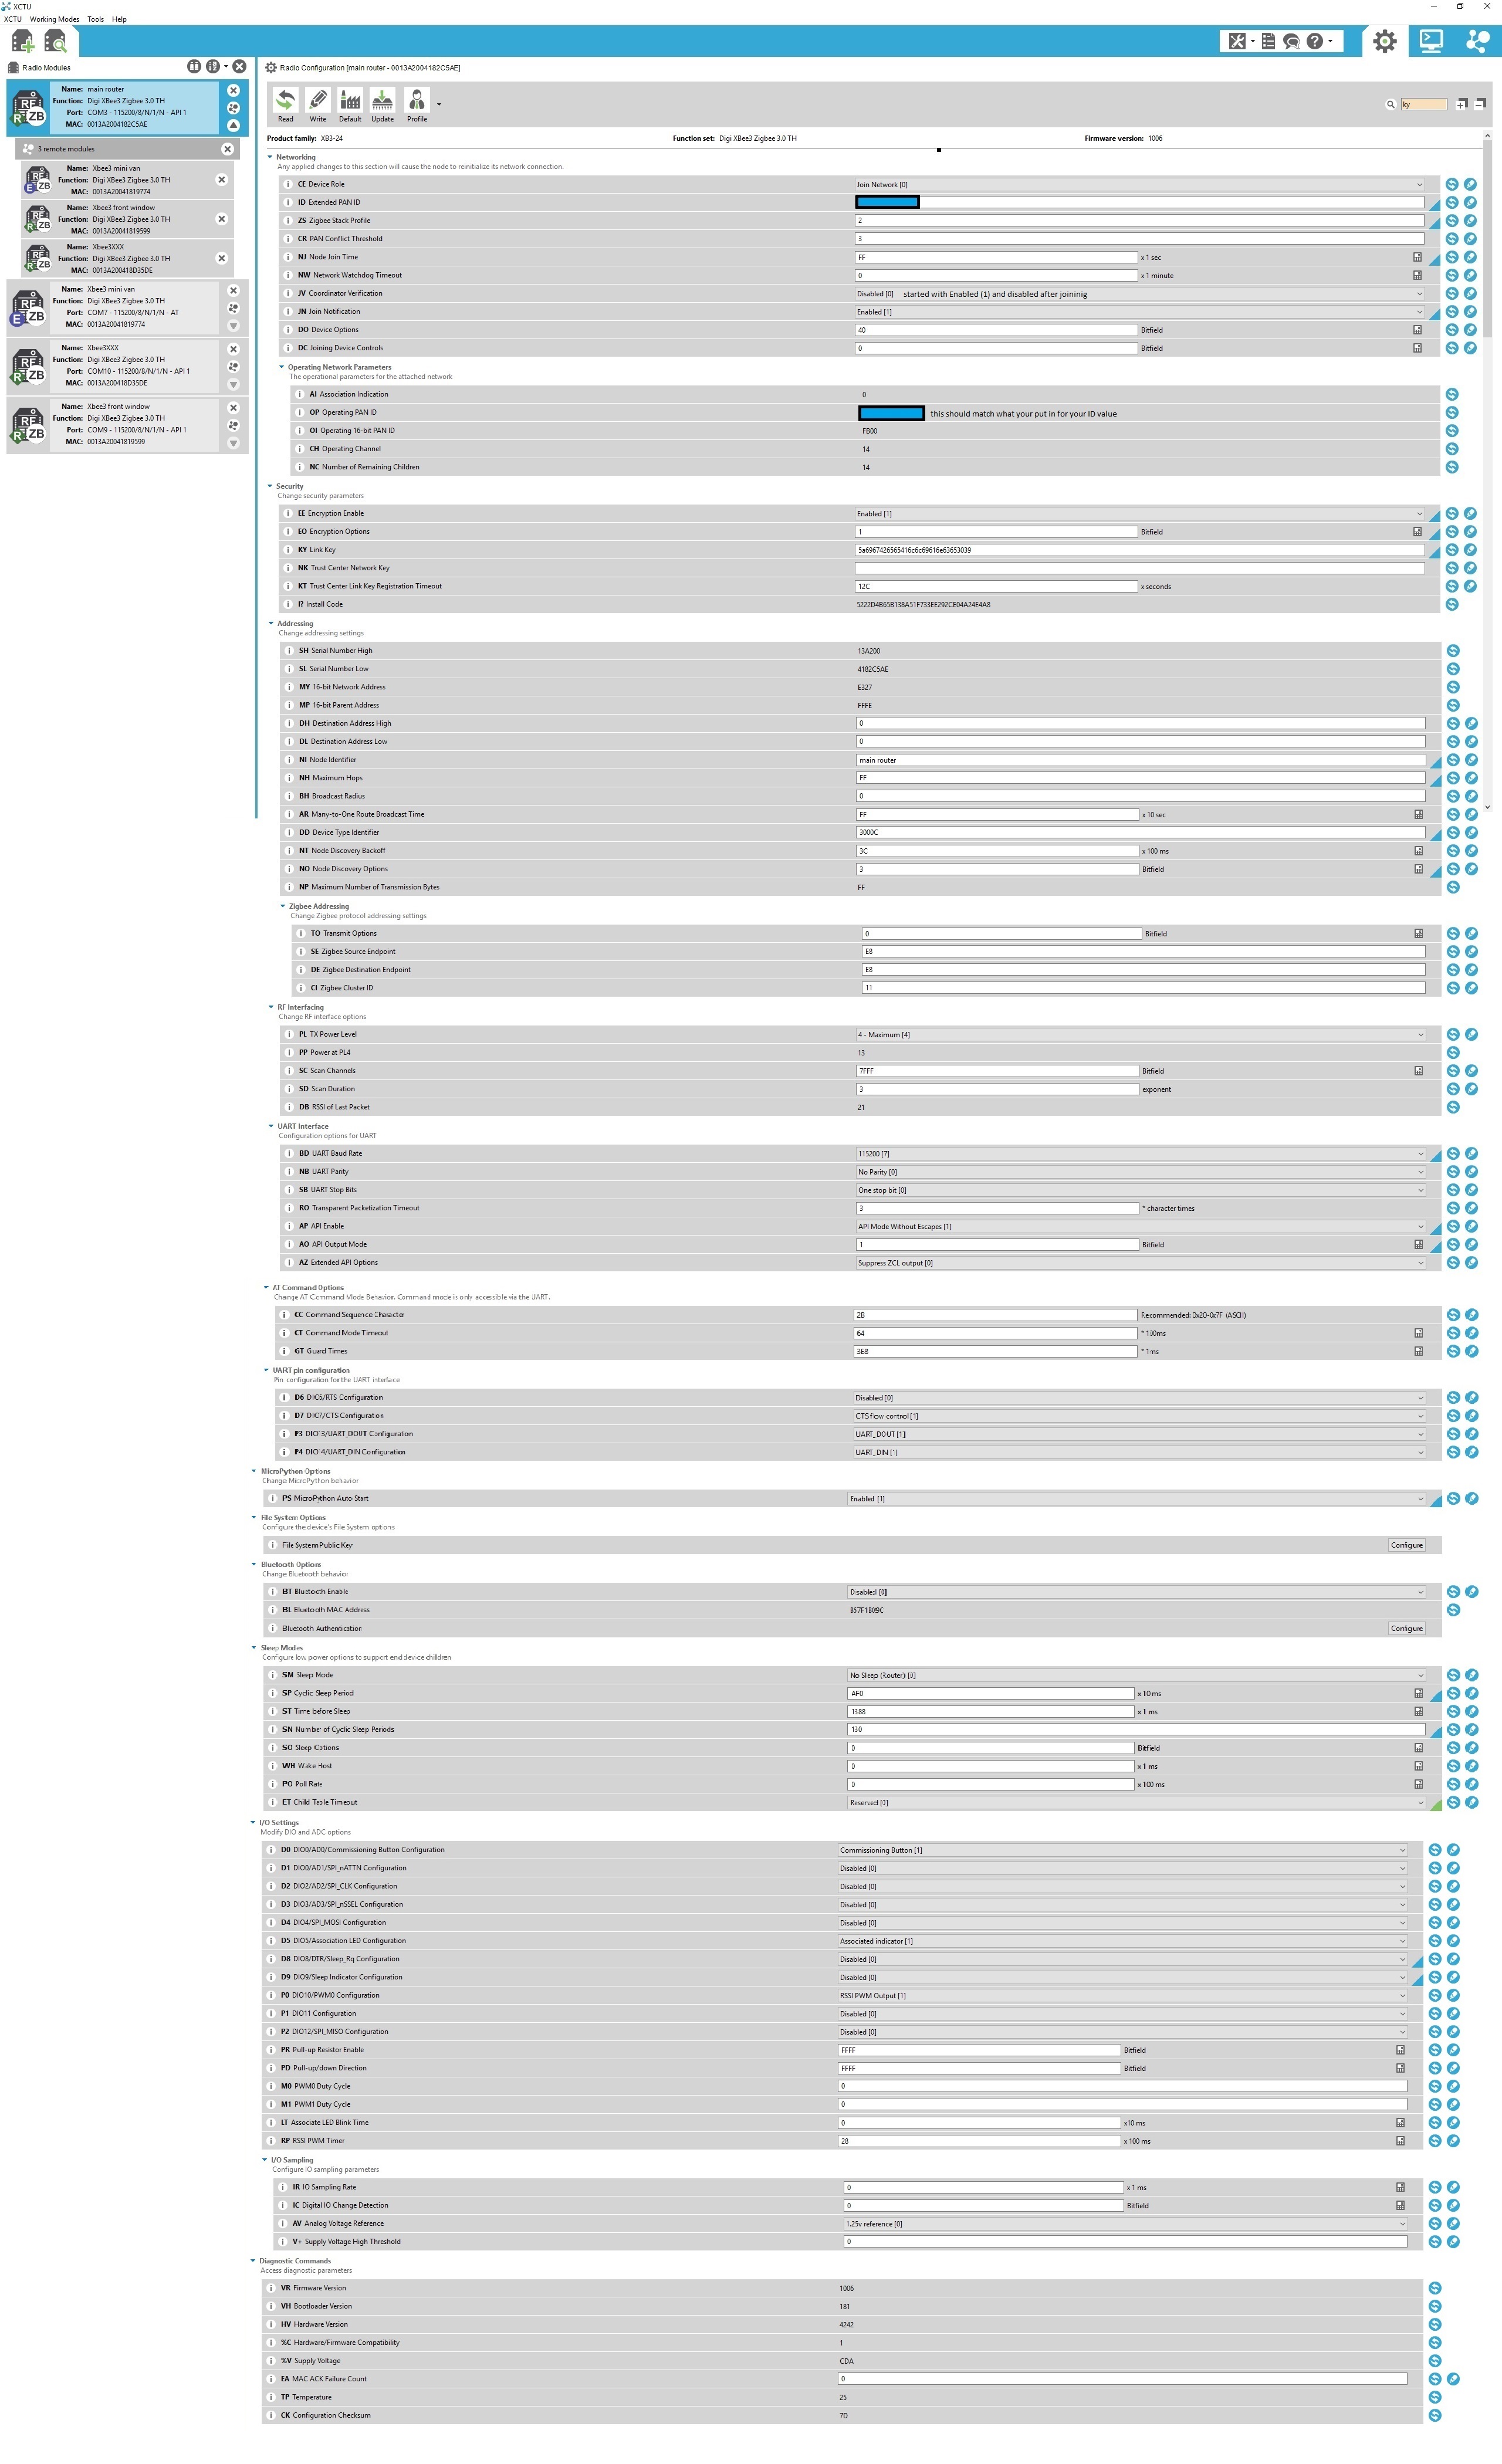
Xbee3 (router) configuration (all settings not listed are set to default settings)
CE = join network (0)
ID = "Hubitat extended pan ID"
ZS = 2 (zigbee pro)
CR = 0 (since extended pan ID is set I disabled this)
NJ = FF (to extend the allowable time for devices to join)
JV = 1 (I changed to 0 after pairing to the hub to keep the Xbee on the same channel after power cycling I have never seen it change but just to be safe)
JN = 1 (optional but device appears faster in the network digikey recommends not enabling on a large network but does not define large network I enabled it and works for me)
EE = Enabled (1)
E0 = 1
KY = 5a6967426565416c6c69616e63653039 (standard home automation key)
(but will be blank after you write and try to read again it is a write only option for security)
NI - (name it whatever you like)
DL = FFFF (to send the signal to all router devices)
NH = FF (latest firmware maximum is FF now) (I set to max so devices could travel farther by being able to travel through more routers)
AR = 6 (I found that setting this rebuilds networks if the last router is not found)
DD = 3000C
N0 = 3
DL = FFFF (set to transmit to all routers/coordinator to extend range)
TO = 6 (use the extended timeout for this destination)
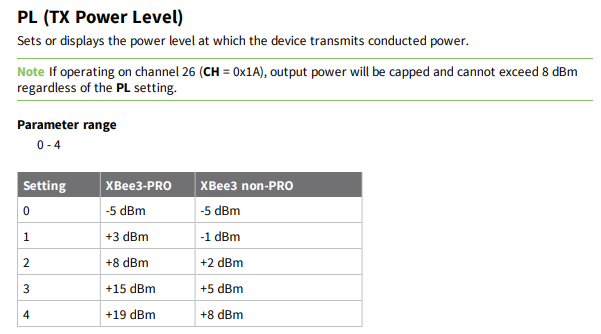
PL = 4 (max power output)
SM = "no sleep (router) 0" for router settings or "MicroPython Sleep (6)" for End Device
SC = 7FFF (default setting) scan channels if having trouble pairing your Xbee try changing this to your Hubitat Zigbee channel in Hex. I use channel 20 so i would put in 14.
AP = "API without escapes (1)" for router or "MicroPython REPL (4)" for End Devices
BD - 115200 (7)
A0 = 1 (not sure if it matters but changed from 3 to 1 due to this note in the manual
"Setting AO = 1 is required for the XBee3 Zigbee RF Module to use the Explicit Rx Indicator frame - 0x91
when receiving RF data packets. This is required if the application needs indication of source or
destination endpoint, cluster ID, or profile ID values used in received Zigbee data packets. ZDO
messages can only be received if AO = 1."
I have not seen this setting make any difference)
PS = 1 (enabled micro python auto start on power up)
SP = AF0 (didn't want it to sleep so set it to max)
SN = 130
D8 = disabled (I do not use them so why have them enabled)
D9 = disabled (I do not use them so why have them enabled)
ID = Hubitat zigbee PAN ID unique to each Hub found on the Hubitat Zigbee information page
this ID setting is required if you only have 1 Xbee3 using it as an end device.
If you leave ID = 0 you need a second Xbee3 set as a router
If you are using 2 XBee3 one as an end device one as a router it is fine to set the ID to Match
your Hubs.
Thanks to Ryan780 for figuring this out.
- then press reset on your USB adapter board
- you may have to put your hub in zigbee joining mode and power cycle you Xbee3 to get your hub to recognize your new Xbee3 end device settings.
of course to pair it after writing all the settings remove power from the xbee then put the hub into pairing and repower the xbee.
They pair as devices but still function.
- I am no expert these are just what worked for me there maybe (are likely) better settings
Why end device settings if you cannot route or scan your network with end device settings?
These Xbee3 have a range up to 2 miles and are programable with micropython so in theory we might be able to program them and use them as a high powered arrival sensor for perhaps your vehicle.
I have not figured out micropython code yet and a DH would still have to be made.
thanks to @dan.t we now can use Xbees as arrival sensors !
Xbee2 manual
Xbee3 manual
XCTU manual
micropython programming guide
surface mount (SMT) type
through hole (TH MT) type
Xbee usb THT vs SMT programmer
@chad.andrews if you have a 3d printer a nice 3d printed case fits Digikey's adapter board