Made a set of Xbee3 repeaters in cases

I needed some Zigbee repeaters and decided to get some Xbees. I ended up with a set of repeaters and the capability to add sensors to them for a reasonable price. Since finding the right case and drilling it was such a task, I thought it would be nice to share my findings. Pictures at the end.

First, the parts:

  • XK3-Z8S-WZM. XBee3 Module Dev Kit, 2.4 Ghz ZB 3.0 by DIGI for $99 (I got mine at Mouser). This kit is a great bargain, as it includes three each of:
    • XB3-24Z8US-J. Zigbee Modules (802.15.4) XBee3,2.4 Ghz ZB 3.0, U.FL Ant, SMT. $20.06 each.
    • A24-HABUF-P5I. 2.4GHz Half-wave antenna. $5.50 each.
      1. XBee SMT Grove Development Board. $31.00 each.
        This is the hidden gem here, as it has Grove connectors for I2C, digital, and analog inputs. Look at https://www.digikey.com/eewiki/display/Wireless/Home under the Digi section (XBee3 projects) and Seeed Studio Grove System Information for some of the things you can do with the board.
    • USB cable
  • Zulkit Project Boxes ABS Plastic Electrical Project Case Power Junction Box Black 3.62 x 2.28 x 0.91 inch. $8.99 for five boxes. The assembled XBee3 fits so snugly in this box that you won't need screws.
  • Scrounged some USB wall power adapters to power the Xbees.
  • Total cost: $107.99 plus tax and shipping.

Next, the assembly:

I assembled the XBee3 module to the Development Board according to instructions. It's quite simple, and I found this SMT board was easier to insert than the old-fashioned through hole boards were. I moved the jumper on the three-pin header from the inner and middle pin ("loopback") to the outer and middle pin for normal operation.

I then drilled holes in the box for the USB cable and the antenna. Here's where I got into difficulties with the antenna. For the USB cable, I drilled a 3/8" hole in one of the short sides of the box, 25mm from the left outside edge, and 8.85mm from the top of the box (the lid was not on). Then I had to extend the hole left and right using a round file to accommodate the width of the USB connector (periodically test fit the Grove Board to check). I drilled a 7/16" hole in the opposing short side near one or the other edges—a 1/2" drill was too big, as the antenna wouldn't stay in. I assembled the antennas (putting the snap-in section on the bottom of the antenna). Then I tried to press-fit the antenna and it simply didn't go. My aged eyes had missed two things: 1) there are two little ridges running down part of the connector that probably is for anti-twist and meant to go into little slots extending from the hole, 2) the clips that provided for the snap-fit wouldn't flatten completely.

I took care of the ridges by filing them down with a small flat file: that only took a couple of seconds. I added room for the clips by using a small flat file to provide some extra space corresponding to the locations of the clips, periodically testing to see if I filed enough. Perhaps a 15/32" drill bit would have made it so I wouldn't have to file the hole and ridges. I've now found a diagram with dimensions for the antenna after I finished the project.

For programming the XBee3, I generally followed the advice in the first post in Everything Xbee, but I did simplify some things.

Use XCTU to program the XBee3 and then load the Micropython code. I used the following settings. The linked post had you set ID to the Hubitat's PAN ID. I didn't do that because I know I'd forget later when I got a new hub, and be left wondering why I couldn't pair the XBee3 to the new hub. XBee3 settings (every other setting but the following are left at their default value):

ZS 2
CR 0
JN Enabled(1)
NI PutSomethingUniqueHere
NO 3
TO 6
NH 30
AR 6
EE Enabled(1)
EO 1
KY 5a6967426565416c6c69616e63653039 
NK 00
PS Enabled(1)
AP API Mode Without Escapes(1)
AO 1

And you're done! Make sure you put a unique name for each XBee3 in the NI field.


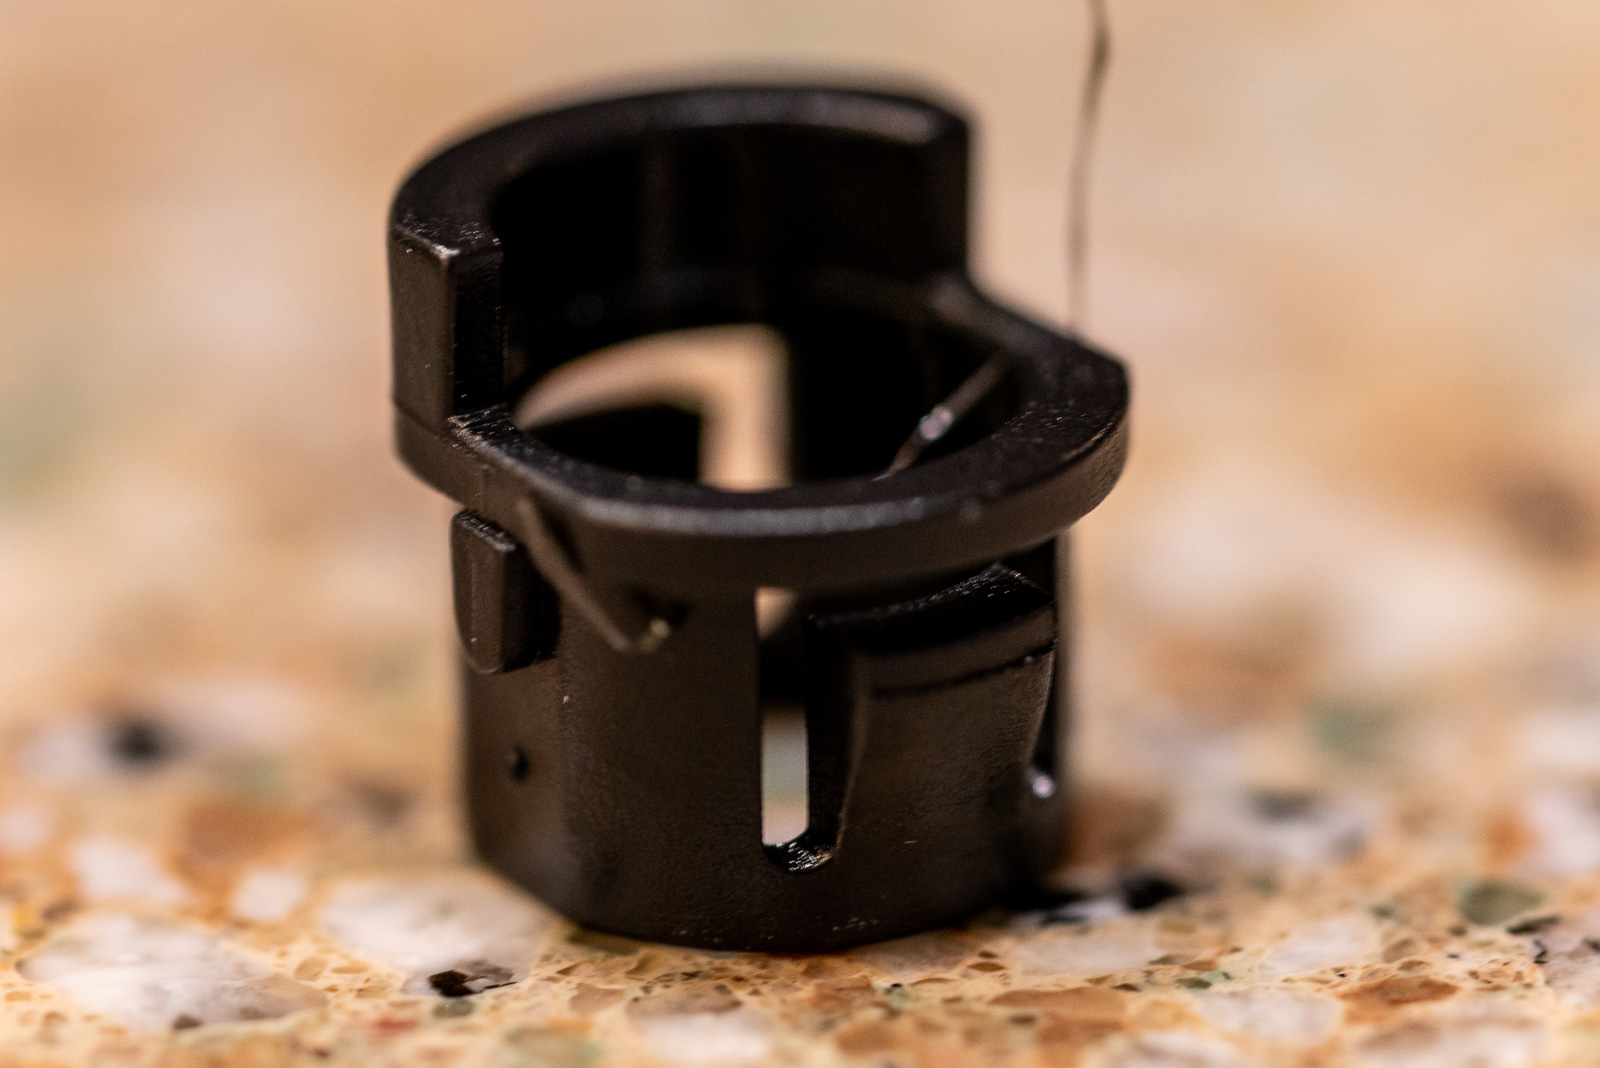
If you look real carefully at the left side of the connector just below the ring, you'll see that ridge that was causing me so much grief.

16 Likes

Very nice. I've wanted to make one of these but I never fully read all the threads, hardware descriptions, and software sites. I might have to finally get back to this. :wink:

Consider build to sell?
Asking for a friend.

1 Like

I thought about it, but the cost would be pretty high once you added in the shipping and tax I pay, the shipping the recipient would have to pay, and the Paypal fees. Maybe $50 each or more.

The only hard part that I encountered was drilling the holes and filing out the hole for the USB cable. Maybe you can get a friend to do that?

Note If you want to measure the module temperature, use the main.py and xbee driver located at GitHub - rsjaffe/Hubitat: Xbee3 presence sensor with battery info

1 Like

Nice job on this. Had 3 of them running for a while now and just updated firmware and checked settings. Plus was able to add the python for temp. I adjusted python and driver to report much less often since these are permanent mounts for me.

So, I have been researching and wanting to build an XBee setup, and I found two posts, yours above and the one below:

I came across this difference between the two posts in regards to the hardware required.

What is the difference between these two models? From a little research, the "J" models appear to be a lower output power versus the models without "J" at the end, I am guessing pro vs standard? There appears to be a lot of XB3-24Z8XX models, and I was just wondering what is the difference between all of them, if you know?

The biggest difference between the XB3-24Z8ST and XB3-24Z8US-J is form (through hole vs surface mount) and they will need different usb adapter boards.
Also XB3-24Z8ST is a pro version with higher power output thus more range.

XB3-24Z8US-J VS XB3-24Z8US
They are the same form and use the same usb adapter (surface mount).
The XB3-24Z8US is the pro version

2 Likes

There are "pro" and standard modules. Pro is high power. Standard is similar to other normal zigbee devices. I don't see a need for high power modules in a house.

The pro modules would be good as repeaters if you have to bridge a large distance. Note that the reception distance for the pro module is not any larger than the standard module, so this high power would allow it to send a longer distance from the repeater to a receiver but not the other way around, so you'd probably need two pro devices at each end of the gap to get the full benefit.

3 Likes

@cjkeenan

One thing I forgot to point out in the difference between the XB3-24Z8ST and XB3-24Z8US-J
XB3-24Z8ST uses a RPSMA Antenna (a common antenna used on WIFI routers that you may already have a spare one in your spare part drawer)
XB3-24Z8US-J uses a U.FL Antenna (not as common and may have to purchase)

1 Like

This thread inspired me to create my own self contained repeater using a Xbee3, but I took it one step further and made it solar powered. I found this Xbee dev board made by Seeed Studio at mouser that contains all of the hard working bits, aside from the Xbee itself. I upgraded it with a 2.5 watt panel as the tiny panel it came with just wasn’t enough to keep it going through a few cloudy days. I put it all into the smallest pelican case I could find and strapped it to a tree in my yard and it’s been working almost perfectly for about a month now. This repeater allows me to have a contact sensor on my mailbox that is situated about 600’ away from my front door, with a hill and trees in between.

My question to @rsjaffe involves the Xbee V/T Presence driver for the Hubitat. Since I’m running this off of a small lipo battery and it can get pretty chilly up here in the mountains of North Carolina, I’m most concerned about how cold the device gets. I’ve installed this in a solid black case, and so far I think that has helped to warm the battery sufficiently to charge without doing any damage. However the driver stops reporting temperature once it gets below 10°C. The device itself continues to operate, report voltage and repeat signals even when it’s considerably colder (it’s been as cold as 15°F so far this year). Is the 10° minimum a limitation of the Xbee’s temperature reporting capability, or is there something in the driver that can be changed to get it to report lower temps?

One other question, but this isn’t a big deal because I can do the math in my head... would it be difficult to change the temp units in Hubitat to °F. I assume it’s a simple formula in the driver code, but I am too ignorant in groovy to know how to do it.

Thanks for all your hard work & thanks for the inspiration!

1 Like

I don't know why it's not reporting below 10C. Do you get any error messages in the log?

The temp code I use is from the manufacturer (see xbee-micropython/main.py at 1ff0fa4d04d4e159a4c338125e56d1ae26b9afb9 · digidotcom/xbee-micropython · GitHub for an example). that example also converts to F, which I hadn't done. It's easy enough to fiddle with the code in main.py to see if you can fix the reporting--it's only a couple of lines that are relevant.

No errors, just once it hits 10, there are no more temperature reports until it’s >=11 again. Battery keeps reporting in the logs every 60 seconds as expected & presence is maintained.

I do have another one set up outside that’s not battery operated, as far as I have noticed, the other electronics in that box have thus far kept it above 10C (it’s reporting 12C at the moment). I’ll keep an eye on it to see if that one goes any lower.

I’ll take a look at main.py & see if I can get °F working.

Thanks.

This thread inspired me (kudos to @rsjaffe) to build a handful of xbee's, mostly so I could do better presence sensing for the family cars (I've got the problem of multiple cars in multiple garage doors, so people-based presence doesn't work quite right when controlling the garage doors). And the ST presence sensors have been, how do I put this, consistently sucky in our experience.

Anyway, I'm a total noob at the python stuff, so I think I messed it up. Got the hardware stuff done (easy, I think). Got XCTU loaded and a xbee configured (XCTU is not a very intuitive app, but that didn't seem so hard either). Then, to load the Micropython code, I did "Profile", then "Apply Configuration Profile" from the XCTU app. I then selected the "profile_100A End Device" file since I'm using it as a presence sensor.

In HE, after loading the driver code, I went to discover devices, selected Zigbee, within a couple seconds, the Hubitat app reported that it was "initializing....". It never did finish discovery, but when I cancelled out of device discovery, a new non-descript "Device" had been added to my zigbee radio within HE. I changed the DH manually from Device to Xbee Presence in the device details page, and then hit Configure.

And then, bam, NOTHING. The device isn't reporting any states or events. The log showed nothing remarkable entries, so ever the fiddler, I changed the "minutes elapsed" setting to 1 minute. As soon as I did that, I got an error in the log. Log is below.

Anyone have any ideas I could try or troubleshoot? TIA!

Summary

dev:10652021-01-01 08:06:06.055 pm errorgroovy.lang.GroovyRuntimeException: Ambiguous method overloading for method java.lang.Long#minus. Cannot resolve which method to invoke for [null] due to overlapping prototypes between: [class java.lang.Character] [class java.lang.Number] on line 156 (checkPresenceCallback)

dev:10652021-01-01 08:05:06.078 pm errorgroovy.lang.GroovyRuntimeException: Ambiguous method overloading for method java.lang.Long#minus. Cannot resolve which method to invoke for [null] due to overlapping prototypes between: [class java.lang.Character] [class java.lang.Number] on line 156 (checkPresenceCallback)

dev:10652021-01-01 08:04:22.913 pm warnconfigure...

dev:10652021-01-01 08:04:08.877 pm debugScheduling periodic timer

dev:10652021-01-01 08:04:08.872 pm debugStopping periodic timer

dev:10652021-01-01 08:00:59.443 pm warnconfigure...

dev:10652021-01-01 08:00:38.023 pm warnconfigure...

dev:10652021-01-01 08:00:09.058 pm debuggetting info for unknown Zigbee device...

dev:10652021-01-01 08:00:07.034 pm debugconfigure() called...

Also, @rsjaffe, this is a nit, but I'm not seeing the project boxes in the dimensions you reference on that Amazon page. Wondering if the seller changed their offer, or there's a typo somewhere on the box dimensions? Thanks

Yeah, looks like they're not selling that size any more. That box was 92mm x 58mm x 32mm

Critical dimension is the middle one (the width of the box). Should be 58mm or slightly larger. No smaller. 58mm was a very snug fit. The height (the 32mm) could be a bit less or more. The length could be very slightly less or could be any amount more.

So the 3.94x2.36x.98 (100x60x25) they are now selling probably would work and might give a bit of well-needed space for the antenna mount inside. I'm a bit unsure about the height--measure the module, though I think it would fit ok.

yeah makes sense. Did you see the waayyyy more important message above that one in the thread?

No, I didn't. Sounds like the configuration didn't go right.

The micropython code is loaded by formatting the file system and then loading the code. I did this a while ago and don't remember the exact steps, but it was definitely a separate process from loading the configuration. I also found that saving the configuration and loading it to other xbees didn't work out for me, so I had to configure each individually. Pairing was super easy, so I don't know what went wrong in your case, but personally, I'd start over with them, reprogram them, load the file system and file, then try again. I'd also remove the device from hubitat before redoing everything.

You NAILED it for me, thank you. This was the part that was non-obvious to the noob in me, from your instructions:

I include it here in case anyone who follows who does the same thing I did. Once I figured this out (go to "Tools", "File system manager", "Open" in the XCTU app), it was game on. Thanks!

Any reason to mount the antenna? Or can I leave it semi-loose inside the more spacious box? Sorry, no electrical engineering prowess here.