The Noob's (in)complete guide to CSS for Hubitat

DISCLAIMER: I'm no web designer and my knowledge of and interest in CSS is pretty low.

Everything I've put together in this post is through searching, inferring and experimenting and if there are omissions, mistakes or things that can be done better (which there will be plenty of I'm sure) I'd be happy to be corrected. Everything here is basic 101 stuff for people versed in html/CSS but probably might as well be Greek to everyone else.

I won't have time to put everything down initially so will update this post bit by bit when I have time or learn something new.

WHAT CAN BE MODIFIED IN A TILE?

In Chrome, if you right click on a tile and select "Inspect" the elements window will display the CSS elements that can be modified in that tile.

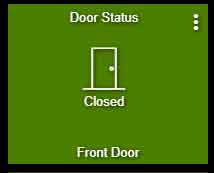
For example my xiaomi contact sensor tile using the door status template shows this (amongst a ton of other stuff):

<div class="tile-title"> Front Door </div>
<div class="tile-contents"><div class="tile-secondary"> Door Status </div><div class="tile-primary closed"><i class="material-icons  he-door_closed" style="font-size: 42px;">  </i><div> Closed </div></div><div class="tile-tertiary"><!----></div></div>

So from this we see that the basic elements that can be re-formatted are "tlle-title", "tiler-contents", "tile-secondary", "tile-primary", "material-icons", "tile-tertiary".

These correspond to the various elements in the tile eg tile-secondary is the text "Door Status"
Front-Door

BASIC SYNTAX

The basic structure for re-formatting a tile is:

#[the tile reference] .[the element that we want to format]{
[element property]:[the new value for the element property (from the defaults];
}

This bit of CSS code would be inserted in the CSS window (dashboard settings (the gear wheel at the top right of the dashboard) - Advanced - CSS)

TILE REFERENCE

There are 2 ways to reference a tile as far as I can tell

  1. Grid reference

This is an absolute reference using the row/column position of the tile in the dashboard, as explained in this post

So in our example structure we could insert the tile reference for the top leftmost tile as follows:
div[style^="grid-area: 1 / 1 / 2 / 2"]

The big drawback of this approach is that if you move your tiles around the CSS continues to reference that position!

  1. Tile ID

If we left click on the 3 dots at the top right of a tile we can see at the top left "Edit Tile ID:#". This is the tile ID number which we insert in our CSS code like so:

#tile-63 (for the tile with ID 63)

TILE ELEMENT

In our example let's say we want to format the text "Door Status" in the tile above.

The tile element in the CSS would be inserted as

tile-secondary

ELEMENT PROPERTIES/STYLES

There are quite a few property types (or more correctly, styles) we can access to change the format of the element.

If we want to hide the text we would insert
visibility: hidden; (or visible)

Colour change
Color: #FFFFFF; (hex colour reference)
or
Color: white; (I have not tried what colours are valid beyond the basic primaries)

Font size
font-size: 20px;

Positioning
position: absolute;
left: 50%;
top: 70%;

Properties can be daisy chained like so:
Color: #FFFFFF;
font-size: 30px;

CSS EXAMPLE

So our example above would look something like this (for me at least, the positioning references will depend on your specific tile size). I've found this to be a trial and error process.

#tile-63 .tile-secondary {
     Color: blue;
     font-size: 20px
     position: absolute;
     left: 50%;
     top: 40%;
}

In fact if we look at the styles window when we inspected the tile in Chrome (and left click on the relevant element) we can see a whole bunch of properties/styles we can probably change to achieve the desired look of the element

Hope this helps!
50 Likes

HOW TO MODIFY TEXT ELEMENTS

Well, actually we can't modify text elements directly but there is a way.

As per our example above If we wanted to change the tile-secondary element with the text "Door Status" to "My Front Door" we would first need to hide the existing element and then create a new one over it like this:

#tile-63 .tile-secondary {
visibility: hidden;
}
#tile-63 .tile-secondary:after {
content: 'My Front Door';
}

EDIT 1:

OVERRIDING STYLE PROPERTIES

Thanks to @morningz for this:

CSS doesn't by default override what is set in the "style" property, but there is a work around.

Add "!important" to your CSS, so to change the font size for an element this would look like this:

#tile-2 .tile-primary {
  font-size: 40px !important;
}

POSITIONING/RESIZING ELEMENTS

There are a couple of ways I'm aware of to re-position elements.

  1. Using "position". There are a couple of options when using position, namely absolute or relative positioning. As far as I can tell absolute is referenced to the top left of the tile, and relative is (sort of?) against the default position of the element.

As an example:

#tile-62 .tile-secondary:after {
content: 'My Title in 26';
visibility: visible;
position: absolute;
left: 50%;
top: 50%;
}

This places "My Title in 26" somewhere in the middle horizontally and about a line below the original element. I'm sure there is a logic to the referencing but I kind of play around with the numbers until I get the look I want as this depends heavily on the device screen you are using.

  1. Using "transform" to move and/or resize an elenent

The translate option moves the element relative to the default element position. Either specify x and y movements separately or the same x/y by using a single value. Values can be in pixels or percentages

transform: translate(100px, 200px);

transform: translate(200%);

Importantly, "transform" can also be used to resize an element, for example:

transform: scale(0.9,0.9);

EDIT 2:

ADDING UNITS TO AN ATTRIBUTE TILE

While you can't display a custom attribute (which are numbers) with a unit at the end unless it's coded into a driver, there appears to be a way to do it in CSS.

#tile-66 .tile-primary:after{
   font-size: 8px;
   content: " ppm";
}

This example concatenates the unit "ppm" after the value of the attribute in a smaller font similar to a standard template tile (of course you'll need to play about with the font size to get it just right.

16 Likes

Rock, great post. Thanks. I’m no CSS expert either, but I was able to apply your tips pretty easily to crack what I think is the biggest issue with HE Dashboards 2.0—inability to customize tile design for certain tiles within a given template class.

With that said, I’m stuck on one thing....when I “inspect” a tile, some of its elements—those that are attributes of the tile overall—sit hierarchically above the level of the elements you mentioned (e.g., tile-secondary, tile-tertiary). I can’t figure out how to control these elements via CSS.

For example, if I want to change the tile’s background color, the property would be background-color, but what would would the element be? I tried using the tile’s class name with your syntax (see below), but it didn’t work.

As a trivial example, this works to recolor the text at the top of the tile:
#tile-[tileID] .tile-secondary {
Color: blue;
Background-color: rgb(50, 70, 50);
}

However, this doesn’t work to recolor the tile itself. Note that “tile water” is the class of the tile when I inspect it.

#tile-[tileID] .tile water {
Color: blue;
Background-color: rgb(50, 70, 50);
}

Any ideas? TIA.

4 Likes

I couldn't get this to work in CSS either (someone please chime in!). I simply create a png image with a solid colour of choice and insert it into the tile edit window (when you left click on the 3 dots on a tile) in the field "Background Image Link". ATM I use an image hosting service as I haven't quite figured out how to use base64 encoding to keep the image local.

Thank you so much for this guide. I was able to do a lot of what I wanted from it. However, I could not get the clock font size to be bigger.

Here are the important parts of the element:

<div id="tile-2" class="tile clock"><div class="tile-contents"><div class="tile-primary" style="font-size: 24px;">10:13:33<small>am</small></div></div>

Here is my CSS code:

#tile-2 .tile-primary {
font-size: 40px;
}

I also tried:

#tile-2 .tile-contents .tile-primary {
font-size: 40px;
}

Would you mind taking a look at what I am doing wrong?

1 Like

@bob11

It is because CSS doesn't by default override what is set in the "style" property, but there is a work around:

add "!important" to your CSS, so

#tile-2 .tile-primary {
  font-size: 40px !important;
}

Here is a working example:

3 Likes

Yeah I've been doing the same thing, but it's a PITA. Hopefully others can chime in.

1 Like

That worked perfectly, thank you!

That's pretty cool !!

1 Like

Thanks, learn something new everyday from the community!

How would you modify the below temp reading tile to increase the font side?

{
"rowSpan": 1,
"template": "temperature",
"col": 7,
"colSpan": 1,
"id": 33,
"row": 2,
"device": "527",
"templateExtra": null
},

Figured it out....this is what I needed to add.

"customCSS": "#tile-32 .tile-primary {\nfont-size: 43px !important;\n}",

1 Like

OK this is weird, one temp tile work just fine but I want to do more than one, lets say 2 this is what I am having a problem with.

In CCS of the dashboard edit window I enter;
#tile-32 .tile-primary {
font-size: 42px !important;
}
#tile-34 .tile-primary {
font-size: 42px !important;
}
I then hit save CSS and go to the layout window and see this all the way at the bottom;
"customCSS": "#tile-32 .tile-primary {\nfont-size: 42px !important;\n}\n#tile-34 .tile-primary {\nfont-size: 42px !important;\n}",
When I hit save Layout JSON it reverts back to just one tile that I first tried to mod. Am I doing something wrong? How do you get it to stick with modding more than one tile at a time.

1 Like

Never mind figured it out again.......dont hit save Layout JSON,

Save CSS is enough to make it stick.

1 Like

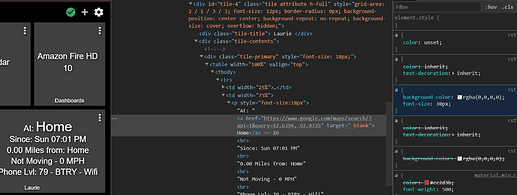
Working on increasing the font size for @bptworld Life360 tile using CSS.
Can't seem to get it to work. Per the below image you can see in google (right click) inspect elements that I have found the path and can temp modify it in google by adding (font-size: 30px;) in google. None of my attempt to write the proper CSS works, any ideas?

Is it possible to replace the icon (not the background) of a tile with a .png from a URL?

Maybe, if you can use this per @rocketwiz
#tile-63 .tile-secondary {
visibility: hidden;
}
#tile-63 .tile-secondary:after {
content: 'My Front Door';
}
to hide it and then add a link to the new one.

Been working on CSS editing in my dashboard. I am still trying to understand the Hierarchy of data in a tile and how it has to be written to work.

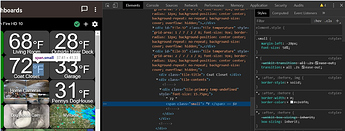
I was trying to move the temp number and deg F closer together in the tile. It works in Google by adding (margin-left: -20px;) in the google page per the below picture, but going back to CSS in the Hikvision dashboard I can't figure it out.

Here is the Hierarchy in google. (I think)
#tile-33 .tile-primary {
element.style
.small

How do you write it in the Hikvision dashboard CSS to make it work.

1 Like

Sorry haven't had to do this, hopefully someone will come up with an answer.

I've also updated post#2 above to include useful tips posted by others in this thread and some new stuff I've come across.

2 Likes

Just to let you all know, I figured it out....lot of guessing but here is what moved it over.

#tile-34 .small {
margin-left: -20px;
}

2 Likes