Note: A version of the "Pushover driver" is now included as part of the Hubitat Firmware. The Hubitat team included a earlier version of the driver below to simplify the process for setting this up for new users. In order to simply use Pushover, you do not need to add the custom Pushover Driver below. However, the Hubitat community has continued to evolve this driver over time, and thus some features may only be available using the community version. You can easily switch between the built-in "Pushover driver" and this user "Pushover" driver to see if you want the new features.
Pushover is an alternative to the Hubitat Hub's mobile phone app's push notifications feature. It can be used as an additional method, or one can choose to use it for all push notifications. Pushover is a very lightweight and efficient mobile phone app. It can be used to allow users to receive Hubitat push notifications without having to give a user access to any other features of your Hubitat hub. Pushover allows ~10,000 free messages per month, which should be more than enough for most all users.
v1.0.20260304 - Emergency message acknowledgements by @hubitrep.
v1.0.20260207 - Performance optimizations.
v1.0.20260203 - Various minor code fixes.
v1.0.20260202 - Minor code cleanup and logic improvements.
v1.0.20260201 - Thank you @hubitrep for the addition of a custom attribute, notificationText, which show the last sent notification to the Pushover server.
v1.0.20260121 - Much thanks to @neerav.modi, who has added a new standardized way of adding optional features on a per message basis. The original way we did this, was to embed a string between two special ASCII characters. The new way does not rely on special ASCII characters. Instead, we can simply use syntax like [SOUND=bugle] instead of #bugle#. (Note: The old method is still supported for backwards compatibility.)
Based on a tip from @Jonovan.Boutte , I discovered Pushover back in 2018. I grabbed the SmartThings DTH and cleaned it up a bit for use as a Hubitat Driver. Since then, many enhancements have been made to this driver by myself and many users of the Hubitat community.
To use this, you'll need a Pushover Account (https://pushover.net) and the Pushover mobile app installed on your phones/tablets. You use the same account to sign into the mobile app on all devices. At https://pushover.net, you'll need to 'Create an Application/API Token' which is used to configure the Hubitat Pushover Device's Preferences.
From your account at https://pushover.net

And here is the Pushover Device configuration screen where you will paste in your tokens from your Pushover account.
You can create multiple Pushover devices on your Hubitat hub, each using the same Keys, but with unique options. For example, you could create a Pushover Device for each of your family members' phones, thereby allowing you to select which user(s) get each message.

And finally, here is the Pushover Driver for Hubitat. Once you add the custom driver, simply add a new Virtual Device and select the User -> "Pushover" driver from the list.
[Note: As mentioned earlier, a version of the "Pushover driver" is included in the Hubitat firmware. To use advanced features (see below) you’ll need to use the Community version of the driver.]
Driver is available via HPM or GitHub
-
Search for "Pushover" in the Hubitat Package Manager (HPM)
-
Or install manually from my GitHub repository
Hubitat/Drivers/pushover-notifications.src/pushover-notifications.groovy at master · ogiewon/Hubitat · GitHub
Documentation of available prefix options, which are used to customize/enhance a message
- You can now set the default priority of your Pushover Notification in the preferences of the driver. With the Pushover app you can set up different notification sounds and visuals based on the priority of the message. You can create a separate virtual device for each priority level and route notifications accordingly...
OR
- If you are like me and don't want to dig through a stack of virtual devices...you can now also add a prefix to the message you send that would override the default priority to one of your choosing.
Message Priority Prefixes (Note: If used, the message priority must be the first part of the message.)
[S] - Lowest Priority (only available in custom community driver v20221204 or newer)
[L] - Low
[N] - Normal
[H] - High
[E] - Emergency
Example - "[H]This is a High Priority test" will send "This is a High Priority test" with High Priority to your mobile app.
The [E] prefix is now used for Emergency notifications and requires the following User Preferences to be set (or overridden as an embedded option in the message text - see below.)
- Emergency Retry - how often to replay notification until it is acknowledged (in seconds with a minimum of 30 seconds)
- Emergency Auto Expire- timeout for resending notifications if they are never acknowledged (in seconds with a maximum of 10800)
Recent change added by @neerav.modi - As mentioned earlier, the old method of embedding an option was to use a pair of special ASCII characters. That method still works and will not be removed to avoid causing users any issues. The new method makes it much more obvious what each embedded option is.
Here is the list of all of the optional features one can add to a message.
[HTML] -- flags the message as an HTML message
[TITLE=messagetitle] -- message title (equivalent to ^messagetitle^)
- New Example - "[TITLE=Awesome Message]This message has a title"
- Old Example - "^Awesome Message^This message has a title"
[SOUND=soundname] -- custom notification sound (equivalent to #soundname#)
- New Example - "[SOUND=bugle]This message will use the bugle alert sound"
- Old Example - "#bugle#This message will use the bugle alert sound"
[DEVICE=devicename] -- send to specific named Pushover device (equivalent to devicename)
- New Example - "[DEVICE=My-iPhone]This message will only be sent to the Pushover device named My-iPhone"
- Old Example - "*My-iPhone*This message will only be sent to the Pushover device named My-iPhone"
[URL=http://google.com] -- clickable URL (equivalent to §http://google.com§)
[URLTITLE=Google] -- short display name for the URL (equivalent to ¤Google¤)
- New Example - "[URL=http://google.com][URLTITLE=Google]This message will contain a URL and a URL Title"
- Old Example - "§http://google.com§¤Google¤This message will contain a URL and a URL Title"
[IMAGE=imageurl] -- URL and path to replacement notification icon (equivalent to ¨imageurl¨)
- New Example - "[IMAGE=http://example.com/example.jpeg]"
- Old Example - "¨http://example.com/example.jpeg¨"
[EM.RETRY=x] -- for emergency priority, how often does it get "sent" in x seconds (equivalent to ©retryinterval©)
[EM.EXPIRE=y] -- for emergency priority, when should repeating stop in y seconds, even if not acknowledged (equivalent to ™expirelength™)
- New Example - "[E][EM.RETRY=60][EM.EXPIRE=300]This Emergency message will re-alert every 60s for up to 300s, or until acknowledged in the Pushover App"
- Old Example - "[E]©60©™300™This Emergency message will re-alert every 60s for up to 300s, or until acknowledged in the Pushover App"
[EM.POLL=n] -- for emergency priority, poll for acknowledgement every n seconds (default: 30, no equivalent)
[EM.CALLBACK=url] -- for emergency priority, URL that Pushover will POST to when acknowledged (no equivalent)
- Tip: Use Maker API to create a callback endpoint (e.g. turn on a virtual switch)
[SELFDESTRUCT=z] -- auto delete message in z seconds (no equivalent)
- Example - "[SELFDESTRUCT=300]This message will be auto deleted from the Pushover app after 300s"
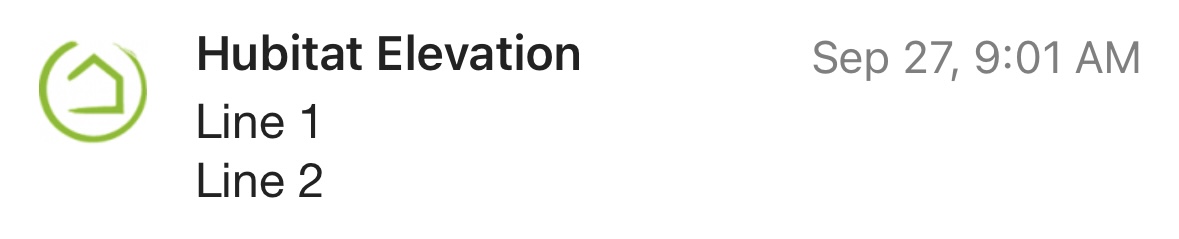
\n -- line breaks in HTML messages. Can also use ≤br≥ using the custom HTML characters feature below.
- Example - A notification of 'Line 1\nLine2' will now be delivered like this:
Set the custom HTML open and close characters to use additional HTML formatting. The default character is ≤ and ≥ (equivalent to [OPEN] and [CLOSE])
The following require the [HTML] prefix as well.
BOLD
- New Example - [HTML] ≤b≥ and ≤/b≥ -- for bold
- Old Example - [HTML] [OPEN]b[CLOSE] and [OPEN]/b[CLOSE] -- for bold
ITALICS
- New Example - [HTML] ≤i≥ and ≤/i≥ -- for italics
- Old Example - [HTML] [OPEN]i[CLOSE] and [OPEN]/i[CLOSE] -- for italics
UNDERLINE
- New Example - [HTML] ≤u≥ and ≤/u≥ -- for underline
- Old Example - [HTML] [OPEN]u[CLOSE] and [OPEN]/u[CLOSE] -- for underline
FONT COLOR
- New Example - [HTML] ≤font color="#FF0000"≥ and ≤/font≥ -- for red colored text
- Old Example - [HTML] [OPEN]font color="#FF0000"[CLOSE] and [OPEN]/font[CLOSE] -- for red colored text
There is a new preference called Testing. Turning this on does all of the formatting above, but does not send the message as HTML. Useful for troubleshooting, testing, or code examples.
There is a new command to get messaging limits and when the limit resets. This command can be called manually or used in a Rule. The results are stored in custom attributes and are also accessible in Rule Machine.
New feature available in v1.0.20260304: emergency message acknowledgements.
There are two ways to leverage this feature:
- by supplying a callback POST URL which the Pushover server calls when the emergency message is acknowledged. A default callback URL can be set in preferences or a specific one included in every message with [EM.CALLBACK=url]
- by enabling emergency message acknowledgement polling (in preferences or with [EM.POLL=n]) and subscribing to the Pushover device's emergencyAck custom attribute.
A picture being worth a great many words, here is a sample RM rule leveraging the polling feature (the rule itself does nothing but log results):

The driver's polling feature is limited to a single emergency message; if a new emergency message is pushed while a previous one is still pending, the new message replaces it and its acknowledgement will be polled for instead.
The callback feature does not have this limitation as a specific callback can be specified for every message, should you need to do so, with [EM.CALLBACK=url]. The callback can be leveraged for automations to be triggered on emergency message acknowledgement, for example, by setting the URL to a MakerAPI endpoint or a Rule Machine cloud endpoint trigger.
Much thanks to the following users who have all contributed to this driver over the years:
@stephack, @garz, @TMLeafs, @s1godfrey, @jpoeppelman1, @ritchierich, @tsaaek, @woodsby, @neerav.modi, and @hubitrep.
For more information regarding the Pushover API used by this driver to implement the above special features, please visit Pushover: API
Note: If you use the 'Speech Synthesis' capability of this driver, you will still simply get a normal text push notification on your phone/tablet. This driver has nothing to do with Text To Speech (TTS). Early on in Hubitat's history, built-in apps did not have the ability to send a push notification. Instead, they were actually able to send a SMS Text message (which was removed from the platform years ago due to rising costs.) However, these apps did offer the ability 'speak' a text phrase to a TTS device, like a Sonos speaker. As such, I added the Speech Synthesis capability to the original version of this driver to allow apps like the early Rule Machine to use Pushover. Now that most all apps support the Notification capability, it is unlikely that many users are still using this old workaround. However, I leave it in place to avoid breaking anyone's existing automations.


