[RELEASE] Virtual Keypad

Virtual Keypad

Create Virtual Keypads to help manage HSM and Mode changes from any dashboard.

There are now 2 options for the Virtual Keypad. The full version which is explained in this first post, and a Virtual Basic Keypad which is outlined in post 2.

The Virtual Basic Keypad operates more similar to a hardware keypad, and only interacts with HSM. There are limited options, but this only uses 1 device and no children devices. Since this doesnt have children devices, the Virtual Basic Keypad does not offer triggers for RM or other apps.

If you want the Virtual Keypad to control Modes, HSM, and custom triggers, use the full version outlined in this 1st post below:

Components:

Apps: Virtual Keypad Manager and Virtual Keypad Child
Drivers: Virtual Keypad, Virtual Keypad Button Child, Virtual Keypad Input Display Child

Use:

Use the App/child app to create however many custom keypads you need. Each keypad can have its own codes and command button options which control who can access and what Modes or HSM options they can change.

Add Virtual Keypads dashboards to any/multiple existing dashboards using an included iFrame function built into the main Keypad Device.

Options:

Delay: Set a time delay for specific commands. ie: 30 second delay before executing Mode-Away after successful code authorization

Exclude commands from requiring a code: ie: HSM-Arm doesnt need a code entered before it will execute

Mode Options:
Change modes directly, or just issue the switch trigger so RM or another automation can manage your modes

Set a default mode that will be switched to first, before executing specific other modes. ie: before Away is set, switch to Disarmed then wait for the delay to execute Away mode.

HSM Options:
Change HSM directly or just issue the switch trigger so RM or another automation can manage your HSM state

HSM Cancel Alerts Option:
When enabled, any disarm commands (mode name has disarm in it,hsm disarm, or custom-disarm) are issued, it will also run HSM cancelAlerts

Notify on bad code entries
set device(s) you want to be notified on if bad code entries are used

set how many failed attempts between notifications

Installation:

Available in HPM (Hubitat Package Manager)

Manual installation by grabbing the above listed files from my github here (install all apps and drivers with title Virtual Keypad):

Add the custom app "Virtual Keypad Manager", and create a new Keypad Child. The Child app has basic settings for how you want this Virtual Keypad to operate. Codes are managed directly in the Keypad Device, or by using Lock Code Manager.

After the Keypad Child is saved, it will automatically create the Keypad device and all child devices.

The command buttons (HSM and Mode) all operate as a push button when used on a dashboard, but they also act as a trigger for custom external functions. They all have a switch capability that will turn on (and auto off) when any of the command buttons are used.

Creating the Keypad Dashboard

Create a new dashboard for each custom Virtual Keypad. You can manually build each keypad dashboard, or use the below template json and css as a baseline to get setup quickly.

For manually creating the dashboard, you will want to add the following Keypad child devices to the dashboard:
10 "number" buttons, with the "button number" set to the value of that button.. ie button 5 should have "button number" 5 set, etc.
1 (InputDisplay) set to use attribute: InputDisplay
1 (Clear) button, I set this to use the refresh icon
1 (Panic) Button, I set this to 'he-siren_and_alarm' icon
how ever many HSM or Mode command buttons you want

The Custom-Arm, Custom-Disarm, and Custom-ReArm are custom command buttons you can use to trigger RM or other automations for those functions. They do not change HSM or Modes unless you set something up that is triggered by their switch value. The Custom-ReArm command, when used, will first trigger the Custom-Disarm.on() switch and then trigger Custom-Arm.on() switch.

Remember

  • buttons are used to submit the entered code and try to execute that function, but switches are used to trigger outside events/automations

If you use the below JSON and CSS, you will need to edit all the buttons to reference the correct device in your system.

Keypad dashboard JSON

{
"localization": "English",
"roundedCorners": 30,
"dateFormat": "MM/DD/YYYY",
"hideLabels": true,
"customColors": ,
"colWidth": "",
"cloudRefresh": 5,
"hsmPin": "",
"hide3dot": false,
"clockMode": true,
"gridGap": 8,
"tiles": [
{
"rowSpan": 1,
"template": "buttons",
"col": 2,
"colSpan": 1,
"id": 0,
"row": 5,
"device": "478",
"templateExtra": "0"
},
{
"rowSpan": 1,
"template": "buttons",
"col": 1,
"colSpan": 1,
"id": 1,
"row": 2,
"device": "478",
"templateExtra": "1"
},
{
"rowSpan": 1,
"template": "buttons",
"col": 2,
"colSpan": 1,
"id": 2,
"row": 2,
"device": "478",
"templateExtra": "2"
},
{
"rowSpan": 1,
"template": "buttons",
"col": 3,
"colSpan": 1,
"id": 3,
"row": 2,
"device": "478",
"templateExtra": "3"
},
{
"rowSpan": 1,
"template": "buttons",
"col": 1,
"colSpan": 1,
"id": 4,
"row": 3,
"device": "478",
"templateExtra": "4"
},
{
"rowSpan": 1,
"template": "buttons",
"col": 2,
"colSpan": 1,
"id": 5,
"row": 3,
"device": "478",
"templateExtra": "5"
},
{
"rowSpan": 1,
"template": "buttons",
"col": 3,
"colSpan": 1,
"id": 6,
"row": 3,
"device": "478",
"templateExtra": "6"
},
{
"rowSpan": 1,
"template": "buttons",
"col": 1,
"colSpan": 1,
"id": 7,
"row": 4,
"device": "478",
"templateExtra": "7"
},
{
"rowSpan": 1,
"template": "buttons",
"col": 2,
"colSpan": 1,
"id": 8,
"row": 4,
"device": "478",
"templateExtra": "8"
},
{
"rowSpan": 1,
"template": "buttons",
"col": 3,
"colSpan": 1,
"id": 9,
"row": 4,
"device": "478",
"templateExtra": "9"
},
{
"rowSpan": 1,
"template": "buttons",
"col": 1,
"colSpan": 1,
"id": 10,
"row": 5,
"device": "474",
"templateExtra": null,
"customIcon": "refresh"
},
{
"rowSpan": 1,
"template": "attribute",
"col": 1,
"colSpan": 3,
"id": 11,
"row": 1,
"device": "479",
"templateExtra": "InputDisplay"
},
{
"rowSpan": 1,
"template": "buttons",
"col": 4,
"colSpan": 2,
"id": 12,
"row": 1,
"device": "461",
"templateExtra": "1"
},
{
"rowSpan": 1,
"template": "buttons",
"col": 4,
"colSpan": 2,
"id": 13,
"row": 2,
"device": "464",
"templateExtra": "1"
},
{
"rowSpan": 1,
"template": "buttons",
"col": 4,
"colSpan": 2,
"id": 14,
"row": 3,
"device": "476",
"templateExtra": "1"
},
{
"rowSpan": 1,
"template": "buttons",
"col": 4,
"colSpan": 2,
"id": 15,
"row": 4,
"device": "475",
"templateExtra": "1"
},
{
"rowSpan": 1,
"template": "buttons",
"col": 4,
"colSpan": 2,
"id": 16,
"row": 5,
"device": "477",
"templateExtra": "1"
},
{
"rowSpan": 1,
"template": "buttons",
"col": 3,
"colSpan": 1,
"id": 17,
"row": 5,
"device": "528",
"templateExtra": "1",
"customIcon": "he-siren_and_alarm"
}
],
"goBack": true,
"modePin": "",
"bgColor": "Black",
"lanRefresh": 2,
"iconSize": 42,
"cols": 5,
"rowHeight": "",
"hideEvents": true,
"tempScale": "F",
"noColors": false,
"readOnly": null,
"rows": 5,
"hideIconText": true,
"name": "kptemplate",
"fontSize": 12
}

Keypad dashboard CSS

.header.flex {
padding:0 !important;
}
.wrapper {
overflow: hidden;
padding-right: 15px;
}
.dashBack.flex, .dashName.flex {
display:none;
}
.he-tap:before {
content: none;
}
.tile.button .tile-title, .tile.attribute .tile-title {
visibility: hidden;
display: none;
}
.tile.button .tile-contents, .tile.attribute .tile-contents {
height: calc(100%);
}
.tile.attribute .tile-primary, .tile.button .tile-primary {
padding:0;
}
#tile-1 .tile-primary :before {
content: "1";
}
#tile-2 .tile-primary :before {
content: "2";
}
#tile-3 .tile-primary :before {
content: "3";
}
#tile-4 .tile-primary :before {
content: "4";
}
#tile-5 .tile-primary :before {
content: "5";
}
#tile-6 .tile-primary :before {
content: "6";
}
#tile-7 .tile-primary :before {
content: "7";
}
#tile-8 .tile-primary :before {
content: "8";
}
#tile-9 .tile-primary :before {
content: "9";
}
#tile-0 .tile-primary :before {
content: "0";
}
#tile-10 .tile-primary :before {
#content: "Clear";
}
#tile-14 .tile-primary :before {
content: "Re-Arm";
}
#tile-15 .tile-primary :before {
content: "Arm";
}
#tile-16 .tile-primary :before {
content: "Disarm";
}
#tile-13 .tile-primary :before {
content: "Away";
}
#tile-12 .tile-primary :before {
content: "Party";
}

*refresh the dashboard after saving the JSON and custom CSS

These JSON and CSS files are available in my github if you are getting save errors copying from this forum:

Adding the Keypad dashboard to other Dashboards

Once you have the custom Keypad dashboard setup, use the main Keypad device to add this keypad dashboard to other dashboards. Get the direct link to the keypad dashboard, and add it to the iFrame preferences in the main Keypad device.

Add your main Keypad device to your other dashboard and specify attribute: Keypad

you will want to apply this custom CSS to any dashboard you add the Keypad iFrame to help format it better:

dashboard with iFrame CSS

/* keypad iframe specific - #tile-25 is the Keypad device attribute: Keypad */
#tile-25 .tile-title {
display:none;
}
#tile-25 .tile-contents {
padding: 0;
height:100%;
}
#tile-25 .tile-primary {
padding: 0;
}

Setting up the Panic Alarm using HSM

(instructions borrowed/edited from arnb's nyckelharpa app documentation)
A custom HSM Rule is required to force an HSM response to a Panic key press, enabling an instant Panic response even when the system is disarmed

  1. Click on Apps-->then click Hubitat Safety Monitor
  2. Click on Custom
  3. Click Create New Monitoring Rule --> Name this Custom Monitoring Rule-- enter Panic -->
  4. Rule settings What kind of device do you want to use: select "Tamper Sensor"
    Select Tamper Sensors: check the Keypad (Panic) device when using HE drivers , click Update
    What do you want to monitor?: Set Tamper Detected
    For how long? (minutes): must be empty or 0
    Set Alerts for Text, Audio, Siren and Lights
    Click the "Arm This Rule" button
    Click Done
  5. Important: verify the Panic rule is "Armed" or it will not work
  6. Do a Panic test: Press the Virtual Keypad's Panic button and then a 2nd time within 5 seconds
  7. The Panic Alert may be stopped using any disarm command on the Virtual Keypad, if the option is selected to issue cancelAlert on any disarm which is enabled by default; or the "Cancel Alerts" button from HE App HSM options

Changelog:

Virtual Keypad
V1.0.22: 2021-12-05

  • added new preference to modify modal css

V1.0.21: 2021-11-04

  • fixed security issue found by @arnb and @scubamikejax904, and added an option to enable or disable.. enabled by default

V1.0.20: 2021-07-29

  • added option to attempt auto centering of keypad when overlay iframe/button is used on dashboard

V1.0.19: 2021-07-12

  • updated autoclose function to reset when manually closed. This will prevent the overlay from closing itself if you open it, then close it, and immediately open the keypad again.

V1.0.18: 2021-07-02

  • added new Button Attribute to keypad device. This will allow you launch a modal overlay with the keypad on a dashbaord, instead of having it visible all the time. There are new preferences for the button in the keypad device.

V1.0.17: 2021-03-10

  • removed the SecurityKeypad capability as this was causing issues when present with the LockCodes capability and is not needed for the functionality of this addon
  • FIXED code entry/update/delete from the keypad device. You do not need to use the "Lock Code Manager" addon.

V1.0.16: 2021-02-16

  • added support options to child app for getting a summary of versions and keypad settings to help troubleshoot issues

V1.0.15: 2021-02-15

  • bugfix - proper handling of cancel countdown and update display
  • added option in app to specify which delayed commands get the chime during the countdown
  • added option to test chime from child device page with 'on' or 'push' commands

V1.0.14: 2021-02-15

  • bugfix - forced setting a standard InputDisplayDefaultText if value is null which was causing issues with users upgrading as it wasnt getting set by default for some reason.

V1.0.13: 2021-02-15

  • bugfix - clear the bad code immediately after receiving the 'Input Denied' so you could start entering a new code without appending to the old bad code before the 5 second timeout to clear the 'Input Denied' message.

V1.0.12: 2021-02-14

  • added preference to customize inputDisplay default text
  • bugfix - input display did not give feedback for bad code input or properly clear bad codes.

V1.0.11: 2021-02-13

  • bugfix - timer errors out when delay chime is not configured.

V1.0.10: 2021-02-10

  • Added option to cancel count down timer by entering an approved code and pressing any command button (not number, clear, or panic buttons) to cancel the timer.
  • Added optional child Chime device, which is a switch trigger (turns on) for a RM/etc rule to send chime/sound/tone/beep/etc to your chosen speakers. Seconds between chime triggers are configurable in the app

V1.0.9: 2020-11-24

  • Added user defined optional command list that will cancel HSM alerts when triggered.

V1.0.8: 2020-09-16

  • Added user defined Custom-Commands into the app settings. These will create custom buttons to trigger outside RM/etc automations based on their switch value.

V1.0.7: 2020-10-09

  • Added ability to choose which HSM/Mode/Custom buttons get child devices created, and will remove child devices that are no longer specified in the app. (you will want to open the app, and configure each keypad again after this update)
  • Moved the iFrame preference setting into the main Keypad device. We no longer need the iFrame child device, or iFrame child driver. This will need to be updated if you use this option after updating.

V1.0.6: 2020-10-05

  • lastCodeName attribute added
  • details for triggering RM on this attribute is in this thread in post 15.

V1.0.5: 2020-10-05

  • minor bump to add versions to all app/driver files

V1.0.4: 2020-10-03

  • added capability securityKeypad for integration into HSM and other apps that require this capability

V1.0.3: 2020-10-02

  • lastCodeName event added to successful code input
  • Updated keypad dashboard JSON and instructions in this post

V1.0.2: 2020-10-01

  • Added Panic button, updated keypad dashboard JSON in this post to include it
  • updated instructions in this post to reflect new options and changes

V1.0.1: 2020-10-01

  • updated to allow immediate code entry after bad code input without waiting for input timeout

V1.0.0: 2020-09-28

  • Initial Release
27 Likes

Skip this post if you are using the main Virtual Keypad app/driver

Virtual Basic Keypad

Components:

Drivers: Virtual Basic Keypad

Available via Hubitat Package Manager and through my github drivers section linked in the first post for manual install.

The Virtual Basic Keypad is a limited version which has a single driver component. This results in a single device with no child devices that only works with HSM commands, and has no external trigger options. This version is designed to replicate hardware keypads and their basic functions.

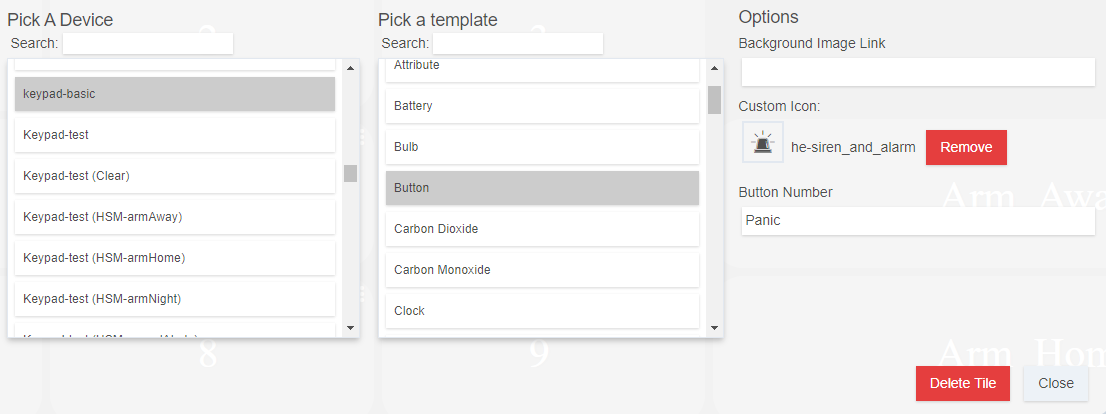
All buttons that are added to the Virtual Basic Keypad Dashboard must be manually configured by setting the "button number" input for each button:

0-9, Clear, Panic, armAway, armHome, armNight, disarm, armRules, disarmRules, disarmAll, armAll, cancelAlerts

Image of button settings:

Here are the JSON and CSS to help setup the keypad dashboard more quickly. You will need to edit each tile and specify your Virtual Basic Keypad device and ensure the "button number" is specified correctly for your intended function:

Keypad Dashboard JSON

{
"localization": "English",
"roundedCorners": 30,
"dateFormat": "MM/DD/YYYY",
"hideLabels": true,
"customColors": ,
"colWidth": "",
"cloudRefresh": 5,
"hsmPin": "",
"hide3dot": false,
"clockMode": true,
"gridGap": 8,
"tiles": [
{
"rowSpan": 1,
"template": "buttons",
"col": 2,
"colSpan": 1,
"id": 0,
"row": 5,
"device": "601",
"templateExtra": "0"
},
{
"rowSpan": 1,
"template": "buttons",
"col": 1,
"colSpan": 1,
"id": 1,
"row": 2,
"device": "601",
"templateExtra": "1"
},
{
"rowSpan": 1,
"template": "buttons",
"col": 2,
"colSpan": 1,
"id": 2,
"row": 2,
"device": "601",
"templateExtra": "2"
},
{
"rowSpan": 1,
"template": "buttons",
"col": 3,
"colSpan": 1,
"id": 3,
"row": 2,
"device": "601",
"templateExtra": "3"
},
{
"rowSpan": 1,
"template": "buttons",
"col": 1,
"colSpan": 1,
"id": 4,
"row": 3,
"device": "601",
"templateExtra": "4"
},
{
"rowSpan": 1,
"template": "buttons",
"col": 2,
"colSpan": 1,
"id": 5,
"row": 3,
"device": "601",
"templateExtra": "5"
},
{
"rowSpan": 1,
"template": "buttons",
"col": 3,
"colSpan": 1,
"id": 6,
"row": 3,
"device": "601",
"templateExtra": "6"
},
{
"rowSpan": 1,
"template": "buttons",
"col": 1,
"colSpan": 1,
"id": 7,
"row": 4,
"device": "601",
"templateExtra": "7"
},
{
"rowSpan": 1,
"template": "buttons",
"col": 2,
"colSpan": 1,
"id": 8,
"row": 4,
"device": "601",
"templateExtra": "8"
},
{
"rowSpan": 1,
"template": "buttons",
"col": 3,
"colSpan": 1,
"id": 9,
"row": 4,
"device": "601",
"templateExtra": "9"
},
{
"rowSpan": 1,
"template": "buttons",
"col": 1,
"colSpan": 1,
"id": 10,
"row": 5,
"device": "601",
"templateExtra": "Clear",
"customIcon": "refresh"
},
{
"rowSpan": 1,
"template": "attribute",
"col": 1,
"colSpan": 3,
"id": 11,
"row": 1,
"device": "601",
"templateExtra": "InputDisplay"
},
{
"rowSpan": 1,
"template": "buttons",
"col": 4,
"colSpan": 2,
"id": 14,
"row": 3,
"device": "601",
"templateExtra": "armAway"
},
{
"rowSpan": 1,
"template": "buttons",
"col": 4,
"colSpan": 2,
"id": 15,
"row": 4,
"device": "601",
"templateExtra": "armHome"
},
{
"rowSpan": 1,
"template": "buttons",
"col": 4,
"colSpan": 2,
"id": 16,
"row": 5,
"device": "601",
"templateExtra": "disarm"
},
{
"rowSpan": 1,
"template": "buttons",
"col": 3,
"colSpan": 1,
"id": 17,
"row": 5,
"device": "601",
"templateExtra": "Panic",
"customIcon": "he-siren_and_alarm"
}
],
"goBack": true,
"modePin": "",
"bgColor": "Black",
"lanRefresh": 2,
"iconSize": 42,
"cols": 5,
"rowHeight": "",
"hideEvents": true,
"tempScale": "F",
"noColors": false,
"readOnly": null,
"rows": 5,
"hideIconText": true,
"name": "zzztest",
"fontSize": 12
}

Keypad Dashboard CSS

.header.flex {
padding:0 !important;
}
.wrapper {
overflow: hidden;
padding-right: 15px;
}
.dashBack.flex, .dashName.flex {
display:none;
}
.he-tap:before {
content: none;
}
.tile.button .tile-title, .tile.attribute .tile-title {
visibility: hidden;
display: none;
}
.tile.button .tile-contents, .tile.attribute .tile-contents {
height: calc(100%);
}
.tile.attribute .tile-primary, .tile.button .tile-primary {
padding:0;
}
#tile-1 .tile-primary :before {
content: "1";
}
#tile-2 .tile-primary :before {
content: "2";
}
#tile-3 .tile-primary :before {
content: "3";
}
#tile-4 .tile-primary :before {
content: "4";
}
#tile-5 .tile-primary :before {
content: "5";
}
#tile-6 .tile-primary :before {
content: "6";
}
#tile-7 .tile-primary :before {
content: "7";
}
#tile-8 .tile-primary :before {
content: "8";
}
#tile-9 .tile-primary :before {
content: "9";
}
#tile-0 .tile-primary :before {
content: "0";
}
#tile-10 .tile-primary :before {
#content: "Clear";
}
#tile-14 .tile-primary :before {
content: "Arm Away";
}
#tile-15 .tile-primary :before {
content: "Arm Home";
}
#tile-16 .tile-primary :before {
content: "Disarm";
}

The inputDisplay is now built into the main Virtual Basic Keypad device. To add this to your keypad dashboard, use the attribute: InputDisplay

inputDisplay on dashboard

The iFrame option is now built into the main Virtual Basic Keypad device. Get the direct URL for the Virtual Basic Keypad dasboard, and paste it into the main device preferences section for iFrame. To add this to any other dashboard, add the main Virtual Basic Keypad device to the dashboad, and specify attribute: Keypad

Keypad iFrame CSS

/* keypad iframe specific - #tile-25 is the Keypad device with attribute: Keypad */
#tile-25 .tile-title {
display:none;
}
#tile-25 .tile-contents {
padding: 0;
height:100%;
}
#tile-25 .tile-primary {
padding: 0;
}

Setting up the Panic Alarm using HSM

(instructions borrowed/edited from arnb's nyckelharpa app documentation)
A custom HSM Rule is required to force an HSM response to a Panic key press, enabling an instant Panic response even when the system is disarmed

  1. Click on Apps-->then click Hubitat Safety Monitor
  2. Click on Custom
  3. Click Create New Monitoring Rule --> Name this Custom Monitoring Rule-- enter Panic -->
  4. Rule settings What kind of device do you want to use: select "Tamper Sensor"
    Select Tamper Sensors: check the Virtual Basic Keypad device when using HE drivers , click Update
    What do you want to monitor?: Set Tamper Detected
    For how long? (minutes): must be empty or 0
    Set Alerts for Text, Audio, Siren and Lights
    Click the "Arm This Rule" button
    Click Done
  5. Important: verify the Panic rule is "Armed" or it will not work
  6. Do a Panic test: Press the Virtual Basic Keypad's Panic button and then a 2nd time within 5 seconds
  7. The Panic Alert may be stopped using any disarm command on the Virtual Keypad, if the option is selected to issue cancelAlert on any disarm which is enabled by default; or the "Cancel Alerts" button from HE App HSM options

Failed Code Input Messaging

If you have configured the Failed Attempts before Notify in the Virtual Basic Keypad device preferences, then upon the set number of failed code inputs, the attribute: Notifications will be updated with a failed code message. You can use RM to monitor this attribute for changes, and send/forward the message to any device you set in RM. The attribute: Notifications will automatically clear itself to "", so you want to handle that in your RM rule to exit the rule if Notifications changes to "".

Changelog:

Virtual Basic Keypad
V1.0.4: 2021-11-04

  • fixed security issue found by @arnb and @scubamikejax904, and added an option to enable or disable.. enabled by default

V1.0.3: 2021-03-10

  • removed the SecurityKeypad capability as this was causing issues when present with the LockCodes capability and is not needed for the functionality of this addon
  • FIXED code entry/update/delete from the keypad device. You do not need to use the "Lock Code Manager" addon.

V1.0.2: 2020-10-09

  • added attribute Notification, which updates with a bad code input message if enabled. this can be used to trigger a RM notification if you watch this attribute for changed

V1.0.1: 2020-10-09

  • initial release
1 Like

Hey @mbarnoe, Great app I just started playing/setting this up, it's exactly what i've been looking for (I think alot of people will find this useful)

Updated to allow for immediate new code entry after failed input message without waiting for the 5 second Input text reset.

Thank you for the quick response, this took a little time to setup, but your instructions were good (my following them could use some work, but I got it working)

Cool, im glad others find this useful. Let me know if any of the instructions should be edited to be easier to follow in any way.

I know the setup is a little involved, but once you do it the first time its pretty easy to modify or add additional keypads.

1 Like

Updated to 1.0.2

  • Added Panic button, updated keypad dashboard JSON in the first post to include it
  • updated instructions in this post to reflect new options and changes

The panic button must be pressed 2 times within 5 seconds to activate the "Tamper" Detected value on the new Keypad (Panic) child device. Use this "Tamper" element as a trigger to run your custom panic routine. I have added instructions in the first post on how to set this up using a HSM custom rule.

I have updated the JSON in the first post to include this new button. You will need to open and save the child app for the new Panic button child to be created for each of your keypads.

side note, this is my first app in Hubitat Package Manager, and I'm not sure if I need to do anything special for each driver to make sure it gets updated. I have just been updating the HPM manifest file and increasing the version number there. Let me know if there are any update issues by those of you using HPM to install this.

@mbarone, I'm not sure if this is possible is there any way to add last code name to the current States (like it's done with the locks) . I ask cause I'm trying to come up with a "hold up code"/Silent panic that activates the panic but also disarms the HSM (makes it look like you turn off the alarm but it's still sounding/send an alert message. I'm thinking If I can get that last code name state I can do the rest in Rule Machine.

Updated to V1.0.3: 2020-10-02

  • lastCodeName event added to successful code input

I actually had this in the code, but it was commented out as I didnt have use for it. It shows up immediately after a successful code input/submission, but it disappears from the current states when you refresh the keypad device. Let me know if this works for your "hold up code" implementation or if I need to make further changes.

Updated to V1.0.4: 2020-10-03

  • added capability securityKeypad for integration into HSM and other apps that require this capability

Updated with package manager, created two versions.

Hey @mbarone, my idea hasn't worked out, I'm putting it on the back burner for now, I was wondering If there was a way That I can get an Alert/notification as to which code/user disarmed the keypad, I have a z-wave deadbolt that setup through Rule machine has access to the value lastcodename, is there any way to do that with the keypad. unfortunately I'm not any kind of programmer, so I don't have much insight into what would need to be done to get that function. it's just my humble request. I love the functionality of this than any other solution available on the community.

@scubamikejax904, Its odd, but i just tested in RM and you are correct.. Its not picking up the "lastCodeName" changed event.

I think its implemented properly, as I can see it update on the device when the event fires (and the event shows the correct details), but the State disappears shortly after it updates. Im not sure if that is connected to why its not being triggered in RM.. but i will need to investigate further. Ill keep you posted, and/or will look into another way to accomplish this.

you rock! Thank you

@scubamikejax904

I just posted an update that should fix this (v1.0.6).. you will need to subscribe to the attribute changed instead of directly to the keypad lastCodeName event which for some reason isnt getting picked up by RM. see my test RM config below that works on the new version:

the %value% variable is what contains the lastCodeName.. you can use this to trigger whatever other custom actions you need

if you use the Comparison: changed like this image, then the event will only fire if the someone else enters a code and the lastCodeName changes.. otherwise, if the same person enters a code 2+ times in a row, it will only fire the first time.

you can resolve this by using the below setup, which will match the lastCodeName to a single value each time any code is entered and this value is updated:

if you need to trigger on multiple different codes, then you might need a few of these = comparisons, 1 for each code name you want to handle.

Let me know how this works for your setup or if it needs further refinement

1 Like

@mbarone, I think that's got both the stickup/panic code idea and the notifications cleared up now. my only thought about using the same code 2+ times in a row would be if there was a way to clear the attribute after x seconds (but that would probably cause issues and isn't worth it in my opinion) this will work perfectly as is. Thank you for this Great app and all the work you've put into it for me.

Virtual Keypad V1.0.7: 2020-10-09

  • Added ability to choose which HSM/Mode/Custom buttons get child devices created, and will remove child devices that are no longer specified in the app. (you will want to open the app, and configure each keypad again after this update)
  • Moved the iFrame preference setting into the main Keypad device. We no longer need the iFrame child device, or iFrame child driver. This will need to be updated if you use this option after updating.

This new version adds the ability to select which button children get created for your keypad device. You will want to open the app for each keypad after updating and configure it for your use case. This will automatically remove all child devices not set in the app after saving.

This new version brings the iFrame setting into the main Keypad Device. if you currently use the iFrame child device, you will need to update the url in the main Keypad device configuration, and update any dashboard you include the iFrame on to point at your main keypad device. Instructions in post 1 have been updated to reflect this change.

This is also v1.0.1 release for the Virtual Basic Keypad. See post 2 for information about using the basic version instead of the full release:

If you have customized your keypad dashboard, please share a screenshot and the JSON/CSS to give us ideas on cool uses for this in various setups. Let us know which version of the app you are using when posting screenshots (Virtual Keypad, or Virtual Basic Keypad).

Dashboard is still a work in progress here's the main dashboard nothing fancy but it works.

.header.flex {
padding:0 !important;
}

.wrapper {
overflow: hidden;
padding-right: 15px;
}

.dashBack.flex, .dashName.flex {
display:none;
}

.he-tap:before {
content: none;
}

.tile.button .tile-title, .tile.attribute .tile-title {
visibility: hidden;
display: none;
}

.tile.button .tile-contents, .tile.attribute .tile-contents {
height: calc(100%);
}

.tile.attribute .tile-primary, .tile.button .tile-primary {
padding:0;
}

#tile-1 .tile-primary :before {
content: "1";
}

#tile-2 .tile-primary :before {
content: "2";
}

#tile-3 .tile-primary :before {
content: "3";
}

#tile-4 .tile-primary :before {
content: "4";
}

#tile-5 .tile-primary :before {
content: "5";
}

#tile-6 .tile-primary :before {
content: "6";
}

#tile-7 .tile-primary :before {
content: "7";
}

#tile-8 .tile-primary :before {
content: "8";
}

#tile-9 .tile-primary :before {
content: "9";
}

#tile-0 .tile-primary :before {
content: "0";
}

#tile-11 .tile-primary :before {
content: "Clear";
}

#tile-13 .tile-primary :before {
content: "Home";
}

#tile-14 .tile-primary :before {
content: "Night";
}

#tile-15 .tile-primary :before {
content: "Disarm";
}

#tile-12 .tile-primary :before {
content: "Away";
}

#tile-16 .tile-primary :before {
content: " ";
}
#tile-16 {background-color: rgba(0,0,0,0);}
#tile-10 .tile-primary {font-size: 40px !important;}
#tile-11 .tile-contents{-moz-transform:scale(.5);zoom:.5}
#tile-12 .tile-contents{-moz-transform:scale(.75);zoom:.75}
#tile-13 .tile-contents{-moz-transform:scale(.75);zoom:.75}
#tile-14 .tile-contents{-moz-transform:scale(.75);zoom:.75}
#tile-15 .tile-contents{-moz-transform:scale(.75);zoom:.75}
1 Like

Using: Virtual Basic Keypad dashboard, designed for use on my cellphone with the Hubitat App. Works with HSM and Nyckelharpa. Resembles an Iris V2 combined with a Centralite.

Cancel Alerts On Disarm: On/True
No Code Required: armAway, armHome, armNight

Keypad Json file: virtualKeypad/dashboard.json at main · arnbme/virtualKeypad · GitHub
After copying json to new keypad's Layout file, save it, close and reopen the keypad, change the device name to your keypad name on all tiles.

2 Likes

Virtual Keypad V1.0.8: 2020-09-16

  • Added user defined Custom-Commands into the app settings. These will create custom buttons to trigger outside RM/etc automations based on their switch value.

the custom command name will be pre-pended with "Custom-", so just add anything after that you want to use for identification. There is no limit to how many you can create, and they get the same options as the built-in commands like assigning the delay before executing or not requiring an entry code.

For each custom command, a button will appear below the text input field with the custom command name; if you click the button, the custom command will be removed.