This looks interesting.
3 Likes
Yeah, it does. I have a potential use for one of those right now... If there is a US frequency version, I may pick one up.
There is:
https://www.amazon.com/dp/B07NDRCTJK/ref=cm_sw_em_r_mt_dp_U_NXbACbGCE43GZ
Yeah I saw this and thought the same. I think it is kind of a repurposed universal binary sensor (FGBS-001 ), which is kind of limited to a is what it could be used for, where as this looks like it can do a lot more. But like the UBS I bet there won't be many people that use it (I'm someone who does) so there is not realy many drivers about to run it 
I currently have a Fibaro Contact sensor with an external temp sensor, DS18B20, connected for my aquarium temp measureing. Works well when paired but it was a right PITA to do.
Might consider this.
Needs an external power supply I assume as it doesn't mention coming with one.
Yeah, I read through the manual - that would be one annoying driver to write as it has so many different modes/capabilities depending on how it is configured.
Not impossible, just annoying/tedious if one wanted to make a driver that could handle all possibilities of inputs.
If I get one, I'll likely just write a driver that only does what I need it to for my combination of sensors.
I have a driver that i ported over from ST but it needs someone to look at it properly over here as although the main code is probbley ok the logging is not and it needs some TLC ![]() . All mine are currently disabled ( I have quite a few
. All mine are currently disabled ( I have quite a few ![]() ) as i have to soak test everything again to see what was causing my hub to crash once a week.
) as i have to soak test everything again to see what was causing my hub to crash once a week.
Edit: I've fixed this now
yes like the UBS it needs a constant power supply but it can be from 9V-30V so relatively easy to sort.
the large disadvantage to the UBS was that you couldn't independently control the output's, but after reading the manual I'm not sure if this one does eather ![]() it kind of suggests you can though by changing some parameters.
it kind of suggests you can though by changing some parameters.
edit: just seen this in its description, great! May get one to swap one of mine.
The Fibaro looks pretty cool, but I am sticking with my HubDuino's.
1 Like
Does anybody have these working? I'm specifically interested in using the 2x inputs and 2x independent outputs. I don't really intend to use the temp sensor functionality, at least for now.
Replying to my own question here... A basic driver for the Smart Implant was discovered over on this thread:
And the Github repo for drivers is here:
The driver seems to be working for me in detecting the states of the 2x inputs, and for independently controlling the states of the 2x outputs. The driver could definitely do with some TLC, but I'm pretty happy to have this basic functionality working as is ![]()
1 Like
Can I ask how you got this to report the state of the inputs? I installed the drivers and attached a normally open dry contact and I can’t figure out how to view its state.
I’ve metered the dry contact on the fabaro and I read the change from 0v to 9v when the contact closes. I just can’t figure out how to get it to report to a tile. Nothing I do seems to work.
I should add that I only see child devices for the outputs, none for the inputs. I see no info from the inputs. I must be missing something.
I'm assuming that your messages were meant for me? Sorry, I completely missed these.
I actually haven't had time to fully experiment with my Smart Implants or the drivers, beyond some very brief testing a few weeks ago. I did notice, as you did, that the driver that's available doesn't actually provide any way to control the outputs. I also may have been mistaken when I said that I could detect the state of the 2 inputs. I've just tried this again on my bench test setup, and I'm not actually seeing the states change. I don't know if I did something differently back then, or if I imagined just it! I may have just been seeing the states of the outputs. (BTW, have you experimented with the various parameters, especially 20-21 and 40-41?)
Given the shortcomings of the existing driver, I actually decided to just write a new one myself. I had gotten started, but then too many other things have gotten in the way, and I haven't had a chance to do much with it.
I'll definitely let you know if/when I manage to finish my own driver. This would be my first time writing a driver for Hubitat, so my progress is a little slower than it might be for others 
2 Likes
Thanks for the reply @jason-lane. Sorry, I should have tagged you. No worries though.
So I'm my testing I can concur what you've noted in that I do not see any state changes for the inputs and there is no control over the outputs. I have not played with the other parameters, though I think there are some interesting opportunities here. When it didn't work at all I didn't have the time to fuss with it so I just packed it away and used a MIMOLite and a MIMO2+ to accomplish my goals. (Too many goals and not enough time.). Would have loved to use the implant, so impossibly small and capable. I'm going to have to find another use for it.
I look forward to seeing the driver you work out. Thanks for making the effort and again for the reply.
1 Like
I installed a smart implant into a PC case and wired the outputs in parallel to the front panel POWER and RESET switches. The only function I observed was that manipulation of the on – off control on the individual child device page would change the state of the output relay. The AUTO OFF function did nothing for me. I was able to get the implant to function as intended by creating a virtual switch on Hubitat and a routine in rule machine. I will next explore creating a way to detect the ON-OFF state of the PC by using the binary connection method for intput and a SSR wired to a Molex connector as the trigger. I am a complete noob with Hubitat and home automation and anxious to continue my learning curve as I figure out how to display this in a dashboard.
@t_rosik What does your rule look like to then control the fibaro device?
I updated the driver from "boblehest" mentioned above with periodic reports, analog and digital inputs, event notifications, etc and made it available here:
https://github.com/muchu999/Hubitat/tree/master/Fibaro%20FBGS-222%20Smart%20Implant
This driver is relatively generic and hopefully it will help others get started with using this device. Because of the lack of documentation on some features, I wasted quite a bit of time (a lot) making it work, especially the periodic reports.
I made another personal version for my own project where I used the smart implant with some relays and other parts to replace a Venmar HRV Altitude Wall Control.
Some specifics:
- [update: To clarify the install, install the 5 files as 5 drivers. Use the main driver file "...smart implant" for the device "type" of the device. This main driver will take care of using the other drivers as required (it will create child devices automatically).]
- Periodic reports only work when multiChannelAssociation is set in a very specific way. Nothing you should worry about unless you plan on changing the code...
- [updated, see next post] Outputs are individually linked to the digital inputs unless the inputs are set to be analog. Once the input has acted upon its corresponding output, it is always possible to set it back to whatever you want using the switch commands.
- I didn't test the external temperature sensors functionality because I don't have any [update, user @tinker3433 said it was working fine with 3 external sensors]
- The on-board temperature sensor always report high because it is heated by the device.
- I didn't test much the scenes and buttons modes
- [updated: solved, commands have been removed from the parent] Some of the commands in the parent device are there just so they work for the children, use the commands in the children devices for setting outputs and refresh
- Don't forget to "save preferences" and then press the "configure" button when changing parameters. Sending all the parameters to the implant over RF takes about 1 minute after "configure" is pressed.
2 Likes
Reading the documentation it struck me that the output can actually be decoupled from the input using the protection command class. Enabling local protection (local protection value=2) stops the output from being controlled by the input while still allowing zwave RF commands to go through (RF protection value=0).
[update 1: There seem to be a bug in the implant firmware, the solution above works for input1/output1 but not for input2/output2]
[update 2: problem solved, Now works individually for both in/out pairs]
I updated the driver I uploaded in my previous post to allow the protection to be changed from the preferences.
It turns out this device is not too bad if you know how to make it work, too bad the documentation is not better.
2 Likes
Thanks @christi999 for the driver. I'm new in the hubitat world and exploring all possibilities.
Bought also recently the smart implant, as its a very powerful device, but works only with the Fibaro hub.
The main idea was to use it as gate opener.
Would your "Fibaro FBGS-222 Child Switch.groovy" somehow work with the output?
Appreciate your help !
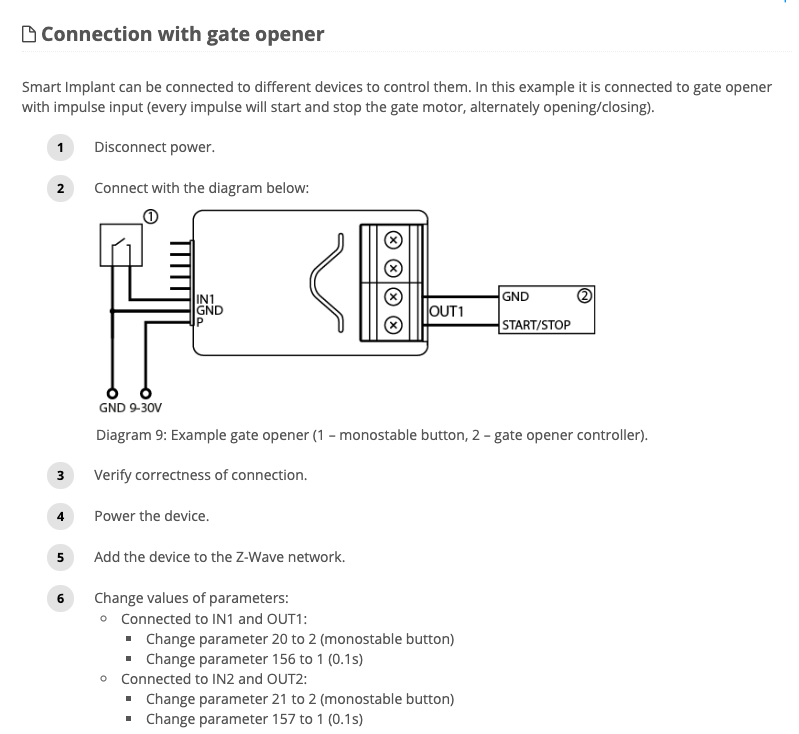
To be clear, when you install the driver for the device you have to install all the files... The way the implant is wired/configured above, pushing the button directly activates the output for the gate controller, without driver intervention (except for the initial configuration). This is because by default, the inputs are linked directly to the outputs inside the device,
As for the driver, yes, the implant outputs are mapped to two instances of the "switch" child device and you can activate/deactivate them individually from the hub. in the child devices interface.

