The Simple CSS Editor is now released, allowing easy access to common Legacy Dashboard styling options without any CSS knowledge required. Find it on Hubitat Package Manager (HPM) under the convenience tag.
Why Would I Use Simple CSS Editor?
Many people, after having used HE's built-in Legacy Dashboards, want to take the next step in polishing their new creation, making it a showpiece in their home. Three common barriers to this are:
- Easy access to basic formatting options for dashboards and tiles
- A lack of expertise in designing stylish and functional dashboard elements such as tiles and the knowledge required to take a design and translate it into a dashboard fit for daily use
The Simple CSS editor aims to solve these barriers by providing:
- A simple interface for adjusting dashboard and tile settings without the need for hand-coding CSS
- The (planned) ability to share design templates for tiles between HE users, allowing others benefit from the design skills of others quickly and easily
- This feature is coming. At the moment formatting of tiles can be shared within the same dashboard on the same HE hub, but sharing between dashboard and between HE users will require further development.
What is the Simple CSS Editor?
Adding the Simple CSS Editor to a Legacy Dashboard provides a pop-up editor for easy access to common styling options, including:
- Hiding individual or all tile titles
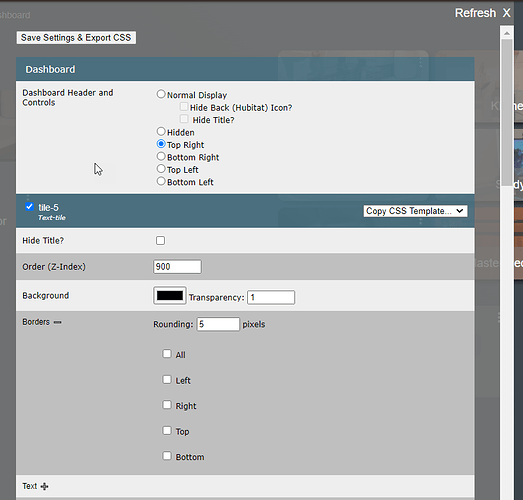
- Hiding the dashboard title and moving the control icons (refresh, add tile and settings cog)
- Hiding sliders and icons on lighting tiles
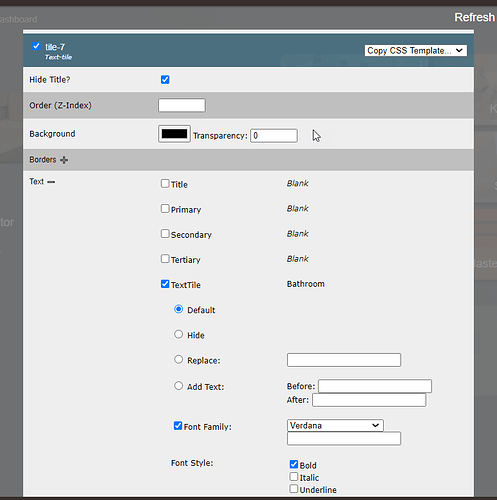
- Adjusting various text elements displayed on a tile
- Modifying borders and background colours on each tile
Once you perfect the styling of one tile, apply the same consistent styling across multiple tiles in the same dashboard.
Installation and Setup
Local File Storage
This editor will store files locally on your HE hub:
- 1 html file - the editor that pops-up on screen
- 2 files for each dashboard that uses the editor, one settings JSON file, and one CSS file
Remote Dashboard Access
This solution has been built with local dashboard access in mind, some success has been proven with remote dashboard access. Reach send me a message if this is of interest for you.
To install the Simple CSS Editor:
-
Install the Simple CSS Editor driver via HPM (use the Fast Word Search option, entering Simple CSS Editor)
-
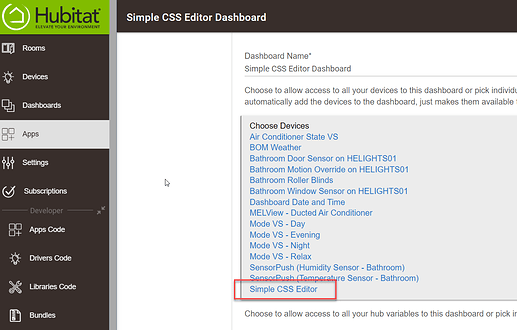
Add a Virtual device on the HE hub, referencing the Simple CSS Editor driver
-
Add the newly created Virtual Device to the list of devices available to a Legacy Dashboard through the Built-In Hubitat Dashboard App, available from the Apps page in the HE Web UI
-
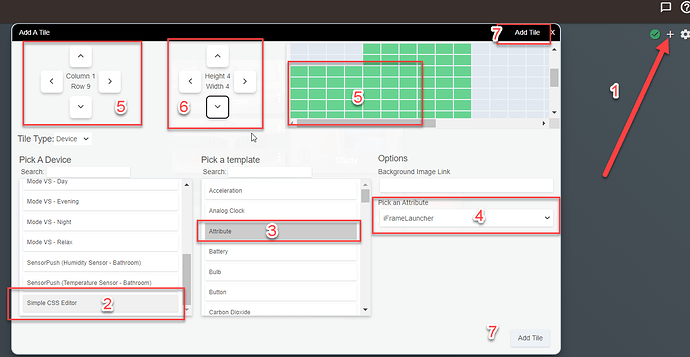
Add a tile to the dashboard referencing the Simple CSS Editor Virtual Device, select the Attribute template and select the iFrameLauncher attribute, clicking Add Tile to complete the tile creation
-
Ignore the warning that is displayed when first adding the tile, this file will eventually be created when the settings are first saved in the editor:

-
Back on the dashboard, open the Custom CSS section by clicking the Cog Icon, select Advanced, then CSS
-
Import the CSS file that will be generated by the Simple CSS Editor by adding the following line of text:
@import url("http://<<HE-Hub-IP>>/local/<<Dashboard-Name>>.css");
replacing<<HE-Hub-IP>>with the IP Address of the HE Hub and replacing<<Dashboard-Name>>with the name of the dashboard as it appears in the top left of the dashboard or in the dashboard listing in the Hubitat Dashboards built-in app, replacing any spaces in the name with an underscore (_). So a dashboard called "Test Space Dash" and a Hub IP Address of 192.168.0.2 would require an import line of:
@import url("http://192.168.0.2/local/Test_Space_Dash.css");
The name of the file in this import statement is case-sensitive. From the example above, test_space_dash.css would not work, the upper-case T, S and D are important. If you are unsure, once you open the editor, you can copy the CSS file URL from the top-right hand corner.
-
Click Save CSS and close the dialog
-
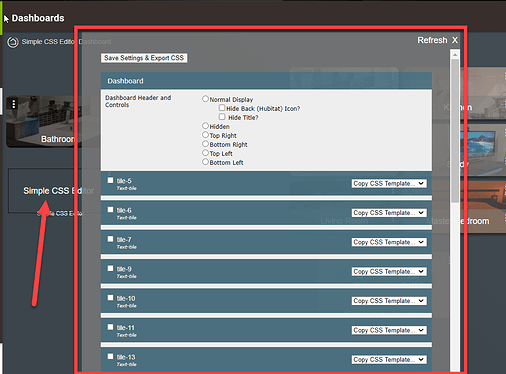
Click the Simple CSS Editor tile. The editor pop-up will appear, listing each tile and available settings (the settings shown below may vary as more are added over time)
-
Adjust any settings you like and click Save Settings and Export CSS in the top left corner of the editor. This will save the Setting JSON file and CSS file to local storage on the HE hub.
-
Click the X in the top right of the editor to close it, and click the green tick icon to refresh the dashboard. The changes made in the editor should now take effect.
Notes on Using the Editor
Turning Styling Settings On and Off
Tick boxes across the editor determine whether a setting or group of settings will be applied to the dashboard, but the settings will still be kept so you can turn them back on in the future without needing to re-enter them. For example, if you wanted to turn off any adjustments made to a tile, simple uncheck the tick-box next to the tile in the list, and Save and Export the Settings and CSS files. To re-apply the settings, open the editor, tick the box and re-export the files.
Tile Styling Templates
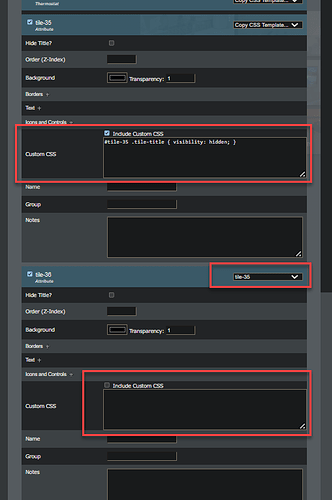
To easily copy / apply the styling of one tile to another, on the target tile click the drop-down in the tile heading and select the source (template) tile to copy the styling from the target. Note, on the target tile, this will override any styling options selected for that tile. Any changes made on the source (template) tile in the editor will automatically be applied onto the target each time the settings are saved / exported. Settings changed on the source (template) tile through the Hubitat Dashboard app will not be applied to the target tile, only settings configured within the Simple CSS Editor will be applied to the target tile. Any custom CSS included in the Custom CSS setting for the template tile will be applied on the target tile, adjusting the tile id references to match the target tile id.

What styling options are included?
-
Dashboard
- Hide Back Icon (Hubitat Logo in top left of the dashboard)
- Hide Dashboard Title (next to the Hubitat Logo)
- Positioning / Formatting of controls (Refresh Green tick, Add Tile Plus and Settings Cog)
-
Tile
-
Export CSS Toggle - choose whether to export the tile settings to the CSS file
-
Hide Tile Title
-
Z-Index - allows layering of tiles on top of one another, the higher the number, the closer to the "front" the tile will appear
-
Background
- Colour and Transparency
-
Borders
- Rounding of Tile corners
- Separate settings for each border positions - All, Top, Bottom, Left and Right
- Thickness (border-width: medium, thin, thick or pixel value)
- Style (none, dotted, dashed, solid, double)
- Colour
-
Text - Adjust settings for different text elements on the tile (Title, primary, secondary and tertiary)
-
Contents:
- Default (No change)
- Hidden / Invisible
- Replace - Replace default text completely
- Add Text Before and/or After the default contents
-
Font Family - Arial, Verdana, etc
-
Font Style - Bold, Underline, Italics, etc
-
Font Size
-
Color
-
Alignment - Left, Center, Right
-
-
Tile Details
- Groups - only used to group CSS into logical sections
- Name - documentary only
- Notes - documentary only
-
Icons and Controls
- Hide Slider (Dimmer)
- Hide Main Icon - Switch, Battery, Fan
-
Custom CSS - Hand-write CSS code for styling not currently supported through options available in the Simple CSS Editor. This keeps your CSS styling together in the same place and allows for re-use of Custom CSS across tiles
-
Style tiles consistently by copying style options from one tile to one or more tiles
-
Enjoy!!
Thankyou
A big thanks to:
@rocketwiz and all those on the CSS thread who I have plagiarised ![]()
@thebearmay for his help getting the downloading of the html file working
@mbarone for his work on the iFrameAdvanced driver


 :
: