Room Lighting
One Lighting App to Rule Them All
We are pleased to introduce our new comprehensive lighting app, Room Lighting. This app can handle most lighting automations, and incorporates Rooms, making setup easier than ever. It offers an easy user interface, with comprehensive features and options. This app incorporates all of the features of our existing lighting apps: Motion Lighting, Mode Lighting, Group-2.1, Scene-1.2, and Scene Transition; in fact, any existing instance of these apps can be imported into Room Lighting, creating an equivalent automation (see this post).
Room Lights
Each automation is a child app called Room Lights. Conceptually, each of these automates the lighting in a particular room, area, or for whatever set of devices chosen.
Room Lights Overview
Room Lights provides means to select a Room to automate, and/or Devices to automate. If a Room is selected, all of the relevant devices in that Room are pre-selected. With or without a Room selection, the 'Devices to automate' pull-down menu provides means to select any lighting device in your system, including shades and blinds.
Room Lights automations are "Activated" or "Turned Off". What Activation means is selected independently for each device. For example, Activation may mean setting a particular color on a bulb, a specific level on a dimmer, or even turning some device off. Turning Off generally means turning lights off, although other options are available (see 'Alternative Turning Off Methods' below). Whether or not any particular device selected for the automation is activated by Activate or turned off by Turn Off can be selected independently for each device. Two buttons in the UI allow the user to Activate or Turn Off the automation for testing. Means to Activate and Means to Turn Off, and associated options, are defined for the automation as a whole. A special Activation Device can be created to allow use with voice assistants, and to create groups and scenes (see this post).
The initial page when creating a new Room Lights looks like this:
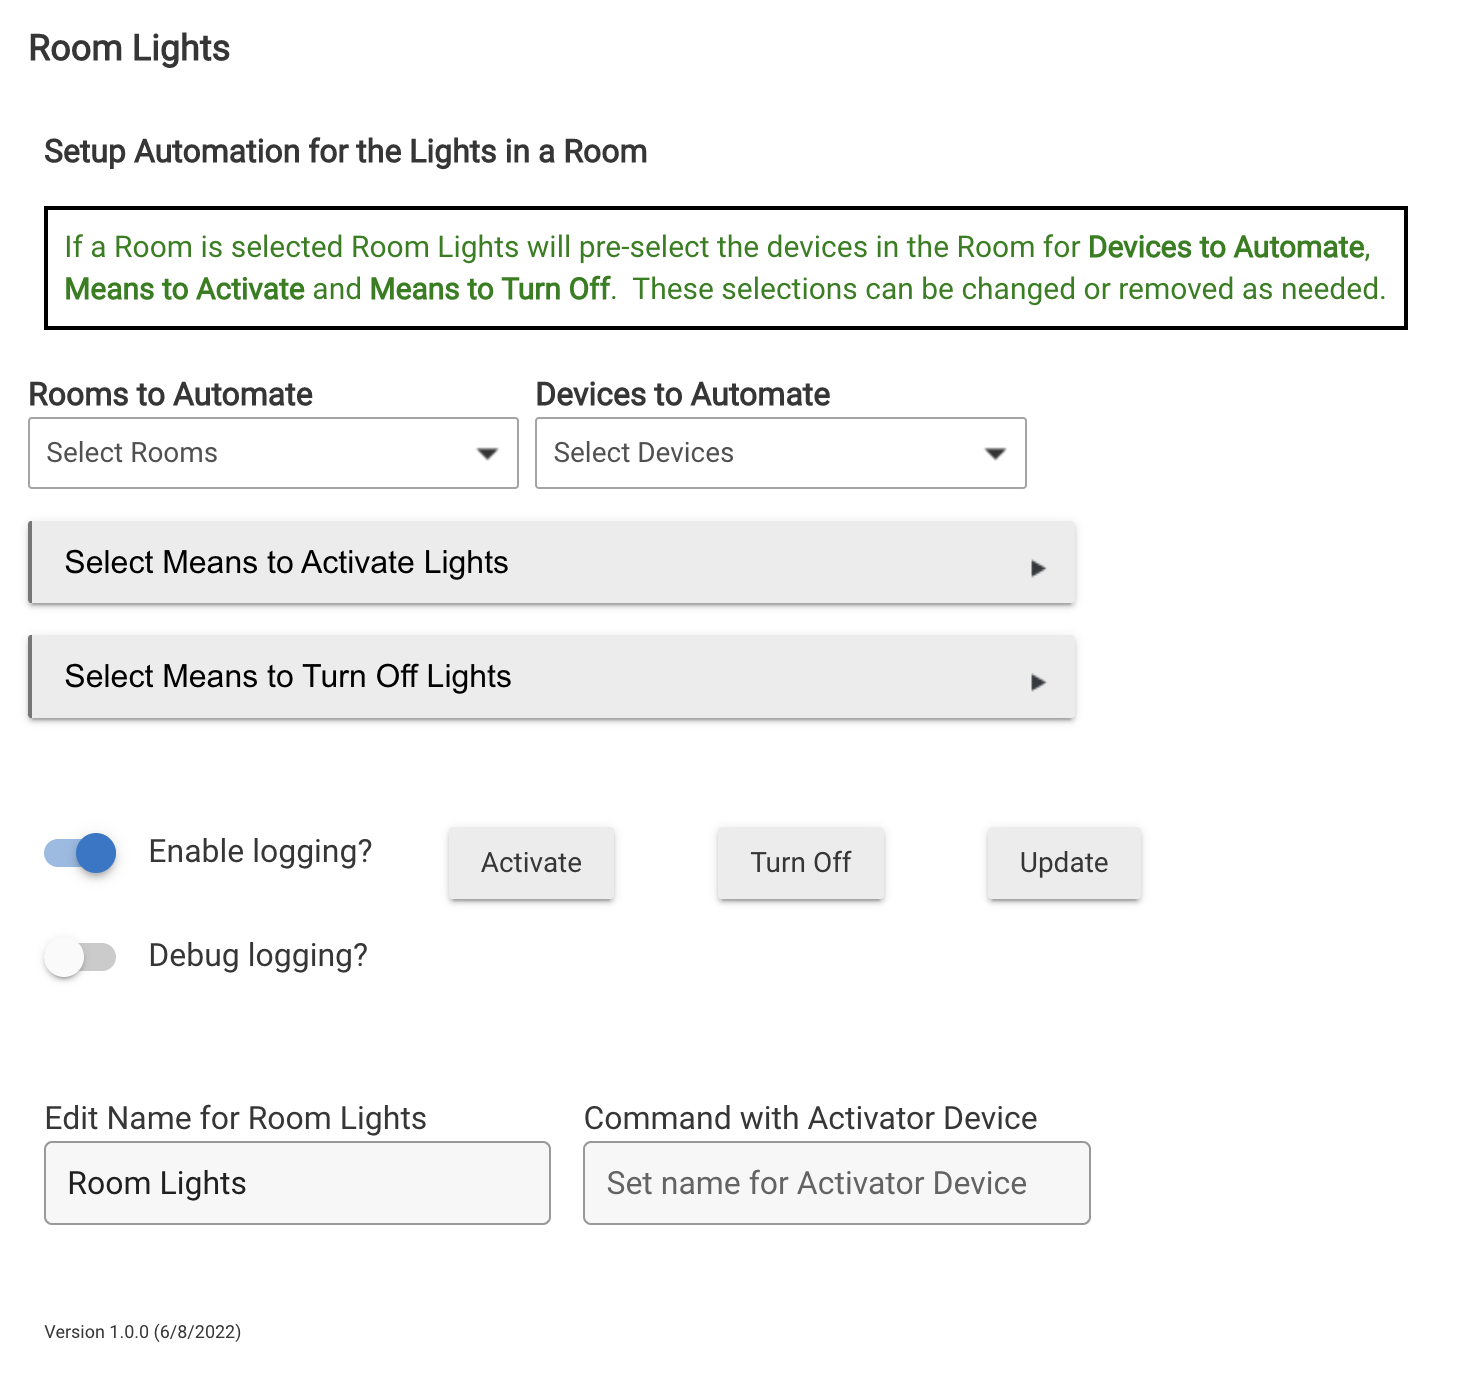
Selecting a Room to Automate
The Rooms to Automate pull-down menu is used to choose one or more rooms to automate:
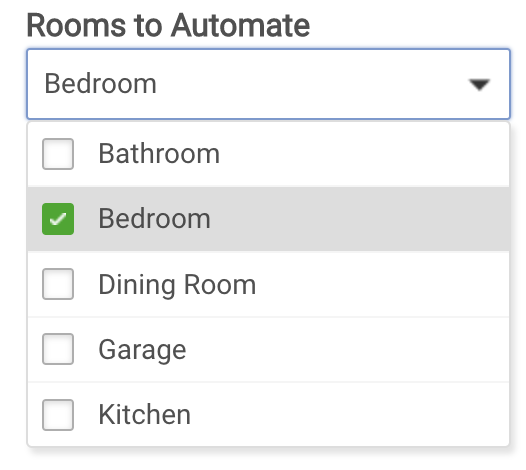
When a room is selected in the Rooms to Automate pull-down menu a number of things are automatically setup:
- Bulbs, dimmers, switches, shades and blinds in the Room are pre-selected as Devices to Automate, and their current settings are captured.
- Motion, contact and Illuminance sensors and button devices in the Room are pre-selected as devices for Means to Activate and Means to Turn Off with obvious initial settings, easily changed.
- The app is setup to work for all Modes; this can be changed to allow specific per-Mode settings.
- The name of the app is changed to the Room name, for example "Bedroom Lights".
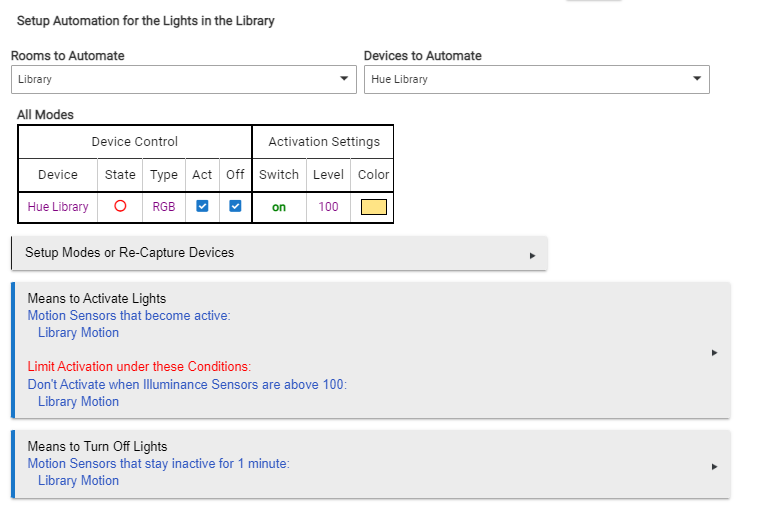
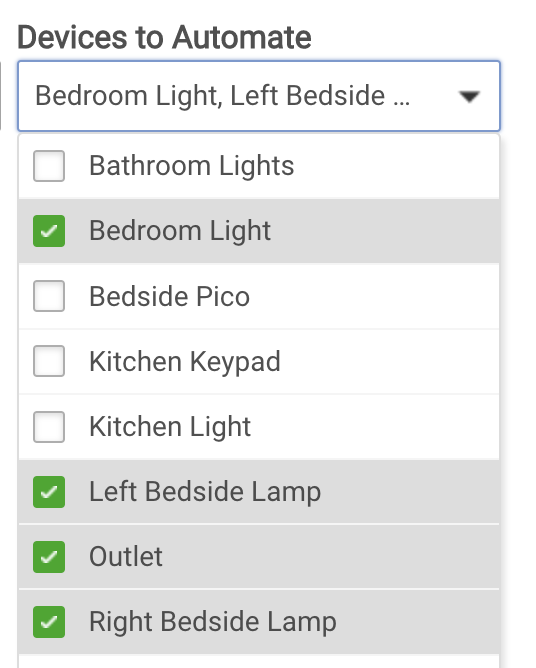
The screenshot below shows the result of selecting Bedroom from the list of Rooms, with all of the automatic settings that result.

Once all of these initial settings are made, simply from having selected a Room, it is possible to modify the settings for your exact needs. Perhaps not all of the devices selected for Activation are actually wanted; these can be de-selected in the Devices to Automate pull-down menu. Or perhaps additional devices should be added for Activation or Turn Off, again using the Devices to Automate pull down.
Means to Activate and Means to Turn Off are also setup automatically, and can be changed as desired. For example, just because there is an illuminance sensor in a room doesn't necessarily mean that it should be used as a Means to Activate or a Means to Turn Off. Each of these automatic settings are easily changed or removed, and additional Means to Activate or Turn Off can be easily selected.
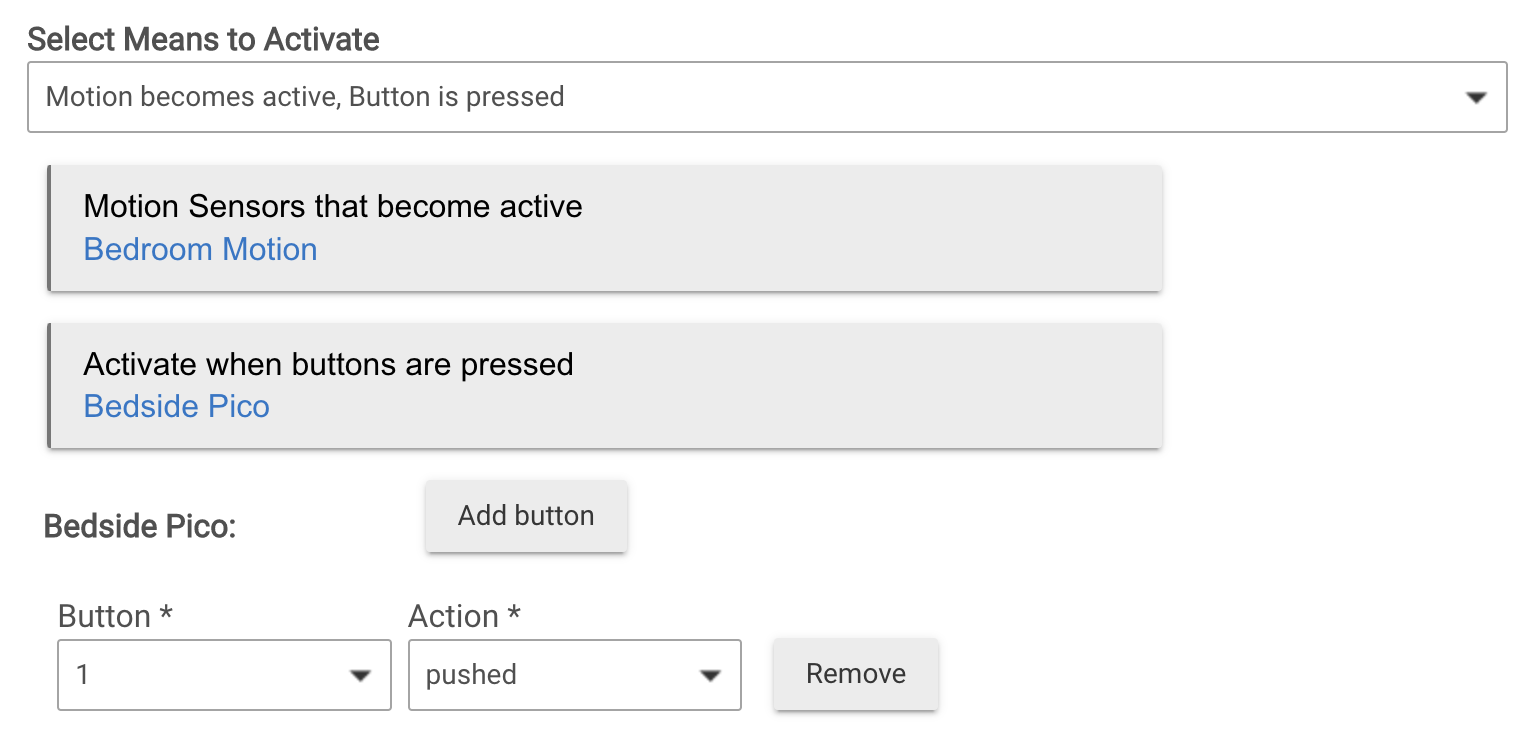
Notice in the example above, that the Bedroom Motion sensor was selected for Activation, and again for Turn Off when motion stays inactive for 1 minute, as well as Bedside Pico for both Activation and Turn Off. These settings are just Room Lights' guesses as to what you would want given the devices in this room. Feel free to customize it to just what you really want.
Selecting Devices to Automate
The Select Devices pull-down menu is used to choose the devices to automate. When a room is chosen, the pre-selected devices are automatically chosen. These could be added to, or some removed from the automation using this pull-down.
While using a Room is one way to select devices for Room Lights, this isn't necessary. Devices to Automate can be used to select any lighting device in your system for automation. The types of devices offered include:
- RGB and RGBW Color Bulbs
- Color Temperature Bulbs
- Dimmers
- Shades
- Blinds
- Switches
- Button Controllers
Once devices are selected using the pull-down menu, their current values are captured and displayed in the device table.
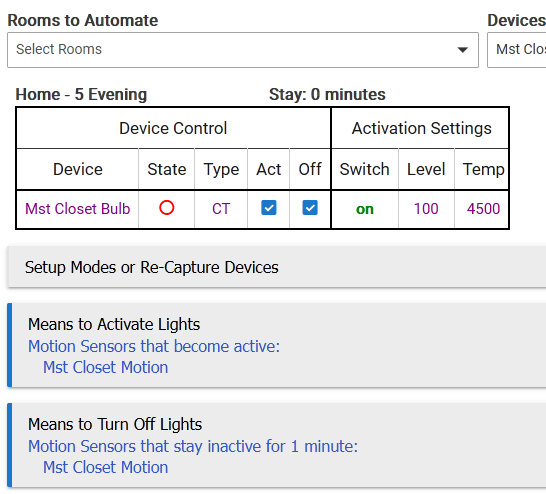
Devices to Automate Table
This table is where the settings for each device to be Activated are displayed and set. These settings are captured when the devices are first selected. The settings can be changed by clicking on them in the table, or they can be re-captured on the page 'Setup Modes or Re-Capture'. If additional devices are added to the selection, they will be captured when added. Button devices are not captured, as these are stateless . These are used to push a button upon Activation, and possibly upon Turning Off -- common for integrated Lutron systems.
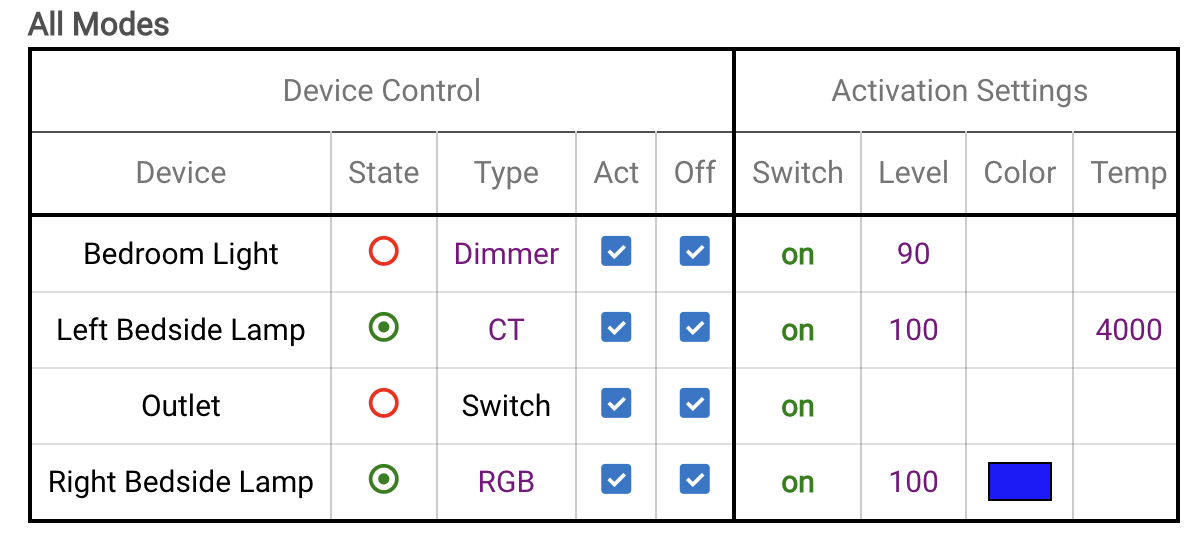
This table is divided into two sections, Device Control and Activation Settings. It shows each devices selected for the automation.
In Device Control columns, State shows the state of the device at the time the page was rendered. By clicking on the circle, the device can be turned on or off. Type shows the type of device as it will be used by the automation. When the text is purple, the type can be changed. For example, controlling an RGBW bulb as RGB versus CT can be selected. Or, a Dimmer could be only turned on/off, not having its level set by the automation, by changing it to Switch.
The two columns Act and Off determine whether a device is Activated and Turned Off or not. Some devices can be Activated, but not Turned Off, and vice versa. For example, an automation can turn off additional lights when the automation Turns Off. These lights must be included here, and would have Act un-checked, but would have Off checked, like this:
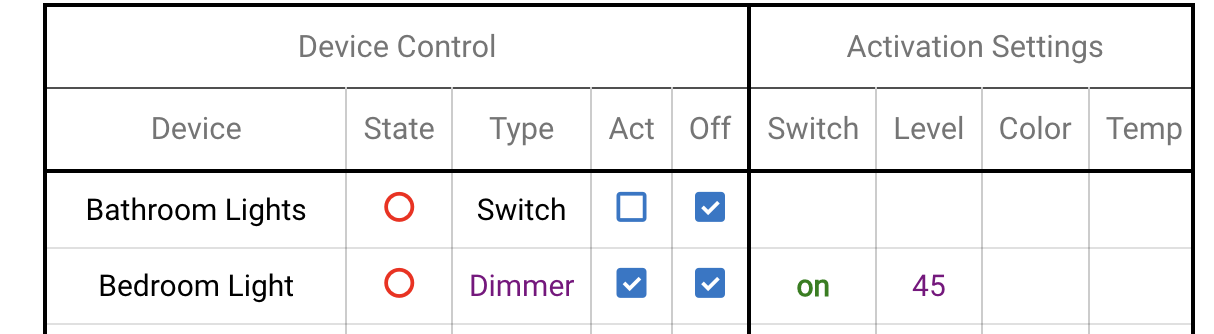
Here, when the Bedroom Lights automation Turns Off, the Bathroom Lights will be turned off. They are not Activated by this automation.
The Activation Settings columns show the specific device settings to be put in effect when the automation Activates. Each of these values can be changed simply by clicking on it, as in this example, after clicking on the blue box for Left Bedside Lamp:

With this table, and these settings, exactly what will happen upon Activation is determined.
Setup Modes or Re-Capture
On this page there are two functions: Modes can be selected for per-Mode Activation, and selected light devices state can be Re-Captured or settings changed. Activation Settings values in parentheses are the current device values, that would become the settings if Re-Captured.
When modes for per-Mode Activation are selected, additional Device Activation Tables are created, one for each mode. The device values are captured upon this happening. The specific device activation values can be changed for each Mode. One way to make this task easier, would be to set the lights the way they should be for a particular mode, and then hit Re-Capture for that mode. The name of the current Mode is highlighted in blue.

When setup for per-Mode use, on the main page the table shown will be for the then current mode.
Activate, Turn Off and Update Buttons
These buttons will Activate or Turn Off the automation for testing. The Update button re-creates app Event Subscriptions and Scheduled Jobs, and does the same actions as the Done button at the bottom of the page, without leaving the app setup. If you add new devices to your system, and want to use them in an existing Room Lights instance, hit the Update button to make them become available in the Devices to Automate pull-down menu.
Control with Activator Device
When a name is entered in the Control with Activator Device field, Room Lights creates a special child device called a Room Lights Activator. Such a device can be used with voice assistants, and is an mechanism to Activate the devices. Such a device can also be used to control a group of devices. This child device is created when a Scene-1.2, Group-2.1 or Scene Transition app is imported into Room Lighting (see this post), and is used to activate the imported Scene, Group or Scene Transition. Similarly, Room Lights can be used to create scenes, groups or transitions, that can be activated by this device (see this other post). When this device is commanded, the Devices to Activate are given the same commands. These commands take precedence over any settings in the Devices to Automate Table, except for Act or Off columns. When Activated or Turned Off by an Activator Device command, Zigbee Group Messaging is utilized for any Zigbee devices in the group.
Select Means to Activate
Room Lights offers a Baker's dozen different Means to Activate the automation:
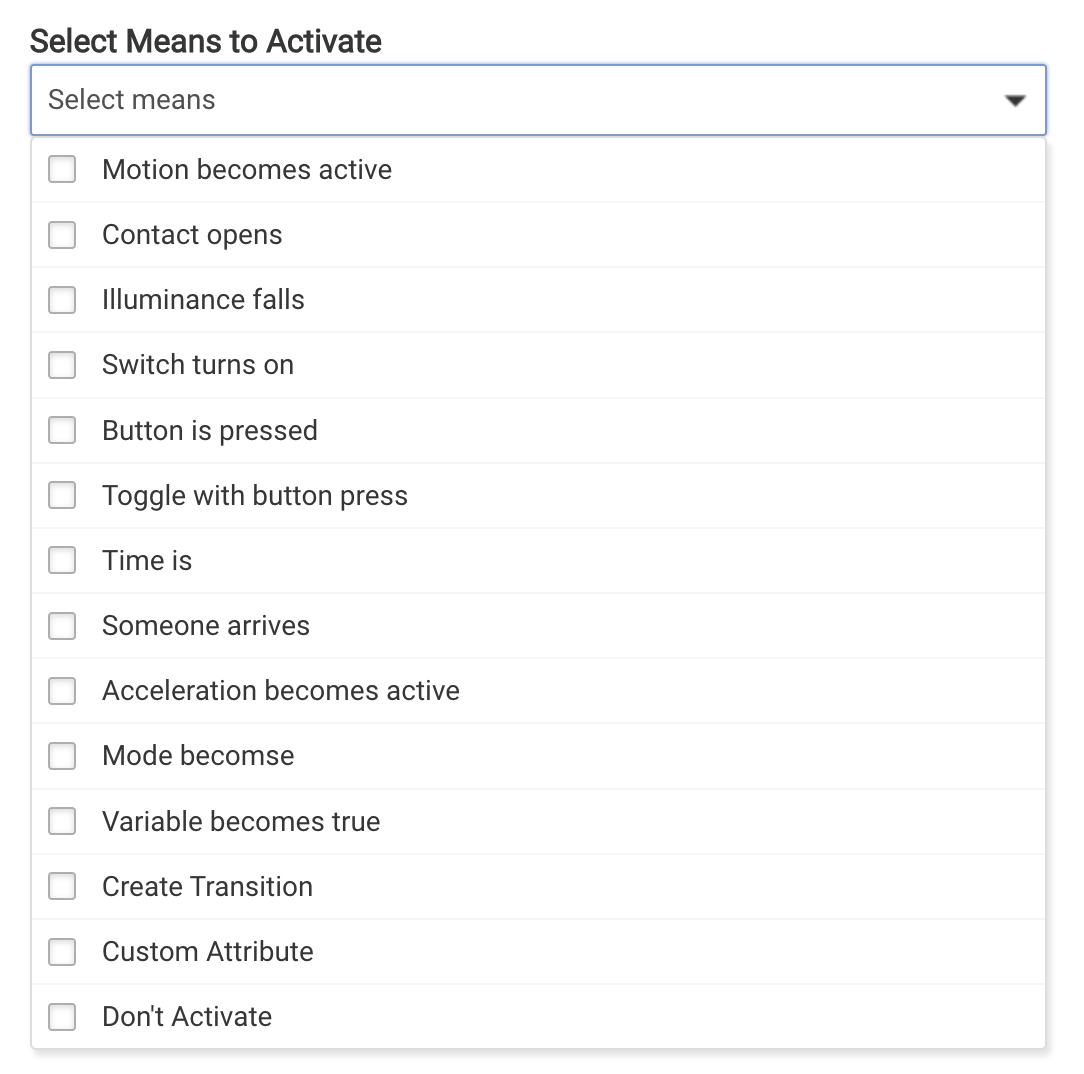
These are mostly obvious. Those that entail a device when selected bring up device selectors:
The "create transition" option is used to create a scene transition between two sets of device settings. Such a scene transition, when Activated, gradually changes the lights settings over a selected period of time at a selected interval. This mechanism is used when a Scene Transition app is imported into Room Lighting (see this post), and can be used to create similar transitions.
The "don't activate" option is used to create an automation that only turns devices off. This is sometimes called "vacancy" automation, and is particularly significant in California where Title 24 applies. Such automations can still use sensors such as motion and contact sensors to cause lights to Turn Off when a room becomes vacant. These are setup under Select Means to Turn Off.
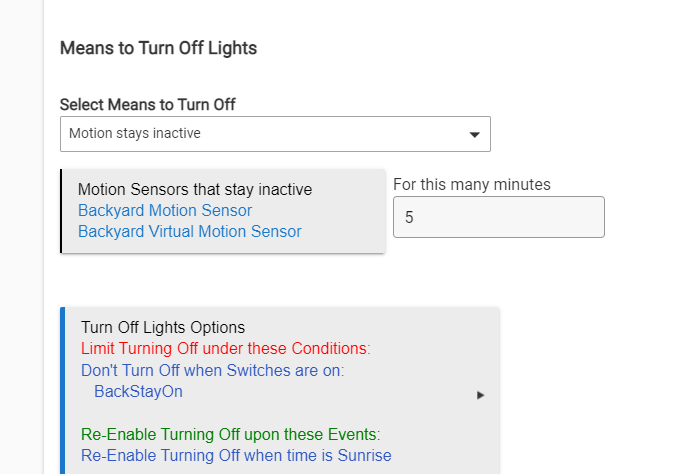
Select Means to Turn Off
Room Lights offers a Baker's dozen different Means to Turn Off the automated lights:
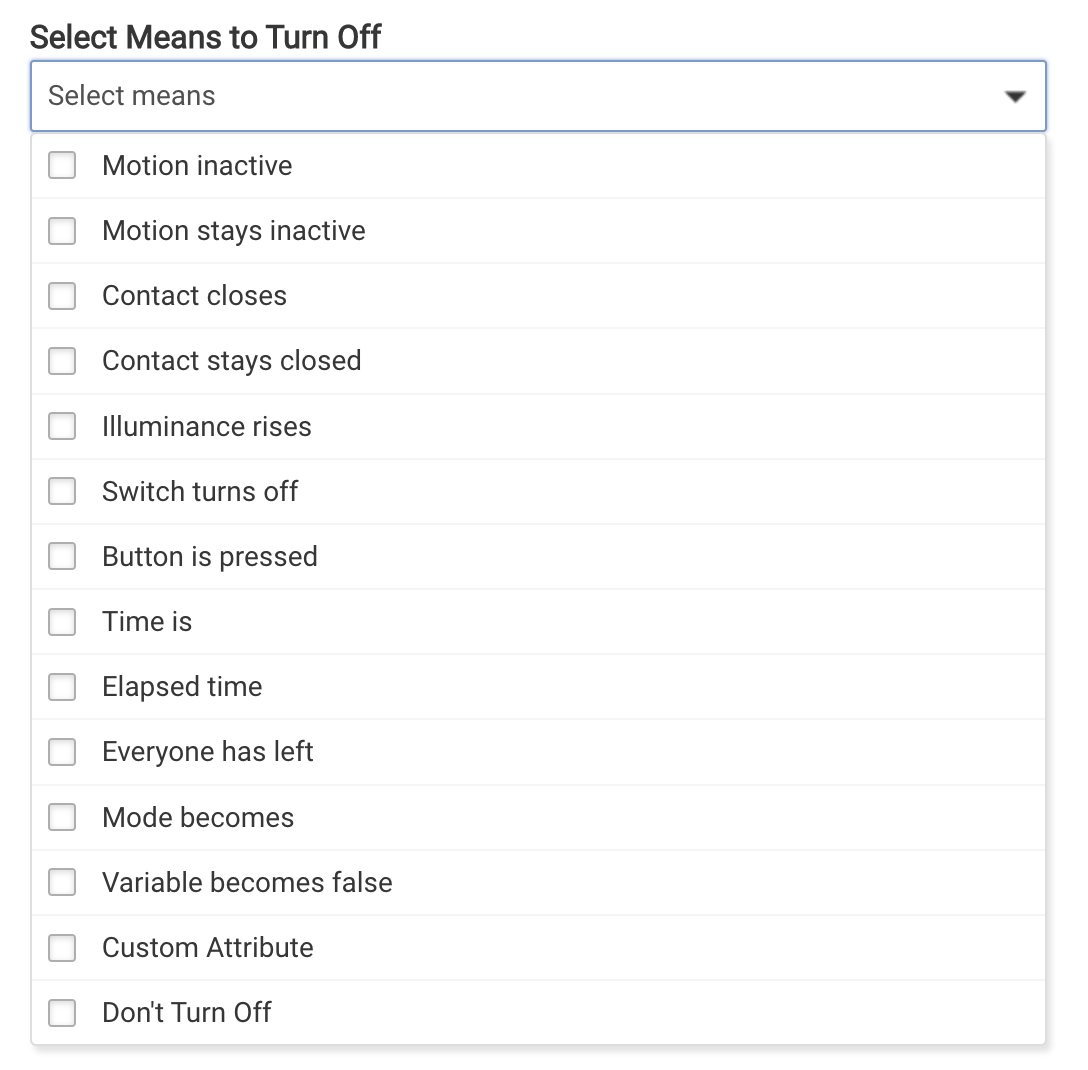
These are mostly obvious. Those that entail a device when selected bring up device selectors:

The "don't turn off" options allows for an automation that activates lights, but does not turn them off.
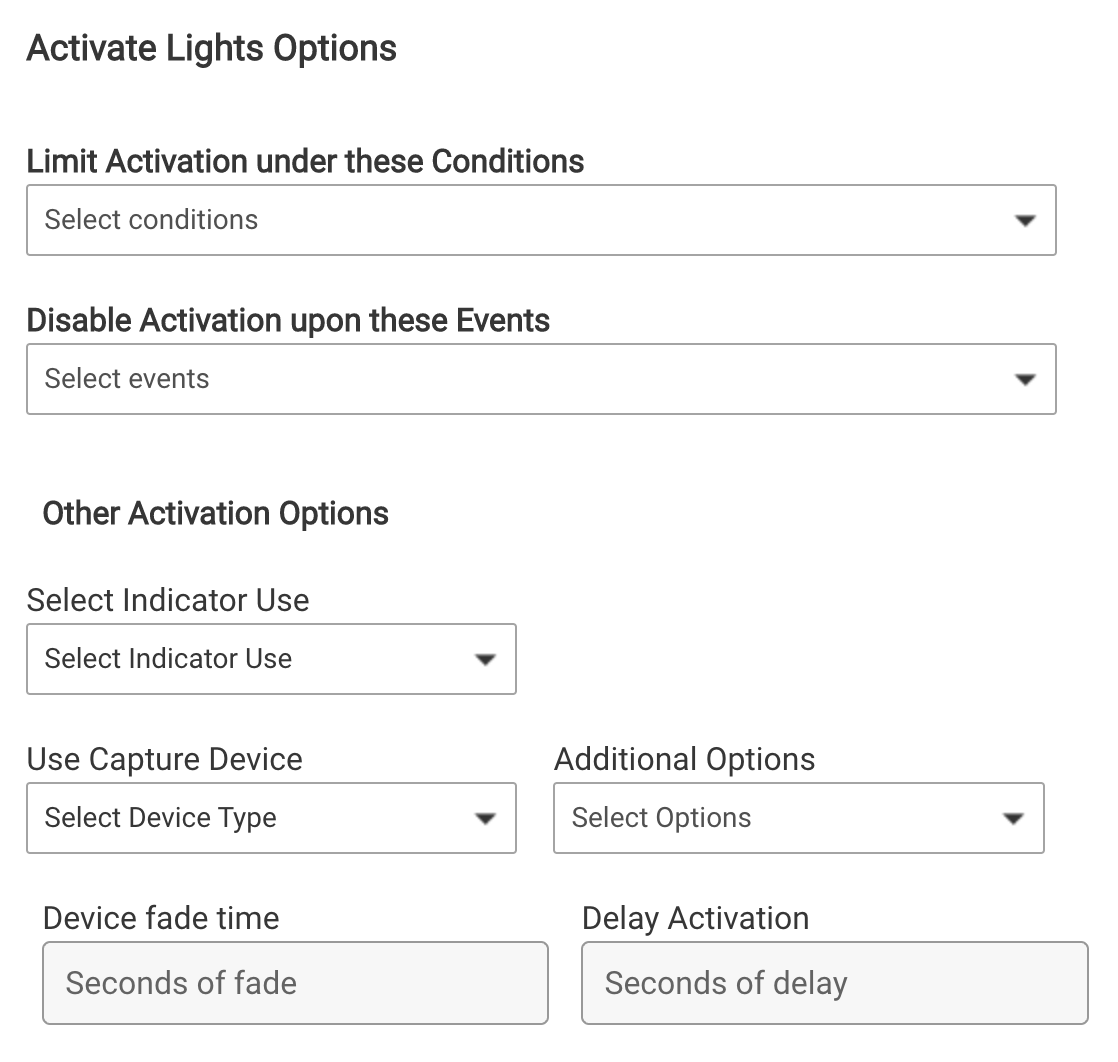
Activate Lights Options
At the bottom of the Means to Activate Lights page there is this link to open the Activate Lights Options page:

On this page are a number of options available that affect Activation. These include
- Conditions that limit when Activation can occur
- Events that Disable Activation and Re-Enable Activation
- Adjust lights on mode changes
- Activate even if already partially Activated
- Activate only Activating switch
- Allow devices on/off irrespective of reported state
- Device Fade Time
- Delay Activation
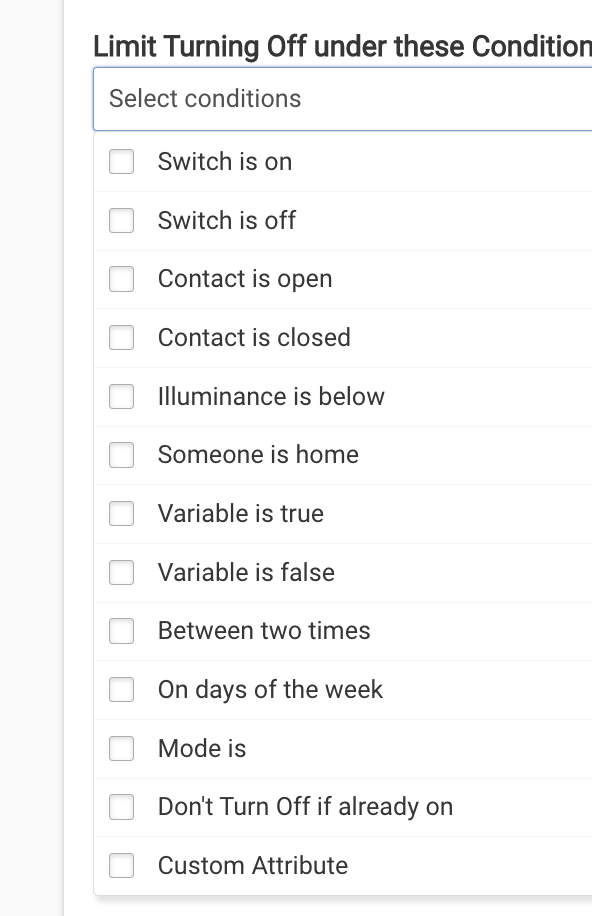
Conditions that limit when Activation can occur
There are a Baker's dozen choices that can be made for conditions that will prevent or limit when Activation can occur.
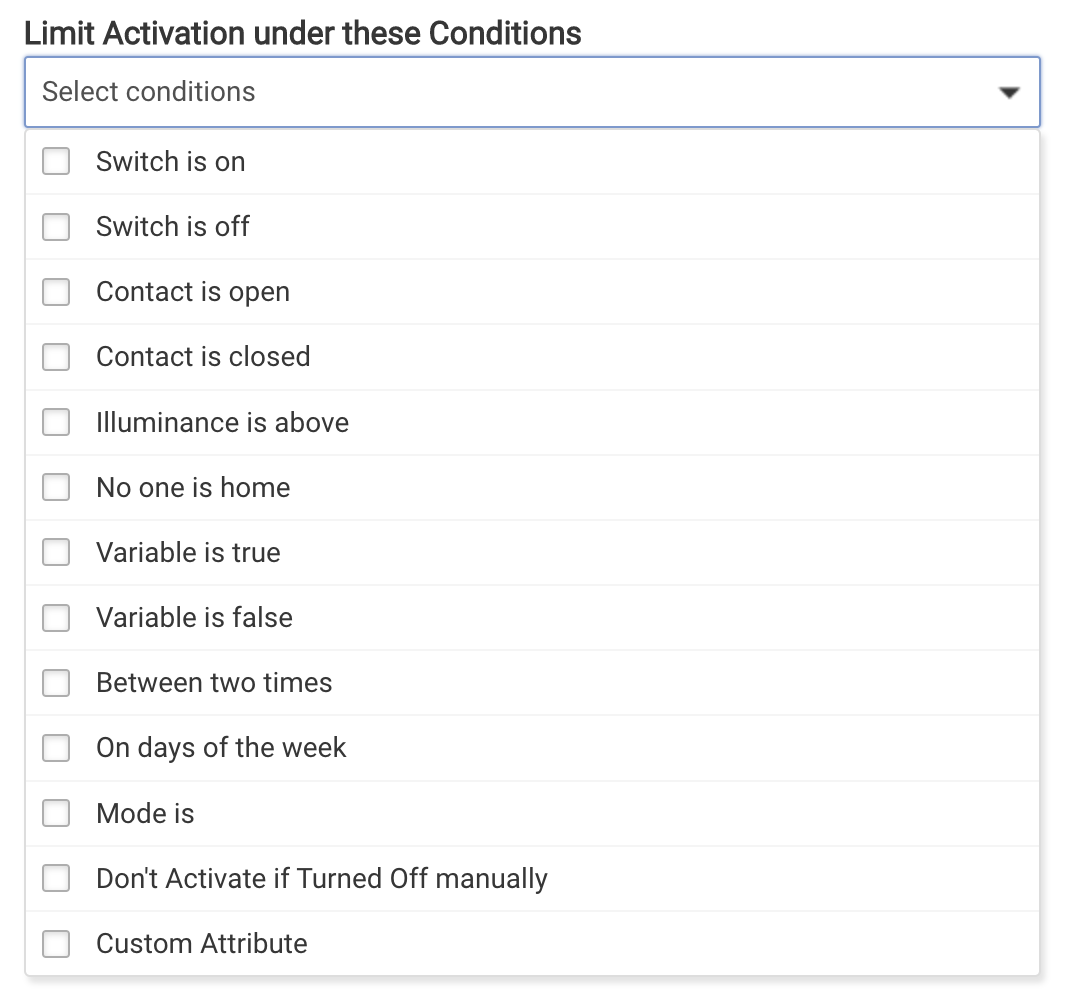
Half of these entail other devices in your system, and when selected appropriate device selectors will be presented. For the option "no one is home", this applies the the presence sensors selected, that is when none of those sensors are present. For switches, contacts and illuminance sensors, if multiple devices are selected, any one of them meeting the condition would prevent Activation.
Events that Disable Activation
There are two choices for events that will Disable Activation until Re-Enabled.

Once a selection is made for an event that would Disable Activation, another pull-down menu is presented for corresponding Events to Re-Enable Activation.

Note that if an Event to Disable Activation is selected, there must also be an Event to Re-Enable Activation selected.
Adjust lights on mode changes
When modes are used selecting this option causes the automation to change to the new modes settings upon the mode change.
Activate even if already partially Activated
Room Lights ordinarily will not Activate the lights if it believes they are already Activated. For some circumstances, particularly where some of the automated lights are turned off independently, it may be desirable for all of them to be turned on when the Means to Activate events occur. This option causes this to happen.
Activate only Activating switch
When Room Lights has multiple switches that may Activate it, especially where more than one device will be Turned Off, this option limits Activation to the specific switch that caused Activation.
Allow devices on/off irrespective of reported state
This option is used when there are devices that do not reliably report their on or off state. Ordinarily, Room Lights will not Activate a light that has reported it is on, nor Turn Off a light that has reported it is off. However, when a device doesn't report reliably, this may cause problems. Selecting this option causes another column of checkboxes to become available in the Devices to Automate Table, called "Force". If the Force box is checked for a device, that device will be Activated or Turned Off irrespective of its reported state.
Device Fade Time
This option allows for a fade time in seconds to be sent to devices. Not all devices support device-level fade time, but those that do will use this value. For many devices, the default fade time can be set in the device preferences. The fade time value entered here would apply to all devices in the Room Lights automation.
Delay Activation
This option causes Activation to be delayed some number of seconds after the Activating event.
Turn Off Lights Options
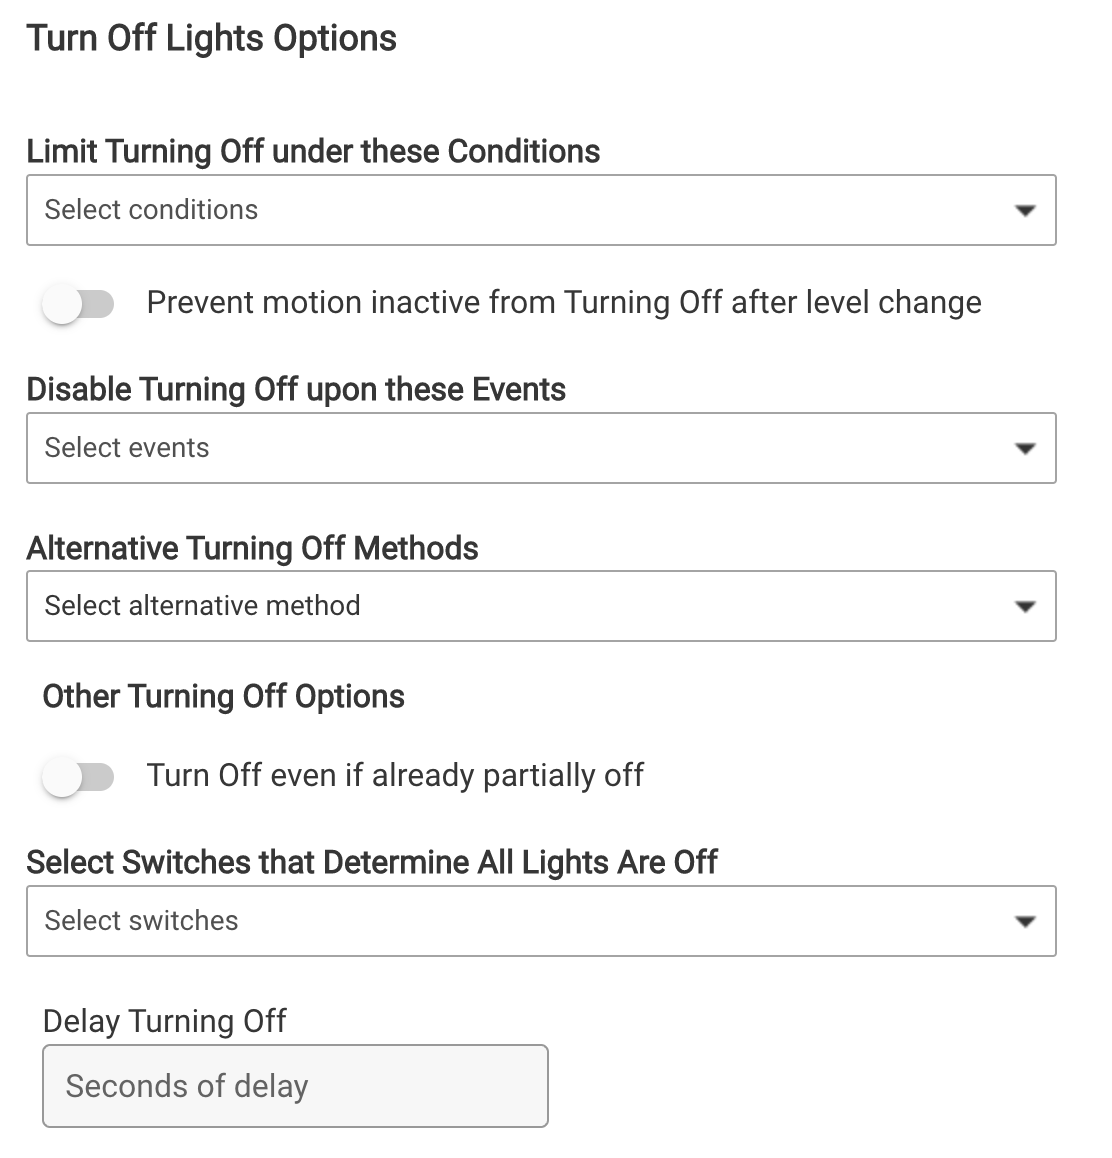
At the bottom of the Means to Turn Off Lights page there is this link to open the Turn Off Lights Options page:

On this page are a number of options available that affect Turning Off. These include
- Conditions that limit when Turning Off can occur
- Preventing motion inactive from turning off after a level change (override)
- Waiting for both motion inactive and contact closed before Turning Off
- Events that Disable Turning Off and Re-Enable Turning Off
- Alternative Turning Off Methods
- Switches that determine all Lights are off
Conditions that limit when Turning Off can occur
There are a Baker's dozen choices that can be made for conditions that will prevent or limit when Turning Off can occur.
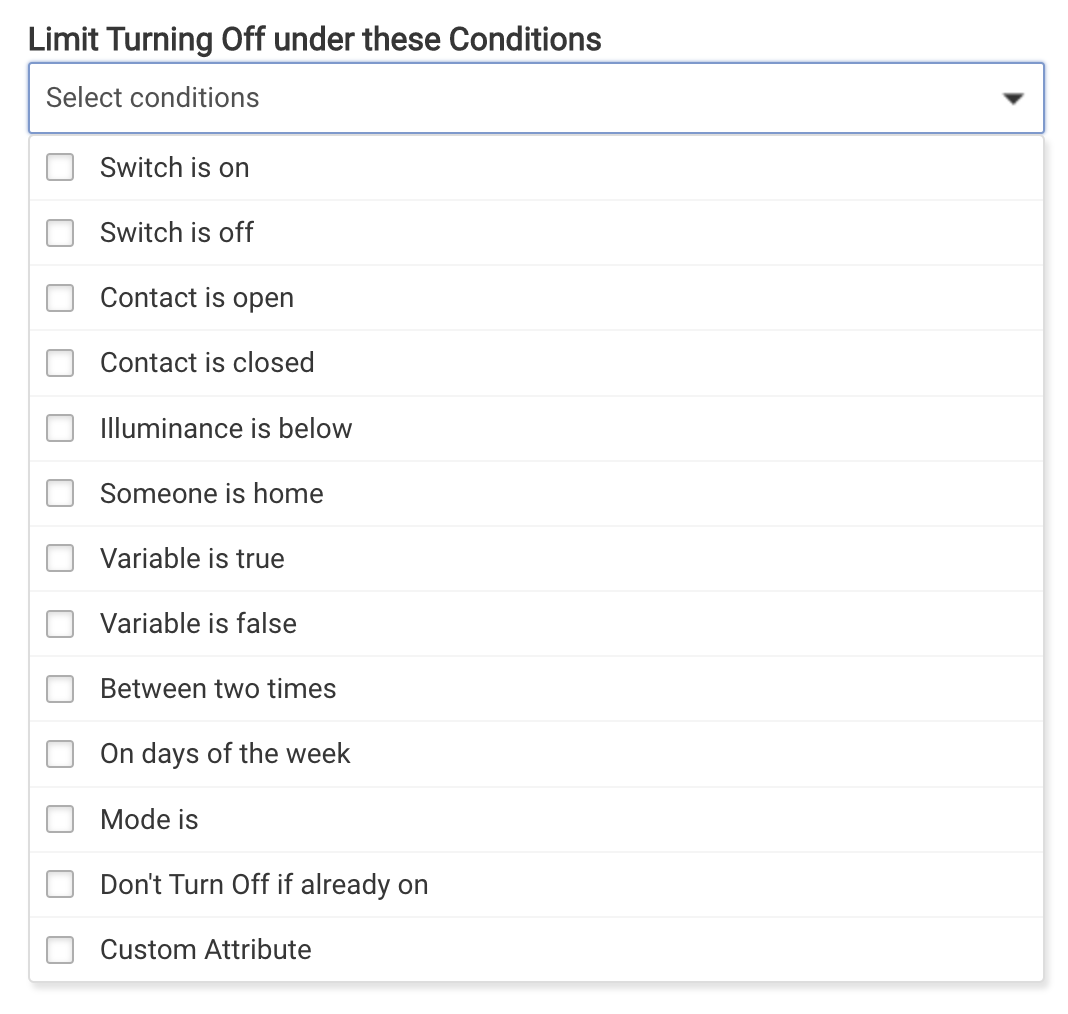
Half of these entail other devices in your system, and when selected appropriate device selectors will be presented. For switches, contacts, illuminance and presence sensors, if multiple devices are selected, any one of them meeting the condition would prevent Turning Off.
Preventing motion inactive from turning off after a level change (override)
In certain lighting circumstances, it is important not to change or turn off the lights if they have been manually adjusted. A good example would be when a dimmer has been brightened in the evening for a makeup mirror area. In general, such a change of dimmer level would not cause the lights level to revert, but sometimes it is desirable that they simply do not turn off at all. If this option is selected, the lights must be manually turned off, and the option for 'Switches that determine all Lights are off' should be selected as well.
Waiting for both motion inactive and contact closed before Turning Off
If both "motion stays inactive" and "contact stays closed" means are selected, an option is presented that allows for waiting until the time and conditions for both have run their course before turning off. The longer of the two times selected is used.
Events that Disable Turning Off
There are two choices for events that will Disable Turning Off until Re-Enabled.

Once a selection is made for an event that would Disable Turning Off, another pull-down menu is presented for corresponding Events to Re-Enable Turning Off.

Note that if an Event to Disable Turning Off is selected, there must also be an Event to Re-Enable Turning Off selected.
Alternative Turning Off Methods
As an alternative to simply turning off the selected lights, Room Lights can set the lights to other settings upon "Turning Off".

When either of the 'Use preset settings for off' are selected, a Device Setting Table will become available on the Setup Modes page. In the case of 'setting for off per mode' there will be one of these for each mode. These tables allow the specific settings to be made for 'Turning Off', including the ability to capture these settings.

There is also an option to make the transition to these 'preset settings for off' over a period of time, by selecting the transition time in seconds. This will also offer an interval for each step in the transition, and an optional switch to stop the transition.

Switches that determine all Lights are off
For some automations, especially those that either don't turn off the lights, or that entail using buttons to Activate and Turn Off the lights (e.g. Lutron systems), it may be necessary to choose those devices that determine that the automation is no longer Activated.
Enjoy Your Elevated Home!
Your home will offer you the most comfort from your efforts to automate it when you get the lighting working just the way your family likes it. This is surely one of the most rewarding aspects of using Hubitat Elevation. Room Lighting is the key to getting your lighting ambiance automated to perfection.