Special thanks to @mike.maxwell and @keithcroshaw for inspiring this work, and to @ogiewon, @ghesp Greg Hesp and @cwwilson08 for the code necessary to make this possible.
Just an important note if you have not had your morning coffee. This is about Alexa TTS, and yes it does use Google Assistant, strange as that seems, but that's primarily a way to activate a SmartThings DTH, and that will then be detected by Alexa to trigger a routine and speak a custom phrase you enter into the Alexa app. The bonus of doing it this way, is you have then also setup Google Assistant Relay, so if you have a Google Home (or maybe this will make you at least pickup a Mini to play with), then you can make it speak too. But owning a Google Home device is not at all necessary. You only need to own some sort of Alexa device. Aside from the Node.js server, everything happens in the cloud.
There are now a few methods for getting Alexa TTS to work from Hubitat. Be sure to check out @keithcroshaw 's method using OtherHub2, @cwwilson08 's method, and @ogiewon 's method.
The method I've documented here isn't the most flexible, but it is entirely via official routines, so there's almost no chance of it breaking, unless any of the three (Amazon, Samsung or Google) decide to deprecate the needed features. It also gives you a way to make a Google Home speak via TTS if you don't already have that setup.
Before You Start
- You will need an Amazon Echo or Alexa compatible device
- A Samsung account or an existing SmartThings account (no hub required)
- A computer or Raspberry Pi to load Node.js onto
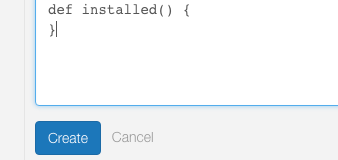
Copy this code from Chris Wilson @cwwilson08 It is a SmartThings DTH (Device Type Handler) that will mimic a motion sensor output when a switch is digitally turned on within SmartThings.
metadata {
	definition (name: "Virtual motion with Switch", namespace: "cw", author: "cwwilson08") {
		capability "Sensor"
		capability "Motion Sensor"
        capability "Switch"
	}
}

def on() {
    sendEvent(name: "motion", value: "active")
    sendEvent(name: "switch", value: "on")
    runIn(12, off)
}

def off() {
    sendEvent(name: "motion", value: "inactive")
    sendEvent(name: "switch", value: "off")
}

def installed() {
}
Getting Started
- Create a new SmartThings IDE account or log into your existing account
https://account.smartthings.com/

If you don't have an existing SmartThings account, choose Sign In with Samsung Account. New accounts must now be created with a Samsung Account, but this will not change your capabilities on the IDE one bit.
-
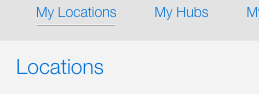
If you never have, or no longer own a SmartThings hub, you don't need to, but you are going to need to create a Location in the IDE. Click on My Locations at the top left of the screen.
-
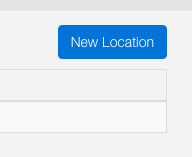
Click the blue New Location button on the top right.
-
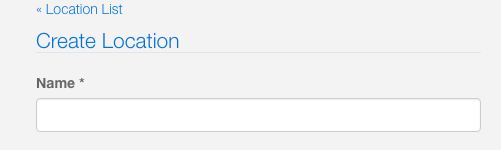
Give your Location a name and click the blue Create button at the bottom. Can be any name you want, like "Virtual Hub" for example.

-
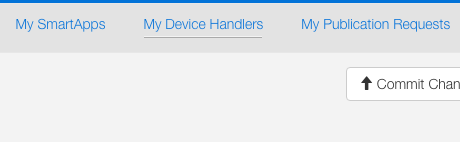
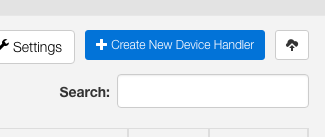
Choose My Device Handlers at that top, then click the blue Create New Device Handler button on the top right.
-
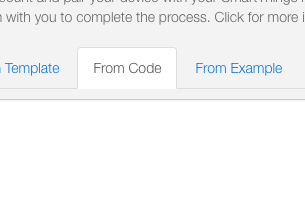
Select the From Code tab and paste the code copied at the beginning of the post and click the Create button at the bottom
-
You should see the DTH show up in your list of Device Handlers . It is not necessary to publish the code. It still works without, but if you're an old salt with SmartThings and you want to do that, go right ahead. It won't matter either way.

-
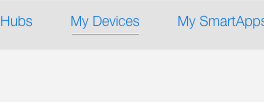
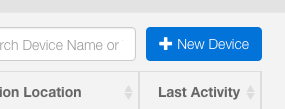
Ciick on My Devices at the top, then click the blue New Device button on the top right.
-
There are only three fields you must fill-in and one drop-down selection you must make.
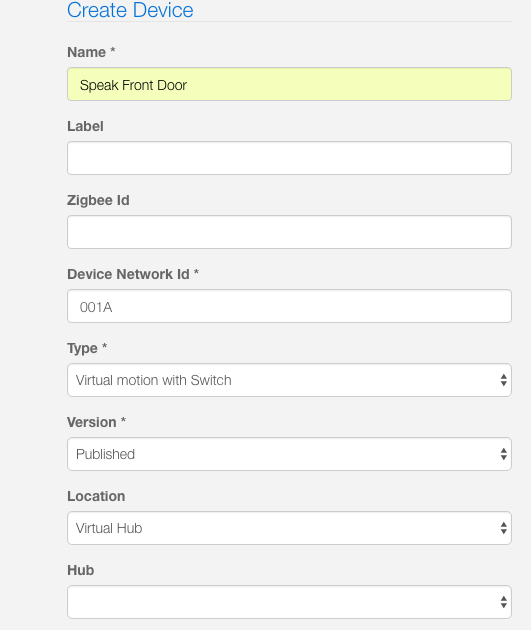
a. Name - I recommend you name your device handler for what it will announce. For example, if you want Alexa to say Front Door anytime your front door is opened, then name it something like, " Speak Front Door" so you can easily identify the device in the Alexa app, and know right away what it is intended for, and won't be confused with a real front door contact sensor.
b. Device Network Id - Same as when you create a virtual device in Habitat. The "Device Network Id" field for devices you create can be anything you want, as long as it is unique from existing device IDs.
c. Type - Click on the drop-down menu, scroll to the bottom, and select "Virtual motion with Switch" from the list
d. Version - This field will show Published by default. Change it if you want, but it won't make a difference to this procedure either way.
e. Location -Select either the virtual hub you created in step 4 or your actual SmartThings hub if you own one.
-
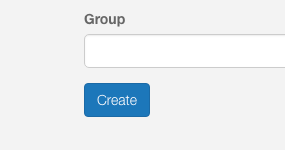
Click the blue Create button
-
You should now see your device(s) in the list. Using the same DTH, you can make Alexa say as many different things as you want. You can now leave the SmartThings IDE if you're done creating devices.
-
Sign into your Alexa app on your phone or tablet and add the SmartThings skill.

Now when a digital event (e.g. contact closes in your SmartThings location, it will simulate a motion event you can used in an Alexa Routine to trigger it to speak a custom phrase you enter in the Alexa app. You can download the SmartThings Classic app and test this if you want. You'll see your Devices in the list of "Things".
Making the Alexa Routine speak your custom phrase from Habitat
-
If you don't already have one, you need to create a Google account for use with Google Assistant.
-
Once your Google account is setup and you have the Google Assistant app on your phone or tablet, add the SmartThings account to your Google Assistant account.
-
Follow these instructions to setup Google Assistant Relay on your Node.js server. Your going to need a Node.js server, but it's really not that hard to do. It is easiest with an old laptop, and not too hard with a Raspberry Pi either.
- Install the Hubitat Google Assistant Relay driver from @ogiewon
Configuring Google Assistant to make Alexa speak
-
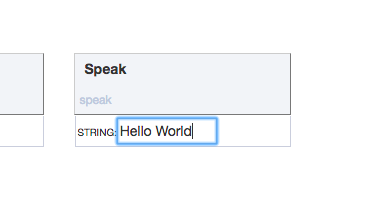
Now that Google Assistant Relay and the Google Assistant Relay driver for Habitat are setup and configured, you can test it by typing a phrase in the "String" field below the Speak button and click the button If you have a Google Home. You'll hear a tone and then the phrase you typed will be spoken, but again, it is not necessary to own a Google Home in order to make Alexa speak.
-
In the String field below the Speak button, type [CC]hey google, turn on Speak Front Door (or whatever the name of the DTH was that you assigned in step 9. This will not speak the phrase on your Google Home device if you own one, but it will turn on the DTH in the SmartThings cloud. Alexa will detect that as motion has been triggered for that device and that will trigger the Alexa Routine to speak your custom phrase.
Note: If you are a Google Home owner, you can also use [CCC] followed by a command and this will also control anything that is compatible with Google Assistant, but will also give feedback. As an example, if you type [CCC]hey google, turn on the kitchen light , Google Assistant will turn the light on and then reply that it has done that.
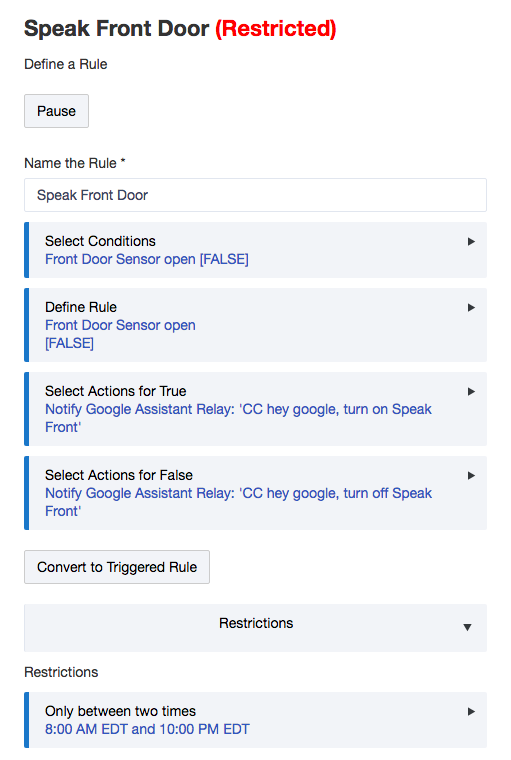
- Now simply create a Rule Machine Rule and just use [CC] before the command. As you can see in the example here, when the Front Door contact sensor opens, RM sends [CC]hey google, turn on Speak Front Door, and this silently commands the SmartThings DTH to turn on, which as we already discovered, creates a motion event on SmartThings, which causes our Alexa Routine to speak the custom phrase you enter into the Alexa app
It seems like this would not be an efficient way to make Alexa speak, and from a setup perspective, it most certainly is not. However, it is fast. My average response time has been 4 seconds from when the door opens, to Alexa speaking "Front Door". Again, if you just want to make Alexa speak, there are other methods, but this one gives you the ability to make both Alexa and Google Home speak, and the [CC] functionality that Dan added also lets you control any device from Habitat that is supported by Google Assistant, but not yet supported by Habitat.