How To: Hubitat Battery Backup solution plus Automatic Shutdown after a power Failure

So I thought I'd post a guide on how to do this as apparently quite a few folks would like this capability. The reasons for adding battery Backup to your Hubitat are varied but here are a couple:

  • Prevent Hubitat Database Corruption in the event of a power outage
  • Enable a graceful sahutdown of your Hubitat in the event of a long duration power outage
  • If you are using HSM as your alarm system, your battery powered security devices will still work

Just a few things to note first:

You need to use a Networked IP device (with a static / fixed IP address) that is not on battery backup, doesn't crash for no good reason and becomes unresponsive, or your Hubitat will assume the power is out. It also needs to power back up when power is restored. I'm using my Raspberry Pi Workshop Computer and it works great (UPDATE: I'm now using one of my Synology MR2200ac Mesh Router's with a fixed IP).

  • Get a battery backup system for your Hubitat. Make sure you buy the exact UPS device specified - there are lots of similar devices that do not provide continuous power when the power is cut. (buy a few units as QC can be hit and miss, I had 3 out of 4 work)
  • Buy a Genuine, known Brand, good quality, 3500 mAh Cell - these are good for over 7 hours of runtime for a Hubitat C7.
  • Get a nice 3D printed case to make it look professional - White plastic lets the status lights shine through the bottom which looks very cool.
  • Install Hubitat Hub Controller via Package Manager
  • Create a new virtual device named "Hubitat Controller" and change the driver to Hubitat Hub Controller .
  • Install HTTP Presence Sensor via Package Manager
  • Create a new virtual device named "" and change the driver to HTTP Presence Sensor
  • Point your "Presence Sensor" device at a suitable IP device that will respond to HTTP commands and isn't on battery backup. Make sure you put HTTP:// in front of the IP address
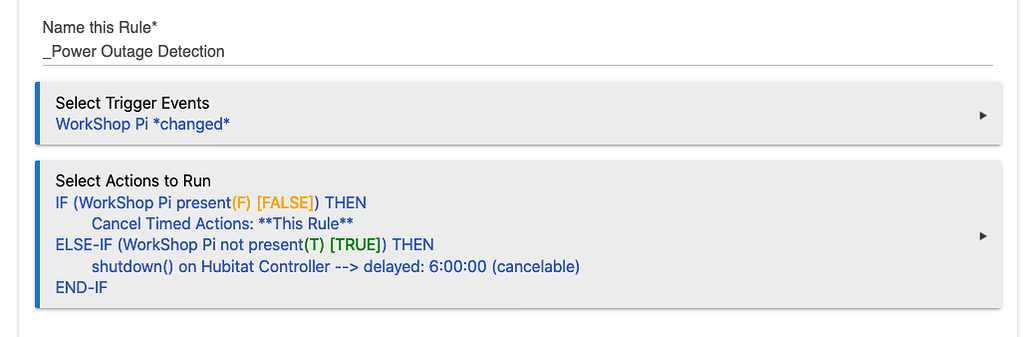
  • Setup a Rule Machine rule using a "Custom Action" to call a "Hubitat Hub Controller" shutdown and glue it all together. I use a 6-hour timer because my backup unit can run my C7 for over 7 Hours. This rule has auto-cancel enabled so if the Power is restored before the timer runs out, it will cancel the shutdown.

RM Code:
IF (Workshop Pi present(T) [TRUE]) THEN
Cancel Timed Actions: This Rule
ELSE-IF (Workshop Pi not present(F) [FALSE]) THEN
shutdown() on Hubitat Controller --> delayed: 6:00:00 (cancelable)
END-IF

Here's mine with some of my Network gear:

14 Likes

guestimating on the run time is not the best solution.. I use a apc smart ups smt1500 with a network card and have a driver i have written that gets the actual run time remaining and/or battery percentage on the ups and i shut down based on that.. Just becuase it was 6 hrs one itme doesnt mean it will not be 4.5 hours a year later.

I've tested it (as have many others), plus I've had it work flawlessly in real world conditions. It ran for 6 hours, shutdown and then was in standby for another 2 before I woke up and powered off the Battery Backup.

1 Like

i don't doubt that.. but i've seen batteries degrade over time quickly.. there is no guarantee it will lik ei said in couple of years.. All I am saying is that there are more foolproof methods.. But to each his own.

That's why it is important to buy a good quality, brand name battery from a trusted source.

4 Likes

Is that an IKEA shelf? I used to have all my stuff mounted like that as well.

1 Like

Yep, it’s the big 4x4 bookshelf, I forget what they call the range now.

I dont have a basement (they are rare in Aus) so all my network gear is in my Study.

I was doing the exact same thing when I was in a small apartment. I found those IKEA pieces very versatile, and also cheap enough that I didn't mind drilling holes into them.

1 Like

Missing one important step.

  • Create another new virtual device named "Hubitat Controller" and change the driver to Hubitat Hub Controller.

Otherwise you cannot create the 'shutdown() on Hubitat Controller --> delayed: 6:00:00 (cancelable)' action in RM.

Might be obvious to someone comfortable with RM, but I struggled for quite a while trying to find the right action in all the drop down lists, before I figured this out.

I have a networked printer so I used its IP address to check for power loss. I have my NAS and hubs on a dedicated UPS with an uptime of about an hour, so I set the shutdown delay for 50 minutes rather than 6.

3 Likes

Good point, I definitely assumed ppl would figure that out (I've updated the instructions).

I do too but my printer powers off at the slightest glitch (we get a lot of sub 2 second outages) and doesnt turn back on (has a soft power on/off switch).

Turns out this isn't working for me, and the iPhone Wifi Presence Sensor is not the right driver to use for this purpose.

The driver makes an HTTP GET call, then examines the result. Any response other than a 408 and a reason-phrase containing "Connection refused" is considered to be offline.

My printer returns a 401 Unauthorized response, so the driver thinks its offline.

I'm pretty sure you didn't write that driver, but there's a number of things that make it unsuitable. First, it really makes no sense to check the HTTP response code. All we're interested in is whether the target device is online. If any response is returned then it must be online; therefore it doesn't matter what the content of the response is.

If there was no response, then either the device is offline or the URL specified in the virtual device's configuration isn't a valid HTTP endpoint.

Second, testing the reason-phrase for specific text is bad practice. There's no standard that says a 408's reason-phrase must contain "Connection refused". It may be something similar, something in another language or it may not contain any text at all.

A quick fix is easy. On line 129 of the driver change:

if (response != null && response.status == 408 && response.errorMessage.contains("Connection refused")) {

to

if (response != null) {

There's no need for the log message on line 130 either, so the entire line can be deleted.

Only problem is that if this driver is also being used to detect an iPhone, it might not work properly anymore. And if Package Manager updates the driver, the changes will be lost. I'll probably fork this driver and write another one that's more generic.

If this is really working for you, then the device you're testing must also return a 408.

1 Like

Correct I didnt, but I did specify:

I'm using A Rasberry Pi and it works perfectly.

To be fair, my "solution" is just a moderately clever kludge. If there was a better tool out there for pinging IP devices I'd be keen to test it and update the instructions if it works.

Don't misunderstand, your solution is definitely clever. It just won't work unless the device you're testing for presence returns a HTTP 408, which your Pi must be doing.

The driver's author has another driver ([UPDATED] HTTP Presence Sensor), but that really isn't any better for this purpose as it checks for a HTTP 200 response.

For your solution to work generically, it just has to test for any response. A device that's offline isn't going to respond so that's the only test needed.

I agree that an ICMP Ping test would be better, but I haven't found a suitable tool on HE that can set presence using this method. I might look at modifying the iPhone tool and see if I can replace the HTTP response test with Ping.

Cheers.

Actually the [UPDATED] HTTP Presence Sensor driver does work for my particular case, since my printer has an HTTP server and responds with an HTTP 200. Fortunately it also has a setting to restore its prior on/off state after a power outage.

A ping test would be good for devices that respond to pings. I think you'd have to use sendHubCommand() with an appropriately configured HubAction object. Getting too tired or else I'd take a stab at it.

Thanks for posting your solution, it's working great for me.

2 Likes

Nice, I didn't realise this device was available - it doesn't work for any of my IP devices (no idea why) but I'll add it as an option to the instructions.

Did you specify a valid URL? The iPhone driver wanted an IP address; this driver wants a complete url, e.g. http://10.0.0.5 (or https if appropriate).

If that's not the case, then in the settings for the virtual device you set up as the presence sensor, turn on Enable Debug Debug Logging. Then go to the Log page and see what shows up. You should get a log entry every minute. If your device doesn't return an HTTP 200, it will register as non-present.

1 Like

Actually I didn’t :man_facepalming:

I’ll retest today.

Ok I tested it against one of my wired mesh Routers and the HTTP Presence detector works great - much better than the iPhone detector for this purpose (it got auto-blocked after a couple of pings to a router).

I've updated the Instructions to use the HTTP Presence Sensor only - it's definitely better than the iPhone Presence sensor for this purpose as it works with more device types.

Just as an aside; I've plugged my C7 and battery backup into my Power meter and boy is this thing efficient!!! It positively sips power - on average it's drawing 1.6 watts with the occasional spikes up to 3.8 watts when the battery has been drained a bit and is being charged.

At 1.6 watts (0.01A), that's only 0.0096 kWh's of energy used in 6 hours! :scream: Even at the worst case of 3.8 watts power draw (0.022 A), that is only using 0.0228 kWh's of energy in the same time frame!

No wonder a 3,500 mAh battery can run for 6+ hours without issue! :grin:

1 Like