Garage openers

Hi everyone,

I have read through many of the threads about garage door openers. Seems like most have just gone with the Linear/GoControl unit. Which would be great if I had the ability to use a dry contact. I've come to learn that the Ryobi unit I have doesn't have contacts (Yes, it's the "smart" one with wifi and only works with their terrible app and has no integrations to anything. It was on sale!). I've gone as far to look at new Chamberlain/LiftMaster and Genie units but from what I can tell none of them have contacts anymore. The wall controls are just wired for power then use RF to the power head.

So at this point I'm thinking about using a relay (below) soldered up to a car remote along with tilt sensors to open the doors. This seems like the easiest way to get this done, albeit not the prettiest or most ideal. Thoughts? Suggestions?

https://www.amazon.com/dp/B01MSEG2J1/ref=cm_sw_em_r_mt_dp_U_0PPaDb12D266Z

https://www.amazon.com/dp/B008D5066C/ref=sspa_dk_hqp_detail_aax_0?psc=1
(Preferably the MiMO2+ as I have two doors to open)

Edit: cleaned up links

You may find that the following device will do the trick.
I did not use it, so your mileage may vary.

"
For your installation, you would use our Universal Security+ 2.0 Interface Module (CAS-UNIVERSAL). The wires marked INPUT will connect to the control wires from your GD00Z-4 device, and the wires marked OUTPUT will connect to your garage door opener (to the same terminals that the wall control connects to -- the red & white terminals). The module will wire in parallel with your existing wall control, and you will not lose any functionality of your wall control. I assume that the wall control is what you're referring to when you ask if your push button will still work.

Here is a link to the Universal Module:

https://www.creativeaccesssolutions.com/Universal-Security-20-Interface-Module_p_13.html
"

Thanks @jtmpush18, unfortunately the Ryobi doesn't have any contacts to hook up to - the wall opener is RF and battery operated.

It appears there is a public accessible API. This setup along with a raspberry pi running an omni thing device should allow you to implement something to allow you to control it. If you want me to walk through more details, let me know.

@Ryan780 I read a bit about someone on ST doing this, perhaps the same thing? Definitely would like to hear your insight on this.

Maybe this? https://www.reddit.com/r/homeautomation/comments/7sux8z/ryobi_garage_door_api/

If so, may be outside my depth with setting up the Pi etc. Also was hoping to keep it all local if possible, I'm assuming if it's hitting APIs, probably not unless doing some magic on the local network?

That's what I found as well. It appears that this is the details behind that post.

http://yannipang.com/blog/ryobi-garage-door-api/

With the java script apps on a device like a raspberry pi, you could trigger to run those commands with a project call OmniThing which allows you to execute any command line command from the device itself.

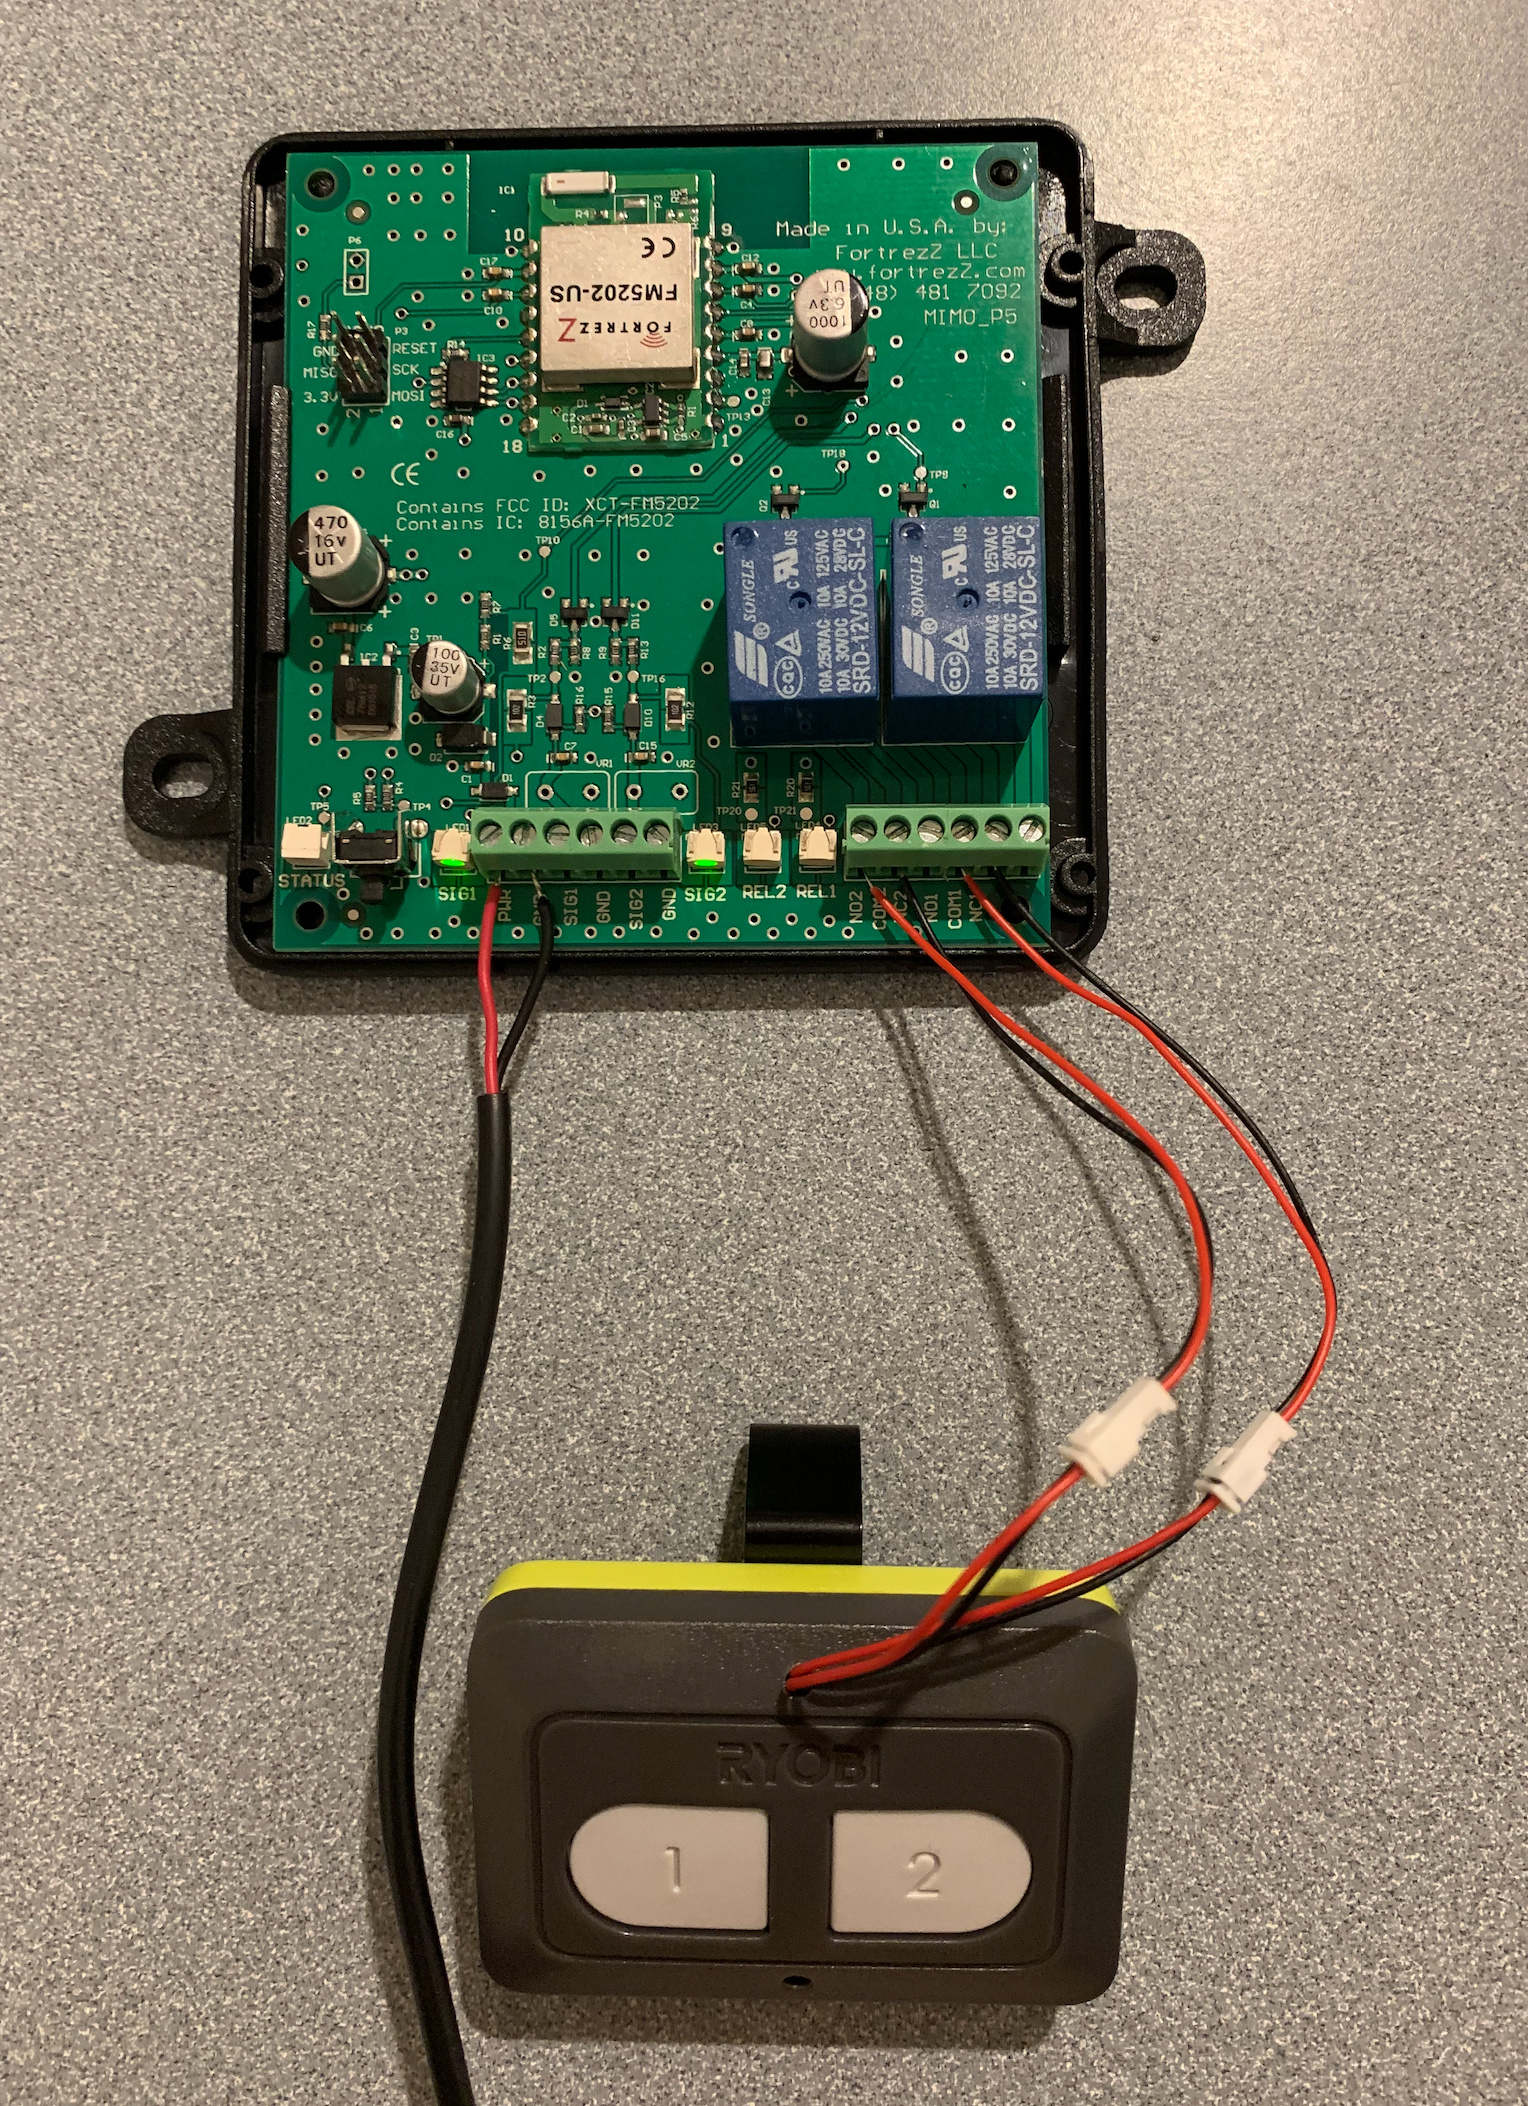
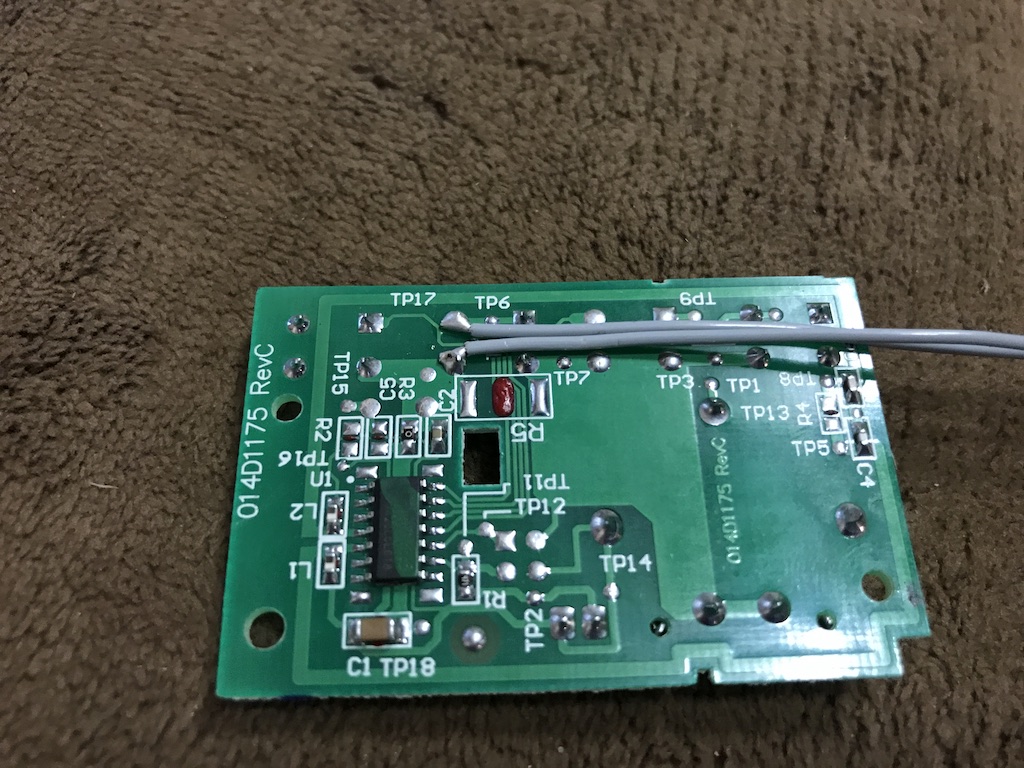
Alternatively, if you want to solder to a car remote, I would recommend a project call Hubduino along with an ESP8266 board. This allows you to implement a timed-relay device that automatically closes then opens the relay to simulate the button being pressed. That would be a LOT cheaper than a mimo or Qubino device. But if you are going to choose between those two, I would definitely choose the Qubino. The mimo has a lot of issues from what I've read. I guess it depends on what the inside of the remote looks like and how expensive the remote is (should you ruin it by soldering to it).

EDIT: Oh, i saw the post in the ST forum that you were talking about. I would try the JS script along with this driver based on the DTH linked in the post.

/*
* Author: Justin Dybedahl
* Ryobi GDO200 Device Handler
* v1.2.1 Modified by @Projectskydroid
*/


preferences {    
	section("Internal Access"){
		input "email", "text", title: "Email Address",required: true
		input "pass","text", title: "Password",required:true
		input "apikey", "text", title: "API Key",required: true		
		input "doorid", "text", title: "Garage Door ID",required: true
		input "internal_ip", "text", title: "Internal IP", required: true
		input "internal_port", "text", title: "Internal Port (default is 3042)", required: true
	}
}


metadata {
	definition (name: "Ryobi Garage Door", namespace: "madj42", author: "Justin Dybedahl") {
		capability "Actuator"
		capability "Door Control"
		capability "Garage Door Control"
		capability "Switch"
		capability "Sensor"
		capability "Polling"
		capability "Momentary"
		capability "Relay Switch"
		capability "Refresh"
		capability "battery"
	}

    attribute "switch", "string"
    attribute "switch2", "string"

    command "on"
    command "off"
    command "open"
    command "close"

}

def poll() {
refresh()
}

def refresh() {
getStatus()
}

def parse(String description){
//log.debug "Parse called"
	def msg = parseLanMessage(description)
    if (msg.body.startsWith("status:")) {
    	def batstatus = msg.body.split(':')[3]
    	def doorstatus = msg.body.split(':')[2]
    	def lightstatus = msg.body.split(':')[1]
	if (batstatus == "255") {
		sendEvent(name: "battery", value: 0)
	} else if (batstatus == null) {
		sendEvent(name: "battery", value: 0)
	} else if (batstatus == 'NA') {
		sendEvent(name: "battery", value: 0)
	} else {
	sendEvent(name: "battery", value: batstatus)
	}
    	if (lightstatus == "false") {
        //log.debug "Light OFF"
        sendEvent(name: "switch2", value: "off")
   		} else if (lightstatus == "true") {
        //log.debug "Light ON"
        sendEvent(name: "switch2", value: "on")
        }
       	if (doorstatus == "0") {
        //log.debug "Door Closed"
        sendEvent(name: "door", value: "closed")
   		} else if (doorstatus == "1") {
        //log.debug "Door Open"
        sendEvent(name: "door", value: "open")
        } else if (doorstatus == "2") {
        //log.debug "Door Closing"
        sendEvent(name: "door", value: "closing")
        } else if (doorstatus == "3") {
        //log.debug "Door Opening"
        sendEvent(name: "door", value: "opening")
        }
    }
}
def on() {
def result = new hubitat.device.HubAction(
				method: "GET",
				path: "/?name=lighton&doorid=${doorid}&apikey=${apikey}&email=${email}&pass=${pass}",
				headers: [
				HOST: "${internal_ip}:${internal_port}"
				]
				)
     
			sendHubCommand(result)
			sendEvent(name: "switch2", value: "on")
            getStatus()
			log.debug "Turning light ON" 
            }

def off() {
def result = new hubitat.device.HubAction(
				method: "GET",
				path: "/?name=lightoff&doorid=${doorid}&apikey=${apikey}&email=${email}&pass=${pass}",
				headers: [
				HOST: "${internal_ip}:${internal_port}"
				]
				)
                
			sendHubCommand(result)
			sendEvent(name: "switch2", value: "off")
            getStatus()
			log.debug "Turning light OFF"
	}
    
def open() {
def result = new hubitat.device.HubAction(
				method: "GET",
				path: "/?name=dooropen&doorid=${doorid}&apikey=${apikey}&email=${email}&pass=${pass}",
				headers: [
				HOST: "${internal_ip}:${internal_port}"
				]
				)
            
			sendHubCommand(result)
			sendEvent(name: "door", value: "opening")
            getStatus()
            runIn(15,getStatus)
			log.debug "OPENING Garage Door" 
            }
            
def close() {
	def result = new hubitat.device.HubAction(
				method: "GET",
				path: "/?name=doorclose&doorid=${doorid}&apikey=${apikey}&email=${email}&pass=${pass}",
				headers: [
				HOST: "${internal_ip}:${internal_port}"
				]
				)
           
			sendHubCommand(result)
			sendEvent(name: "door", value: "closing")
            runIn(5,getStatus)
            runIn(25,getStatus)
			log.debug "CLOSING Garage Door" 
            }


def getStatus() {
	def result = new hubitat.device.HubAction(
				method: "GET",
				path: "/?name=status&doorid=${doorid}&apikey=${apikey}&email=${email}&pass=${pass}",
				headers: [
				HOST: "${internal_ip}:${internal_port}"
				])
			sendHubCommand(result)
			log.debug "Getting Status"
	}
    
private String convertIPtoHex(ipAddress) { 
    String hex = ipAddress.tokenize( '.' ).collect {  String.format( '%02x', it.toInteger() ) }.join()
    //log.debug "IP address entered is $ipAddress and the converted hex code is $hex"
    return hex

}

private String convertPortToHex(port) {
    String hexport = port.toString().format( '%04x', port.toInteger() )
    //log.debug hexport
    return hexport
}

def updated() {
	if (!state.updatedLastRanAt || now() >= state.updatedLastRanAt + 5000) {
		state.updatedLastRanAt = now()
		log.debug "Executing 'updated()'"
    	runIn(3, "updateDeviceNetworkID")
	}
	else {
//		log.trace "updated(): Ran within last 5 seconds so aborting."
	}
}


def updateDeviceNetworkID() {
	log.debug "Executing 'updateDeviceNetworkID'"
    def iphex = convertIPtoHex(internal_ip).toUpperCase()
    def porthex = convertPortToHex(internal_port).toUpperCase()
	device.setDeviceNetworkId(iphex + ":" + porthex)
}

I took out the tiles and converted physicalgraph to hubitat. Have no idea if this will work but it's a place to start.

So this is what I ended up doing. Hopefully it helps someone else.

Luckily HE added a driver for the MIMO2 after my original post.

Would be interested to know if anyone knows how to make a dashboard button that could combine control and status of two separate devices eg. a relay and a tilt/contact. As if this were an all-in-one garage controller like the linear/go control units.

Right now I have a four buttons (2) relays and (2) sensors. Which is just kind of annoying but works. Thoughts?

1 Like

There a garage door template for the dashboard. If you were to use a virtual garage door device and set the status based on the contact sensor and then execute the other actions based on it's changes it could be displayed in a dashboard on it's own.

You just blew my mind, thanks so much! Could you elaborate on how to do this "set the status based on the contact sensor and then execute the other actions based on it's changes".

I know how to make a virtual device, not sure how I could set the status based on the contact though.

Well, you can't use the stock virtual garage door driver. Here is one you have to use.

/**
 *  Virtual Garage Door
 *
 */
metadata {
    definition (name: "Virtual Garage Door", namespace: "ryan780", author: "ryan780") {
        capability "Actuator"
		capability "Contact Sensor" 
        capability "Garage Door Control"
        capability "Switch"
        command "confirmOpen"
        command "confirmClosed"
    }
}

def open() {
    log.debug "open()"
    on()
}

def close() {
    log.debug "close()"
    on()
}

def on(){
    sendEvent(name: "switch", value: "on")
    runIn(3,off)
}

def off(){
    sendEvent(name: "switch", value: "off")
}


def confirmClosed(){
	sendEvent(name: "door", value: "closed")  //added for HE dashboard
    sendEvent(name: "contact", value: "closed")  //added for HE dashboard
}

def confirmOpen(){
    sendEvent(name: "door", value: "open")  //added for HE dashboard
    sendEvent(name: "contact", value: "open")  //added for HE dashboard
}

This driver will turn on when the open command is issued from the dashboard but won't show status of open until you issue it the "confirmOpen" command. So, what you have to do is go into rule machine and set up a rule with your contact sensor that is triggered off it changing, you then would do the custom action of "confirmOpen" when the contact sensor is opened and "confirmClosed" when the contact sensor is opened.

To trigger whatever mechanism you are suing to open the door, it has a simple momentary switch that will be on for 3 seconds whenever an open or close event is triggered. This way, the device works correctly if you use another device, such as a local button, to also open and close the garage door. In your case, you would use a time function that turn the relay on for one second every time the switch is on in the virtual device. :slight_smile:

The other great thing about using the Garage Door (control) tile is that it asks you to confirm that you really want to open or close the door, which i just love!

1 Like

Thanks so much! I'll dig into this this weekend.

Would love to know if you could share some thoughts on this Cleanest garage control rule(s) too.

@thekevtoo How much of a pain was soldering wires to the GDA100 remote? I think I may attempt something similar.

@hwarf

Pretty easy with even basic soldering skills, I did something very similar above with an opener for my car as it lacks any sort of door control,

Thanks for the encouragement! I was able to successfully solder to the switch on my Ryobi GDA100 remote and connect it to a MIMOlite. I think wiring up the reed sensor took longer than anything else. So far everything seems to be working well. :slight_smile:

1 Like

Is this still the only way to combine a momentary and a status on a single tile in a dashboard?

Well, yes and no. Dashboard tiles can only be for one device. You can't combine two separate devices in the same tile. But there are many different ways to accomplish that. You can use an app to combine them into one virtual device tile.

Yeah I was thinking of doing that, although I'm sure it's already been done before. Got any you'd recommend?

Hi Ryan
I'm playing around with your garage door driver, and it works great for my combo of Fibaro Smart Implant switch and Xiaomi contact, but I'm missing the ability to set the "opening" and "closing" state that the Garage control tile supports. By the way, does that template support a "stopped" or "error" state?
My plan is to support this through a current sensing smart plug.
Would something like this be hard to implement?

br Claus

Never mind, I figured it out :slight_smile:
I added
sendEvent(name: "door", value: "closing")
and
sendEvent(name: "door", value: "opening")
to the open() and close() definitions. Also added an "unknown" state.

Works great :slight_smile:

br Claus

@cstovgaard I'm trying to do the same thing, does your code look like this:

def open() {
    log.debug "open()"
    on()
    sendEvent(name: "door", value: "opening")
}

def close() {
    log.debug "close()"
    on()
    sendEvent(name: "door", value: "closing")
}