DIY Garage Door Control Solution

(Was voluntold to put this post together by @april.brandt and tagging @agnes.zooz so she can see what we did.)

Since starting with HA I've worked to integrate my garage door with whatever system I had.

Of course like most, I went with the MyQ solution and quickly got fed up of it. Wifi issues, cloud issues and slow response were just some of the issues I had. I even went as far as writing my own drivers for it (that worked well) but could not solve the issues with their cloud dependency. I have since gotten rid of it and implemented this solution.

My current solution is all controlled locally using Hubitat over ZWave and is so much more reliable and customizable. It should work with any garage door opener that has a remote and you can place the setup anywhere as long as the signal from the remote reaches the opener.

What You will Need

I really like this device. Its small, cheap and works really well. It has 3 relays built in and each are independently controlled using Z-Wave. You have the option of wiring each relay into each button on the remote and control up to 3 doors easily. You could also go even further by wiring up a button into it to give manual control, but I didn't do this as my wall buttons still function
nicely. Note, you might want to order the USB-C cable ahead of time too to keep the install even cleaner.

  • Wire, wire strippers, soldering iron.

You are going to be doing some soldering into the remotes. You will need thin wire,18 or 20ga is good enough.

  • Garage door opener remote

I sacrificed one of the garage door remote for this. The main reason is that my opener is a newer MyQ opener and they have done their best to try and lock you out of creating a solution to control their doors so that you have to use their MyQ. Running wires directly to the opener to control the door does not work on my openers as it requires more than just a closed circuit to trigger it. Instead, I soldered directly to the remote board and simulate pressing the remote button with the relay. It is battery powered but I can't remember the last time I changed my garage door remote battery. So I'm find with this.

  • Electronic project box

I use these to keep things clean. Instead of having the remote dangling, I put them in a box and seal it off so it can be easily stacked.

  • Tilt/Contact sensors, Rule Machine Rules

I won't get into these here as I wanted to focus on the control itself, but if you want to integrate the status of the doors in you will need some contact or tilt sensors that you mount
to the doors. Zigbee or Z-Wave doesn't matter, just make sure the mesh they are on reaches out that far. If you have the ZEN16 in the garage too, it acts as a repeater so helps
in that regards. You can then create RM rules to do whatever you would like to control the doors or beep a chime if you want.

Everybody Loves Pictures

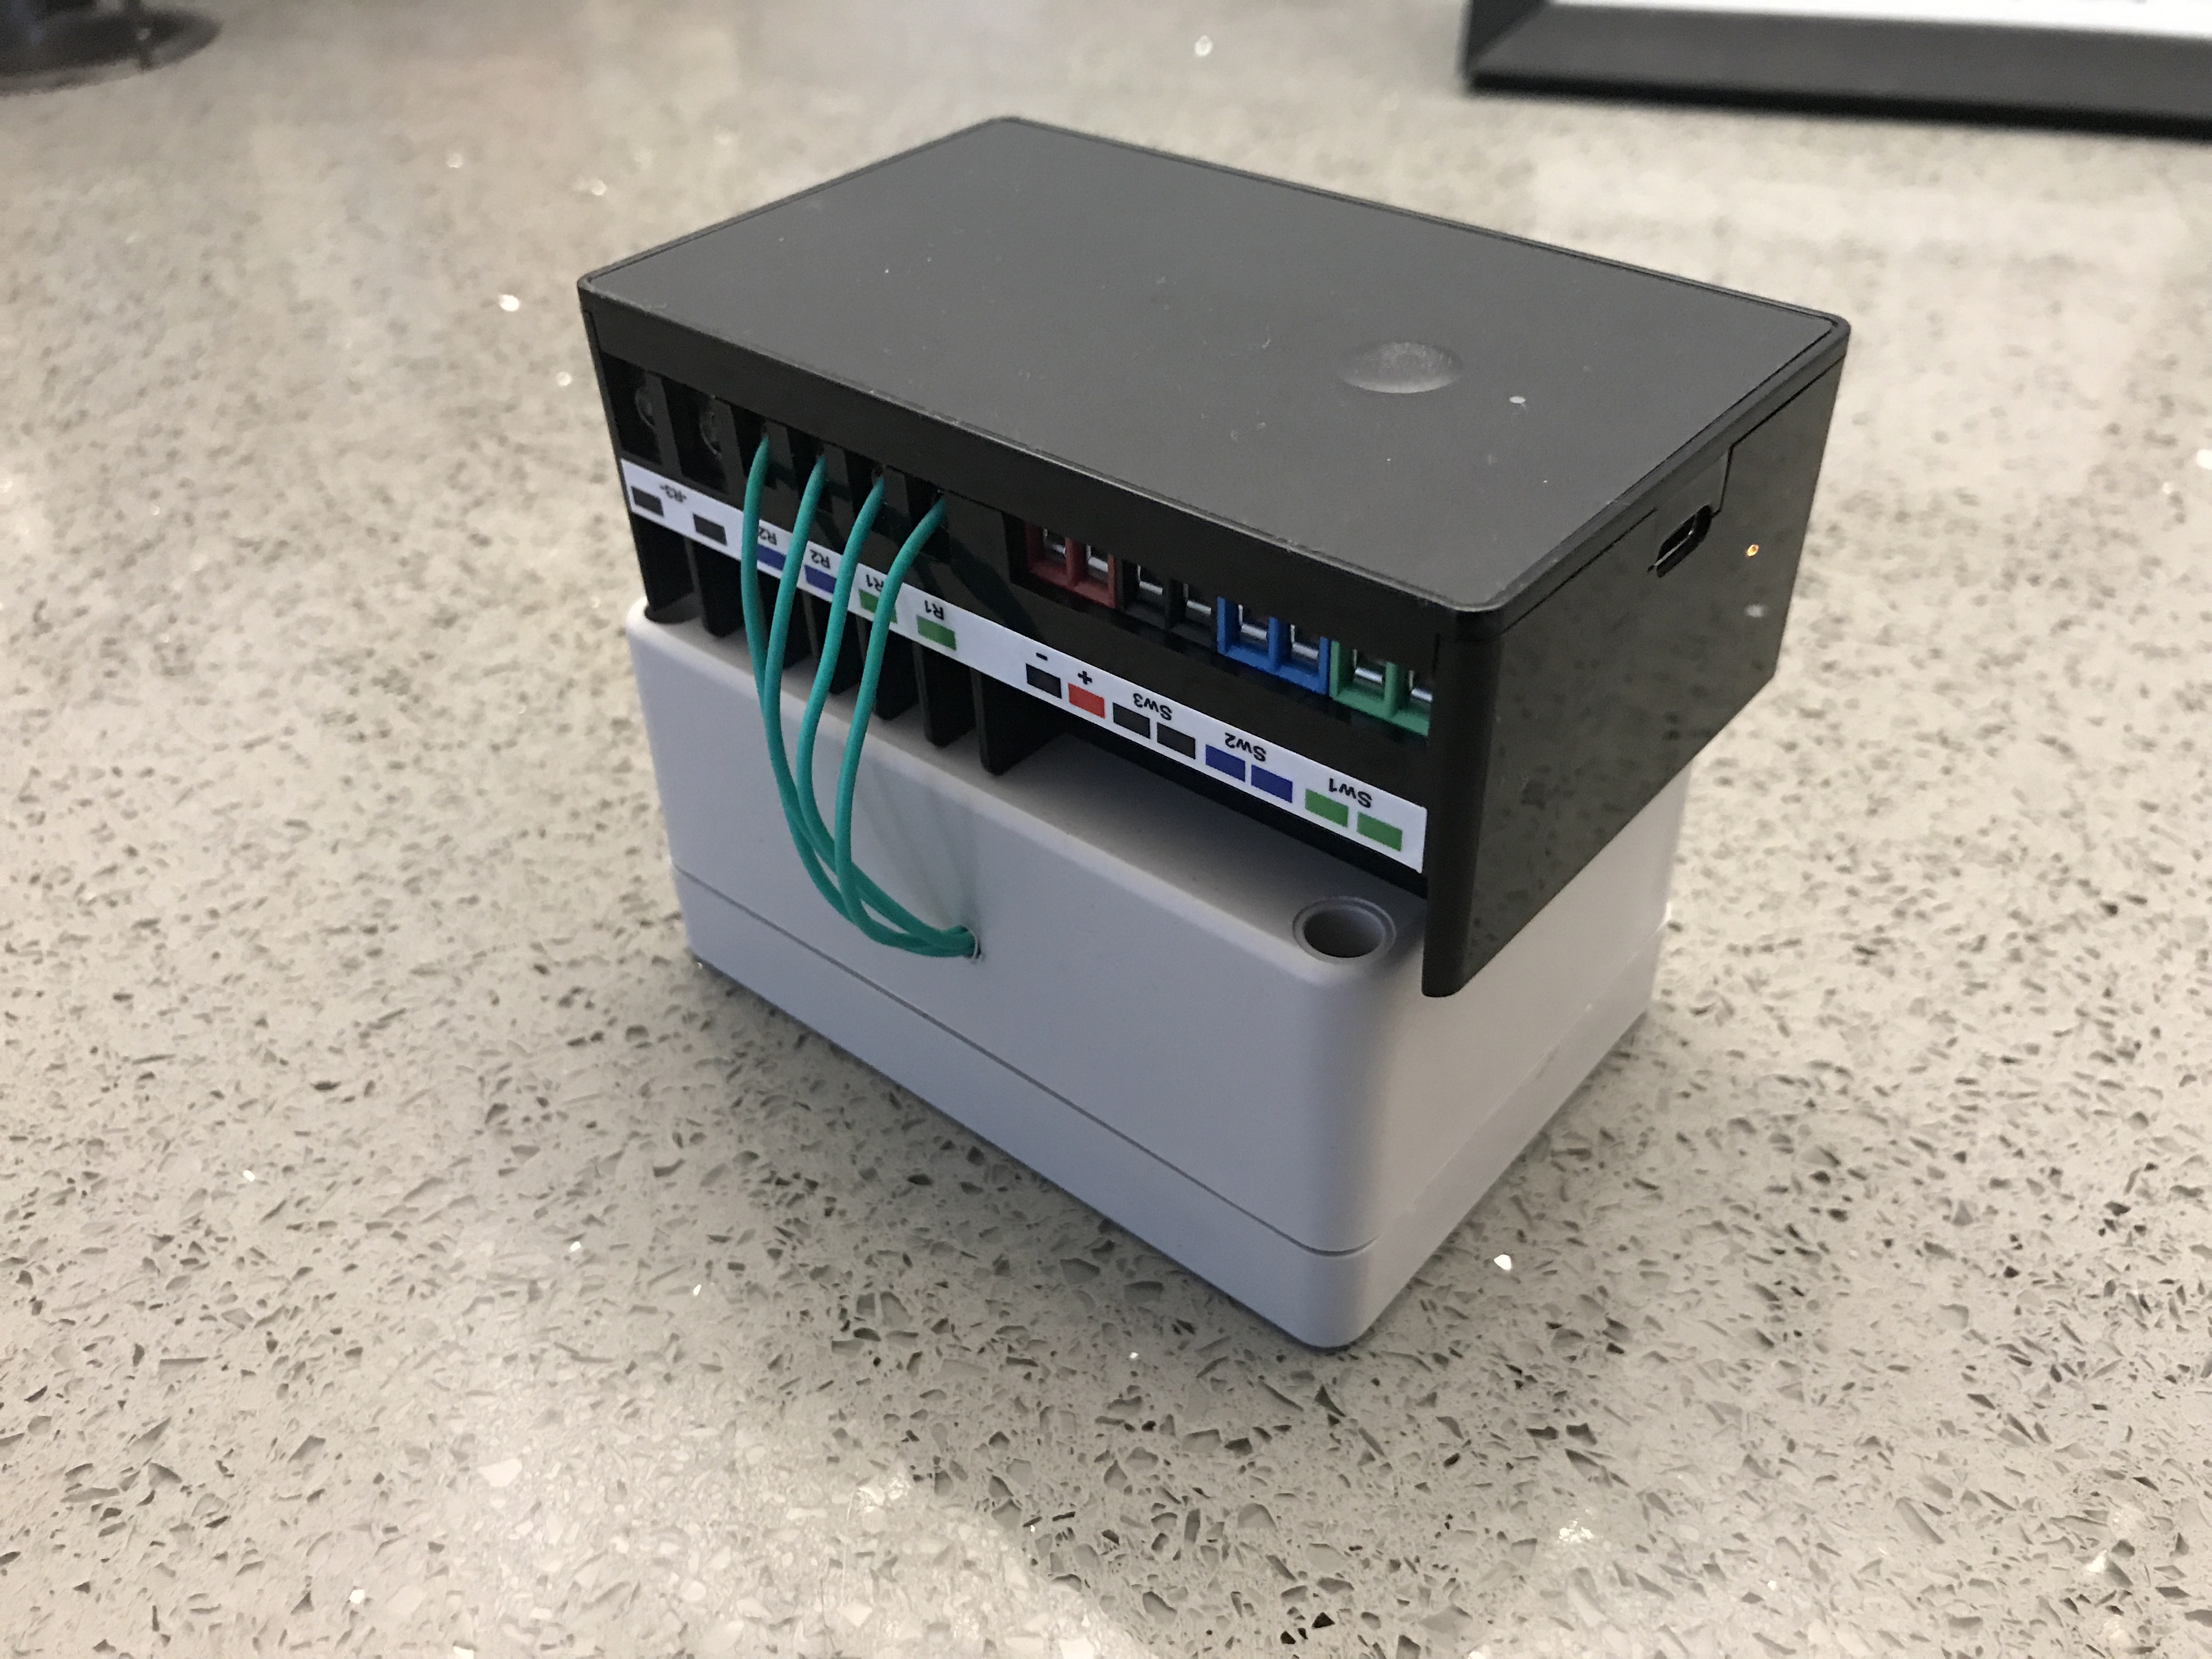
This is the finished product. The USB-C cable that powers it all goes in on the right. I have wires running from the first two relays into a small hole I drilled into the box. You will see that these are connected to the remotes.

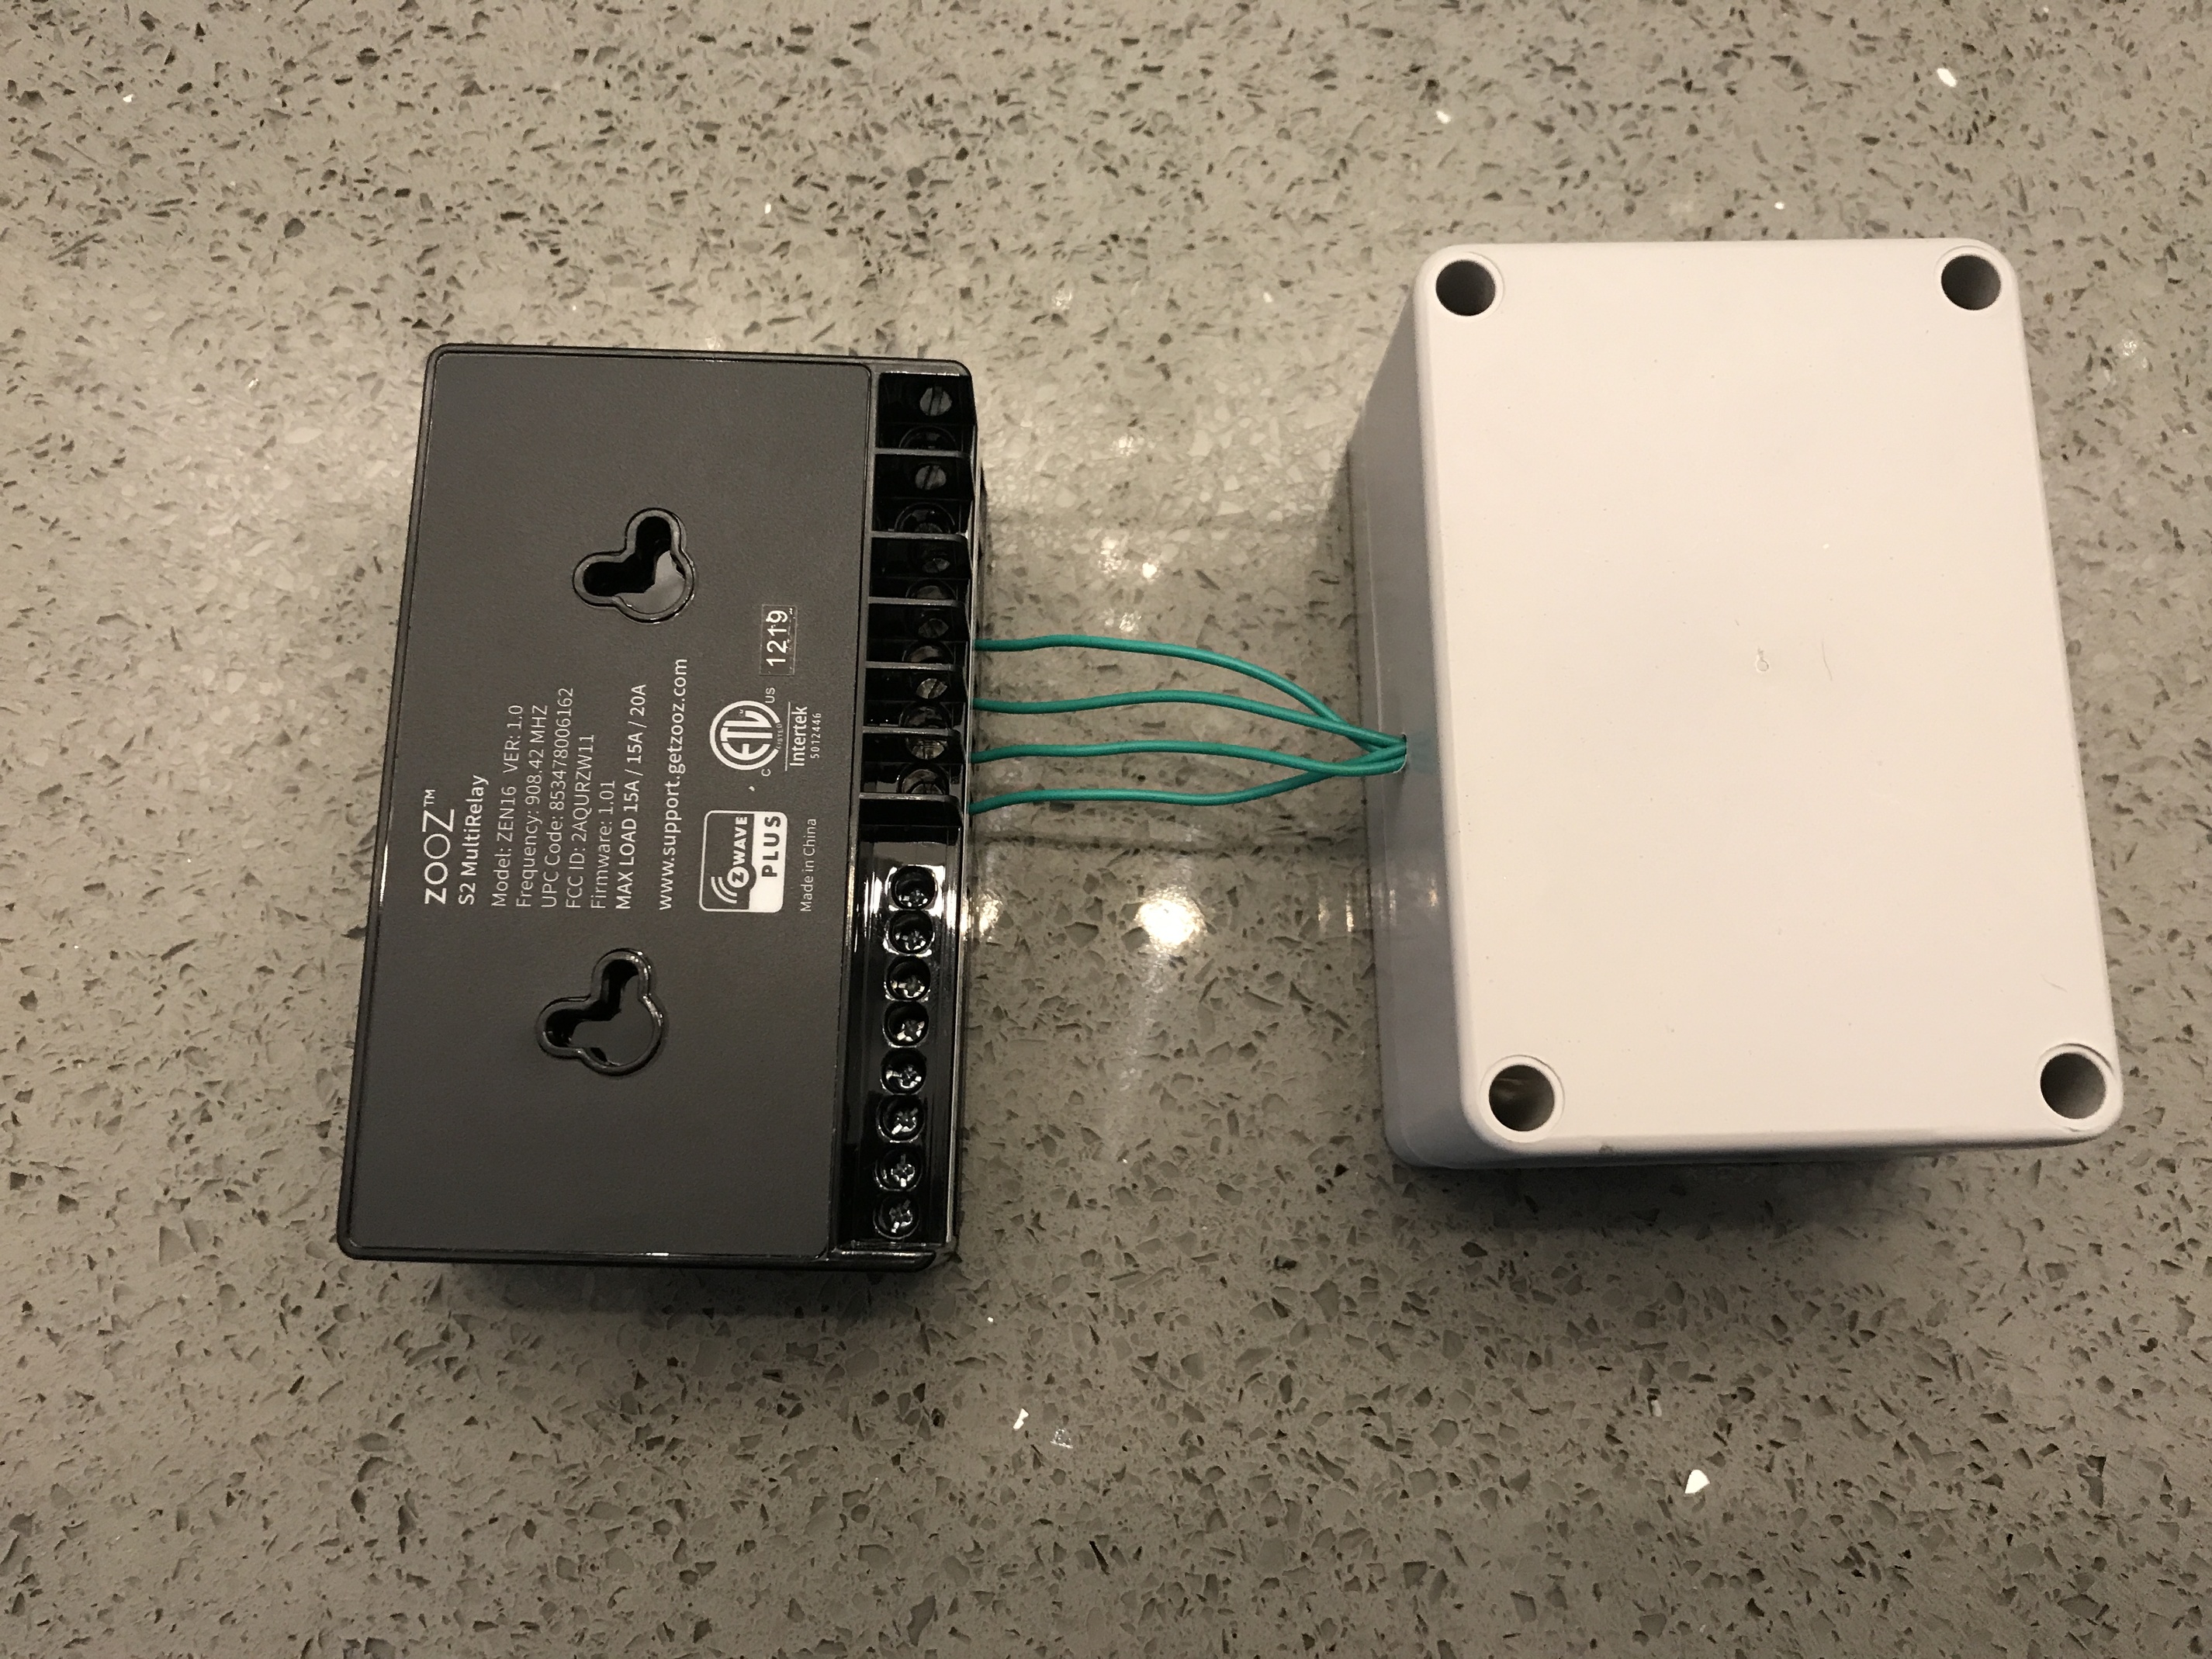
This is the the two boxes separated. I can mount it to the wall this way if I want.

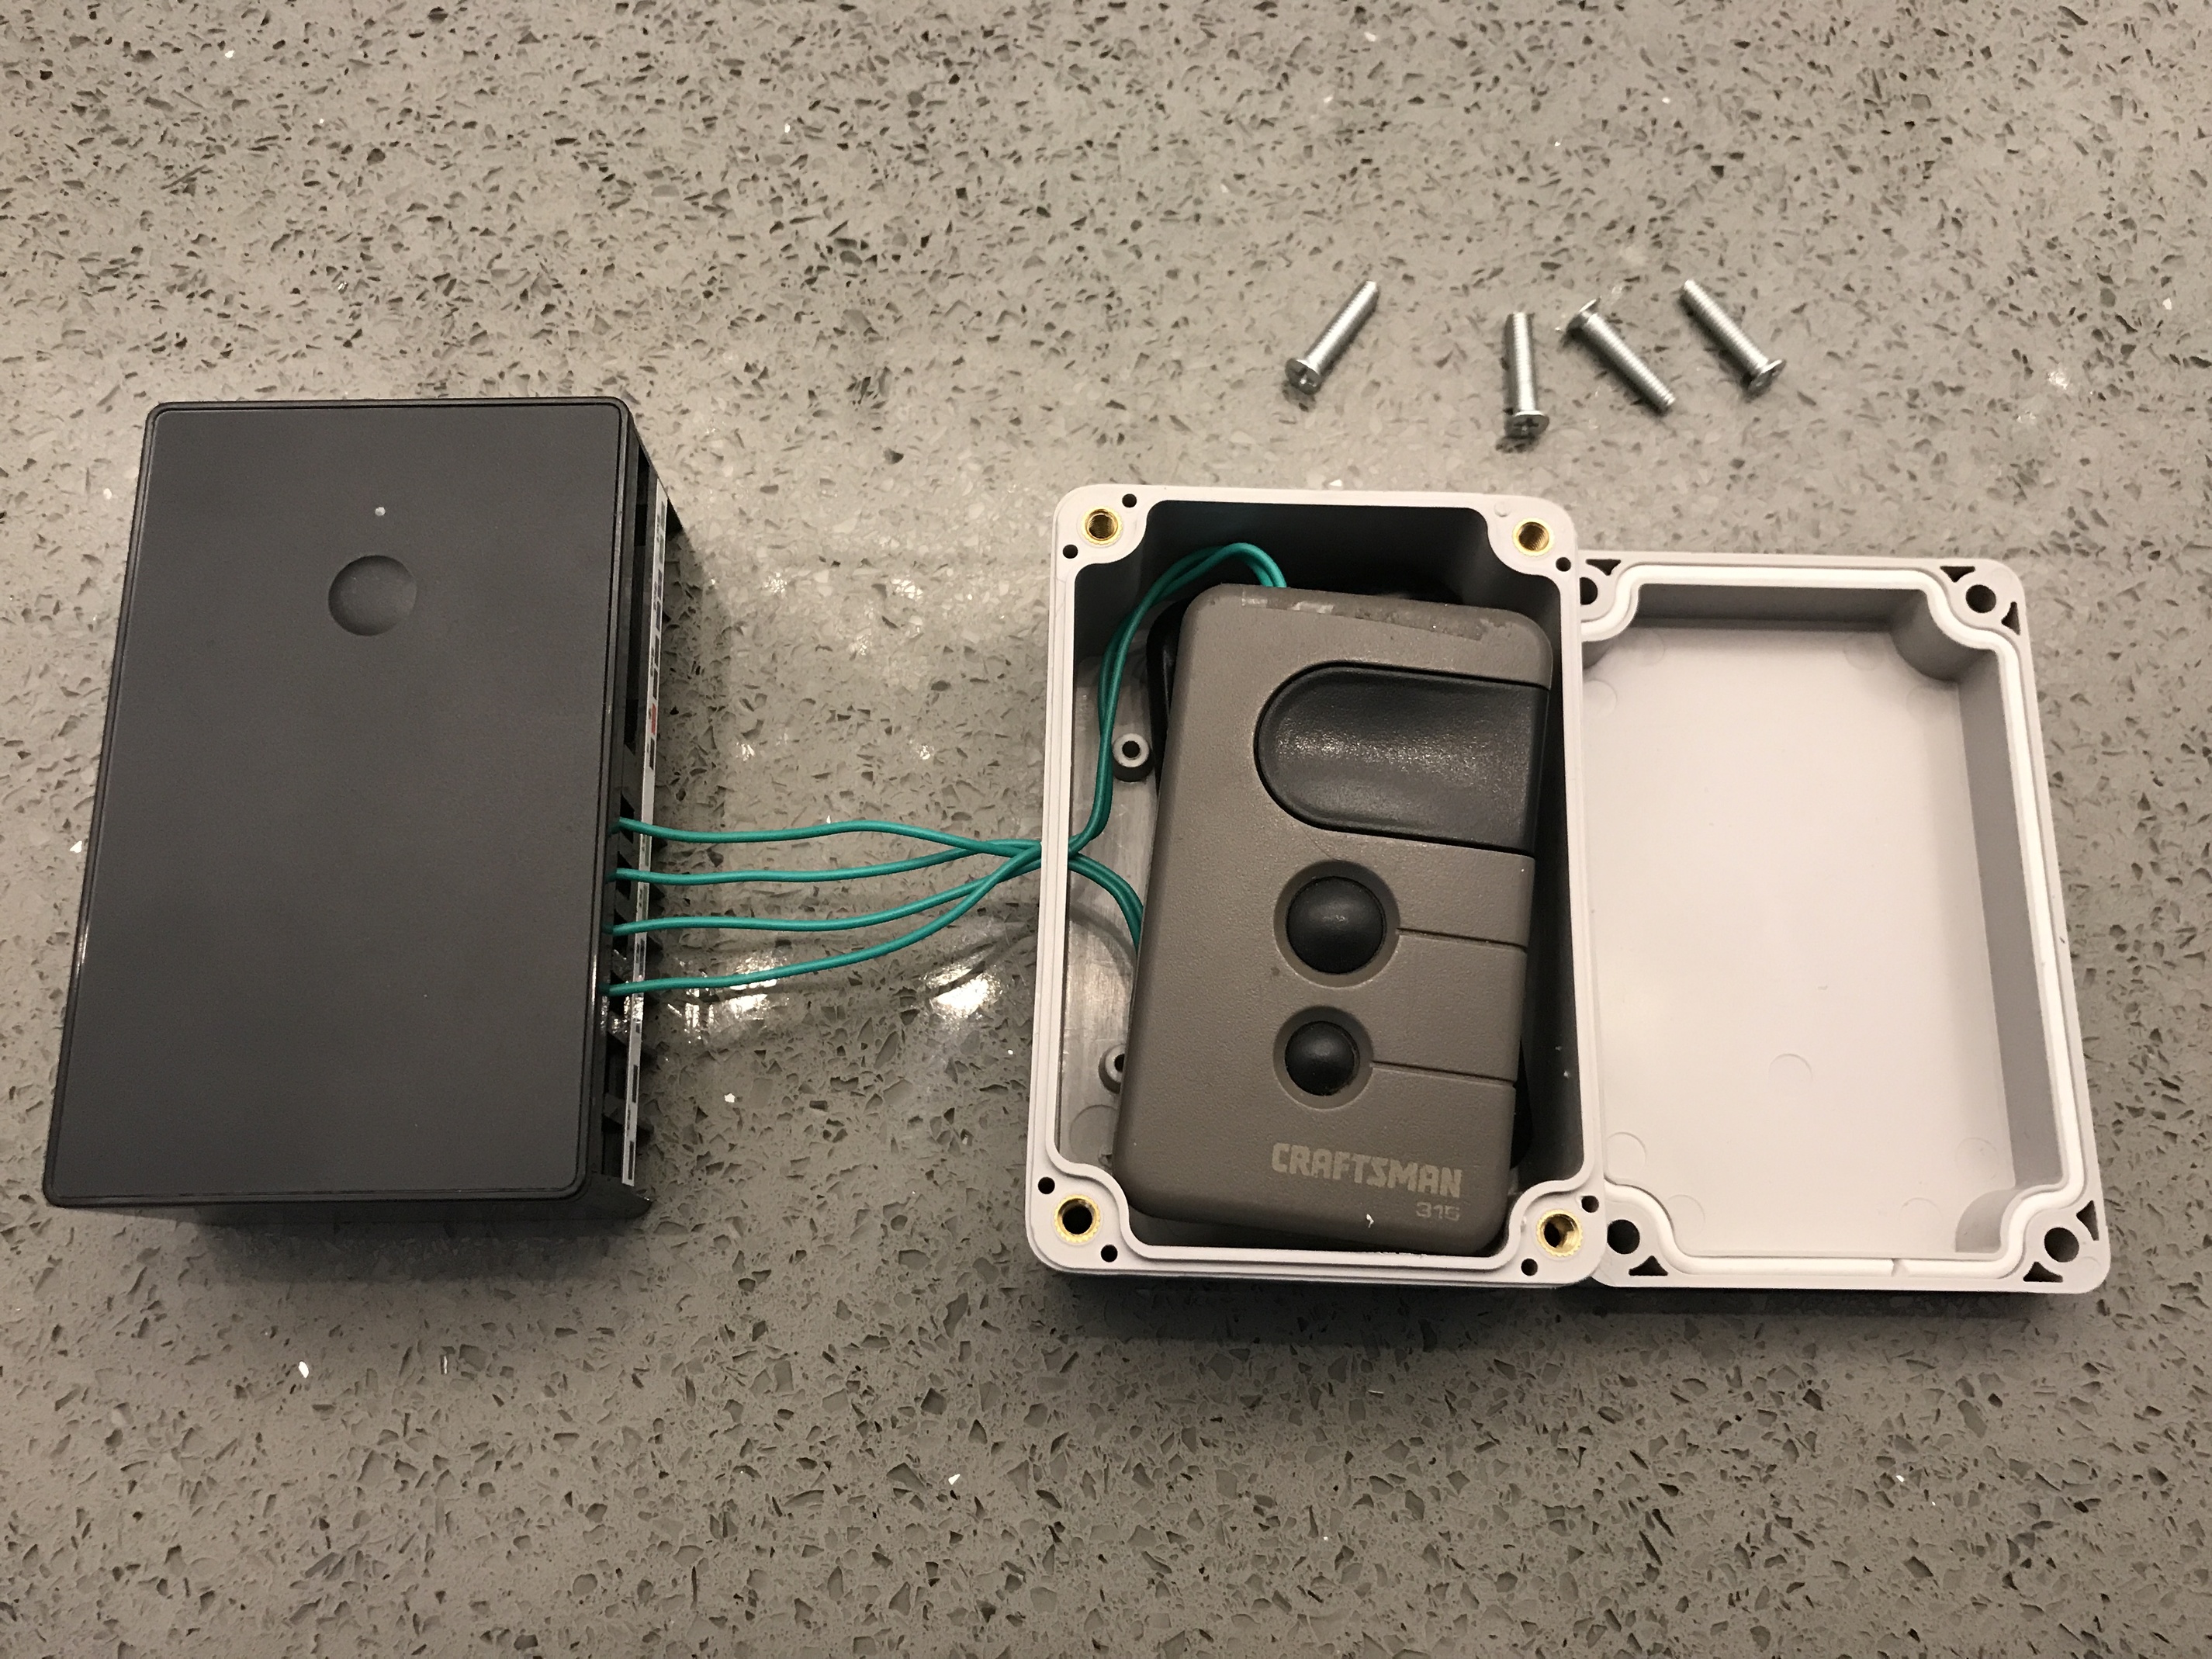
Opening up the project box you see my two remotes in there. I drilled a few small holes in the side of them just so they could stay closed and the wires could be run. I left them in their cases because on one of them the battery was mounded on the case and not the board. No big deal.

I also have to use two different remotes. This is mainly because the MyQ remote can't be programmed to my other door. But eventually when I upgrade that opener, I can program two buttons on one remote to control each door individually.

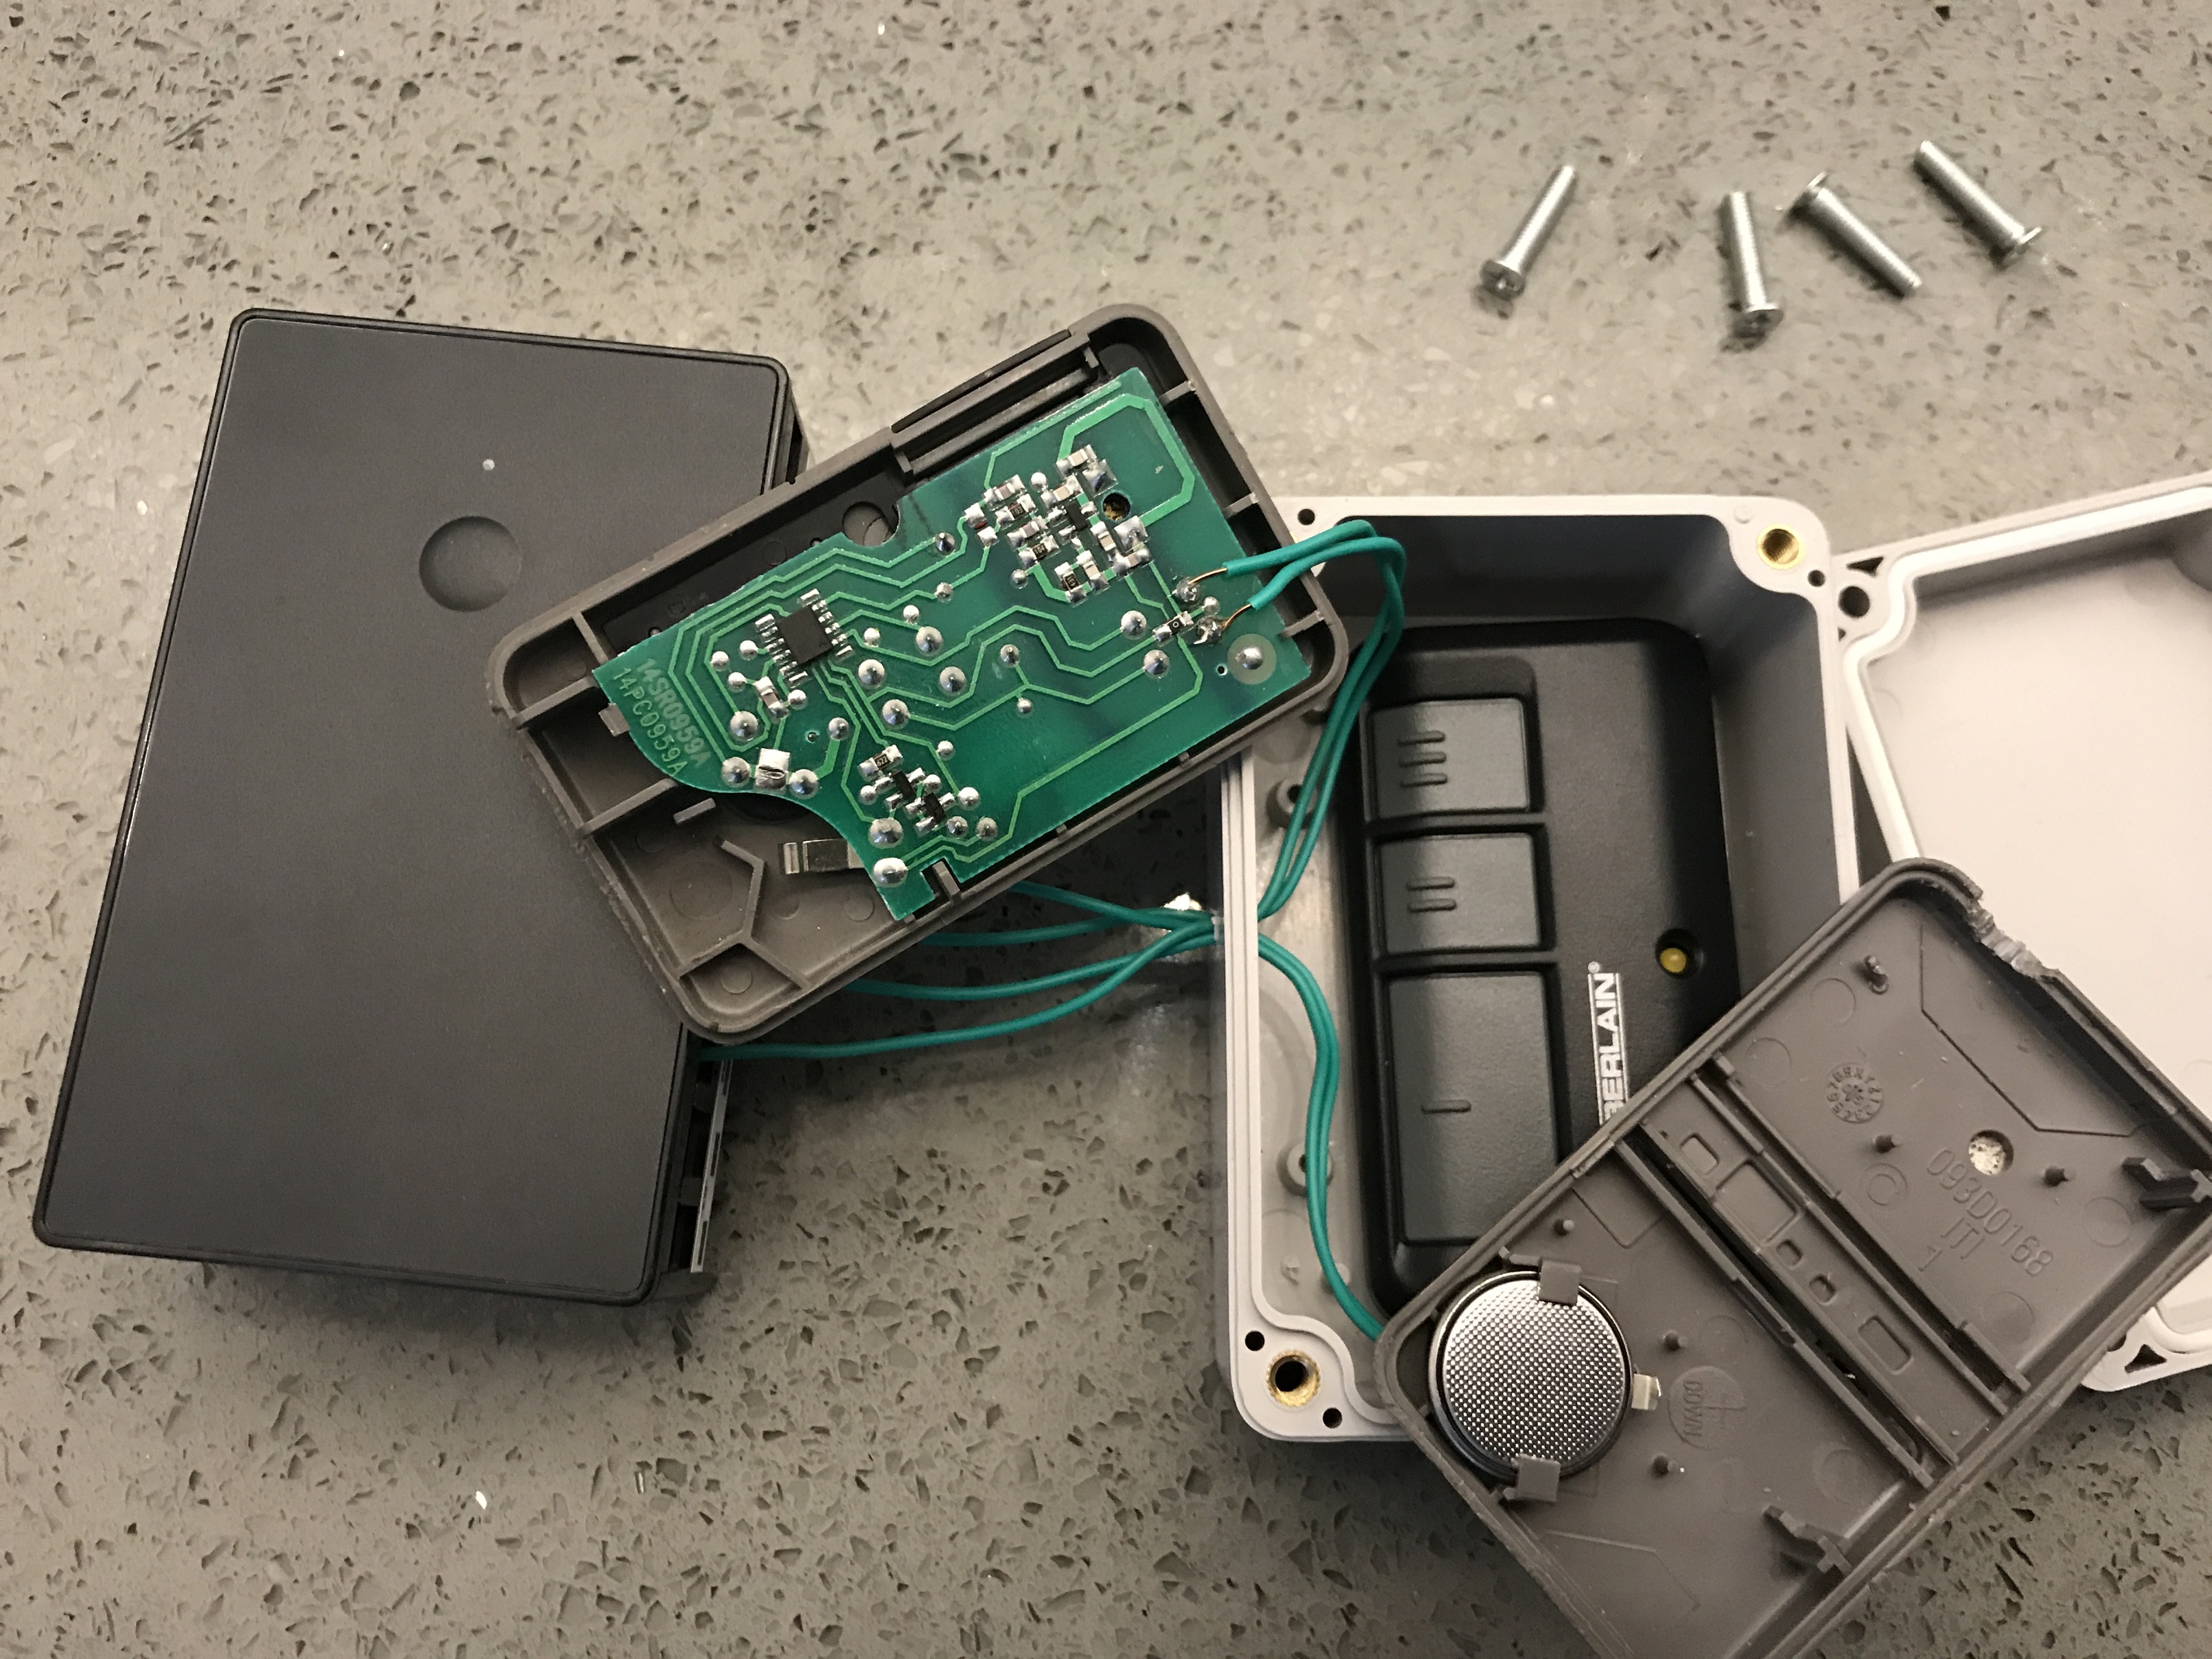
And here you see where I soldered the wires to. Finding the points to solder to wasn't really difficult. Got an idea of where the button sat on the board and saw there were a few mounts. Taking a wire I touched two points to see which two triggered the button and made the door open. Once I found them soldering was easy. You can also see what I meant by the battery being part of the case. Also, if I ever have to change the battery, I just need to open the box, open the remote and change the battery and put it back in. Not a major job.

That pretty much sums it up. I like the look and it works nicely. If you have any questions I'll do my best to answer.

21 Likes

Nicely done, lad! Have you considered hardwiring power to the remotes (especially if they're both 3V DC)? Then you'd never have to touch your opener setup again.

1 Like

Thought about it, but then I would need to run more power. The multirelay doesn't output any power, its just dry contacts. The batteries rarely die so I'm fine with changing them once every 10 years (or whatever it is).

1 Like

Thanks for sharing this. I may have to do this after I clean out the garage - there's a lot of junk to haul away first.

@gavincampbell - Very nice, simple design. Your write-up is great!

This is the first time I have seen the Zooz MultiRelay ZEN16. Looks like a very nice package with great local control options. I like how the outputs can be configured as momentary outputs as well. Seems like a really well designed product!

Thank you for sharing!

2 Likes

I think its the actual inputs that can be configured. The outputs, do have auto on/auto off settings too, but unless you get the latest firmware you can only set it in minutes. In the end I just updated my garage door app to auto turn it off after x seconds.

The input setting lets you choose from momentary, toggle and on/off so you can trigger the relay with multiple types of switches.

It is a great device though like you said. Just took me a while to get it in Canada.

2 Likes

I am humbled. Amazing job @gavincampbell. You just needed a little push to show off your greatness. Very innovative and very "outside the box" even though you fit it nicely inside the box. You should be proud.

3 Likes

Ain't that the truth!

Tagging @april.brandt

3 Likes

Hey, it's all out of love. :love_you_gesture:

2 Likes

Thanks for sharing and showing yet another way to automate the garage door with the ZEN16!

We're also working on a new update where we want to include "garage door mode" as one of the input options which will trigger the auto-off time automatically after a couple of seconds so it's one less setting to set. I'll post here once this version is ready in case anyone wanted to give it a try.

5 Likes

This relay looks like a nice and clean solution. I used 2 linear openers and had to solder onto the remotes as well since they're both chamberlain security 2.0 openers. This would have been half the hardware, the same amount of labour, and 1/4 of the cost. Well done! I know which route I'll be taking when one of the linear's inevitably fails on me.

3 Likes

Do you need the remote or can you hook up the ZEN16 to the wall switch in parallel?

It depends on the garage door opener. The MyQ GDO's stop that from working.

An easy test would be to take the switch off the wall and touch the two wires (mimicking a button press). If the door opens you are in luck and can wire the Zen16 right in. Otherwise the work around is to use the remote like I did.

1 Like

After buying a mains powered z-wave garage door controller that wasn’t compatible with my opener (RYOBI GDO) I went so far as to buy another remote opener to do the exact same thing. I just need to pull it down off the ceiling so I don’t need to soldier on a ladder with my head in the rafters of my garage.

Hope it works as well as yours did.

1 Like

This is probably a stupid question but I see two pairs of wires coming out from the ZEN16. Are one of the pairs going into the Chamberlain remote? If so, would you please show the inside of that remote so that I know the solder points in that?

This is a brilliant use of the ZEN16. Thank you for sharing

If anyone's researching this use case, the new 1.02 firmware that makes it even easier to use the ZEN16 as a garage door controller is already available and devices sold on May 15th or after already come with this firmware.

We also have a dedicated SmartApp solution for the ZEN16 as a garage door opener, thanks to a great contribution by @krlaframboise.

5 Likes

I have two sets of wires. One for each relay and they go to each opener. I have two openers because I have two different aged garaged door openers. One is a myQ with the security and one is an older one. If I could program one remote to open two I would only need one remote.

On the last picture it shows the solder points I used on one of the remotes. It may be different for you though. I found the points by just using a small piece of wire and touching the two points around the button until it opened and that told me the two points to solder to mimic the clicking of the button. You may have to do that as well. Just look for the points around the button and test those.

If you have more than one GDO and they can both be controlled by one opener then you just need to find the points for each button and solder it to those for each relay on the ZEN16.

It really is a great solution and works really well.

2 Likes

Video from today (July 15th 2020)

$20 total

1 Like

So dumb question. I see you have an older Craftsman garage door opener. I assume this uses the 2 wire "door bell" style button to open and close it manually? If so, wouldn't have been easier simply to connect the relay to those wires with a tilt sensor on the door? That way you still have the remotes. You can still keep a remote keypad outside as well. And with the tilt sensor you get open or closed status. What am I missing? Genuinely interested.

The problem is that Chamberlain has evolved the interface over those wires so that, in later models, an encoded signal is sent to the controller. Search these forums - the solution that many have used is to open up the wall button (or even a remote) and solder wires directly to the button contacts. It all depends on how old your model is, whether it has a simple button or not.