Cutting out MyQ cloud from Garage Door control

Sorry for the long post but for those of you that do not want cloud dependent control over your garage door opener (and have just miniscule soldering skills) may hopefully find this helpful.

I have a MyQ compatible LiftMaster Security+ 2.0 garage door opener which I wanted to control through Hubitat so that I could open the garage door via a NFC tag in our cars. The purpose of converting to NFC tag control was to 1) prevent theft of the remote control from the car and 2) prevent accidental opening (accidental pushing of remote control button in my wife’s purse or by stuff in the center console. Since the phone (not the NFC tag) could host the http end point, I figured this would also increase security as reading the NFC tag would do nothing without an authorized (programmed) phone. This also prevents “scanning” of the remote control radio signal (which admittedly may not be as much of a problem with modern channel hoping). Anyways, in order to enable this, I had to figure out a way for Hubitat to control the garage door opener, which brings me to the point of this thread.

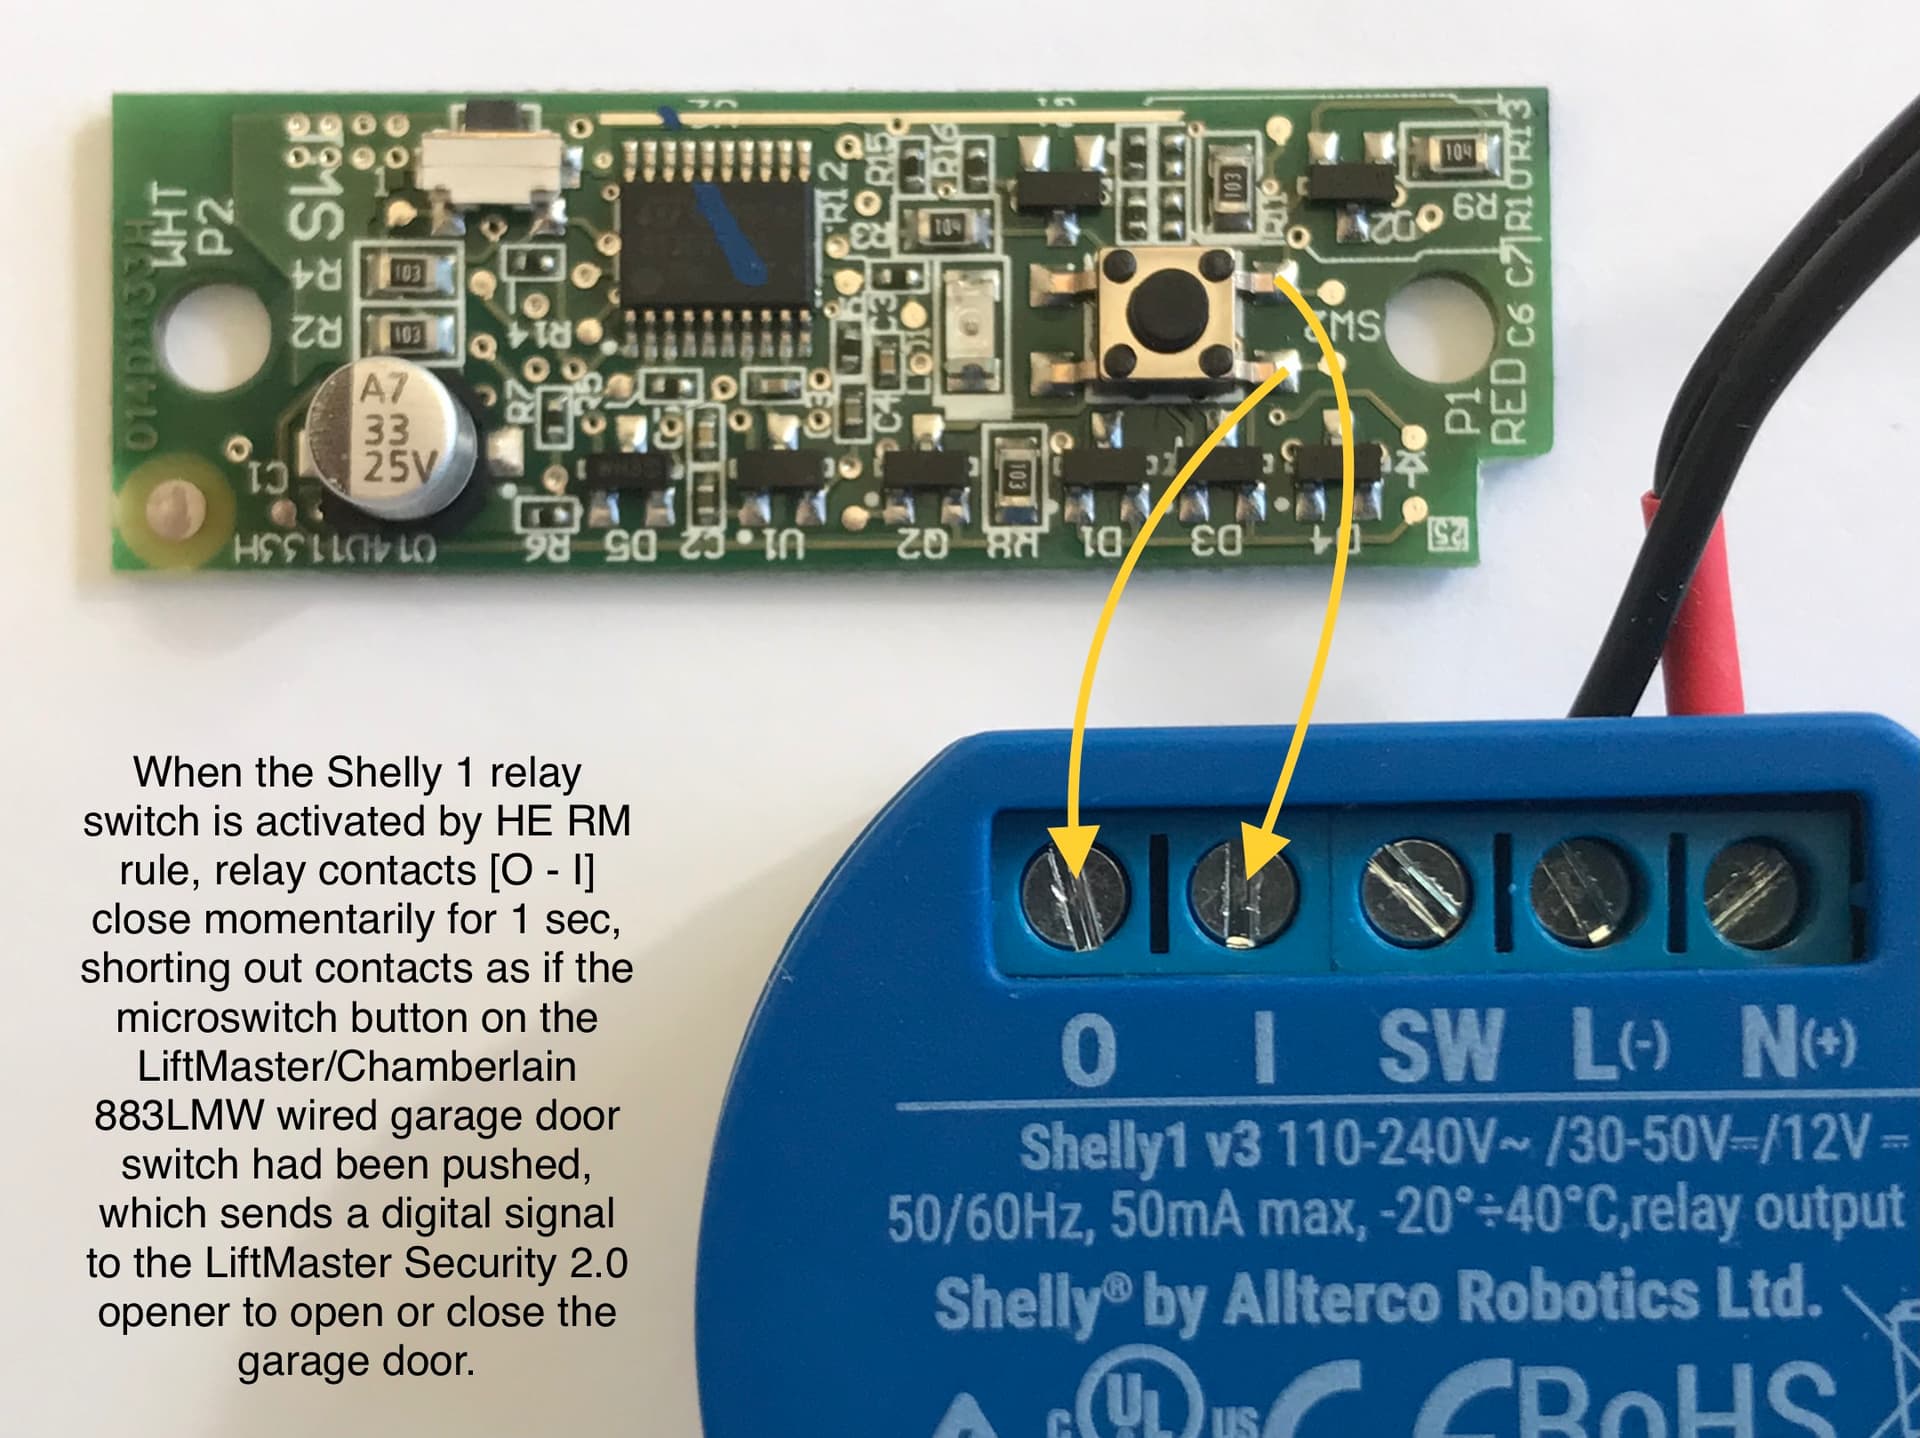
Due to potential MyQ API changes and of course its cloud dependency, I did not want to use (and purchase) the MyQ module for my garage door opener. I had originally planned on using a Hubitat controllable relay to just short out the garage door switch contacts (I ended up using a Shelly 1 relay/switch that I Tasmotized since I have very strong wifi in the area of the garage, but not so great Zigbee, although a Zigbee or Zwave relay could have been utilized). Unfortunately, unlike “dumb” or older garage door openers, on newer “smart control” compatible garage door units, the two wires going from the wall mount momentary door switch to the garage opener (which also provides 12vdc to the wall switch) cannot just be shorted out to open or close the unit. The door switch actually has to send out a digital signal (over the same two wires) to control the main unit upon pressing the door switch button.

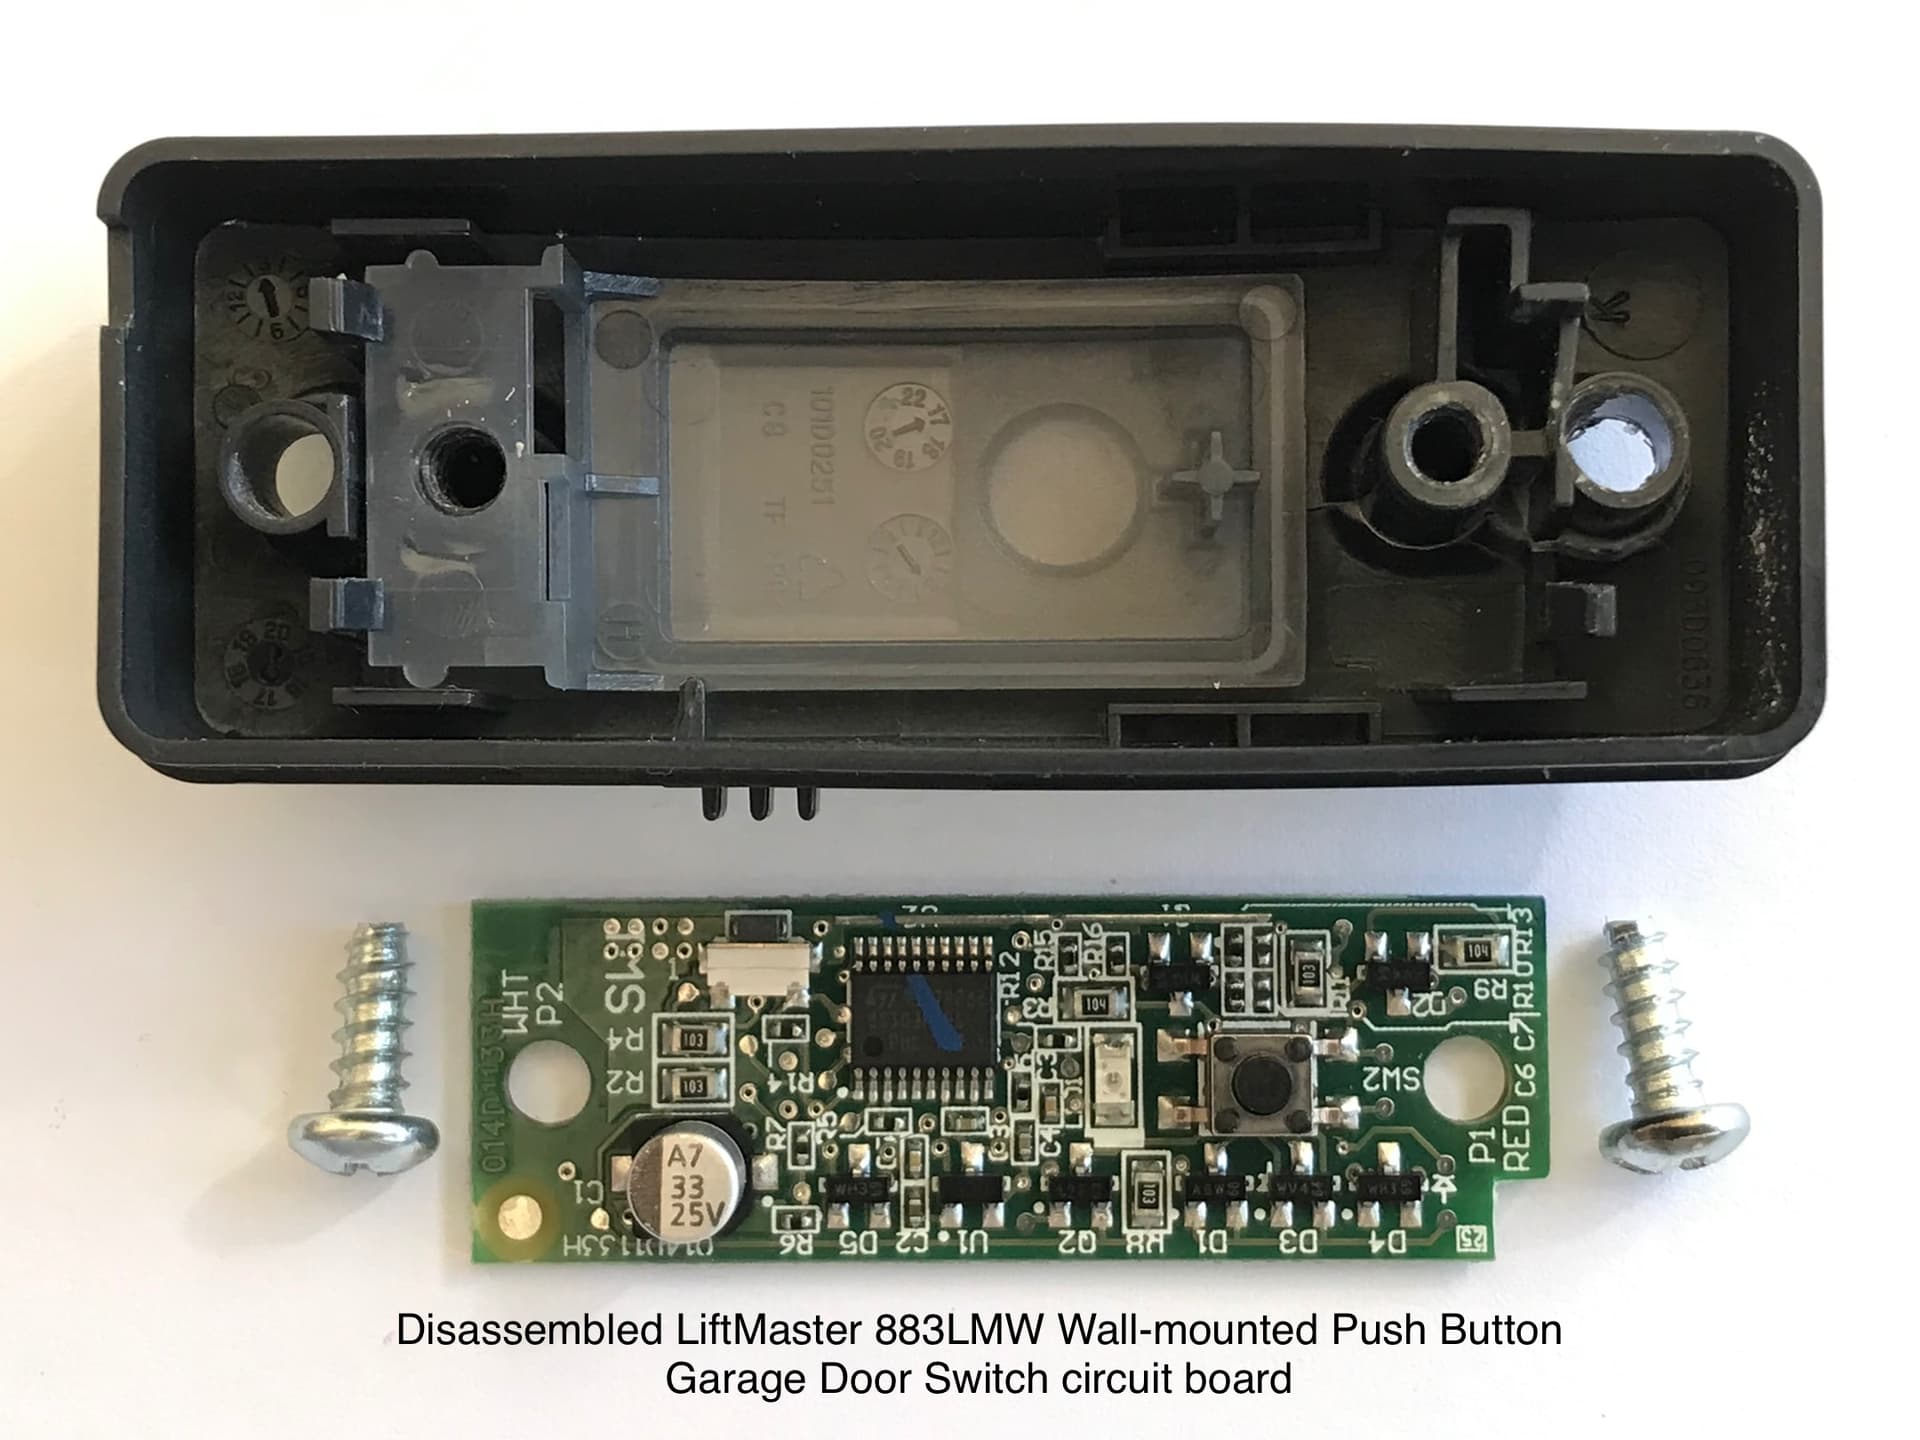
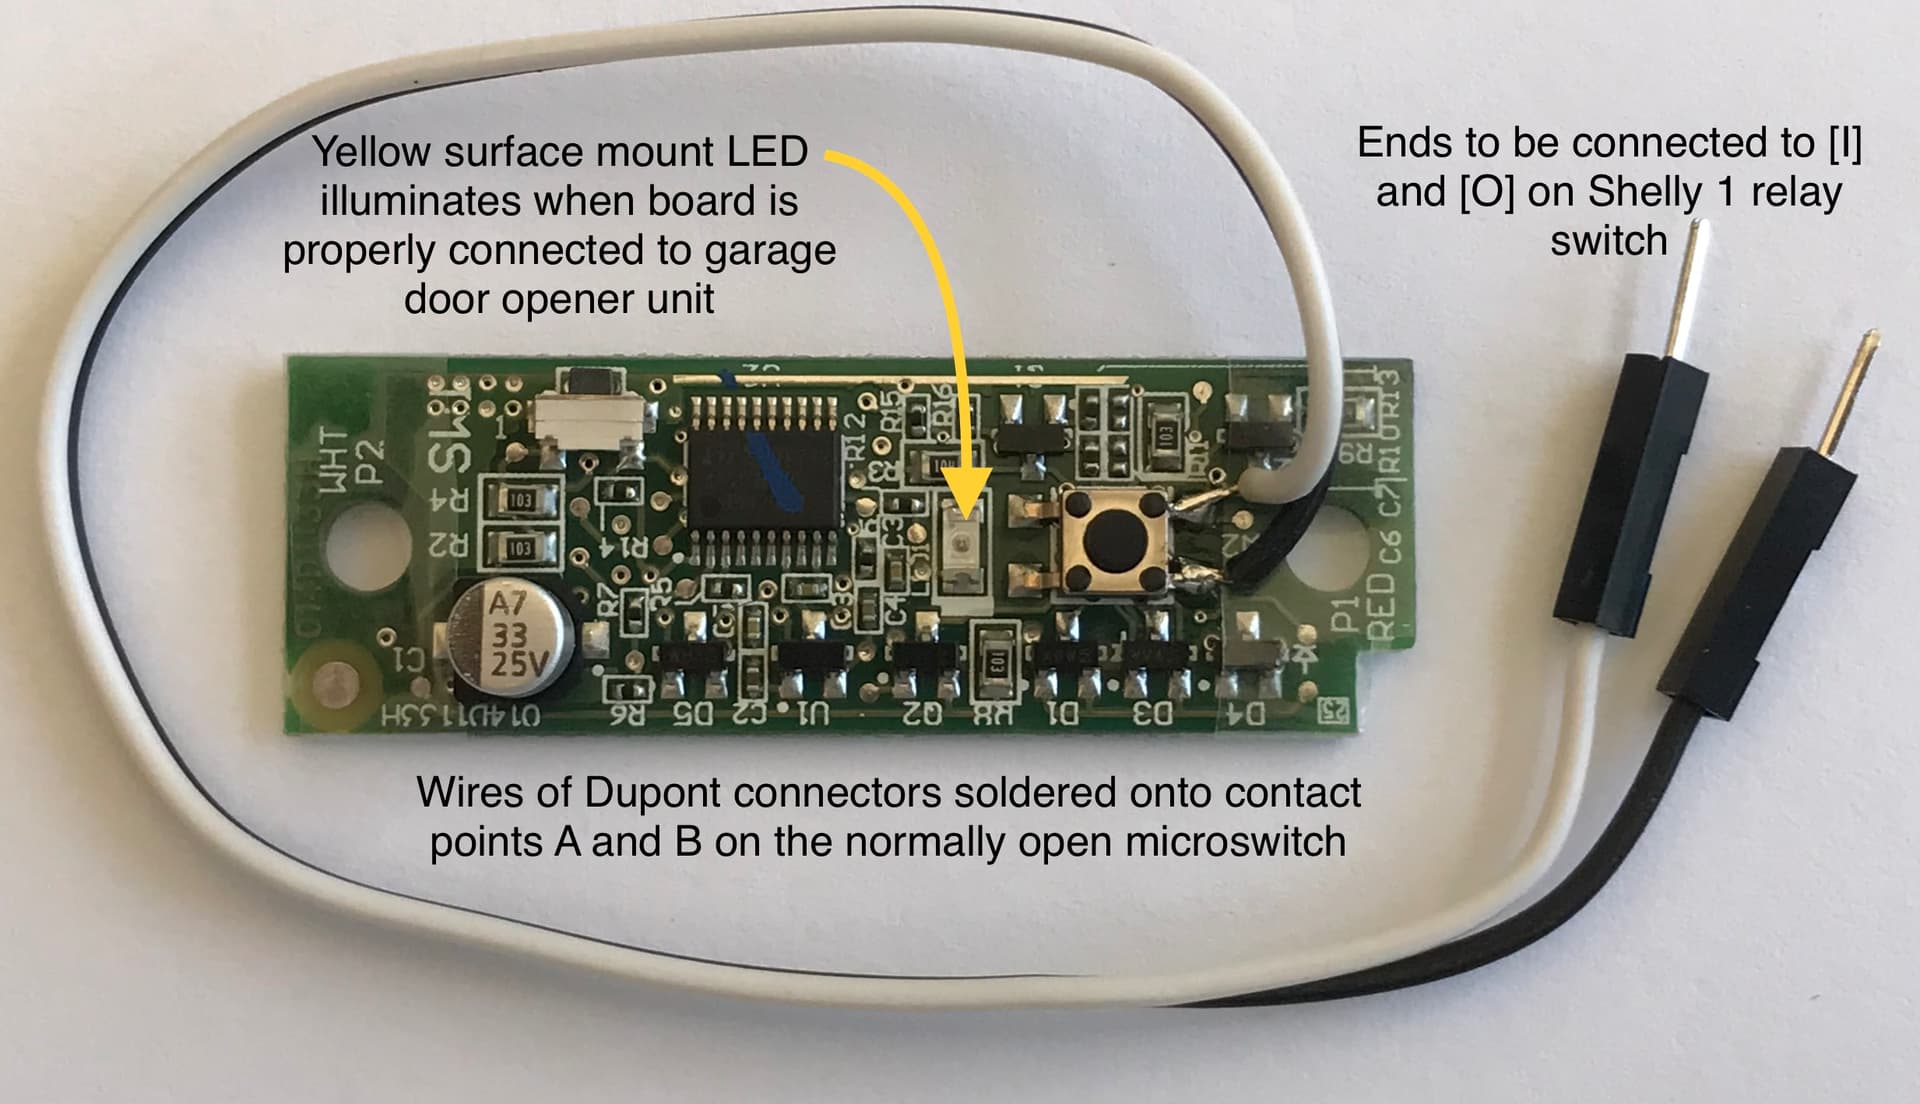
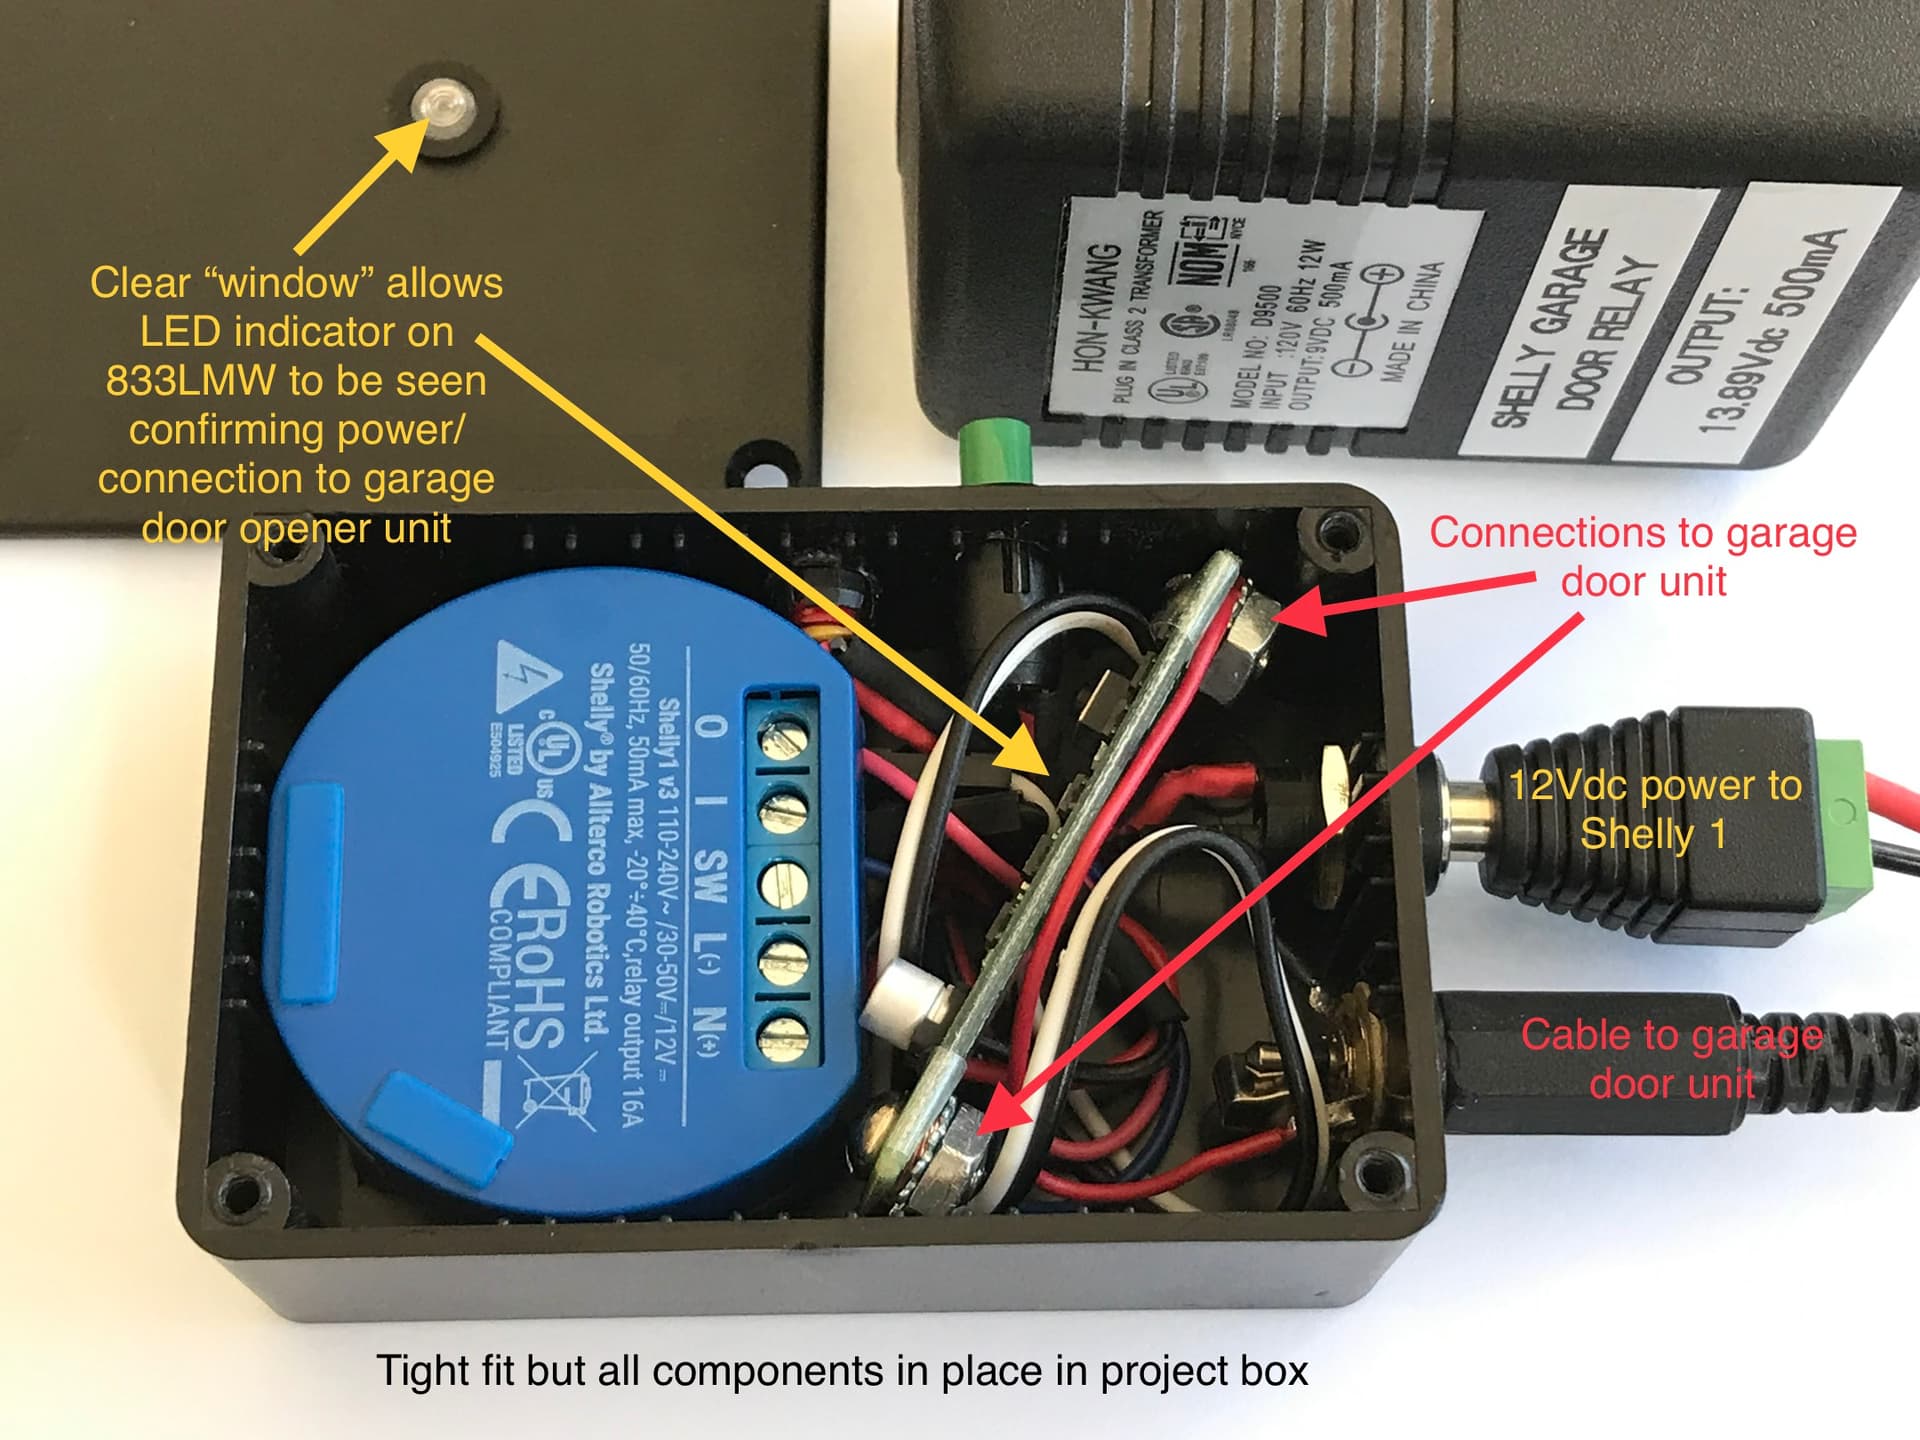
In order to get around this, I took apart my door switch and identified the contacts on the normally open microswitch that triggers the digital signal from the door switch (my door switch is a Model 883LMW). While this can also be done on a remote controller, the cost of an extra door switch on Amazon was 10.99 USD vs over $30 for a remote control (in addition, as previously stated, the remote control radio signal can theorectically be “scanned”, whereas a wired switch cannot). The following photos of my project show what was done:


I wired my device in parallel with the mounted door switch in my garage (although I was once told this could not be done, I have encountered no problems having two switches wired in parallel) and they both work independently to control the opening/closing of the garage door.

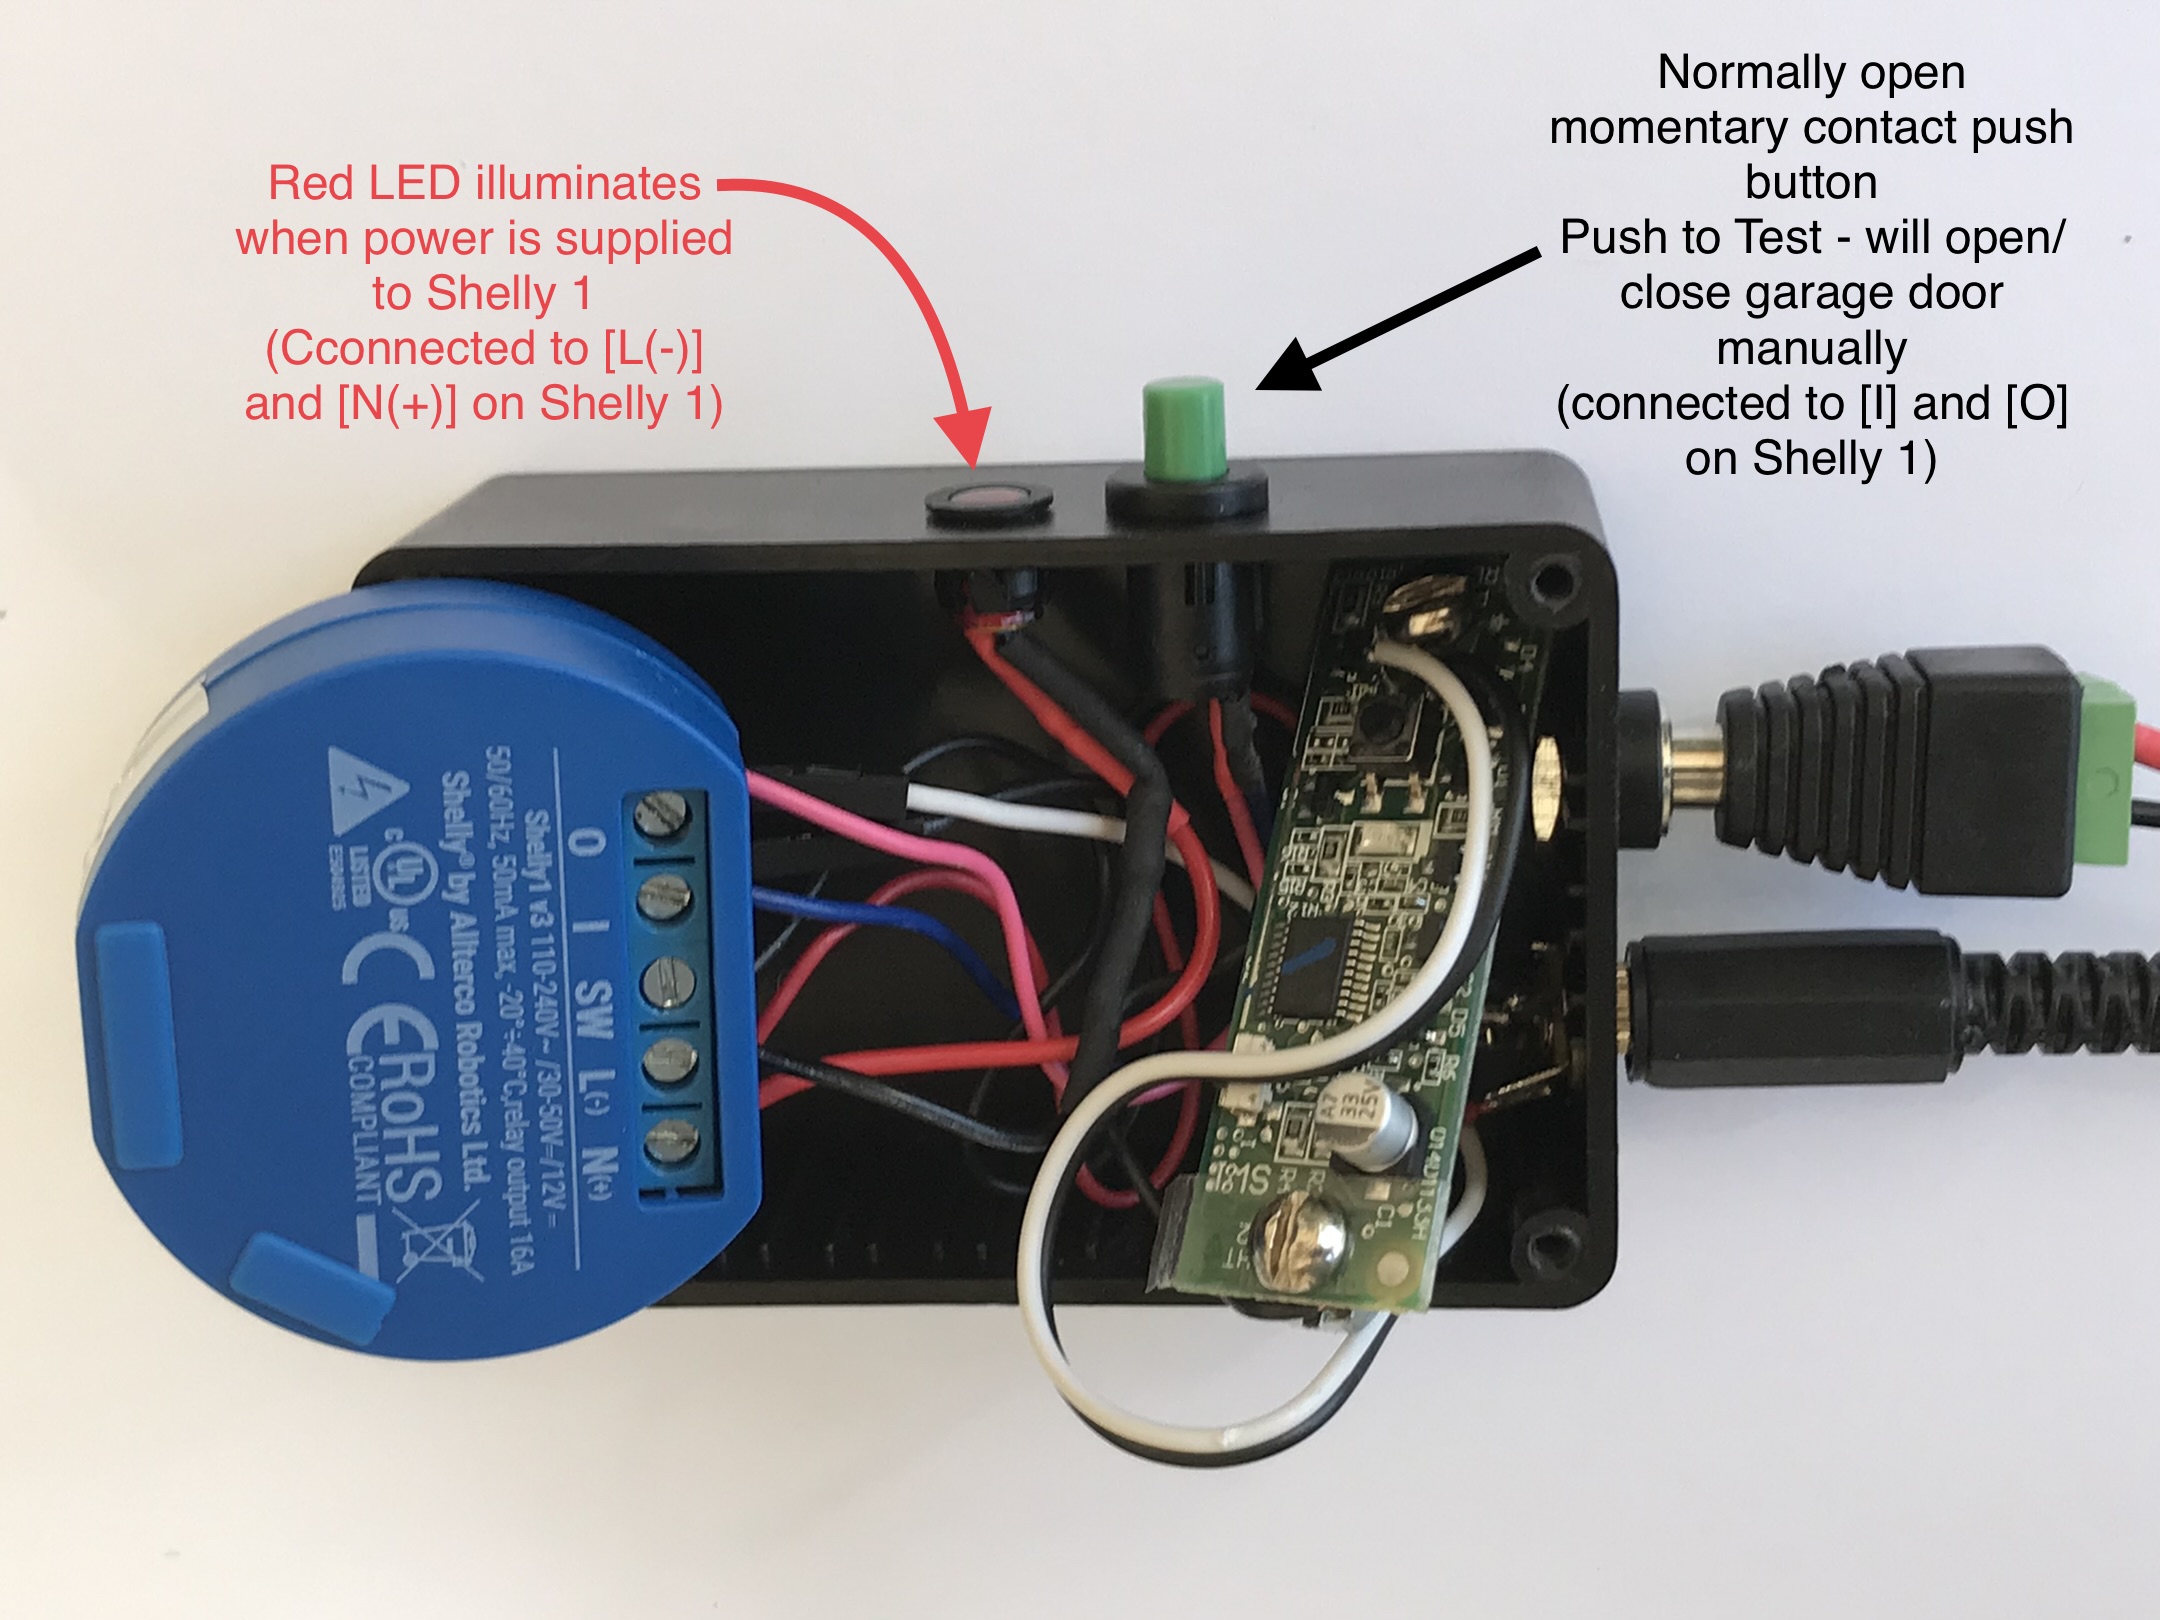
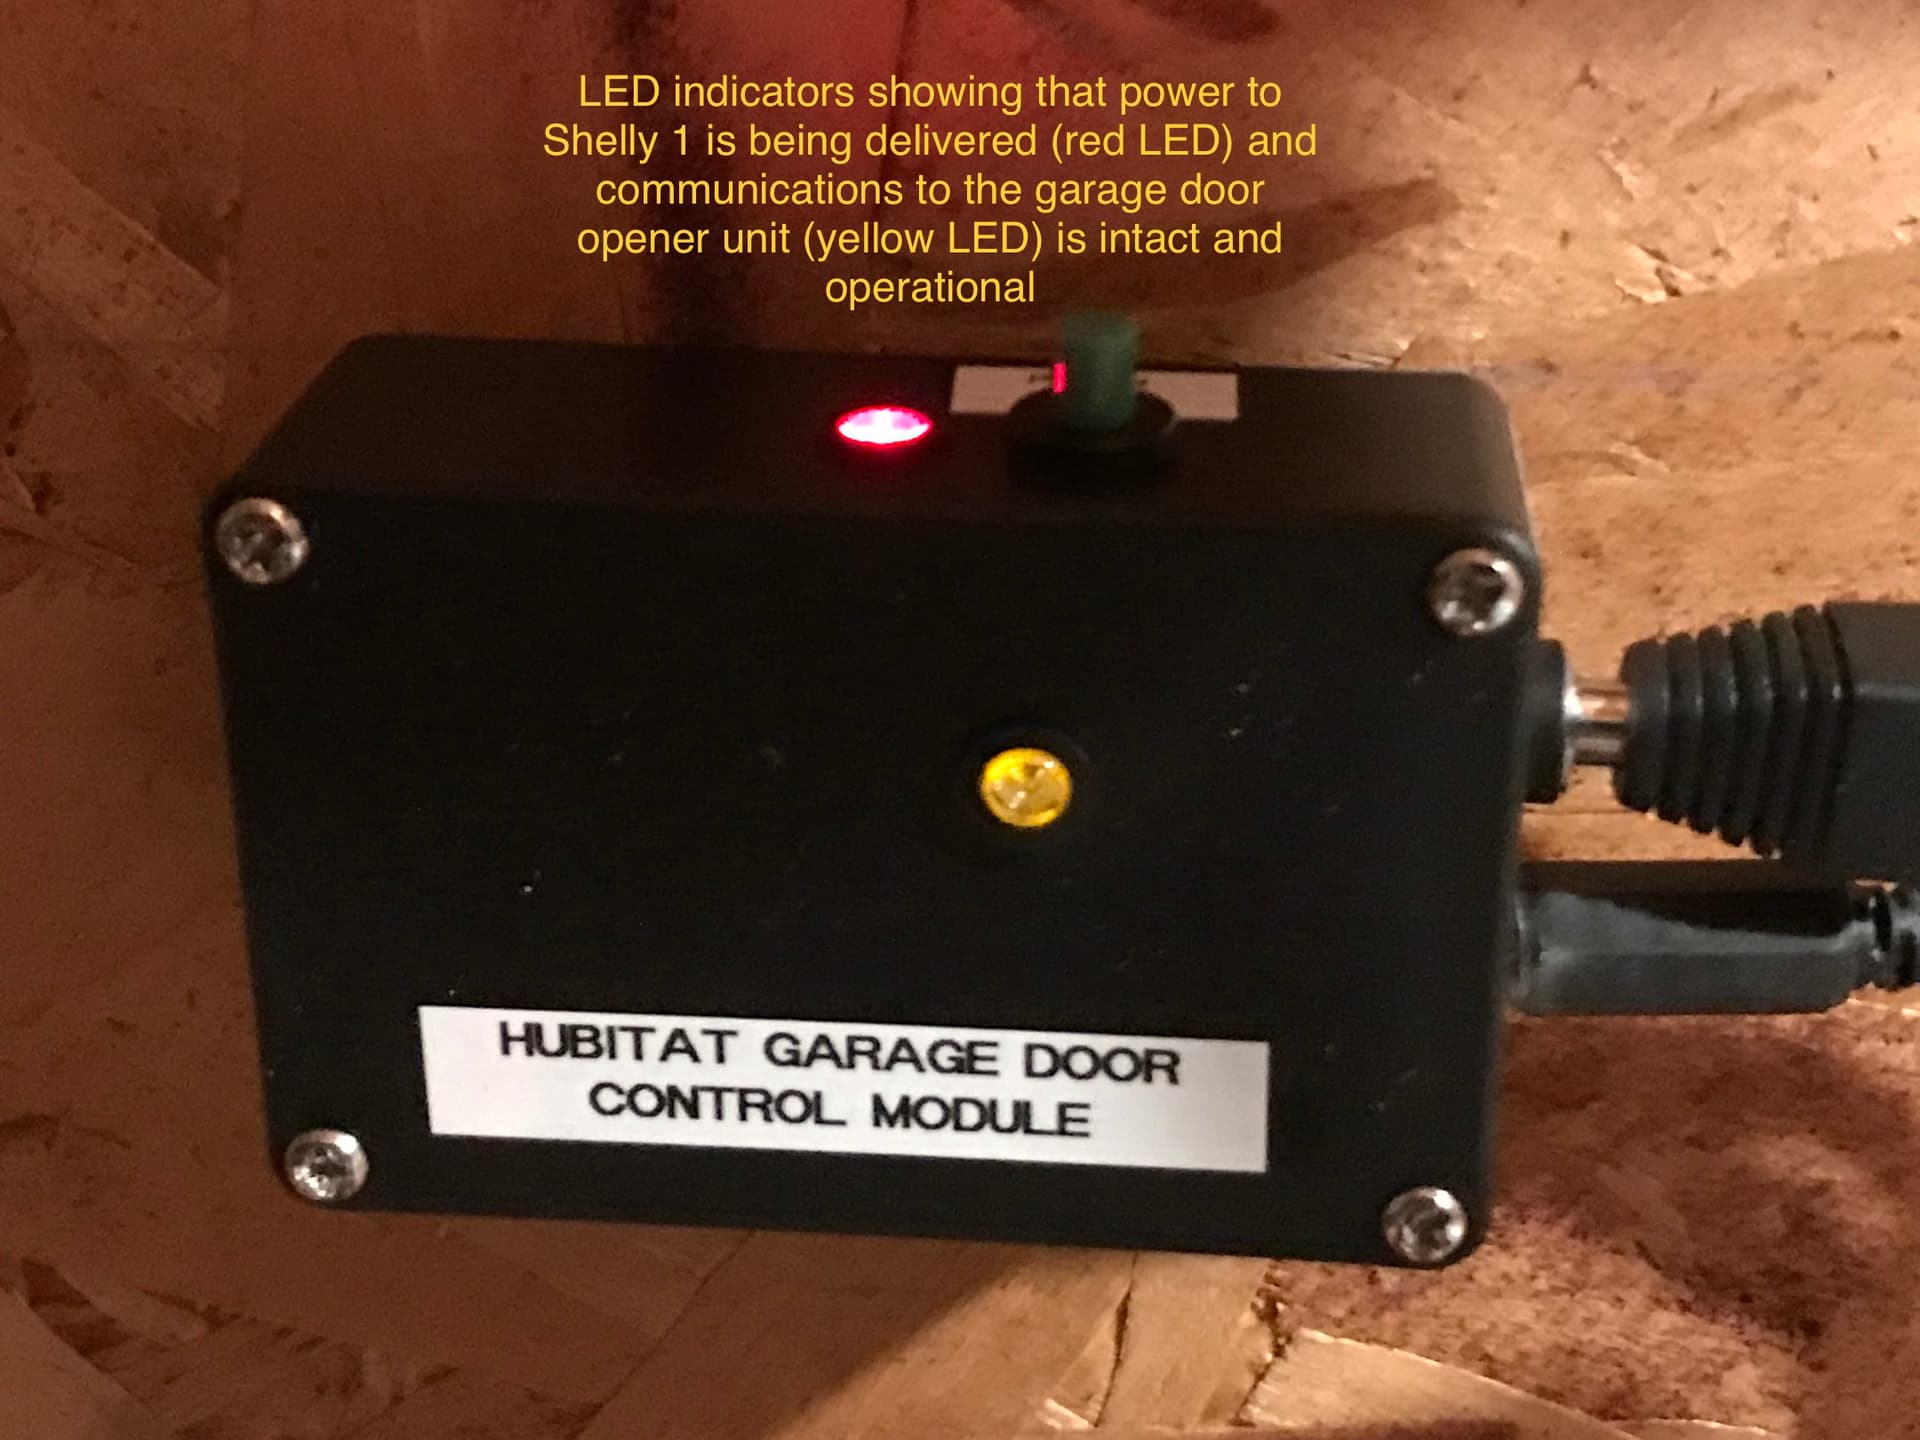
I probably overdid it with the LED indicators and the Test Button (all of these are optional) but I like them for diagnosing potential problems such as whether or not the Shelly is powered, or whether the 833LMW board is properly connected and functional. This device can be made MUCH more simply by leaving out these optional features (just use to Shelly or other device to short out the two pins on the microswitch upon activation). This little device, which is extremely easy for a hobbyist to make, can free you from cloud dependency and allows you to control your garage door by a variety of methods: 1) securely tagging an NFC tag in your car, 2) your garage door switch, or 3) a Hubitat dashboard, and 4) you can still use a conventional remote control FOB if you wish.

On a side note, I have set up via a Hubitat rule to automatically disarm my security system whenever I open the garage door through this system. This way, when I drive into my garage, I do not have to rush to get to a security keypad to disarm the system before the time out occurs. Also, this prevents me from having to disarm the security system with yet another key FOB (I can also control this through my phone).

In addition, if anyone does happen to invade our home, the wall-mounted garage door switch (that is in the garage that we usually use to open the garage when we are at home) is set up with a relay that inactivates it whenever the security system is armed. That way, no one can disarm the security system by just opening the garage door. Also, this prevents us from accidentally triggering the alarm system by opening the garage door when the house is armed in Stay or At Home Mode.

Anyway, hope someone finds this very inexpensive way to free themselves from the tyranny of the cloud useful. Again, sorry for the long post and multiple photos.

12 Likes

Nice writeup!

If someone less skilled with a soldering iron is looking to replicate your project there's this option:

6 Likes

Nice find @Ranchitat ! From the photos on the product page, I bet they just soldered to the same two points I did. I also saw that they even offer a Security+2.0 remote wired in the same way (personally, I would not do the remote since you are still dependent upon batteries for the remote and you are still subject to the potential for scanning). For those who are interested in doing this with the remote, the solder points on the remote control board are much easier to access compared to the wall switch (I had also taken apart the same remote showed in the photos. . . I have the exact same one in my car), but decided against the remote for the reasons in my OP. I had no idea some company was selling these mods as well. I’d like to say great minds think alike, but it didn’t really take much of a mind (mine) to figure out where to short the contacts, LOL!

1 Like

Thanks very much for the detailed instructions.

1 Like

Incredible write up...

I assume that if you have more than one garage door opener that you would need to make more than one of these devices?

Also, the NFC chip that you mention...Is that an iPhone and does it utilize the presence function in Habitat to open and close the door?

Thanks @jeffjangell. Soon after I did the project and writeup, @Ranchitat found a company that was doing a similar conversion (albeit without all the bells and whistles I put into mine) which they were selling commercially.

The NFC is using the iPhone, I understand it is even easier with an Android phone, but I am not using presence (although I am sure presence can be easily incorporated for automatic opening if you so desire…I do not for the reason below). I prefer not to use iPhone presence as some threads have found it to be sometimes hit or miss and leaving my garage door open inadvertently is not something I wish to risk.

Rather, my NFC chip in the car (“hidden” in plain sight) just needs to be in close proximity to my phone to open the door. I prefer this since I always take my phone with me (and never leave it in the car), I do not risk having someone break into my car to steal a dedicated garage door fob/remote that they can then use with the vehicle registration paperwork to go to my home later to break in by opening the garage door with a remote (they would have had to have stolen my phone as well).

Even though @Ranchitat pointed out that a commercial version of the converted garage door switch is available, like many in this community I like to tinker and as a hobbyist, there is a bit of satisfaction of figuring out how things work (I am a fan of Richard P. Feynman) and doing it yourself. Plus, it was less expensive to do it myself as I already had many of the parts, lol.

1 Like

@moh Another option would have been either a zen-16 or 17 or a MHCozy dual relay (if you want zigbee) as well a security 2.0 to dry contact and ecolink tilt sensor. It will run in parallel with your oem controls.

2 Likes

I think I get it now...

Two wires from the remote control to the shelly device
Two wires from power supply to the shelly device
Hubitat sends signal to the Shelly device to open the garage door - Shelly device receives the signal and activates the Garage Remote Control...Same is true for open or close.

How does this device confirm if the garage door is open or closed or do you still need the tilt sensor for that?

Also, why the shelly instead of say a Zooz Wave Relay?

I have my Hubitat monitor all points of access (window and door open/closed status) through my security system (a DSC security system panel) so garage door status is done via a magnetic contact sensor rather than a tilt sensor. My integration is done via the Envisalink Integration. There are several threads on why security functions are best done via purpose built UL approved systems and while Hubitat can be used to monitor security, it should NOT be relied upon as a security system (much like it should not be used as a sole means to provide other life critical functions such as smoke and fire detection).

This magnetic sensor is one that is made specifically for monitoring garage doors (a thread search in this community regarding garage door systems will point to some photos of this sensor and my set up). It is a wired sensor that has a particularly wide gap due to its powerful magnet as it is purpose built for this application. Although it is a wired sensor, as it is a simple magnetic contact sensor, it can also be wired to trigger a wireless sensor to send a signal to Hubitat if desired.

I just happened to have some Shellys laying around and because one of my wifi access points (mesh system) is in a security closet right next to the garage, it was more reliable than a zigbee or zwave contact relay which was much further away and several walls away from my Hubitat hub. Also, I could hard wire my Shelly to a power source in my garage attic space and not have to worry about changing batteries.

@jeffjangell, hope this answers your questions. As @rlithgow1 ‘s suggestion states, there are many ways to do this with various relays and sensors, my way is just one of many options and YMMV. I just wanted to share as I have received so much help myself from this community.

1 Like

Many thanks!!!

Not to beat a dead horse but for the sake of completeness, this is the thread which references the type of magnetic contact sensor I utilized:

Please note, per the thread, I did NOT use the Konnected system but offered my solution as an alternative (and posted pictures of the contact sensor I used).

Like you I want to use Konnected instead of MyQ.
But not implementation yet with Hubitat even though they said originally coming soon.
Ordered two but decided to return them until they are implemented.
Have MyQ installed in two garage doors with Genie door openers that works good.
Installed MyQ with HPM.

Installed two zwave tilt sensors.
Used a Rule to close both in an hour if open

Worked with Hubitat and MyQ for about 6 months then stopped a few weeks ago.
MyQ keeps screwing with their cloud implementation to keep us out.
My Konnected stuff works. Wonder what the holdup is for them working with Hubitat ?

Have not tried to use the advice the following guys did to have theirs work again.

MQ Lite Stopped Working - :gear: Custom Apps and Drivers / Custom Drivers - Hubitat

Done with MyQ.

Why wait for konnected. You can use a zen 16 or 17 or and mhcozy if you want zigbee :slight_smile:

That's why MyQ does not work!

Suggest updating the code to get the doors working while you move forward with getting things local.

rlithgow1 YES moving that way. thanks for you help
arnb may try it while I wire up the local fix. I already use Mhcozy for landscape watering

2 Likes

@moh Thank you very much for this write-up! I have two garage openers. One was the easy dumb kind where I could simply attach a Shelly 1 to two of the screw terminals, and the other has the exact same button as yours. Even with my rudimentary soldering skills I was able to attach doorbell wires to the button to then connect to a Shelly 1.

I sent my wire through the wall so I didn't need a case as you've made. One thing I had to do with my wires to solder them to the board was create a fish hook shape to then send the wires towards the middle of the board, this then allowed me to bend the wires around the board to the rear of the case so that I could send them directly into the wall.

Thanks again! Your post was a lifesaver!

@Knowcontrol ,
Welcome to the community. I’m so glad that my write-up was of assistance. The beauty of this community is how much so many members are actively pitching in to share and help problem-solve. I just wanted to do my humble part in trying to “pay-it-forward” for all the times I have received help from the members. Thank you for your feedback. It makes it all worthwhile to try to help (it makes me feel good when someone can actually benefit).

2 Likes

Now that Chamberlain is officially shutting down their "open" API, is there any hope for support of the ratgo solution?

https://paulwieland.github.io/ratgdo/

1 Like

Or use existing solution zen 16/17 for z-wave or an MHCozy for zigbee, ecolink tilt sensor, and if needed a security 2.0 to dry contact (available for $20).

Maybe: