Newbie (sorry). I've got Meross & Nanoleaf bulbs/presence sensors/plugs connected via Homekit hub and paired them all (apparently successfully) using Matter to my new Hubitat hub that arrived today. But none of these devices can be controlled in an HE dashboard ( no icons showing up on the times and getting unsmiley emojis ![]() ) It says "Unknown device type: "Other" Use hub's UI to managers it". Where am I doing wrong please? I've tried reassigning the device type to Generic Switch Controller for the smart plugs but still nothing. Help would be great.y appreciated.
) It says "Unknown device type: "Other" Use hub's UI to managers it". Where am I doing wrong please? I've tried reassigning the device type to Generic Switch Controller for the smart plugs but still nothing. Help would be great.y appreciated.
So 2 questions (to start):
- Are the devices controllable from the individual device pages?
- Which dashboard are you trying to use?
1 Like
Hi
Many thanks for the quick reply.
No, none of the devices is controllable from the individual device page.
I've tried both the standard and EZ dashboard... same problem.
I think I'm out of my depth with Hubitat and I'm regretting buying it ![]()
Until you can control them from the device page there is no need to try creating a dashboard tile for them. What does the Device Information tab of the device page look like (screen shot please) - it’s possible that you just need a different device driver (generally will contain the word Matter in the description,i.e. Generic Matter RGBW Light).
1 Like
Many thanks! Yes, you're absolutely right, I hadn't realised the need to set the correct driver type in the Device Info tab: all my Meross Matter devices are now working as well as my Nanoleaf string lights. I've plenty of other Meross non-Matter bulbs but I think it'll be easier to change them to Matter bulbs than try to get them to work on HE (I cannot get my head round this Meross integration GitHub stuff). Steep learning curve for me... the next challenge is my Ecowitt weather sensors - unfortunately there's only one customized weather service local API shown in the Ecowitt web menu, and I've already taken that by linking it to my HomeAssistant. Unless you or somebody out there knows anything different, it looks like I'll have to remove the Ecowitt HA API if I want to use HE. I can't find anything on using two local APIs for Ecowitt in this forum or others ![]()
Suggest you do some research on the number of devices your WiFi supports. Matter has some advantages but does tax the WiFi. I have found the matter WiFi devices are slower joining back after disruption then Zigbee. But Zigbee has its own pros and cons.
Take a look at
1 Like
Ah. I see now... Yes, I did add the ability to forward on the data feed in my driver... That may be of interest....
1 Like
Yes -thanks - I'm interested to have my Ecowitt linked to both HA & HE. Please tell me how.
One way around this that I am using. I have a second router hooked up as an access point. I connect some of the Matter devices thru that and it thus alleviates the load.
You can also just use the HA Device Bridge to bring EcoWitt in from HA to HE, without having to save and process the data in two places.
If you are using HA, you probably want the ability in the future to bring something else in that does not work with Hubitat. I just added a Midea AC unit to HA since there was no local integration for Hubitat, and then used the bridge to bring it into Hubitat.
1 Like
Thanks user2574: I found a Hubitat bridge in HA but it only seems able to import in the direction HE>HA. I'm struggling with the HA Device Bridge as basically I don't understand the instructions. I think HE is beyond the ability of my non-IT-trained brain ![]()
The HADB app in HE brings in entities from HA, to have them become Hubitat devices. My AC Unit I connected to HA appeared in the list in the HADB app, and when I select it, HADB creates a Hubitat device that lets me get status and send commands back, giving me full local control of the AC from Hubitat. In this case, it created a thermostat device in Hubitat.
If you want to go the other way, there is an HA HACS for Hubitat, and that will let you bring Hubitat devices into HA. I installed it but then found I have no use for it. I do everything in Hubitat, as far as dashboards and automations. Once I have a device connected with HA and shared with Hubitat, I have no reason to even go into HA unless I need to fix something with an integration.
Edit: Ah, looks like you got the HACS installed already, disregard the 2nd paragraph and see my next post.
After you install it, you will have an App called Home Assistant Device Bridge. Open that app and that is where you put your Access Token, and it is explained how to get that from HA. You also put in the IP of HA, and use port 8123,
In the app, you click on Discover and select devices. Any entities HADB finds in HA will be listed there. After you select devices to pull in from HA, you click done and a child device will be created under the parent device that is also called Home Assistant Device Bridge, which you will find under devices. It may take a bit of time for the devices to appear, as they have to send some data first. Click that parent device, and it will then show you the child devices when they are created. Those devices are now part of Hubitat like any other device.
Here are some very brief notes on this feature...
Thanks, but I don't understand how to install it. It seems I have to copy & paste some code from somewhere to somewhere else, but is this bridge an app or a driver?
Ah, have you not installed Package Manager yet? That helps a lot. Granted, you have to copy the code for Package manager into the apps code in the same way. You first have to go into settings and enable developer tools for those to appear on the GUI. After enabling dev tools, you will have a new section on the left menu that you can expand to show Apps code and Drivers code.
So you have to copy the code into those spots for an app or driver. Just click on "new app" in apps code or "new driver" in driver code, and paste the code in and save. Then once the code is there, you go to Apps and "add app" and it will be a user app, not a built-in. You will be brought to the installation page when you select it. For drivers it will appear in the list of drivers on the device info page of a device.
Package manager avoids all that, but you have to do it the manual way once to install Package Manager. Then the package manager app will let you search for community apps and drivers, which you can then just select for install without having to do any code pasting.
1 Like
Many thanks, I've copied & pasted the app & driver code and now have a Home Assistant Device Bridge...but have fallen down on the HA Long-Lived access token: I can't see any instructions for this. I did a Google search on this token and it shows yet more code in a terminal window, but I'm lost on that ![]()
On the release page there are install instructions, click on install instructions. You will find this:
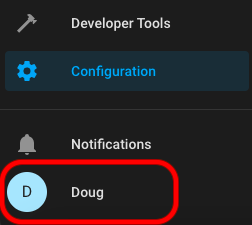
- Press on your user account in Home Assistant
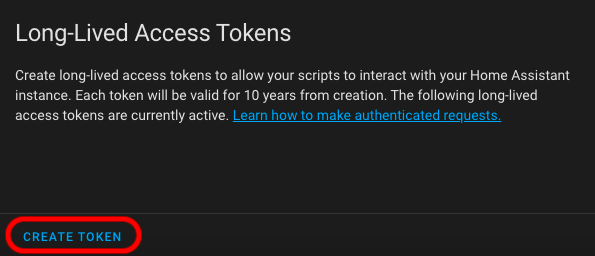
- Scroll down to the bottom and select CREATE TOKEN
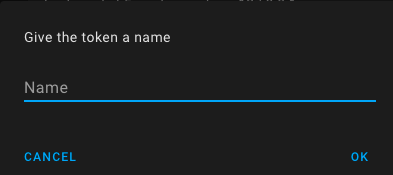
- Name your token (This can be any name you want.) and then press OK.
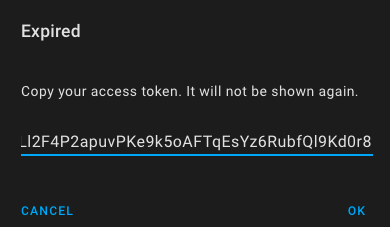
- Copy the token. It isn't accessible after creating it, so if you forget to record it somewhere and need it again later, just delete the old one and create a new token for use in Home Assistant Device Bridge.
Step 2 - Press Discover and select devices to poll Home Assistant for a list of compatible entities.
Got it! Many thanks for your patience with me. I can now see all my HA devices in the Bridge app... clicked on a few but I don't see many new devices as yet, I guess they take time to come across.