Hubitat Apps and Device Handlers for X-10 Devices using Mchad or Heyu with Node Red bridge
******Please note that I am not maintaining this any more. Gave up on X-10 and moved on to Zigbee/Z-Wave things. This has worked for many people, and for some its been nothing but heartache and frustration for others, sincerest apologies @Chad_Heminger . I never had Heyu always used mochad so this was done with help of others in ST community and ported to HE pretty much untested. Reading the original post again, I see that point is not made and I apologize for wasting anyone's time. *****
Seems like @Chad_Heminger has found a better solution link in post 5 below
All code is in github and other repos, use if you want, or not. It was fun while it lasted. There is a lot of good discussion here and in ST forums, if you are interested you can fork and do your own thing. ****

This solution allows 2-way communication between Hubitat and X-10 devices using Node Red and Mochad. You can control your X-10 devices from within HE and use various automation solutions within HE. You can also use X-10 remotes and motion sensors to control other devices. X-10 equipment is fairly inexpensive and readily available on E-Bay etc.
In this solution all X-10 settings and device mappings are done using the Hubitat app. Only a couple of one-time settings need to be made on the Node Red flow.
See the orginal ST page for details and user discussions
Changes from ST Version
-
Uses telnet connections for more robust connectivity between node red server and HE. The default TCP port is 1025, you may need to change it, if its not available on the machine where you are running the node red server
-
Device P-15 is reserved for pinging the system to maintain connectivtiy every 30 minutes. If you need to use this device for something else you can change it in x-10-node-red-mochad-device.groovy
-
Heyu functionality has NOT been tested, since I don't have a heyu device. For ST a heyu user worked with me to do the implementation. If anyone is interested ping me, if you can compare it code and make the changes yourself, feel free to send me a PR
Supported Devices and Functionality
-
X-10 Switches and Modules - on/off and dimming are supported
-
X-10 Motion Senors and Remote buttions - on/off funtions supported from devices sending housecode/unitcode on/off commands
-
X-10 Security Devices
Please note: Dimmer functions are a bit wonky - don't rely too much on percentage just treat them like up/down buttons becaue that's what is available on physical X-10 devices. You can get percentages almost right, if you caliberate by setting to 0 and physically dimming to dark, but it remains dicey, there is no good solution to it.
Requirements
Raspberry Pi
These instructions are for Raspberry Pi, but they can be easily adapted to any Linux variant
Mochad and CM15A or CM19A USB Devices
Mochad exposes a TCP interface to X-10 commands, and can run on any linux system including Raspberry PI. It uses CM15A or CM19A USB devices to communicate with X-10 over RF or powerline. Using these devices you are not limited to a single house code, you can use any of the 15 house code with any x-10 device.
https://bfocht.github.io/mochad/
https://bfocht.github.io/mochad/mochad_reference.html
Node Red
Node-RED is a programming tool for wiring together hardware devices, APIs and online services using a browser-based editor. Node Red is very simple to deploy and is very light-weight. Requires very little effort to setup and run
https://nodered.org/docs/hardware/raspberrypi
Setup
Step 1: Install Mochad on Raspberry Pi
Follow any number of tutorials to setup your Raspberry Pi using your favorite distro, make sure you install the development tools. On Raspbian you can do this using the following command
> sudo apt-get install build-essential
Build mochad
- Install libusb-1.0.0 development files. mochad will not build without this.
> $ sudo apt-get install libusb-1.0-0-dev
- Get mochad source code and unpack it.
> $ wget -O mochad.tgz Download mochad from SourceForge.net
> $ tar xf mochad.tgz
> Now build mochad.
> $ cd mochad*
> $ ./configure
> $ make
> $ sudo make install
- Edit /etc/udev/rules.d/91-usb-x10-controllers.rules change the following line to :
> RUN+="/usr/local/bin/mochad &"
This ensures that mochad will load whenever the usb device is detected, include when Raspberry pi reboots
Blink a lamp
-
Plug in a CM15A, CM19A, or CM15Pro into a Raspi USB port. Connect a lamp to X10 module set for address A1.
-
If using a CM15A or CM15Pro try the following power line (pl) commands.
> $ echo "pl a1 on" | nc localhost 1099
> $ echo "pl a1 off" | nc locahost 1099
- If using a CM19A try the following radio frequency (rf) commands.
> $ echo "rf a1 on" | nc localhost 1099
> $ echo "rf a1 off" | nc localhost 1099
At this point you should make a list of commands that you need to turn your X-10 devices on and off, you will need this later.
credit - X10 Linux: Installing mochad on a Raspberry Pi
Step 2: Install & Setup Node Red
Install Node Red
Follow the instructions on this page to install Node Red on your Pi Redirecting…
Play around a little bit to get the hangs of the basics
Setup Node Red
-
[For Mochad] Copy the contents of hubitat-x10.mochad.flow.json to the clipboard from https://raw.githubusercontent.com/enishoca/Hubitat/master/X-10Bridge/node-red-flows/hubitat-x10-mochad.flow.json
-
[For Heyu - untested] Copy the contents of hubitat-x10.heyu.flow.json to the clipboard from https://raw.githubusercontent.com/enishoca/Hubitat/master/X-10Bridge/node-red-flows/hubitat-x10-heyu.flow.json
-
Browse to the Node Red page on your browser
-
Click on the menu to right and select Import->Clipboard
-
Copy the contents of the clipboard in the edit box, select 'new flow' and import it
-
Verify the listening port 1025 is free on the node-red machine, if not change the port in the first node to any other free port, you will need to configure ths in the Hubitat app later
-
Edit the flow and put the hostname for the mochad server, and the file path for the settings file. If you are running node red as user pi and mochad is running on the same machine, you wouldn't need to make any changes.
-
Next Deploy the flow to activate it.
Step 3: Add the Apps and Drivers Code in Hubitat
You will need to install the following Apps and Drivers in the appropriate sections - make sure you install all of them
-
[App] x-10-node-red-bridge.groovy - https://raw.githubusercontent.com/enishoca/Hubitat/master/X-10Bridge/apps/x-10-node-red-bridge.groovy
-
[App] x-10-node-red-button-child.groovy - https://raw.githubusercontent.com/enishoca/Hubitat/master/X-10Bridge/apps/x-10-node-red-button-child.groovy
-
[App] x-10-node-red-switch-child.groovy - https://raw.githubusercontent.com/enishoca/Hubitat/master/X-10Bridge/apps/x-10-node-red-switch-child.groovy
-
[App] x-10-node-red-security-child.groovy - https://raw.githubusercontent.com/enishoca/Hubitat/master/X-10Bridge/apps/x-10-node-red-security-child.groovy
-
[Driver] x-10-node-red-device.groovy - Hubitat/x-10-node-red-device.groovy at master · enishoca/Hubitat · GitHub
-
[Driver] x-10-node-red-mochad-device.groovy - https://raw.githubusercontent.com/enishoca/Hubitat/master/X-10Bridge/drivers/x-10-node-red-mochad-device.groovy
Step 4: Add App to Hubitat and configure X-10 devices
- Add the X-10 Node Red Bridge Parent App in the Apps section in Hubitat IDE using 'Add Usser App' functionality
You will need to select the hub and configure IP address and port for the Node Red server - this should be the same IP address you use to connect to Node Red on the browser. Port is specified in the first node in the flow, it defaults to 1025 - ensure that you are using the same port on both sides
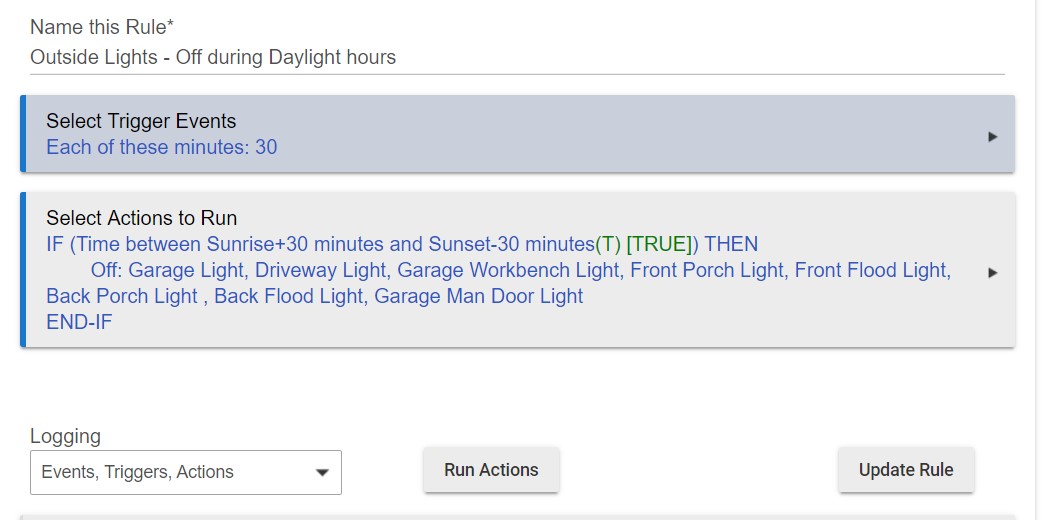
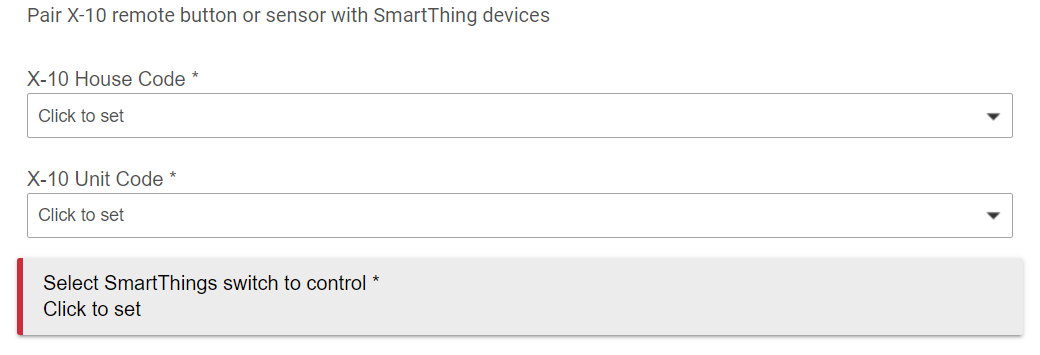
- You can then add X-10 devices in Hubitat and set their X-10 addresses.
Once you add a switch you should be able to turn it on and off. You can map remote buttons and motion sensor address to any device that supports on/off function and control it.