I give up!
I scrapped this entire set up, deleted every device and app.
I then set up the HomeGenie for X10 on a linux (I am running elementary.os) box following these instructions:
http://forums.x10.com/index.php?topic=30427.0
This guide is for the totally new PI beginner .
PI boards run Linux and for so that in itself is intimidating however HomeGenie (GH) takes that into account (I think)
I'm not going into installing setting up the Pi operating system as I assume you've done that and most likely you now have a desktop displaying this guide will not be for installing into a lite version of Debian but the full desktop version as many newbies first load.
It has been said any Home Automation setup needs to be setup on a OS without the desktop environment in order for best performance. Although that maybe the case if your Setup includes several other protocols but we're just worried about X10.(for now)
HG isn't actively being worked on however being open source it has been forked (code used for another project) HGBE this is basically HG with some added features and is still not ready for the PI (my opinion)
For this reason I'll walk you through the HG install.
The install
1: Fire up your PI and open the desktop
2: find the terminal window( linux version of the Command Prompt) and open it.
3: copy this line of code and paste to the terminal window and hit enter on your key
wget https://github.com/genielabs/HomeGenie/releases/download/v1.2-stable.30/homegenie_1.2-stable.30_all.deb
This will download HG but not install it it goes into the downloads folder but you don't have to worry about that.
4: once done do the same for this line
sudo apt-get update
This updates the PI OS so you have the latest drivers and such. sudo tells the PI to use heightened privileges
5: next do the same for this line
sudo apt-get install gdebi-core
This (my understanding) gets and installs the extractor for the HG file you first downloaded.
6: now to extract and install HG. simply add this line to the terminal window and hit enter on your key board
sudo gdebi homegenie_1.2-stable.30_all.deb
Once that is finished you can close the terminal window.
OK I'm done but where is HG?
HG is a web based program there is no shortcut to it.
to access it you need to open a browser. Since you have installed the desktop PI OS one is installed and should be on your task bar. Just open it and point to 127.0.0.1 or localhost since you most likely have not installed any other web based server application you don't need to specify a port which would be 80. (8080 if you have installed something else in which case your browser entry will be 127.0.0.1:8080 or localhost:8080)
now that your there you can book mark it.
Since HG is a server you can access it from another device on your network you just need to know your Pi's IP. and the port HG is using. Type this into a browser on any device and you have HG displaying.
But what is all this stuff displaying in HG?
HomeGenie preinstalls a bunch of demos to help with understanding what is capable.
This I feel is confusing at first. Luckily you can remove that stuff However I'm not going to recommend that untill you have HG doing what you want with your X10 stuff.
Ok so tell me how to setup x10.
I know your itching to get something usable working so first you have to tell HG what X10 interface your using.
1: At the top of the HG web page is a tab called configure then settings click X10 interface options in the new screen that appears.
2: click on device port and select your interface I use the CM15a so I selected CM15 Pro-USB.
3: select all house codes you wish to use You can come back to select more at any time.
4: on the right is a button labelled Disable click on it to enable X10
there is no save, this is actively engaged. go to the top and select configure again.
This time we're going to create a group so your x10 devices are separate from the demo stuff so we click on groups to open the groups page
At the bottom right is a button "Add groups" click it and add the name you wish for your new group and click ok this adds your new group to the groups list. On the right for each group is arrows up and down if you wish HG to open to your X10 group and not the demo group move it up.
Click on the group name you created to open the configuration of it.
The new window allows you to change the wallpaper of the group. HG comes with several but you can add your own .
Now to the good stuff at the bottom right is the actions tab.
Click on the actions tab then add module
Now scroll down to find your first X10 module to add to the group and continue doing this till all are added. then click the X in the add module screen to close it.
now click the home tab (top left) to open the group view and control (test) your X10 devices.
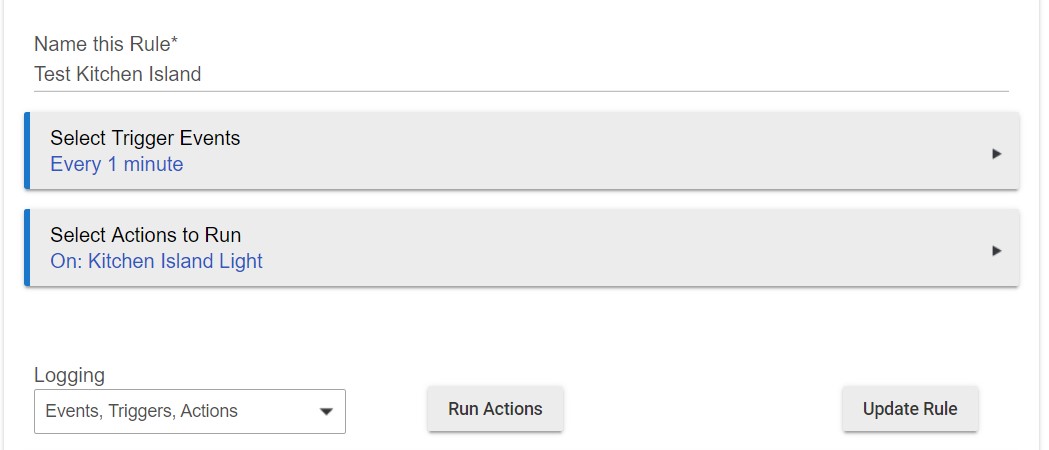
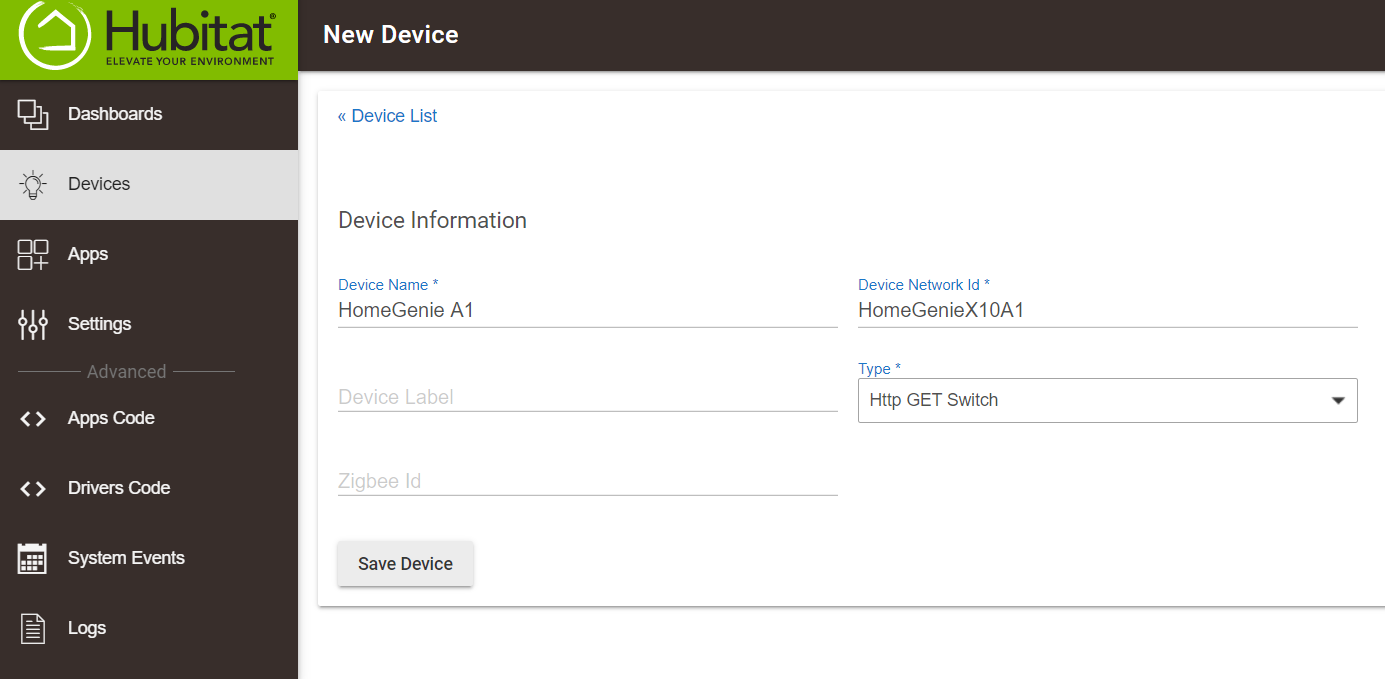
Set up Hubitat to talk to HomeGenie
Add custom Device
Log into your hub
Click on the <> Driver Code on the left side
Click New Driver
Copy and past this into a new driver:
/*
- Http GET Switch
- Calls URIs with HTTP GET for switch on or off
*/
metadata {
definition(name: "Http GET Switch", namespace: "community", author: "Community") {
capability "Actuator"
capability "Switch"
capability "Sensor"
}
}
preferences {
section("URIs") {
input "onURI", "text", title: "On URI", required: false
input "offURI", "text", title: "Off URI", required: false
input name: "logEnable", type: "bool", title: "Enable debug logging", defaultValue: true
}
}
def logsOff() {
log.warn "debug logging disabled..."
device.updateSetting("logEnable", [value: "false", type: "bool"])
}
def updated() {
log.info "updated..."
log.warn "debug logging is: ${logEnable == true}"
if (logEnable) runIn(1800, logsOff)
}
def parse(String description) {
if (logEnable) log.debug(description)
}
def on() {
if (logEnable) log.debug "Sending on GET request to [${settings.onURI}]"
try {
    httpGet(settings.onURI) { resp ->
        if (resp.success) {
            sendEvent(name: "switch", value: "on", isStateChange: true)
        }
        if (logEnable)
            if (resp.data) log.debug "${resp.data}"
    }
} catch (Exception e) {
    log.warn "Call to on failed: ${e.message}"
}
}
def off() {
if (logEnable) log.debug "Sending off GET request to [${settings.offURI}]"
try {
    httpGet(settings.offURI) { resp ->
        if (resp.success) {
            sendEvent(name: "switch", value: "off", isStateChange: true)
        }
        if (logEnable)
            if (resp.data) log.debug "${resp.data}"
    }
} catch (Exception e) {
    log.warn "Call to off failed: ${e.message}"
}
}
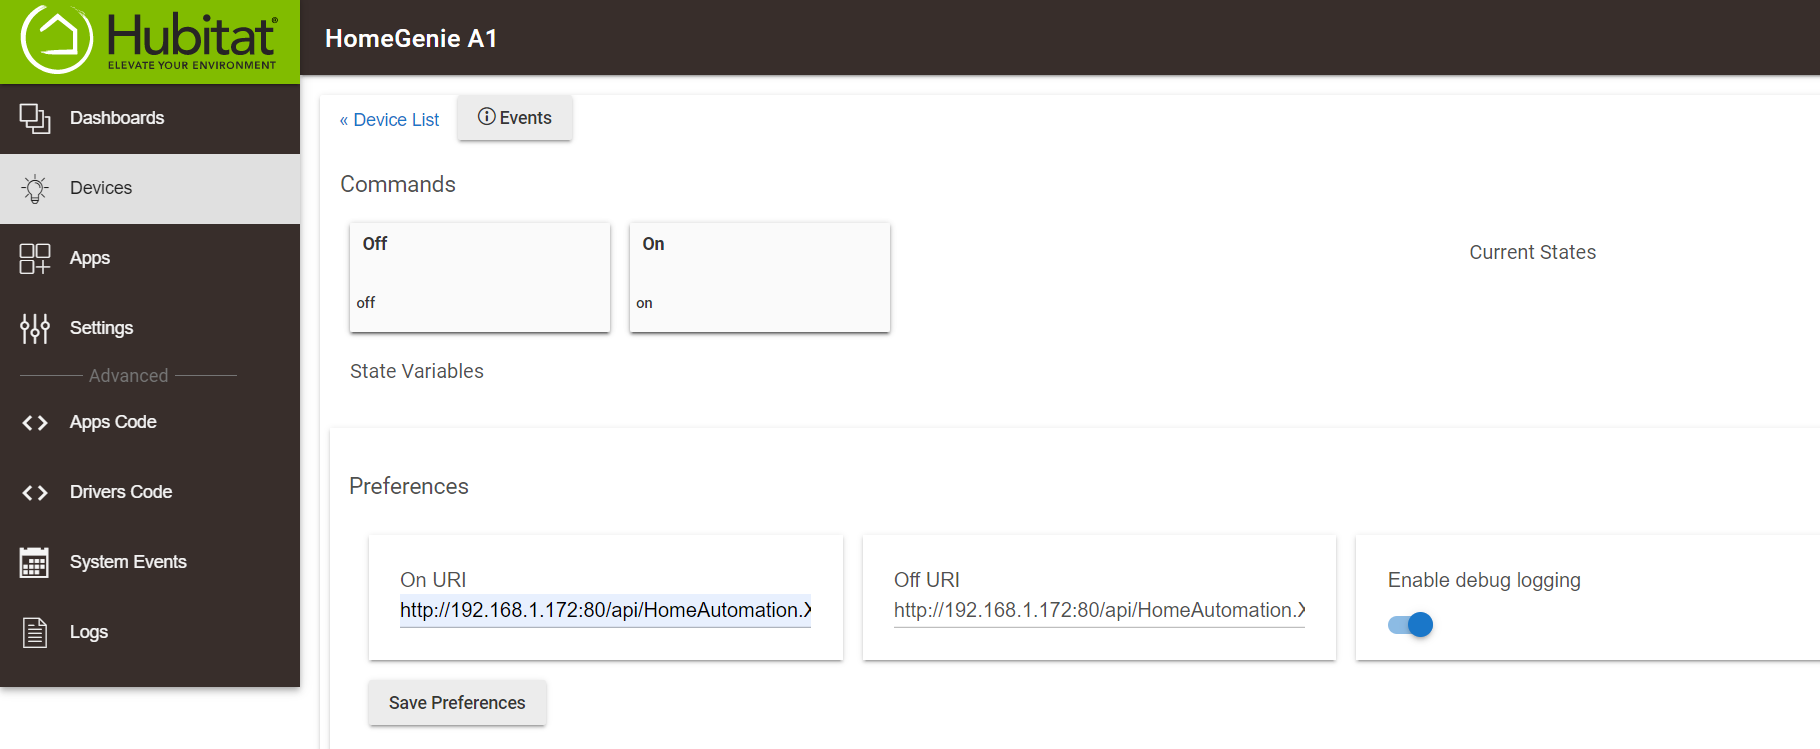
Save your new driver
Add Device to Hubitat
Click on the devices on the left side.
Add Virtual device
Create new by entering name and such, but pick the HTTP Get Switch
Click the Save button
Next you need to add the Preference URL:
My server IP is 192.168.1.172:80 so My on URL is
http://192.168.1.172:80/api/HomeAutomation.X10/A1/Control.On
My off URL is
http://192.168.1.172:80/api/HomeAutomation.X10/A1/Control.Off
This has fixed my problem. Hopefully if you are setting up your X10 it will help you walk through it.