You don't stay in one place. The smarts of your Hubitat smart home shouldn't either. Powered by Google Directions, Multi-Place is a Hubitat App that extends your smart home's reach to your favorite places and the roads therebetween.
Multiple Places. One tile.
Multi-Place displays your presence across multiple places on a single dashboard tile, referred to in the app as a "Tracker", with a clean graphical look that is highly customizable. Multi-Place can even display your presence across vehicles, using either dedicated presence sensors or OwnTracks. Moreover, Multi-Place integrates with Withings Sleep, to display your presence in bed. No matter where you are, Multi-Place centralizes the display of your presence into one clean graphic for your dashboard. The tile is not required for any other features.
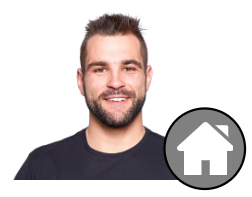
*Icon in the gray circle changes based on your presence across multiple place, e.g., a briefcase when you are at work, a vehicle when you're in the car, a bed when you are in bed, etc. All completely customizable.
Automate based on current traffic conditions.
Before you typically leave for a certain destination, like work or school, Multi-Place checks traffic conditions for you. Set up Multi-Place to turn on a switch or notify you with a push notification if traffic is bad and you need to leave X minutes earlier than usual. Or, configure Multi-Place to just discretely display that information on your dashboard only when necessary, so as to keep your dashboard clean and not interrupt you otherwise. Multi-Place stays aprised of traffic conditions shortly before and throughout the window of time that you typically depart for your destination, so you don't have to worry about missing a traffic update.
Always take the best route.
When Multi-Place checks traffic conditions, it also identifies the best route for you to take to your destination. Set up Multi-Place to display the best route on the dashboard you have beside your door, so that one glance informs you of which way to go to your destination. Or, configure Multi-Place to send you a push notification with the best route when you get in your vehicle or open the garage door during your typical departure time window, so as to have traffic information exactly when you need it. Better yet, tell Multi-Place the route you prefer to take typically, and Multi-Place will only display or push route information if the best route to take is different than your preferred route. That way, you're only bothered if you need to take a different route than you would have taken anyway.
(images enlarged for preview purposes; can be as big or as little as you want. Red part in static image is from an animation that indicates bad traffic)
Automate based on departure and arrival for a typical trip.
Multi-Place can trigger automations based on your departure from the origin of a typical trip and/or your arrival at the destination of that trip. For example, configure Multi-Place to turn the kitchen pendant light to green when you get in the car to leave work and head home, in order to notify your family members at home that you're headed home. Or, tell Multi-Place the time your teenager is supposed to be at school, and selectively get a push notification if he or she arrives X minutes later than the required time.
Keep others up-to-date on your ETA.
Once you depart on a trip, Multi-Place determines your estimated time of arrival (ETA) at the trip's destination, given current traffic conditions. Multi-Place displays your ETA on your dashboard, so others at home can know when you'll arrive. You can also make Multi-Place smart enough to know when you're typically supposed to be at a certain destination. That way, if you're going to be late, either because you haven't left yet or you're stuck in traffic, Multi-Place can automatically send a push notification to someone else to notify them that you are going to be at least X minutes late. No more getting stuck in a meeting at work and getting grief for neglecting to at least send a note that you're running late; Multi-Place can do it for you now, automatically. Multi-Place can also alert you if someone does not arrive at a certain destination (e.g., school) within the expected time window,
Reward Accessories
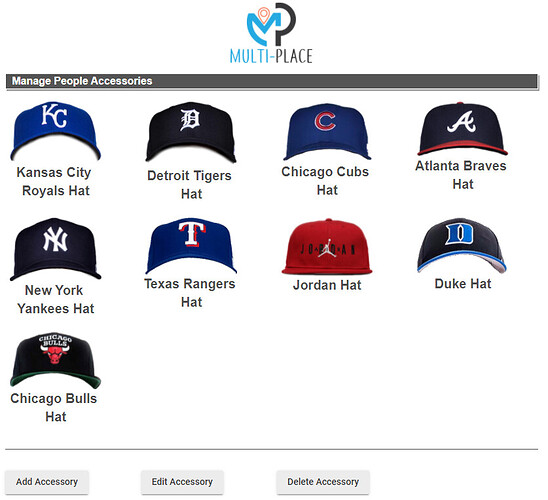
Set up digital accessories, like baseball hats, for your avatars. Accessories can be configured as earnable upon the rewarding of a specified number of "stars". So, if you have an avatar configured for a child, you can reward stars to the child for good behavior, and reward digital accessories upon the earning of a certain number of stars.
Sleep. Compete. Repeat. Multi-Place's integration with Withings Sleep allows your family to compete with one another in terms of your sleep scores. Multi-Place awards a daily ribbon, a weekly trophy, and a monthly trophy to the person with the best sleep score. Get to sleep and show off your bling in the morning.
Main User Interface
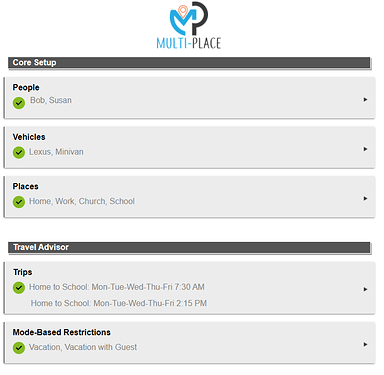
Simple, intuitive interface with few very little needed to get up and running.
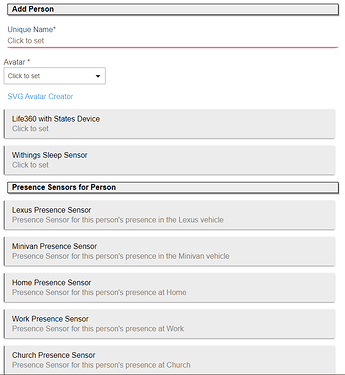
Interface for Adding a Person
Interface for Accessories
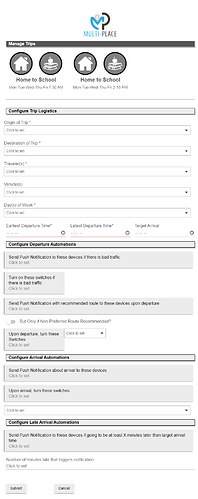
Interface for Adding a Trip
Detailed Instructions for App Setup
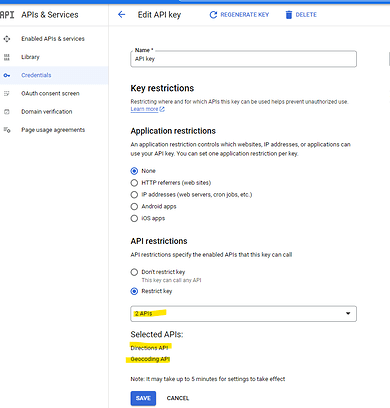
- Get a Google Directions API key here.. Enable the Google Directions API. If you will use OwnTracks, also enable the Google Geocoding API and connect your API key to both the Directions API and the Geocoding API
Google gives you $200 a month in credit, which translates to 20,000 Google Directions API calls or 40,000 Google Geocode API calls a month for free. That’s more than plenty to keep this free for you. Multi-Place (by default) stops making API calls if the free limit is exhausted, ensuring the app stays free. However, it is ultimately your responsibility to keep track of your API costs, especially as Google may change their API call costs without notice and without this app taking those changes into account (at least until someone notifies me).
-
Create one or more people in Multi-Place by giving each person a name and a picture of your choosing. Tell Multi-Place which OwnTracks device and/or which Withings Sleep device is specific to each person.
-
Create one or more vehicles in Multi-Place by giving each vehicle a name and a picture of your choosing. Tell Multi-Place which sensors in Hubitat indicate which person's presence in each vehicle. One way to set up a vehicle sensor is this:
- Get a bluetooth beacon, like the USB RadBeacon from Radius Networks ($30)
- Use an app on your phone (like Geofency for iOS) that detects a beacon and sends a webhook to Rule Machine upon enter/exit events
- Use Rule Machine to set a virtual presence sensor upon receiving a webhook
- More detailed setup instructions in the README
-
Create one or more places in Multi-Place by giving each place a name, an address, and a picture of your choosing. Tell Multi-Place which sensors in Hubitat indicate which person's presence in each place. You have a few options here:
- (A) Use OwnTracks. Multi-Place will use the longitude and latitude reported by OwnTracks to detect whether you are at a certain address input into Multi-Place. Name the places in OwnTracks the same as you name them in Multi-Place. Multi-Place will detect your presence at a Multi-Place when OwnTracks detects your presence at an OwnTracks place with the same name.
(B) Use an app like Geofency for iOS on your phone and send webhooks to Rule Machine when you enter/exit a geofence configured for that place. Then just use rule machine to set a virtual presence sensor based on those webhooks
(C) Use dedicated beacons or other types of presence sensors at one or more places
- (A) Use OwnTracks. Multi-Place will use the longitude and latitude reported by OwnTracks to detect whether you are at a certain address input into Multi-Place. Name the places in OwnTracks the same as you name them in Multi-Place. Multi-Place will detect your presence at a Multi-Place when OwnTracks detects your presence at an OwnTracks place with the same name.
-
Create one or more trips in Multi-Place by defining an origin and destination for the trip, as well as which people and vehicles are associated with that trip. Tell Multi-Place a window of time during which you typically depart on the trip, as well as a target arrival time. Select which automations to configure for the trip, such as by selecting which devices to push which notifications to.
-
Set up restrictions on when Multi-Place detects trip departures and checks travel conditions. For example, you can configure Multi-Place to not do those things when your Hubitat hub is in vacation mode.
-
Click Done on the App's main page, and Multi-Place does the rest.
-
For each person, Multi-Place creates a "Tracker" device with the name of "[Person's Name] Multi-Place Tracker". This Tracker device has an attribute called "tracker" with the graphical display that you can add to your dashboard. Multi-Place also outputs this graphical tracker at a cloud endpoint in SVG or html format, for use on an image tile in dashboards like Sharptools.
Hubitat Package Manager Install Instructions
- Find Multi-Place under the tags "Vehicles & Transportation", "Sleep", or "Presence & Location"
- Install Multi-Place Package via Hubitat Package Manager
- Follow the install instructions in the Multi-Place app
Hubitat Manual Install Instructions
- Install the Multi-Place Tracker driver
- Install the Multi-Place app
- Enable OAuth in the Multi-Place app
- Follow the install instructions in the Multi-Place app
Light Weight Alternative
DriveTime is a light weight alternative if you simply need directions and want to program the logic yourself using Rule Machine



 )
)