[RELEASE] AlarmDecoder for Hubitat

This is my first attempt at simplifying the setup of the "AlarmDecoder for SmartThings" that was ported to HE. I found the setup process cumbersome and confusing. I have to modify the code to say how many contact sensors I have??? I have to manually change the device type from a Virtual Contact to a Virtual Smoke Detector? All of that should be handled by the setup process! So that's what I did! This is NOT my integration, I simply made changes to the existing SmartThings integration to better support HE.

Please use Hubitat Package Manager ([BETA] Hubitat Package Manager) to install. There are just too many separate drivers in this integration and I really don't want to provide support for installing everything by hand. The code is available at https://github.com/dcmeglio/alarmdecoder-smartthings

The changes are:

1.) Support for Night Mode for Hubitat Safety Monitor
2.) Support for contact sensors, motion detectors, smoke detectors, CO detectors, and shock sensors from the UI instead of having to modify device types
3.) Support for entering in RFX serial numbers which lets you get battery and tamper reports from wireless devices (you can find the serial number by popping off the cover of the device, it will be stamped on the inside on a sticker. The other option is open the AlarmDecoder Live Log and open a window/door/whatever. You'll see a message like !RFX:0103966,01 the part in bold is the serial number. You will need to enter this for each wireless zone device.
4.) Much easier wizard-driven setup process

Caveats:
The documentation currently sucks and still talks about SmartThings a lot. I'll get to it, just not there yet!
Still more work to do but I think it's already much easier than the ST version!

4 Likes

I installed from HPM on Friday evening, and it did build all of the devices for my Ademco Vista 20P.

When it reached out to Alarm Decoder during the install, I ASSumed that it was using a back-door to configure the AD side and download the sensor map from there. Bad assumption on my part. It took me several hours to find out that I still needed to manually set up the UPNP Push on AD so the data was pushed to my HE.

The moral of the story is to read/follow the instructions from the README.md file on GitHub:

https://github.com/dcmeglio/alarmdecoder-smartthings/blob/master/README.md

My only gripe (don't know if this is Ademco-specific) is that both my alarm system installer and I are OCD about zone numbers matching everywhere, and the installer created all of the virtual devices with sequential numbers that did not match the Vista zone numbers. It also required me to go back in and edit each created zone to put in the Vista zone for each so they would work. Long story short, I'm not sure how much time (if any) the automatic sensor build saved me because of my OCD and it not automagically mapping Vista zone numbers.

I don't know if the app API can handle it, but I'm wondering if just asking for the lowest/highest zone number and presenting a big 'ol honking HTML table where each column is an AD zone and has fields to enter the Device Label, RF S/N, Loop(s), and a picklist/checkbox grid for device type (defaulted to contact sensor and including "none" to skip making this zone)? Maybe I'm just being too OCD?????

I wanted to do exactly what you're suggesting but I don't believe the AD has an API that lets me grab that data, at least I couldn't find one. And the AD author has gone radio silent when I've asked questions lately :frowning:

1 Like

Not a clean API, but you can screen-scrape it from http://MyADHost/settings/zones/ if you ask the user for an AD username/password.

I did discover a possible alternative. If you export the settings from AD, it dumps out a .tar.gz file to the web browser containing several JSON files with various settings. There's a file named zones.json, which looks like this on my AD-Ademco-Vista setup:

[
    {
        "description": "Living Room Motion",
        "id": 1,
        "name": "Living Room Motion",
        "zone_id": 1
    },
    {
        "description": "Door Basement Entry",
        "id": 2,
        "name": "Door Basement Entry",
        "zone_id": 2
    },
    {
        "description": "Water Flood Basement",
        "id": 3,
        "name": "Water Flood Basement",
        "zone_id": 3
    },
    {
        "description": "Fire Heat Basement",
        "id": 4,
        "name": "Fire Heat Basement",
        "zone_id": 5
    },
    {
        "description": "Front Door Entry",
        "id": 5,
        "name": "Front Door Entry",
        "zone_id": 10
    },
    {
        "description": "Rear Door Entry",
        "id": 6,
        "name": "Rear Door Entry",
        "zone_id": 11
    },
    {
        "description": "Foyer Left Window",
        "id": 7,
        "name": "Foyer Left Window",
        "zone_id": 12
    },
    {
        "description": "Foyer Right Window",
        "id": 8,
        "name": "Foyer Right Window",
        "zone_id": 13
    },
    {
        "description": "Computer Room Window",
        "id": 9,
        "name": "Computer Room",
        "zone_id": 14
    },
    {
        "description": "Master Bedroom Window",
        "id": 10,
        "name": "Master Bedroom Window",
        "zone_id": 15
    },
    {
        "description": "Rear Bathroom Window",
        "id": 11,
        "name": "Rear Bathroom Window",
        "zone_id": 16
    },
    {
        "description": "Rear Laundry Window",
        "id": 12,
        "name": "Rear Laundry Window",
        "zone_id": 17
    },
    {
        "description": "Kitchen Side Window",
        "id": 13,
        "name": "Kitchen Side Window",
        "zone_id": 18
    },
    {
        "description": "Living Side Window",
        "id": 14,
        "name": "Living Side Window",
        "zone_id": 19
    },
    {
        "description": "Living Front Window",
        "id": 15,
        "name": "Living Front Window",
        "zone_id": 20
    },
    {
        "description": "Remote Arm Stay",
        "id": 16,
        "name": "Remote Arm Stay",
        "zone_id": 23
    },
    {
        "description": "Remote Arm Away",
        "id": 17,
        "name": "Remote Arm Away",
        "zone_id": 24
    },
    {
        "description": "Remote Disarm",
        "id": 18,
        "name": "Remote Disarm",
        "zone_id": 25
    },
    {
        "description": "Garage Door",
        "id": 19,
        "name": "Garage Door",
        "zone_id": 21
    },
    {
        "description": "Garage Door 2",
        "id": 20,
        "name": "Garage Door 2",
        "zone_id": 22
    }
]

I don't know if the HE programming options can deal with it or if it is reasonable to expect an end user to unpack a .tar.gz file and cut/paste the contents into HE, but the info is available if you can figure out a way to grab it.....

But those are just zone numbers. Your zone 2 is a contact vs your zone 4 is a smoke detector, and I'm not sure what those remote arm/disarm are but they don't appear to be "real zones". So it's something, but it doesn't tell you what device type it is and in the case of wireless sensors it doesn't give me the serial number which is needed for battery/tamper reporting.

Also, HE cannot open a tar.gz so someone would have to manually copy/paste the json. While I definitely see value in automatically creating things, if it created the sensors all wrong I feel like that's worse than not creating them at all.

1 Like

The arm/disarm things are buttons on an old Honeywell RF "talking" remote control. I gather that pushing one of those buttons trips the zone like a contact sensor, and the panel uses that action to set the appropriate mode. I have never used them for anything interfacing to AD.....

Right. That’s kind of my point. If I just load that json it would create window contacts for those.

1 Like

My thought was to iterate by zone_id and build a big 'ol HTML table, where the zone and name are pre-populated and the user could pick a different device type or enter the RF S/N on each row.

The way that it is coded now works for the non-OCD users, so I'll just crawl back under my rock and try to avoid a third false alarm to the central station this week just trying to update the software on the AlarmDecoder Pi..... :turtle:

Let me think on it a bit... I really hate doing screen scraping because all it takes is a new version of the AD2Pi and poof broken :frowning:

1 Like

Not sure how good I feel about the accuracy of that zone list. Mine returns only some of my zones and each time I do the Scan Panel, I get different zones. Like on some scans it detects a zone and the next scan it doesn't, but for me it has yet to return my correct zone list. It was a nice idea, but I don't think it works well enough to rely on. I have 50 zones, I never got it to detect more than 33 after several tries.

I just received my HE. I’d like to try this out for starters. I love to do any testing and love the idea of the matching zone #’s (yes, OCD :slight_smile: ) I’ll see if I can get the plugin to work, dig into it and see if I can figure out what I’m doing. Glad to see this as other solutions seem to be complex or not supported. Thanks for your efforts.
2 Likes

Question, I think I'm figuring out the difference. For your release, this would only be based on an AD2xxx setup? (I have an AD2USB and Envisalink3 and have used both) I am currently discovering which route to take before I do any zwave/zigbee transfer to HE. Would one of you mind clarifying?

Thanks

This is a LAN integration using an AD2Pi running the AlarmDecoder WebApp. It talks to the API running on that webapp.

...as well as the AD2USB (also connected to AlarmDecoder).....

2 Likes

As long as you have the web app you’re good!

1 Like

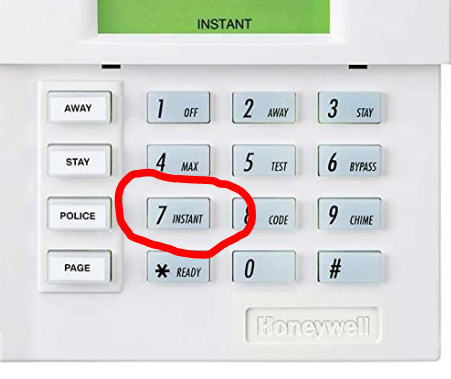
I am curious, is Arm-Instant available through the API?

image

That's what I used before I got Alarmdecoder working when arming alarm to go to bed at night with existing keypads.

Thank you for porting this from the ST version and putting it into your HPM. The joy of now being able to push one button on a remote and turn off all of my lights AND arm my alarm at night is great. I thought I was going to be able to do that w/ Konnected easily but didn't do enough research.

Yeah. The api just basically sends key strokes as a fake keypad. So if like you type 12347 to arm instant if your code was 1234, I’d just have to add a command to the driver to send 12347

I should have time to add this this weekend.

Interesting side note. My DW and I both left the house at the same time yesterday, and it was the first time that we were both away since COVID-geddon started (and I switched from Wink to Hubitat).

When I was a few hundred feet out of the driveway, I received a phone alert from TC 2.0 that our alarm system had armed itself. As I was pulling into the driveway, I received another TC 2.0 alert that the alarm system was disarmed.

Gotta love Mode Manager and HSM (as well as HomeBridge for the iPhone presence function) for making this work so effortlessly.....

1 Like

Done. New version has an arm_instant() command and also a virtual button to press it. To get the virtual button to show up you will need to use the Rebuild Virtual Devices option in the app to create the child device.

2 Likes