Home Remote dashboard for Hubitat

Excellent news! The developer of Home Remote has posted an official integration as of 5/23/20.


Information below this paragraph is old. It may still be valuable and give some ideas, but it relates to prior versions of Home Remote and a no longer actively developed integration. Instructions on how to set up the new integration are on the Hubitat topic linked above and The Home Remote Community forum, link also above.


The information below will help you set up a connection between Hubitat and Home Remote, a dashboard app to control your devices.

EDIT: This thread is a little old. I am still actively using Home Remote, but I'm no longer using this integration. I have switched to using MQTT to make the connection between HE and Home Remote. If you have a lot of devices, the MQTT connection is the way to go. However, if you just want to check out Home Remote, I'd suggest starting with this code first. It is a lot simpler to set up within Home Remote and doesn't require you running an MQTT broker/server.

Here is the dashboard design I created, but the possibilities are endless:
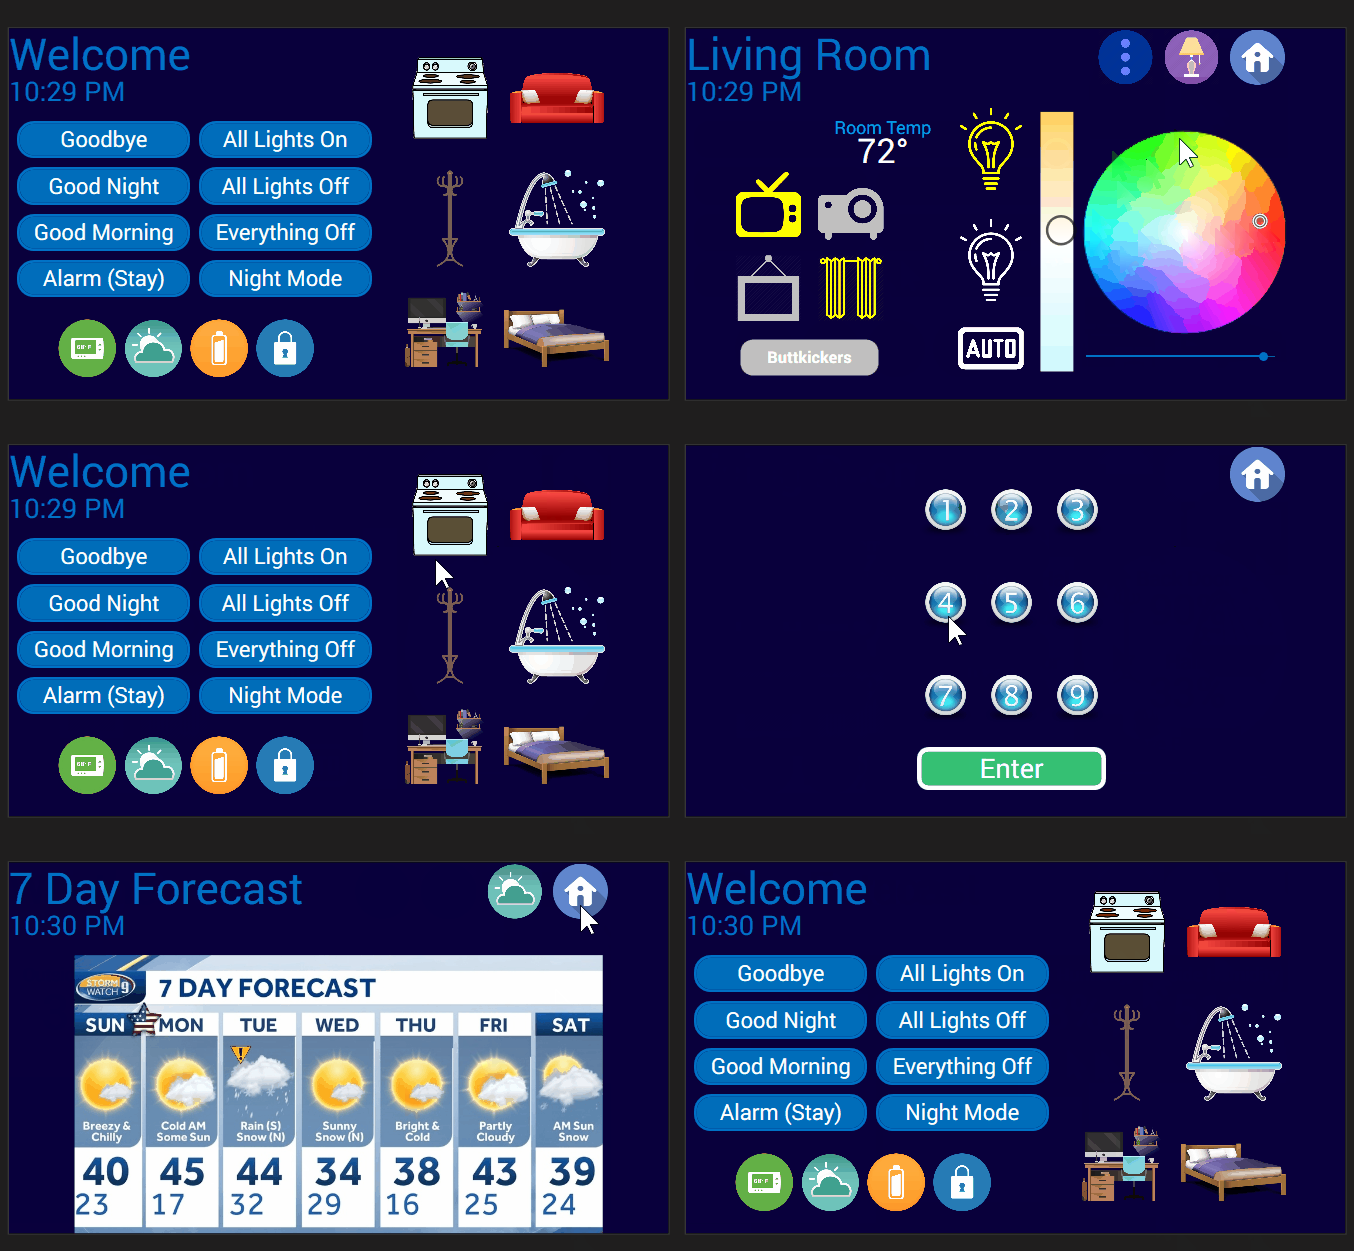
dashboard

I have also created an LCARS theme - check the posts below.

I've modified code for a Hubitat app to create the link to Home Remote - see github below. Home Remote then communicates to the app via http. My coding skills are very limited, so possibly someone with more skill than I can make the connection better. Polling too often (which is a setting in the plugin device code) might bog down Hubitat - but I haven't experienced any problems.

The github repository with the code is below. Feel free to post edits to the github.

I'm always looking for help to better the connection between the Home Remote dashboard and Hubitat. Please let me know of any changes you have made or post the updated code.

For more information the Home Remote website, Google Group forum, and instructional videos can be found here:

Homepage: http://thehomeremote.com/
Google Group Forum: Redirecting to Google Groups
How-To Videos: https://www.youtube.com/playlist?list=PLjUyFa0JDn2ZV3v8A9BxJHtbLZhIRwru1

Thanks for your help!

SETUP

Setting up Hubitat (animiation below):

  1. The hubitatapp code should be pasted into the Apps Code section of Hubitat. OAuth needs to be enabled- be sure to click on update to create the token.
  2. Add the user app in Hubitat under the Apps section.
  3. Select the devices you want to use in Home Remote (note that the system can handle a lot more device types than initially shown, they have just been commented out of the app code as I don't have these device types and have no idea if they work correctly.)
  4. Done/Ok your way out of the app. Then, in another window, bring up the hubitat log. Leave it open and go back into the app. Select the "Connection Info" button at the bottom of the page to show the info you need to make the connection in your log. It may not work the first time - you can try the refresh token button in the app to get a new token in case it hasn't been created yet, and/or going back in and out of the app until you get the necessary info in the log.
  5. Goto http://thehomeremote.com/ and get the designer software.
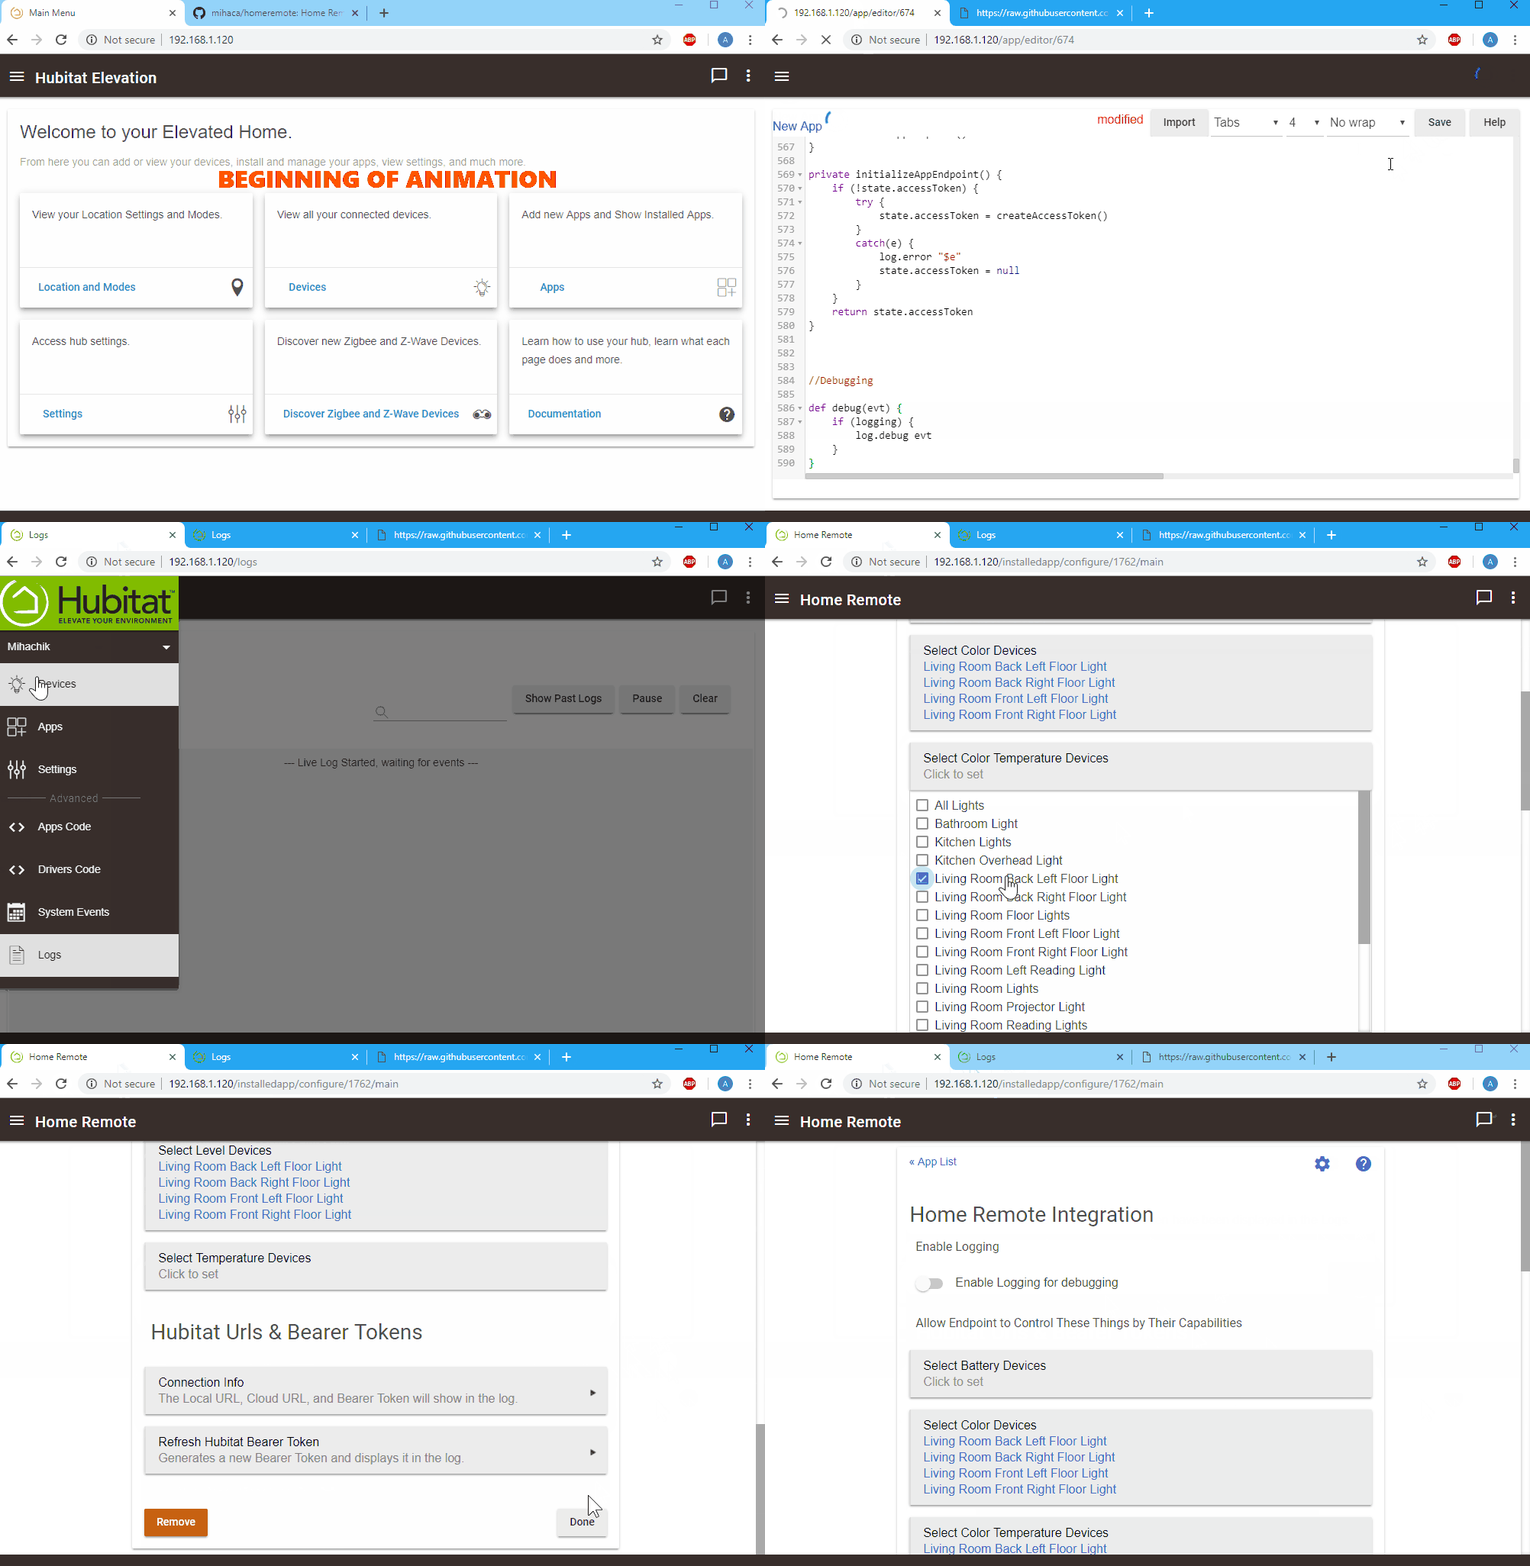
HubitatSetup

Once the above is done, setup the connection within Home Remote (See animation below):

  1. Right click on devices, add a source, plugin device (not shown on animation below as it was off screen), name it Hubitat
  2. In the script box that pops up after the device creation, replace the code by copy and paste with the script from github
  3. Right click on the hubitat device, open it, edit it's settings. Add three plugin settings, one for "LocalURL", one for "CloudURL, and the last for "AccessToken". The values will be the values from your Hubitat log. I did not show the entry of the values in the animation for security reasons.
  4. After completing the entering of the two URLs and Access Token, go back out, right click on the Hubitat Device again and synchronize devices. The devices you authorized in Hubitat should show up.
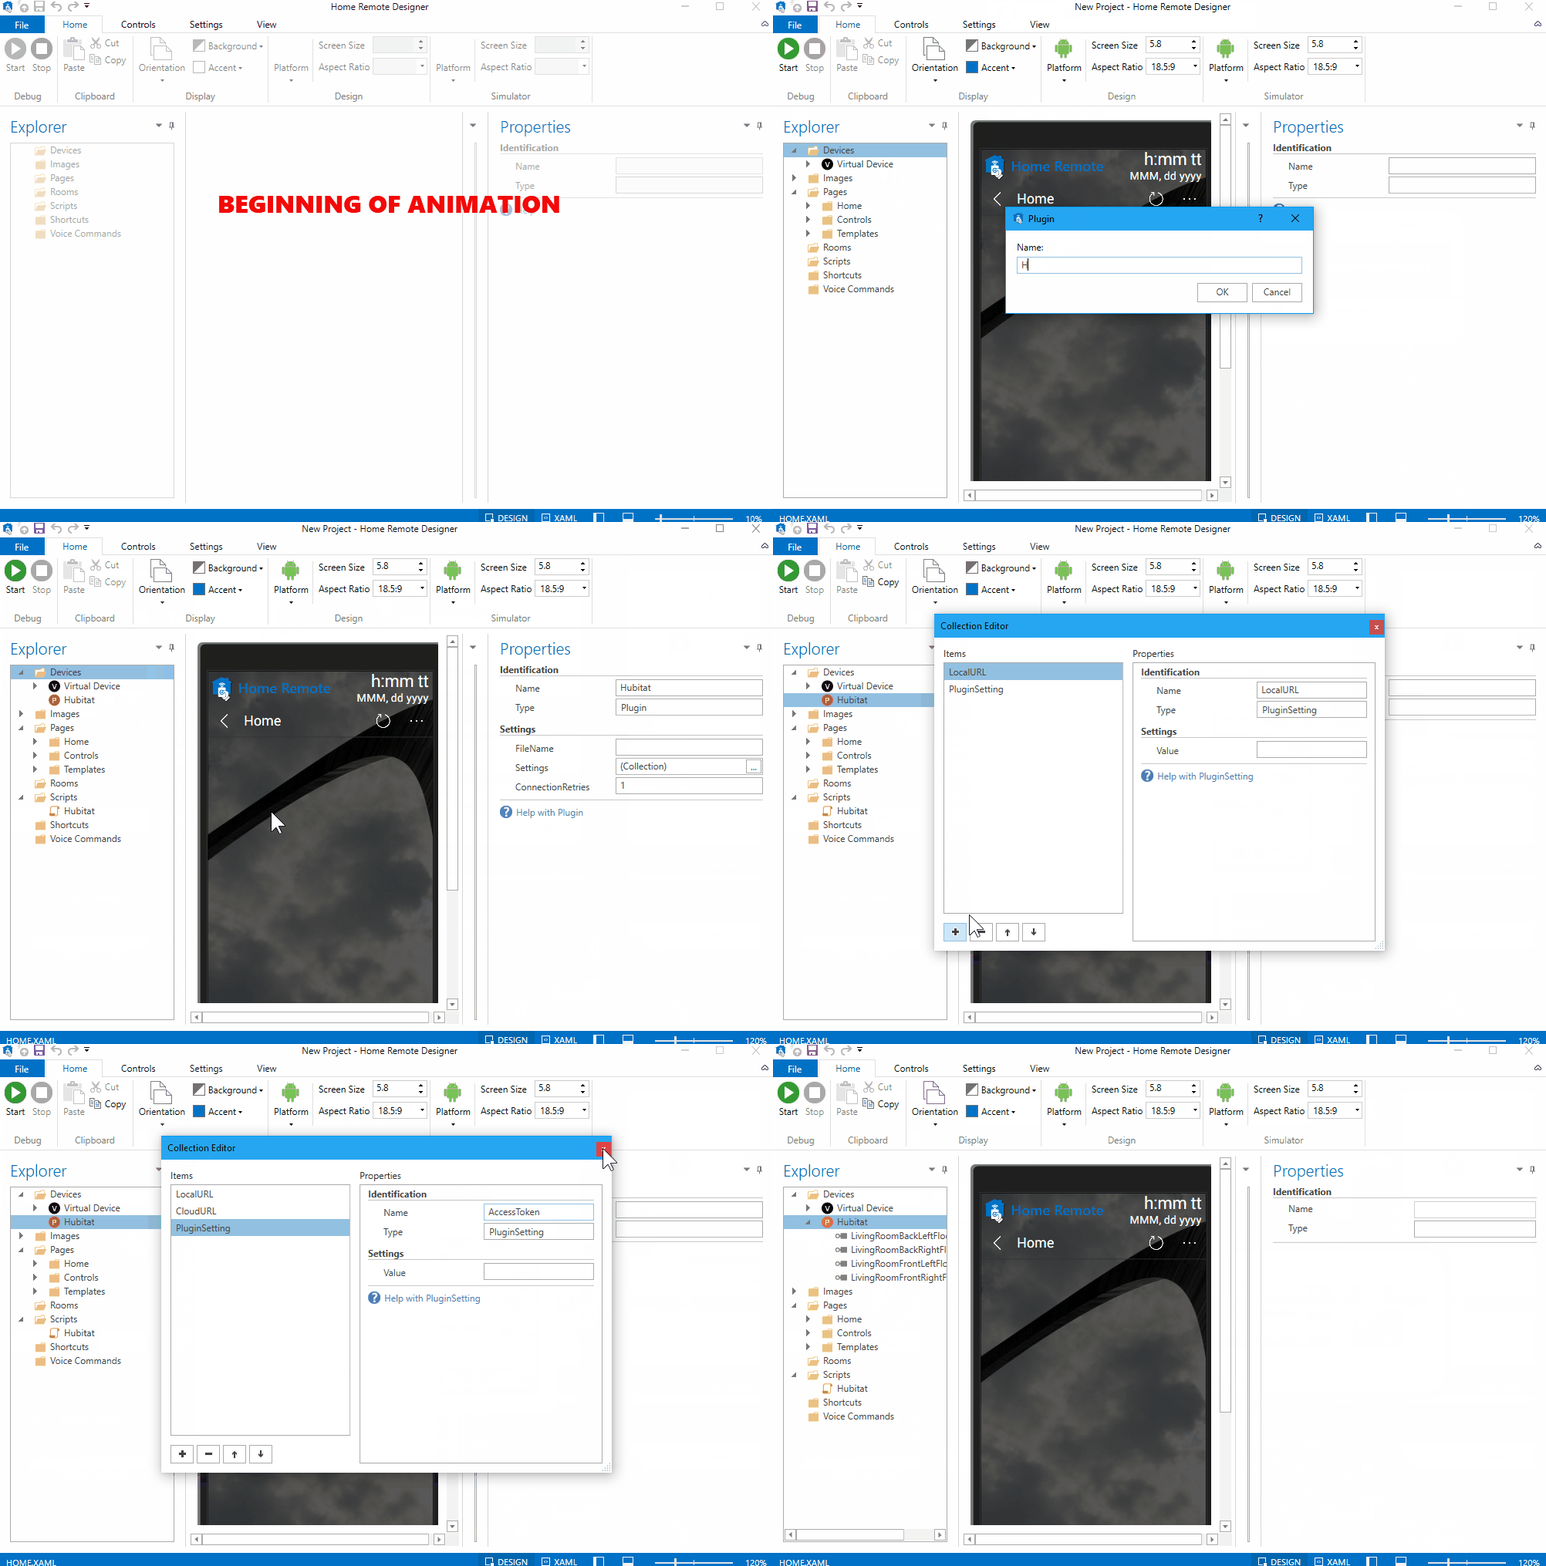
HomeRemoteSetup

If you chose switches or lights (which have predetermined tiles), and you hit start in the designer, you should be able to control your devices. Animation below:
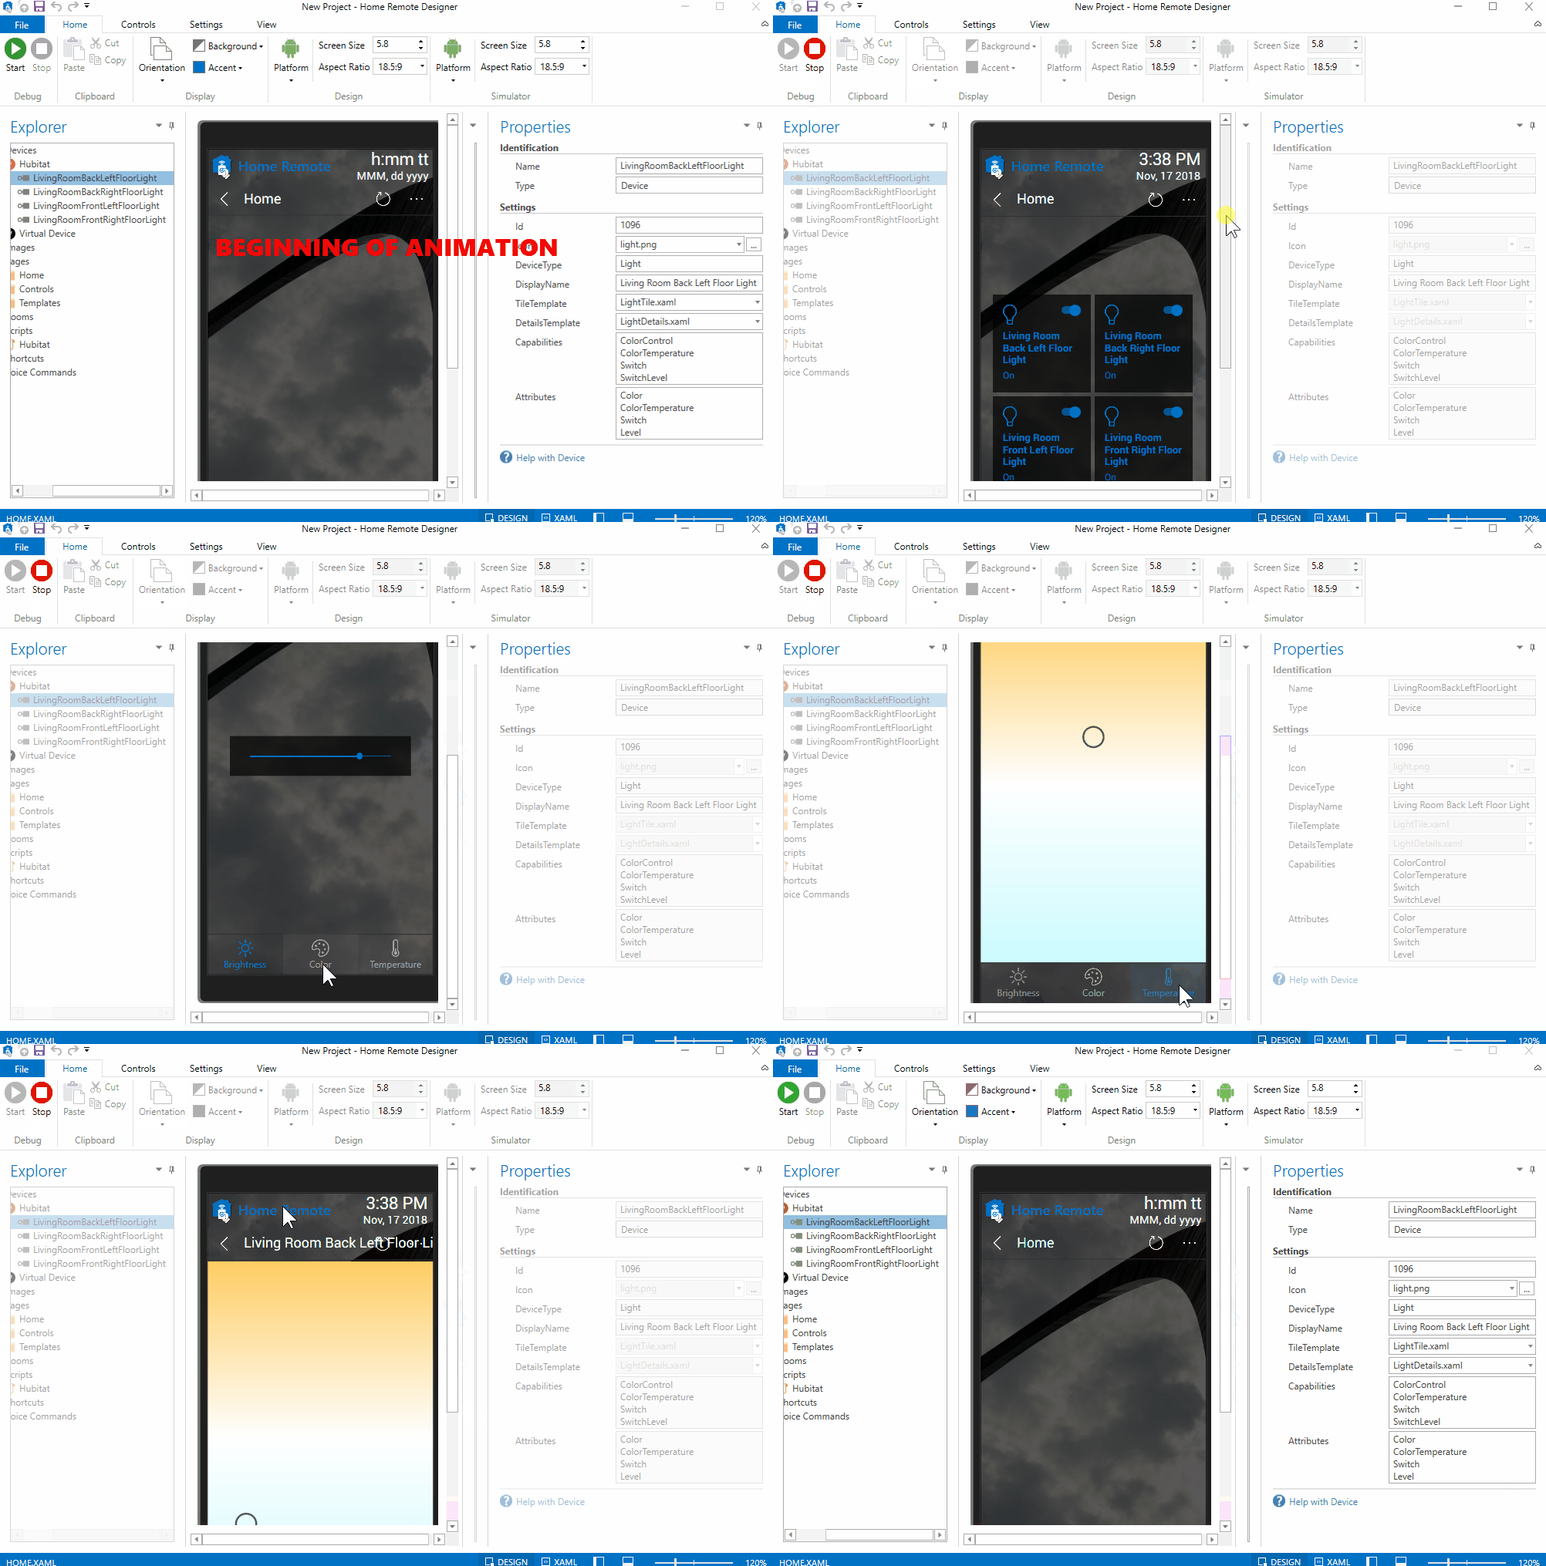
TilesWorking

I personally prefer to create my own controls for each device, which really isn't that hard.
To add a new page and working controls for a color bulb, please see the animation below.
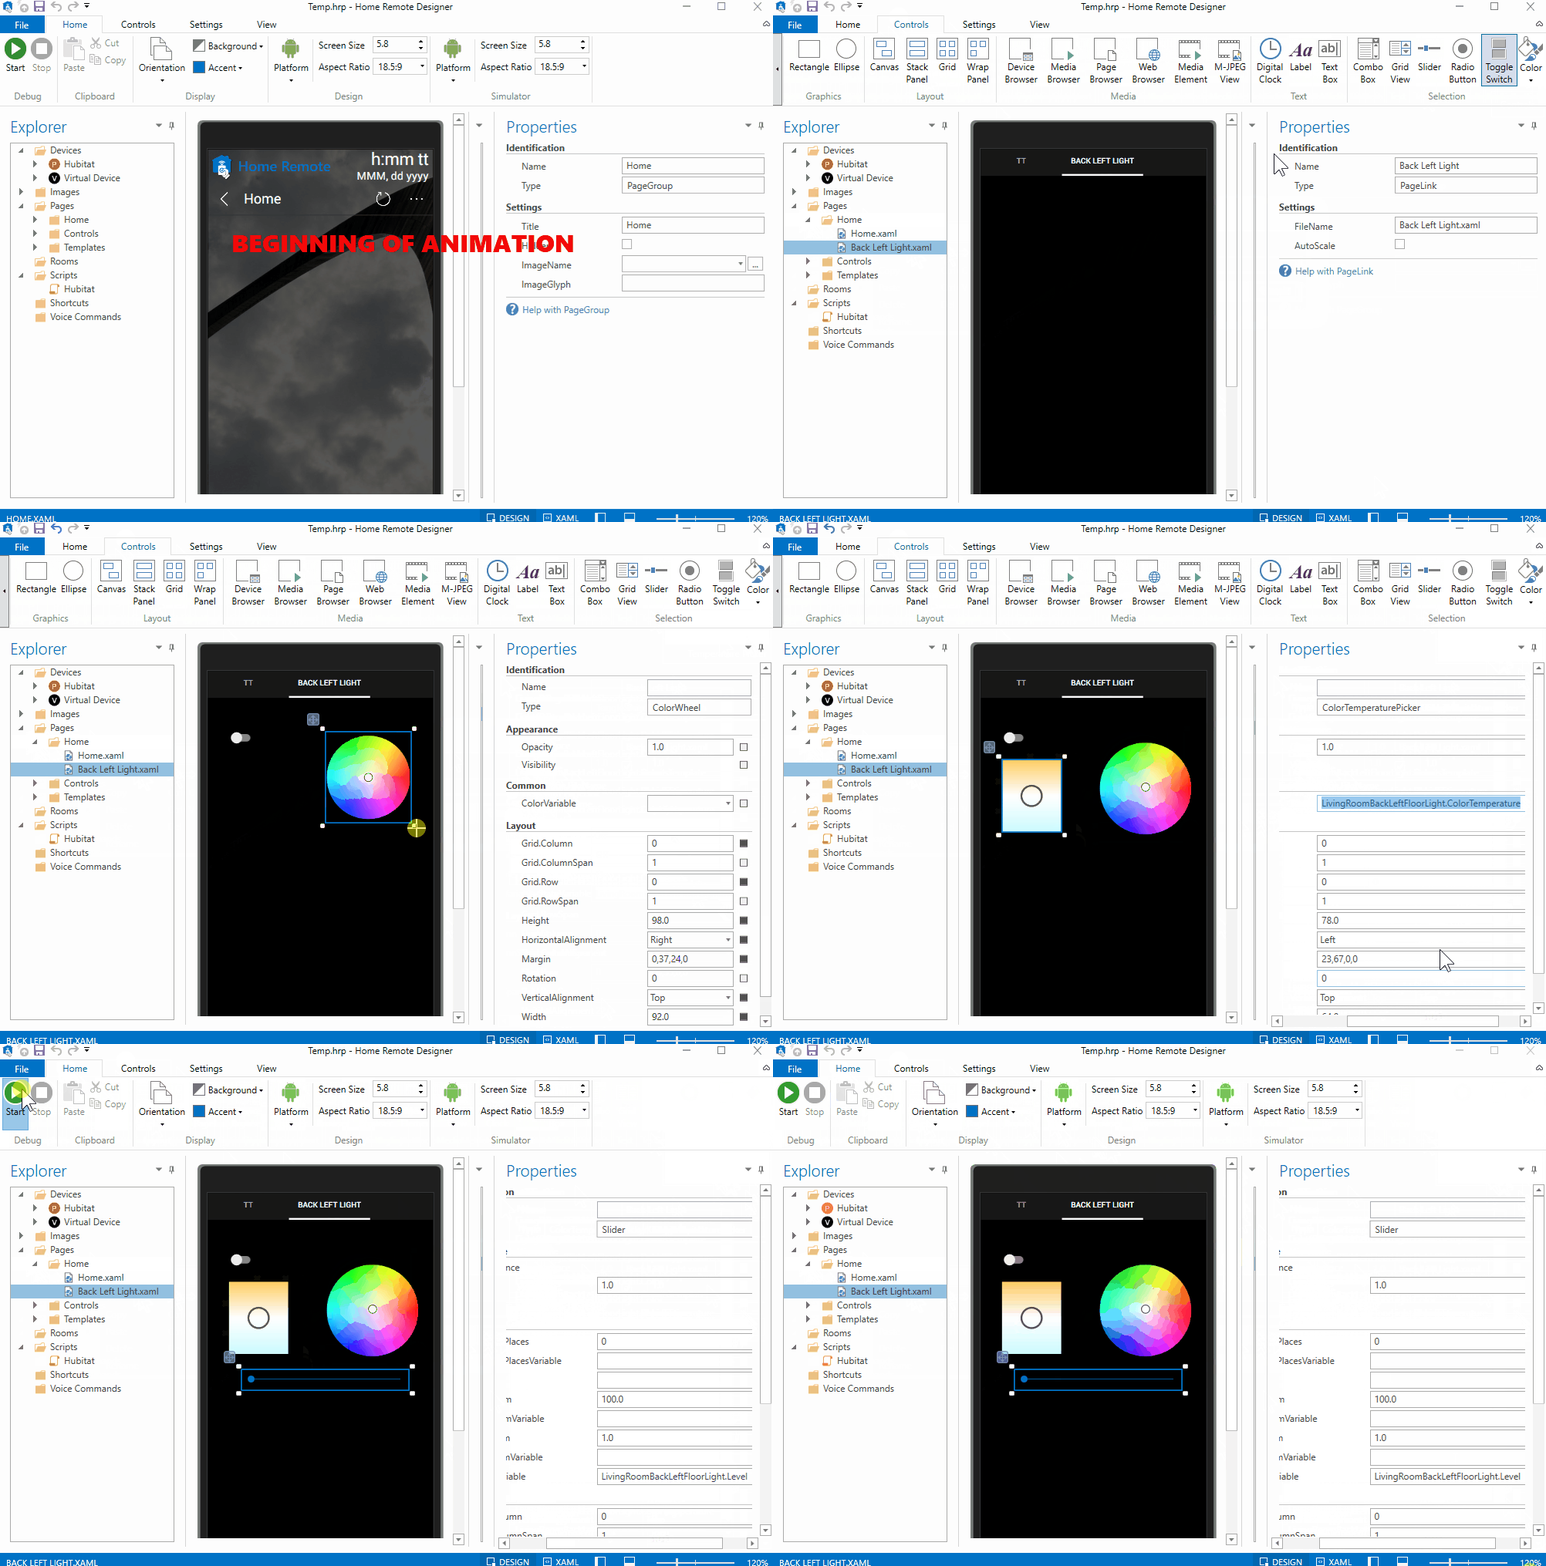
AddingControls

Let me know if you have any trouble getting the app or your first light controls set up

2 Likes

First minor bug...just a typo :grin:
Change line 505:

from: deug("updated")

to: debug("updated")

There will be bugs. I have very little coding experience. But I did play with Apple Basic as a kid and took a beginners Visual C++ course in college, so I have that going for me!

This code has been cobbled together from the Home Remote app for SmartThings and another app suggested as an example for opening an interface (Open-Dash) posted here in the community. I took them both and did google searches to find the missing pieces to put them together.

The debugging code has been fixed in the github post. If you make changes to the code, send it to me and I'll replace it. Or I believe you can just repost the changes to github?

1 Like

Well, after playing around with the Designer portion of this program I can say that it is very powerful. Then in another word... confusing!

It reminds me of how the HomeSeer Dashboard software (hstouch) works but doesn't have any of the drag and drop device types like HomeSeer has. In HS if you want a light switch, simply drag the device name onto the panel and release. Just like that you have something to work with. You can then change it up, size, text, image, etc. but at least you have something to work with.

With Home Remote, each and every element must be assembled from scratch. They do have some preset code but it needs to be copied and pasted, then modified and merged into the code. Way too cumbersome.

After an hour and half, I'm throwing in the towel. Too much work to get anything resembling a custom dashboard for me. I applaud your effort to make this an option with Hubitat but just not for me, sorry.

Guess I'm still waiting for Imperihome to come on board, lol. :grin: Used it with HomeSeer for years.

Good luck!

1 Like

Definitely takes some work! But it has been getting more user friendly.

I'm not in front of a computer right now to say exactly - but you might have been playing with the tiles code. You can modify the tiles, but it might be hard as a first time user to start off doing that. I personally prefer making my own individual controls for each device versus using the built in tiles. I find the controls more intuitive and allow you to customize more for each individual device.

The developer is aware and has plans to have drag and drop as a future enhancement - but until then, adding controls is fairly easy. I'll update the first post to include doing so.

All that said, I understand throwing in the towel! Honestly, when I first tried the program with SmartThings I was overwhelmed and gave up. I obviously went back later and tried again :slight_smile:

1 Like

In case I am lucky enough to have a second person give the program a shot, or bptworld gives it a second chance, I wanted to at least help that person create their first switch.

It is easy to get overwhelmed with the program, but it really isn't as hard as it first seems.

I have added some setup info and how to create your first switch to the first post in this thread.

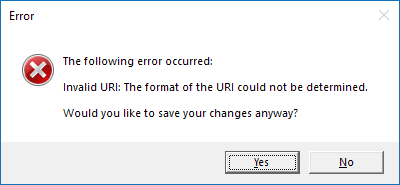
I was unable to get it to work. After inputing the two settings, I get the following error when closing.

image

I tried both the cloud and local URL. Are you supposed to input them with the http:// or without it. You don't show that in your clip.

During the past week a lot has changed... I've been working on getting new animations. I should be posting them within the hour. Also the github has been updated within the past few hours. I think you grabbed the code and set it up in between my changes to the code and instructions in this post.

Everything should be updated soon. Make sure you are using the latest app and Home Remote plugin script. After I make the changes, I'll check back in to see if that fixes your issue. If not, let me know!

I've updated my first post to include better instruction and animations for the new code. Hopefully this fixes your issue. You should include the "http" in the settings. I think you were experiencing issues because my previous instruction only had you add one URL to the Home Remote settings. The new code requires both the Cloud and Local URLs. It will then test the local first and if it fails go with the cloud (in theory). Please let me know if it doesn't work.

Yup..that worked. Thanks!!

Maybe this is a stupid question but how in hell do you add anything you've synced to that damn layout. I tried to use this program with ST a long time ago and experienced the same level of frustration on doing the absolute simplest thing. I can't add anything to the layout.

Not a stupid question, because I experienced the same thing. In my final animation in the first post it shows me creating a new page with my own controls on it - versus using the built in tiles

Yeah, I just want the things to show up first. Not going to go through the trouble of making my own tiles for a damn switch. Way too much trouble.

Believe me, I understand. But until there is a better solution, I have found it is either design your own or work with the standard tiles and layouts designed by others - such as the built in Hubitat Dashboard or the Sharptools dashboard. Both of which are great solutions, and I suggest checking them out. I just wanted more control over how my dashboard looks - and that means designing it myself.

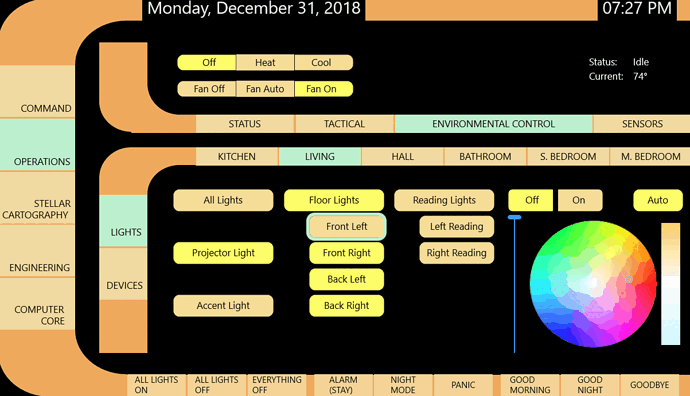
LCARS mostly complete besides a few cosmetics.

One of the hardest parts is trying to make the layout usable. As you start designing it becomes painfully obvious that the Star Trek artists were (obviously) focused on TV appearance not usability.

Gotta go - Happy New Year!

Edit: Bill from Home Remote has posted my project file for the LCARS design - I'm not able to post the file type here. It won't run without the connection to my system, but feel free to take a look at the design. It might give you ideas or help you start designing your own.

http://thehomeremote.com/downloads/examples/LCARS.hrp

4 Likes

That's awesome!! Great job!!!

That is one heck of a lot of work... really impressive.

It’s a shame the original model hasn’t married well with practical use but I do see some interesting aspects there .. like the horizon/vertical bars with rooms / device category refinement.

1 Like

I think you could do more if you were to invest in a (very) large touchscreen - then you could probably display more than one section at a time. But working on a 10 inch tablet limits you due to readability of text and ability to easily hit the button.

I looked at a lot of LCARS images on the web, and the most disappointing thing for me was I couldn't be true to the color schemes. Turns out when you use lots of bright pastels, you can't tell which switch is on / off or what area is trying to get your attention. Everything in caps doesn't help either.

I downloaded the latest update to see if I could get heat and cool setpoints to work. Now I'm getting a "Device is null" error when trying to sync hubitat in Home Remote Designer. I tried refreshing tokens and even deleted the Home Remote App in Hubitat and re added it. Still getting the same thing. Not sure what happened.

Thanks for checking it out and for helping with the bugs! I think I've managed to replicate the issue.

The new code adds two new devices to your setup. One is a "log" device - which basically lets you see any logging initiated from the plugin code from within the running interface. Very helpful for debugging. The other is labeled "LastPoll" - that helps speed up the process of syncing the system with Hubitat by only getting updates for devices that have changed since the date/time stored in the LastPoll device.

Basically, what is happening is the system is trying to interact with these devices before they have been setup from your sync.

Just wanted to let you know I'm working on it! And (once we get this fixed), don't delete those two devices because the system is using them.

I've updated the GitHub. Could you try the new code and see if the error is fixed?

Please make sure you are using the latest Hubitat App code, the latest Home Remote plugin code, and for best performance (assuming they get added correctly) don't delete the "log" or "lastPoll" devices that show up in your list of Hubitat devices.