[Deprecated] Xiaomi / Aqara ZigBee device drivers (possibly may no longer be maintained)

[UPDATE] v0.8.2 of Xiaomi/Aqara Temperature Humidity Sensor device driver for Hubitat

Thanks to @ajeshm 's feedback, I discovered that the object used to store a user's custom humidity offset value was named incorrectly. This has been fixed, and I've taken this chance to update and fix a few more things in this driver.

The updated driver code can be grabbed from here.

Major Changes

  • Humidity offset value setting is now working correctly

  • Pressure events now use the officially supported Pressure Measurement capability
    Prior to this release, atmospheric/environment pressure reports were made using a custom attribute. A while back, Hubitat added official support for the PressureMeasurement capabliity. From a user perspective, there's no change in the attribute name (pressure) but an Aqara sensor should now show up in apps which can use pressure as part of an automation trigger / rule.

  • Temperature values are now reported in hundreths (0.01 precision)

  • The voltage range for Battery % has been changed
    The minimum / maximum voltage values used to calculate battery percentage have been changed from 2.5V min / 3.0V max to 2.9V min / 3.05V max. This means your reported battery percentages will change from what you have been seeing! It should not be a cause for alarm, however. Keep in mind that using the min / max voltage values to calculate a battery percentage only gives a very very rough estimate of battery health. Also, remember that the min / max voltage values can be changed in the preference settings in the device details page for each sensor.

Detailed Change List

  • corrected misspelled humidity offset setting object name so that humidity offset value now works correctly
  • switched from use custom attribute to officially supported PressureMeasurement capability to generate pressure value events
  • renamed object used for pressure offset value to pressureUnits
  • changed to use of location.temperatureScale to determine user's temperature scale setting, following Hubitat's environment sensor driver example
  • changed precision level of temperature event values from 0.1 (tenths) to 0.01 (hundredths)
  • fixed regression in default battery min/max voltage used to calculate battery level percentage - default values are now 2.9V minimum and 3.05V maximum
  • refactored portions of code

I believe I need to change a battery soon on this temp/humidity sensor... But it's still working fine... lol

Battery level is -10% (2.885 Volts)

:rofl:

But that’s helpful, actually. When the sensor working, please let me know what the last reported voltage was and the I can update the minimum voltage in the drivers to a lower value.

Ok I will keep an eye on voltages and as soon they are dead I will let you know :wink:

@veeceeoh @Somel
Just updated my driver and I'm getting the same. I did have min voltage of 2.8.
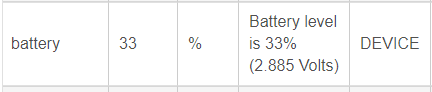
My last battery report was as follows.
image

@veeceeoh is the voltage reported by the device? Just asking as my oldest device (main door sensor) that I never swapped the battery and is on operation for over 20 months now has a reported voltage of 3.025...

If it is reported by the device.... damn this thing last as hell...

If you have custom set min / max values those will remain unchanged through any driver updates. It’s good to know that you also are seeing 2.885V on a working sensor.

Yes, I see similar values with my Door Window Sensors after more than 1.5 years.

I just thought I would change to the values you mentioned in your release notes.
I've changed it back now.
Just thought I would let you know.

Are these Aqara? My Aqara temp/humidity sensors started acting-up at 2.75 volts.

My reported reading of Voltage on the Xiaomi Aqara WSDCGQ11LM Temperature Humidity Sensor

Min reading of all time and the device is working now at this voltage: 2.845V
Max with a new battery 3.145V
current reading on my 6 WSDCGQ11LM
2.845 2.885 2.885 2.905 2.925 2.925
new driver Version 0.8.2
a very big thanks to @veeceeoh for all the work you do for us

I have an issue with some of my devices, I am trying to add Original Door Sensors but they are struggling to initialize - they sit there for hours and nothing happens. My Aqara Door Sensors work and pair fine!

Anyone else experience this?

Did you kept pressing the pair/reset button every second to keep the device awake? And sometimes after the initialization starts I reset the device and kept pressing the button every second to make then finish the initialization.

Yeah i have kept pressing it. Haven't tried the reset whilst initialising will try again later...

It sounds like a minimum Voltage of 2.8V and either keeping the max at 3.05V or going up to 3.10V may yield more "realistic" battery level calculation, for Temp-Humidity Sensors, at least.

Related to this - After I saw my Xiaomi Cube report a voltage level of 2.735V, it went back up when I stopped doing tests with the newest driver.

Since then, it's been bouncing between 3.005V and 2.975V - which correspond to 70% and 50% using the current driver's 2.9V/3.05V min/max values. I'm going to look into calculating battery percentage level on a curve (something akin to a logarithmic curve) because from everything I understand about battery life with these button cells, there can still be quite a bit of capacity remaining as the voltage first starts to drop off from its maximum reading, but the relative capacity drops more as voltage goes down to the lowest levels.


I have a fair number of the original Door-Window sensors, but it's been ages since I've paired one, so I'll try it to see if anything is different than it was last year, but...

What @vjv explained is the best procedure for getting Xiaomi / Aqara devices paired. There's definitely a correct timing of the continuous short presses to get it to work, however. Basically, after the initial roughly 5 second long-press, on each short-press you should see the LED flash as you short-press and then wait for another LED flash before the next short-press.

Also, if the initialization hasn't finished within 90 seconds, I'd recommend starting over.


In other news, after a false start with a DOA device, I got a working ZigBee sniffer and with its help I have finally figured out how to correctly change the sensitivity level of the Aqara Vibration Sensor!

I need to re-work the code and do some testing when I have time, but a driver update is imminent!

Finally i might be able to use mine....
Hooray. Man

THANK YOU

Mine are all working now following vjv advice

Yippee! Seriously, thanks for staying with this.

[TUTORIAL] Use of the Xiaomi Mi Cube Controller device driver

Now that I've given the Xiaomi Mi Cube driver some love and it's more-or-less fully working, I am hoping for some input from users so I know what direction to take with future changes to it. In order to get that kind of feedback, I figure that people probably need to know how this driver works in the first place!

The first thing to keep in mind is that this driver is a port of SmartThings Community user @ClassicGOD's Xiaomi Magic Cube Controller (Advanced DTH), which in turn was based on user @DroidSector's Xiaomi Mi Cube / Magic Controller SmartThings device handler. So the explanations after the pairing instructions are adapted from @ClassicGOD's device handler notes.

PAIRING

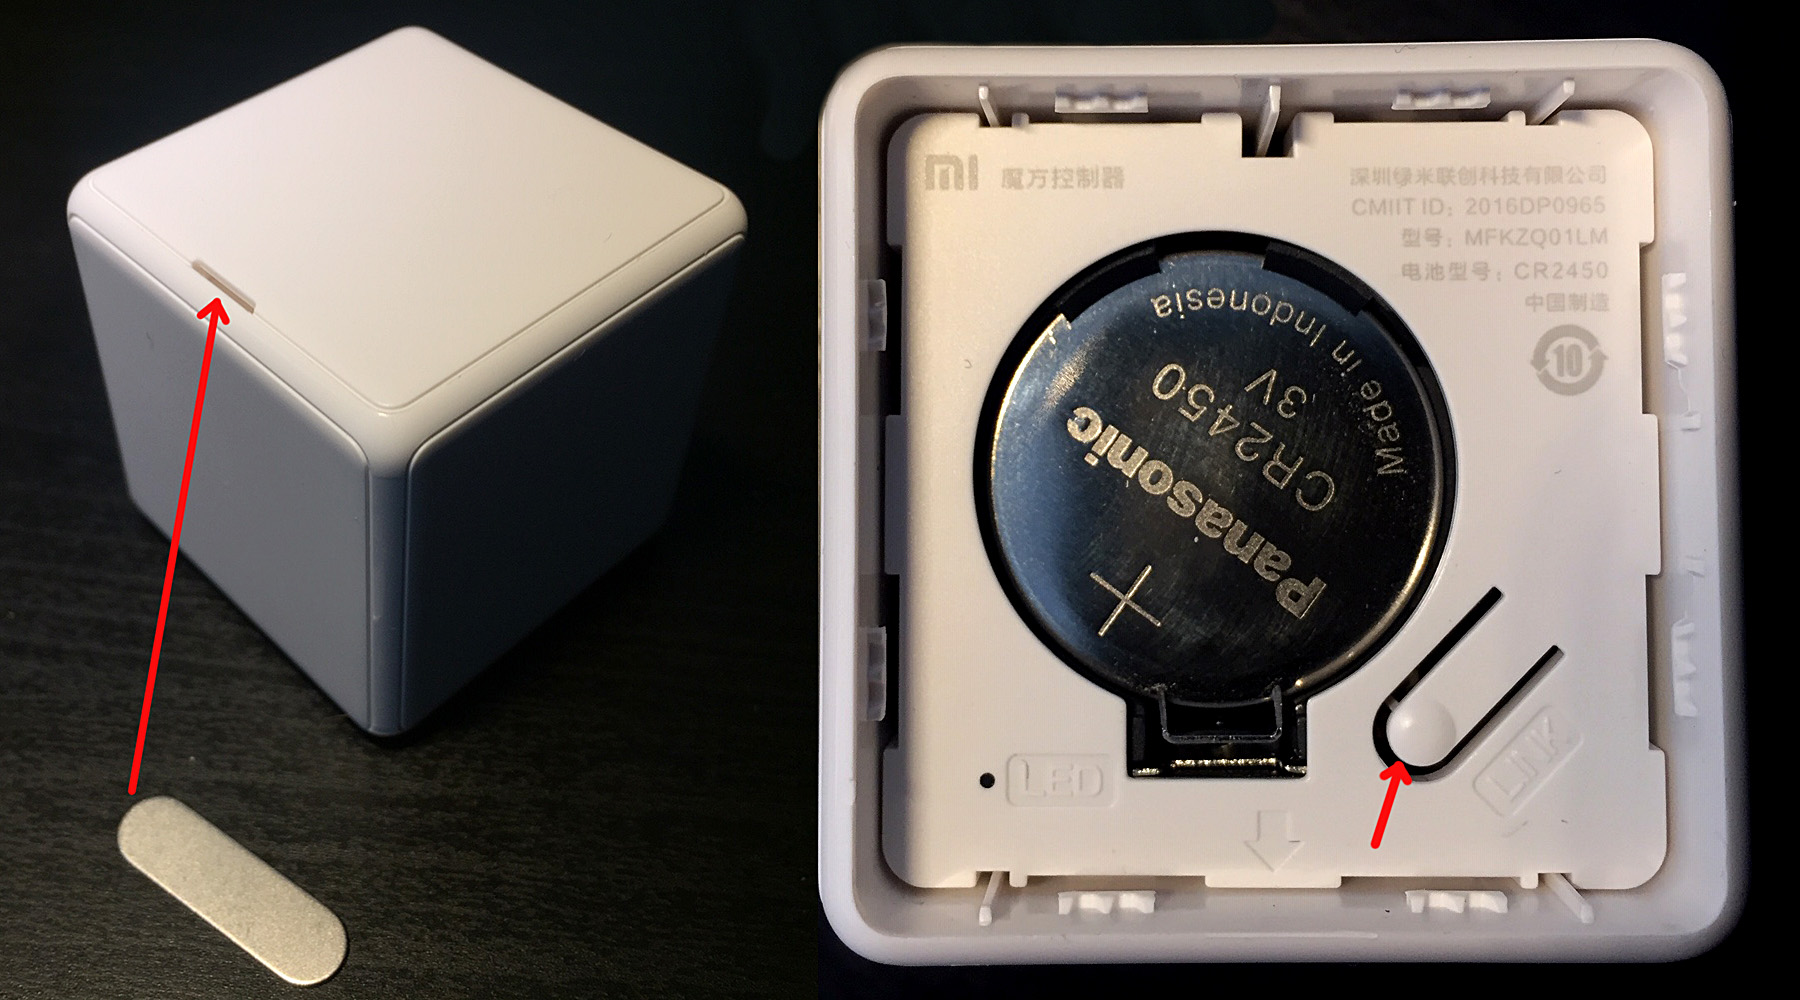
Although an unpaired Xiaomi Cube has a neat trick of entering pairing mode when shaken in mid-air, this does NOT work when pairing to a Hubitat hub. Instead the reset "LINK" button, which is hidden under a removable cube face, must be used. To access this, use the metal lever tool included with the cube to gently pry open the face with the corresponding slot, as seen here:

Once the cube is opened, start the Hubitat hub's Zigbee and ZWave device discovery mode. Next, press and hold the cube's "LINK" reset button. The LED light will turn on, and when the LED blinks 2-3 times (after about 5 seconds) then release the reset button.

After a few moments, the LED will either blink rapidly 3 times - indicating successful pairing, or flash once - meaning pairing has not yet occured. In both cases, start repeatedly short-pressing the button. When short-pressing the button the LED will blink, but after a short delay, the LED will light up again, responding in the same way as above (3 blinks = paired, 1 longer flash = not yet paired.) Make sure the next short-press comes after the LED flash response, so about every 2 seconds.

Continue short-pressing the button about every 2 seconds until either the cube's device name appears in the web browser window, ready to be renamed, or 90 seconds has passed by. If not successfully paired after 90 seconds, start the whole pairing process again, beginning with the long-press of the "LINK" reset button.

CUBE MODES

The driver offers 3 different Cube Modes of operation, which is set in the Preferences section of the device details page of a paired Xiaomi Cube:

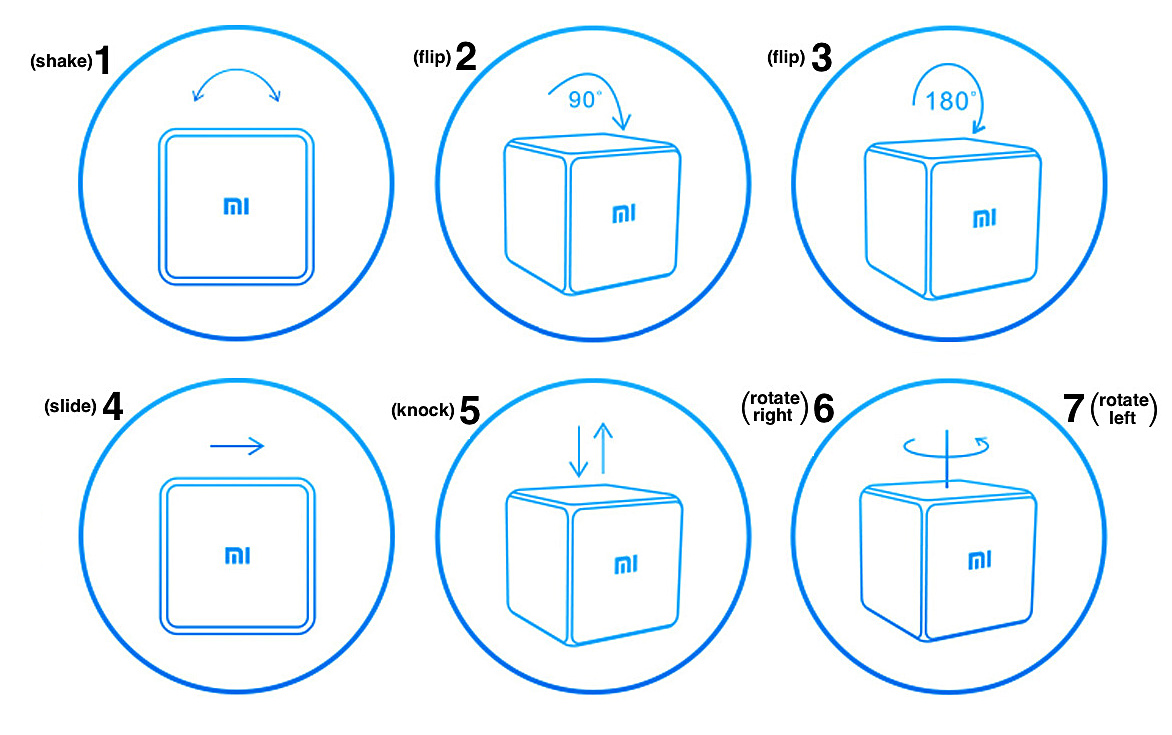
  1. Simple - 7 buttons
    This mode is set by default when the Xiaomi Cube is paired and matches the functionality when it's used with a Xiaomi Gateway and the Mi Home mobile app. The 7 buttons are assigned to the 7 basic gestures as follows:
    1. Shake (in mid-air)
    2. Flip 90 degrees
    3. Flip 180 degrees
    4. Slide
    5. Knock (pick up and firmly hit surface twice)
    6. Rotate Right (spin clockwise)
    7. Rotate Left (spin counter-clockwise)
      .
  2. Advanced - 36 buttons
    Xiaomi Magic Cube Controller (Advanced DTH) author @ClassicGOD discovered that the messages sent by the cube for slides, knocks, and flips to any side also contained orientation data, meaning a number for which face of the cube is pointing up (and for the flip gestures, the number of which face was up before the cube was flipped.)
    Multiply 6 faces by those 3 gestures and there are 18 possible combinations, but if the last-known upward face number is known it can also be used with shake and left/right rotation gestures to increase the number of combinations to a total of 36.
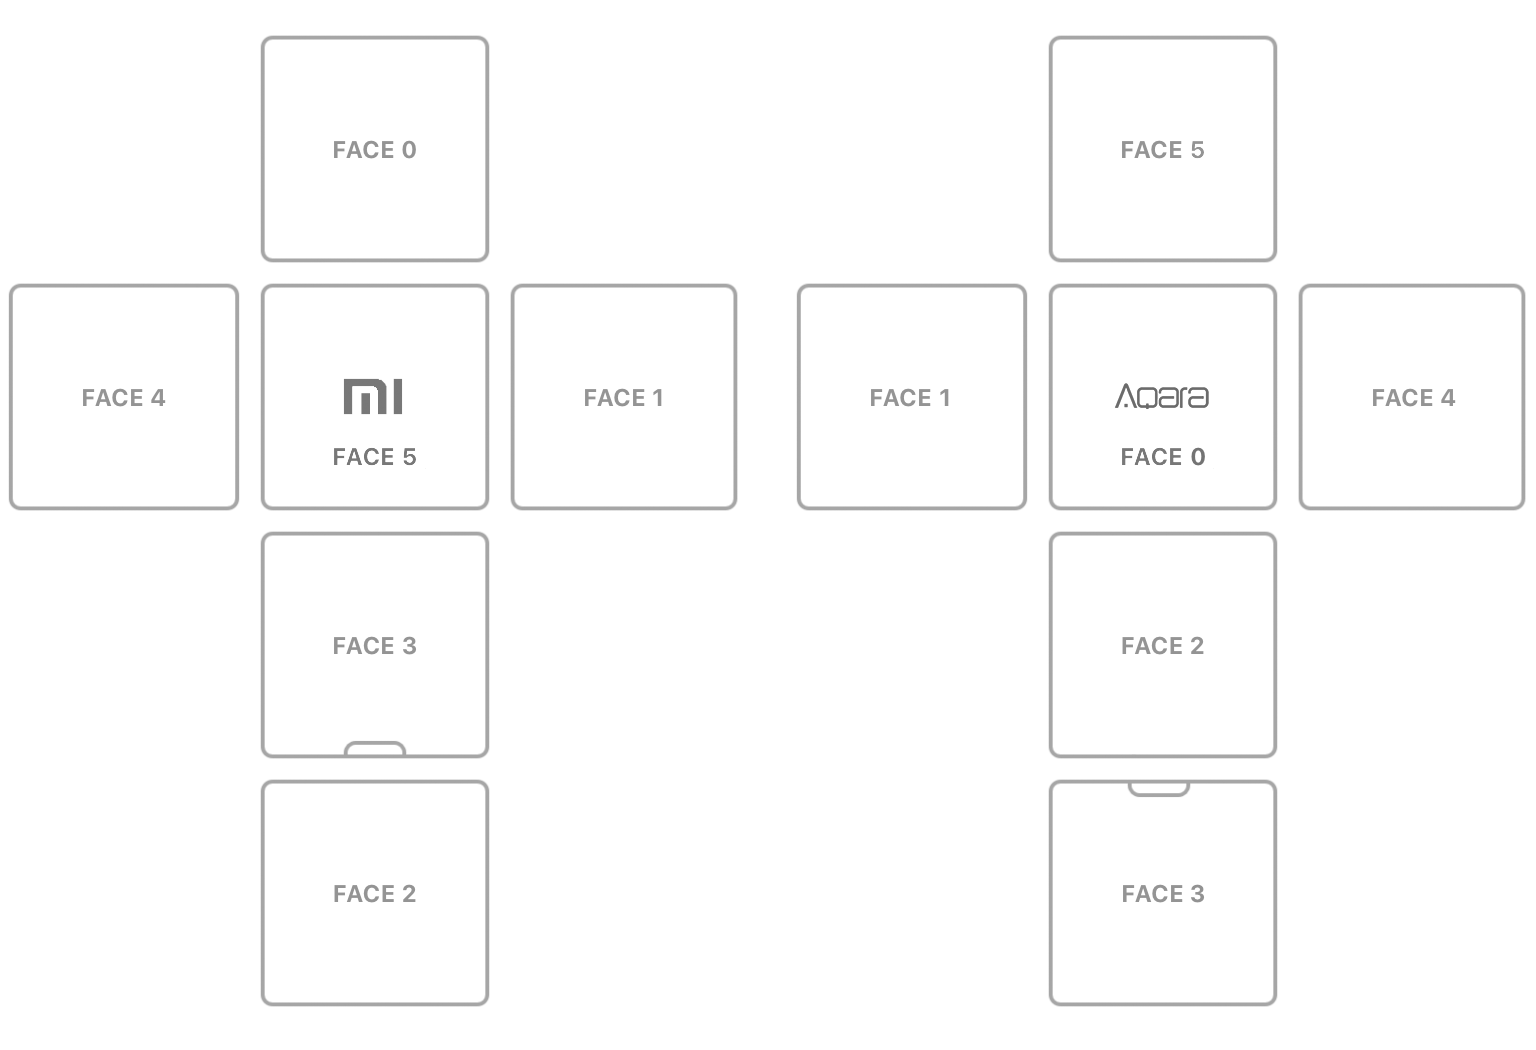
    Here are the face number arrangements of the Mi and Aqara-branded cubes:

    The Advanced Mode button assignments are as follows:
    • button 1 to 6 - flip ending with face 0 to 5 pointing up
    • button 7 to 12 - slide with face 0 to 5 pointing up
    • button 13 to 18 - knock with face 0 to 5 pointing up
    • button 19 to 24 - right rotation with face 0 to 5 pointing up
    • button 25 to 30 - left rotation with faces 0 to 5 pointing up
    • button 31 to 36 - shake with face 0 to 5 pointing up
  3. Combined - 43 buttons
    In this mode, every gesture produces two button pushed events: The first for buttons 1 to 6 as defined in Simple Mode, and the second following Advanced Mode but with the button assignments all increased by 7 as follows:
    • button 8 to 13 - flip ending with face 0 to 5 pointing up
    • button 14 to 19 - slide with face 0 to 5 pointing up
    • button 20 to 25 - knock with face 0 to 5 pointing up
    • button 26 to 31 - right rotation with face 0 to 5 pointing up
    • button 32 to 37 - left rotation with faces 0 to 5 pointing up
    • button 38 to 43 - shake with face 0 to 5 pointing up

Combined mode example: A flip from face #0 to face #3 will result in button 3 pushed (Basic Mode flip 180 degrees) - and - button 11 pushed (flip ending with face #3 pointing up).

CUBE MOOD APP COMPATIBILITY

The driver also uses the “Three Axis” capability to indicate orientation and should work with apps like the Mood Cube app ported to Hubitat. This functionality is affected by limitations described below.

LIMITATIONS OF THE DRIVER

Because the hardware does not send face # pointing up data for all gestures, there are some limitations to how well the button events work in the Advanced and Combined Cube Modes:

  • The cube only sends face orientation data for these gestures:
    • 90/180 degree flip
    • slide
    • knock
  • Orientation data for rotation and shake gestures is based on the last known orientation.
  • The cube does not send any data if gesture is unrecognized - rotating the cube randomly in the air and placing it down will probably not result in any button pushed event(s).
  • The driver will correct last known orientation and send missing flip/face activation events if needed as soon as it receives the orientation data
  • For the above reasons, rotation and shake gestures may result in button pushed events for the wrong faces, if previous flip gestures are not performed correctly (e.g., rotating the cube randomly in the air)

Please by all means if anyone has any more ideas or suggestions to add to this tutorial, please let me know and I will add them to this post (and at some point start a new thread so it can be the OP.)

Just a note, the Aqara model has the brand name on face 0, not face 5 like the Mi brand.

Thank you very much. The offset value for all works fine now.
Is it only me, not sure - the attribute ‘ lastcheckintime’ or ‘lastCheckinEpoch‘ does not show up even it is enabled or disabled. Not a breaker but just checking if I am doing something wrong.