Follow-up: Okay, now that I have the Zen17 included, I am not sure how to use it.
I want to be able to run my backyard landscape lights from the relay. Do I need a power source to the lights other than the relay? Perhaps that is where I am going wrong?
Help much appreciated.
From the manual:
LANDSCAPE LOW-VOLTAGE LIGHTING: one leg from power supply to
R1 C, the other leg from power supply to lights; R1 NO to the other
input on the lights.
So you'd use the existing lighting power supply. Get in touch with Zooz - they are very helpful with this stuff.
2 Likes
Has there been any movement on updating this driver?
Would it useful to just have a companion driver for viewing and setting the additional settings? Sounds like some might change the way the child devices are setup though. But maybe if you change the settings and then delete the child’s when you go back to the normal driver it might create them again?
I would create a new whole driver from scratch but it’s a fairly complicated device.
1 Like
It looks like it is just the Auto On-Off parameters that are not accessible. Not sure how many people actually use those. I wish this thing was not so hard to configure. This whole include the device, pick you mode (but don't change anything else), then exclude and reinclude?!?! There has to be a better way.
1 Like
It would REALLY be nice to have access to the input reversal paramters 19/20.
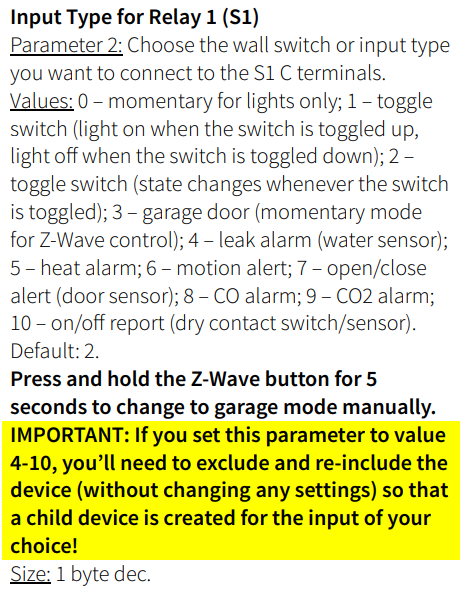
Parameter 19: Reverse the reported values for your selected input type on S1 C terminals (select the same value as you chose for parameter 2 to reverse the values for open and closed circuit).
Values:
0 – values reported as normally open, not reversed (default);
4 – leak alarm (water sensor);
5 – heat alarm;
6 – motion alert;
7 – open/close alert (door sensor);
8 – CO alarm;
9 – CO2 alarm;
10 – on/off report (dry contact switch/sensor);
NOTE: This will not affect the relay behavior if you leave the input linked to the output, it will still trigger the relay to on when the circuit is closed (if connected between NO-C), regardless of the reported value. This setting only affects the reports displayed in the hub for the input and does not affect the relay (output) behavior.
Size: 1 byte dec
1 Like
Has anyone tried configuring it, using the "Device" driver to delete the childs and then go back to the normal driver and hit configure? If it is coded well, it should re-create the should with the new settings. This was kind of my idea for a companion driver, you could change other settings, pick which Childs to delete and then go back to the main driver and hit Configure to get everything setup again.
I can test it as well but I will have to pair mine up, I have one but I have not even taken it out of the box yet!
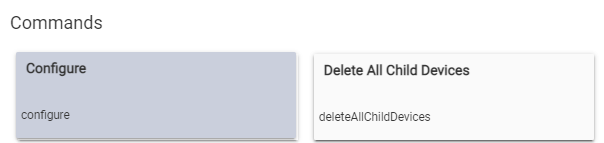
I am using the Hubitat built-in driver for the ZEN17 and there is NO button to "Delete All Child Devices". Are you using a community driver?
You have to switch to the driver named just "device". It is a generic driver to perform extra functions like that.
2 Likes
You taught me something today. I did not know the "Device" driver existed. What are the other uses for this driver?
ANyway, I did use it to delete the Child Devices, then went back to the ZEN17 driver and hit Configure. It did in fact recreate the Child Devices.
I guess I am still confused on why Zooz say to exclude/include if you change parameter 2 or 3? Does deleteing and recreating the Child Devices get around this issue?
Just the buttons that it has on there, basic cleanup stuff mostly for if your device gets included with the wrong driver and you want to wipe up any garbage left behind. Also the Info button will put the "fingerprint" in the logs, useful for driver devs to include in new drivers.
They probably did not know about this trick either, or because it looks like that is in the PDF manual, that is the 'universal' process for any hub you might have it on. It sounds like this would get around the need to re-include because Zooz is saying you only need to do that so the child devices get created correctly. @agnes.zooz see above, potential to update docs for Hubitat at least, if you delete the childs using my trick above and then go back and hit configure they get re-created. No exclusion needed.
I will also put in my todo list to make a companion driver for this device, just to view and configure all the parameters, and probably a button to delete child devices as well.
6 Likes
Great, thank you for sharing! I'll make sure we update the instructions for the Hubitat knowledge base articles. The printed manual will most likely need to feature the current disclaimer since other systems still require exclusion and re-inclusion for the child devices to appear.
2 Likes
@dale.boyles @steve.maddigan @neonturbo @Levahj @hydro311
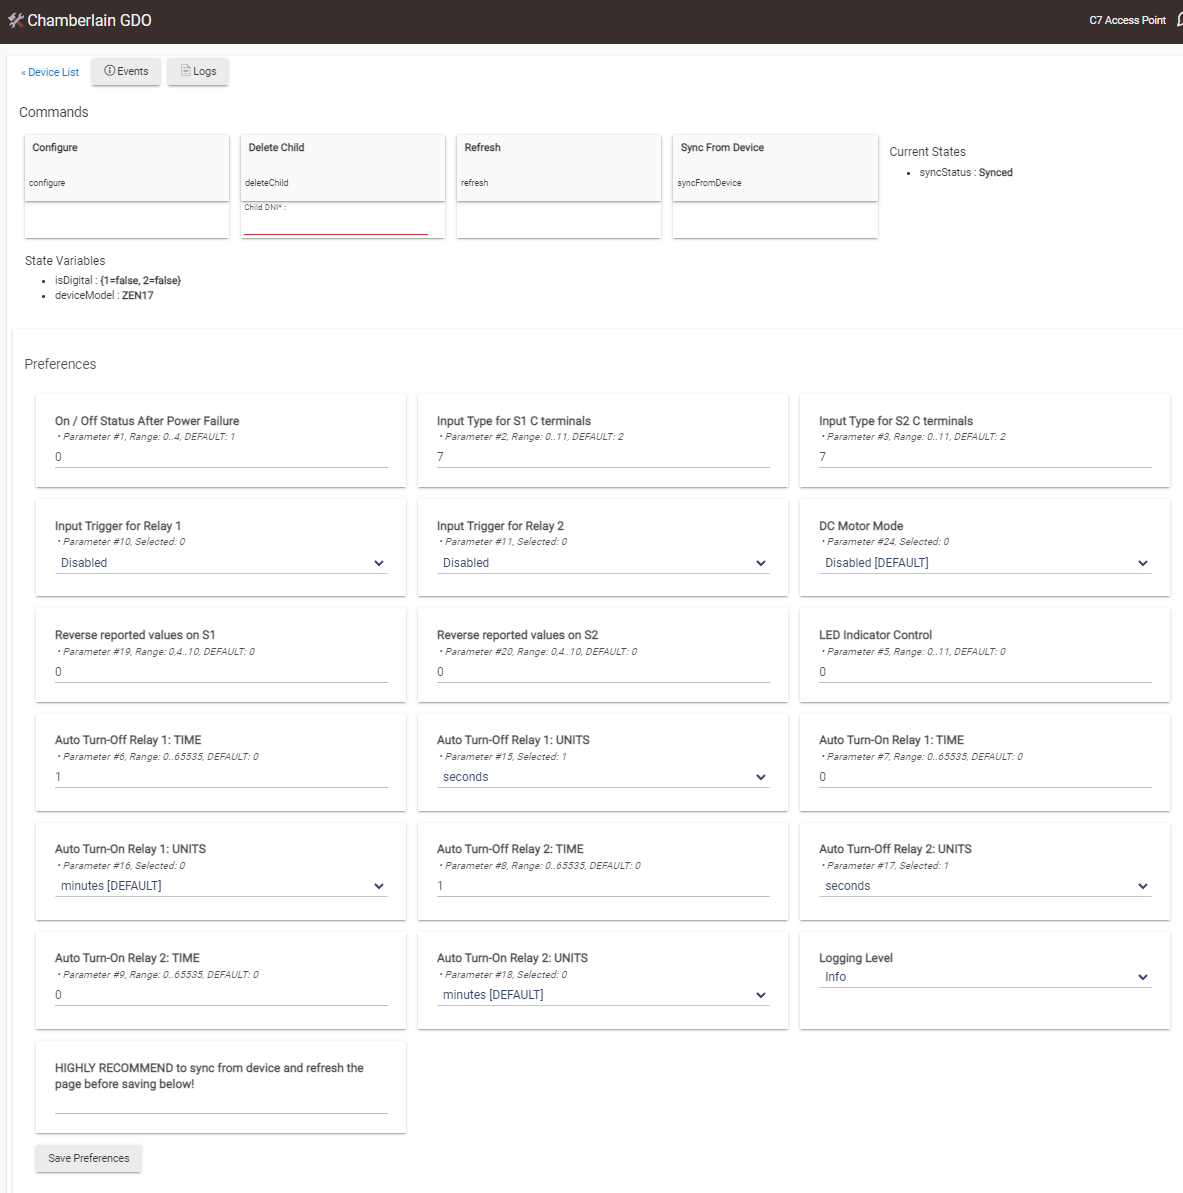
I put together a companion driver for the ZEN17. THIS DOES NOT REPLACE THE STOCK DRIVER. It is a companion to help with configuration of settings missing from the stock driver.
During testing I noticed that the stock driver seems to delete/create the child devices automatically as needed. So I don't think you ever needed to exclude the device, was just bad general directions from Zooz that don't apply to Hubitat due to the driver. There could be some cases though if the childs do not get created correctly, you can use my driver to delete the ones you need to then run configure on the stock driver to create them back correctly.
- All parameters available
- Can sync settings from device
- Settings will sync with stock driver
- Allows you to delete a specific or all child devices
Should always run CONFIGURE on the stock driver if you change any settings that it uses from within this driver!
If this seems to work out ok I will probably make a new post for the driver, so let me know what you think.
3 Likes
I will take a backup and test this tomorrow in the daylight. Don't want the garage door lighting automations going wild after dark.
Thanks for making this driver!
2 Likes
Nice! I'm about to bounce out of town for a few days, but I'll play with this Sunday or Nonday when I return -- thank you!!
1 Like
Thanks for the help! I just installed remotely and I appricate the "in-driver" directions about syncing. I will do some testing when I get back home, but so far so good.
It seems to work fine here. I configured mine for the one input to be a heat alarm, and to reverse that input which has been impossible to make work correctly in the past. I even deleted that heat alarm child device from relay slot 1 and re-created it to see what would happen. That went smoothly when deleting from your companion driver and running Configure again from the built-in driver. It created the new child correctly.
My only critique is that the parameters must be matched up with what each sub-setting in each parameter does. They aren't all listed out, which would be tough with so many settings, so I get why they aren't. Additionally, I believe there are at least a couple firmware versions out there with some having different (or more?) parameters than other firmware.
So maybe specify in the instruction post that users need the listing of parameters from their particular firmware version of this relay before using this companion driver.
I have never had to exclude the device to switch parameters, so I think that it also might be good to clarify that too if you copy this to a new post.
1 Like
Awesome little tool Jeff that worked exactly as expected.
Had to get out the datasheet since I had to decode Input Type for Sn C terminals, but really when you are configuring this thing you should probably have that handy anyway.
Just in case it matters, my zen17 is on FW 1.10.
1 Like