That worked. Thank you!
1 Like
Hey there, just a short question. I'm planing on a DIY smart coffee maker with the option to autofill my water tank. Right now, I can't decide between using a few modified Zigbee water sensors to regulate the filling level or a water level sensor, connected to the Shelly UNI. Question is: Does the UNI live update the water level so that I could automatically shut off a water valve, when a certain filling level is reached, or would that be to slow? Right now I got the feeling, that it wouldn't do the trick and using the Zigbee water sensors would be the better option, but I'm not sure.
What type of water level sensor will you use?
The Uni can send an event when the ADC reading reaches above a certain voltage level or below a certain voltage level.
If either of those correspond to the desired fill level you could get an update immediately.
Other than those two threshold events, the ADC value is only updated periodically by polling.
So the over/under events are instantaneous updates but otherwise the updates will have some lag.
An ADC-Sensor. Or better said, I was thinking about either an ADC-Sensor together with a Shelly UNI or a few Zigbee water sensors. What I'm trying to achieve is a DIY Smart Coffee Machine with the possibility to tell my Voice Assistant to make X cups of coffee, and it will do so. In theory, not that hard, combined with HE. What I'm doing now is trying to find the best and also the cheapest solution.
For what I see right now, is that the Shelly UNI might not be the best solution, at least to measure multiple water levels.
Yes, that may be true.
One advantage that you have is that you know when the brewing is happening. So, you could quickly poll the Refresh() method on my Uni driver during that time period so that you get more responsive updates. There would not be a need to poll continuously at other times. The Shelly Uni is cheap, so maybe you could get one and the sensor to experiment with.
I think your ideal measurement device would be one that reports its ADC measurement whenever the reading shows a relative change by a few % or V/mV, so that you can get multiple events to observe in your automation.
Possible, yes, but wouldn't be the best solution, for what I'm trying to achieve. As I said, the plan is: "Hey Google, let's make 6 cups of coffee" and then everything runs by itself. The water tank fills up, coffee gets ground in the right amount and the coffee machine starts brewing. All by itself achievable, with a little tinkering, the only question is the right hardware. ![]()
Did that already, I tried to install it on the relay of my old coffee machine. Apparently the relay is powered only with 5V, so I need a Step-Up module, to get the Shelly working. I need to get to my local E-Store tomorrow and get me some parts. ![]()
That would be perfect. I found a water level sensor, which is capable of doing this, but sadly it's Arduino and requires I2C-Pins, which would present a whole new set of problems I would need to solve. Sure I could use a D1-mini with Tasmota and see how far I could get, but my coding experience is zero, so I guess I would get nowhere. ![]()
1 Like
I was going to suggest @ogiewon's Hubduino project, but I just noticed you have already posted in that thread. 
He could comment about responsiveness on i2c connected devices and options there. Don't let your lack of programming experience scare you away- it's really easy to get started and there are tons of great examples from @ogiewon and others.
1 Like
Yeah, I'm already trying. Right now, I'm playing around with Arduino and Tasmota. With Tasmota I had my first success, kind of, by getting the Ikea Air Quality Sensor online. Not into Hubitat, but at least online. ![]() With Arduino, it is a different story right now, which was basically my fault. I've used an old power supply to build a switch and burned my last D1 mini. Now I have to wait, till the next shipment.
With Arduino, it is a different story right now, which was basically my fault. I've used an old power supply to build a switch and burned my last D1 mini. Now I have to wait, till the next shipment.
You're absolutely right about that. And @ogiewon is really supportive. For me, one big reason to find one of this easier solutions is to make things accessible for people who like to tinker, but like me have no idea about programming and are either too scared to try, or just lack the time. That's one reason why I love the Shelly modules. They give you this great experience of "I've built it by myself! This is my thingie!", but still make it so much easier for you, to build this stuff. I remember, when I build my first Smart Roller Shutter, using the Shelly 2.5. It felt great, was easy to do, and now it is my personal Roller Shutter, which cost me a fraction of the price of commercial ones (80€ for a fully functional black out Roller Shutter of 1,5 m in width, 1.5 m in length).
That's one reason, why I'm often times posting my mini projects and "Idiot"-solutions to give other people this experience, a staring point, and especially for people who want to have all this comfort-smart-devices but don't have that much money, a possibility to build those by themselves, without any deeper knowledge. ![]()
2 Likes
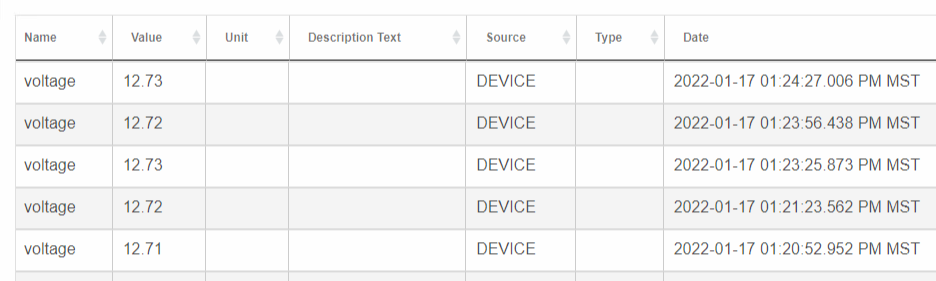
Is there currently a way to suppress update of voltage if same as previous value?
Hubitat should do that for you, since I don't use the isStateChange: true flag. The default behavior is to not fire duplicate events when the value has not changed.
If you look at the Events view of the ADC child device, do you see multiple entries with the same value?
Interesting... the device events show this.
But the entries in the database using node-red shows this...
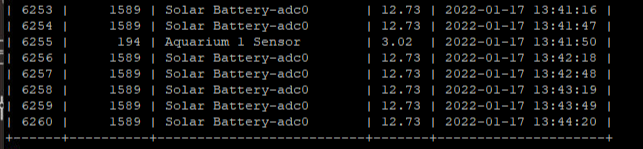
I don't use node-red. How does it connect to Hubitat?
It's using websockets to connect to the hub. I followed the thread below.
I did a little bit of tinkering, and the eventsocket interface (ws://<hub>/eventsocket) sends every event, even if they are duplicates and isStateChange is set to false.
This is a difference in behavior from events elsewhere in Hubitat. For example, if you used this attribute with a trigger in Rule Machine, you'd only see it triggered as often as what shows up in the Events list for the device in Hubitat.
1 Like
Thanks for investigating that @tomw! I'll try and work around it on the node-red end.
I've been meaning to ask but keep getting sidetracked. When I go to the parent Shelly device and edit a setting, like the Refresh interval. The device becomes a totally new device somehow, the device ID gets changed and I have to reauthorize other apps that use it. Is there a way to preserve the device ID?
It just happened today after I changed the refresh rate from 30 to 60 secs.
1 Like
I noticed this happening as well - didn’t realize what I had done to cause that to happen, and didn’t spend the time to investigate… I’ll second that it would be nice if the device ID could remain…
1 Like
It is totally fixable. I'll send you guys some code to test out.
1 Like
I pushed the fix to retain child devices on save/re-configure. It is in version 0.0.24.
Thanks to @eibyer and @Sebastien for testing and feedback on the Shelly Uni support.
I made the same changes to the Button1 and i3 drivers, but they're not tested yet. If anyone has issues with those please let me know.
2 Likes
Hey @tomw thanks for your work on these drivers.
I've got my Uni working as a garage controller with the Hubitat built in "Garage Opener" app.
I had to add contact sensor capability to the input driver though - so just a something you can add back in for those that need it.
/*

 */

metadata
{
    definition(name: "Shelly Input Child", namespace: "tomw", author: "tomw", importUrl: "")
    {
        capability "Actuator"
        capability "Refresh"
        capability "Switch"
        capability "Contact Sensor"
        attribute "commStatus", "string"
    }
}

preferences
{
    section
    {
        input "inputNum", "text", title: "Input number of this child", required: true
    }
}

def setupDetails(details)
{
    device.updateSetting("inputNum", details.inputNum)
}

def setCallbackURLs(URL)
{
    getParent()?.getCommon()?.writeSettingAction("btn_on_url", inputNum.toInteger(), URL, true)
    getParent()?.getCommon()?.writeSettingAction("btn_off_url", inputNum.toInteger(), URL, true)
    getParent()?.getCommon()?.writeSettingAction("longpush_url", inputNum.toInteger(), URL, true)
    getParent()?.getCommon()?.writeSettingAction("shortpush_url", inputNum.toInteger(), URL, true)
}

def on()
{
    // do nothing, but refresh anyway
    runIn(1, refresh)
}

def off()
{
    // do nothing, but refresh anyway
    runIn(1, refresh)
}

def refresh()
{
    def input = readInput()
    if(input)
    {
        sendEvent(name: "switch", value: input.input ? "on" : "off")
        sendEvent(name: "contact", value: input.input ? "closed" : "open")
    }
}

def readInput()
{
    return getParent()?.getCommon()?.readStatus(false)?.inputs?.getAt(inputNum.toInteger())
}
I also needed to reverse the inputs in the Uni settings, but that will depend on what switches you used. In this case I used the cam switches build into the motor.
1 Like

