Vote for Shelly UNI

Thanks @tomw, the Shelly Uni driver is awesome.

I figured out why I couldn't configure the Shelly Uni on the configuration page. I put in the IP address as http:// 192.168.50.202/, which didn't work. So, I changed it to 192.168.50.202 and it started working and gave all the child devices.

Then I configured the "Shelly Uni for Reef Tank-adc0" to read the correct voltage, since the default voltage offset was -0.4 volts. I changed it to "-0.0" and it worked.

I was then able to create an alert app that sends a notification to my phone. Although, a tricky part was I had to use "Custom Attribute" as the capability of the Trigger event

It works perfectly now :slightly_smiling_face:

2 Likes

One more question. I haven't been able to add the Shelly Uni to my Dashboard to monitor voltage, since it doesn't show up as a device in the "Add A Tile" Pick A Device drop down menu.

Could it be that the Shelly Uni was created as a virtual device?

No, it should show up there. You may have to go to the configuration page for that dashboard instance and add the device to the list.

3 Likes

Thanks! I can't believe I forgot about that.

Also, for anyone trying to add a Shelly Uni tile with Voltage, I had to pick the "Attribute" Template and then select Voltage from the Pick an Attribute pull-down.

2 Likes

Hi, can you please lead me how did you install the HPM ?
Thanks in advanced

See the official HPM thread for details and instructions:

2 Likes

I'm pretty sure this is what I did to install HPM.

First, go to https://github.com/dcmeglio/hubitat-packagemanager and click on Go to File.

Then click on apps/Package_Manager_groovy.

Then copy the code over to Hubitat to "Add User App" on the Apps tab.

I hope this helps. :slightly_smiling_face:

1 Like


sure it helps a lot,thank you very much for your clear informative reply,
much appreciated. :+1:

have another question please.
when i add the UNI as device it show me in the Type several options like Shelly UNI,Shelly child device,Shelly Common,,,
which one i choose?

Choose "Shelly UNI". The others are component devices that will be created automatically, if needed.

1 Like

thanks a lot :+1:
very helpful team here . thanks for sharing this driver for UNI. tomw great job.

is there a way to add to your UNI driver a water tank level Tile on Hubitat ?
which covert the voltage signal coming from UNI to water/liquid level animation? so we can use Uni to measure tanks level. example this sensor read 0-5 0r 0-10 volts .compatible with UNI.
it would great.

2 Likes

I'm planning on doing the same thing for the sump on my Reef Tank. Although, I haven't done it yet.

Here's a great video on it " wire shelly uni to water level sensor" ... تجربة حساس مستوى الماء مع شيلي يوني - wire shelly uni to water level sensor - YouTube

1 Like

great vedio, WE SMART channel is my favorite .
I could add UNI to Hubitat by following your instructions.
it gave me voltage measurment on the Tile same like Shelly app.
what iam looking for now is how to make a tank animation Tile on Hubitat to be friendly user for my familly to see tank level without calculating the Uni Volts.
if you reach any idea please share.

1 Like

Result is clear :slight_smile:

1 Like

hi,
Is there a way to convert the Uni voltage readings on the tile to number (liters) readings on dashboard ?,
example each 1 volt = 60 Liters
1.5volts = 90 Liters
.2 volts =120 Liters
and so on..? it will be great results

You could do this in Rule Machine - Setup a “String” variable and if conditions that place the relevant value in the string based on the voltage. The string variable could be displayed on the dashboard.

1 Like

Thanks Sebastian,
I am very new to Rule Machine ,
could you give me a lead how to do it step by step whenever you have time.
Thanks in Advanced

Sure!

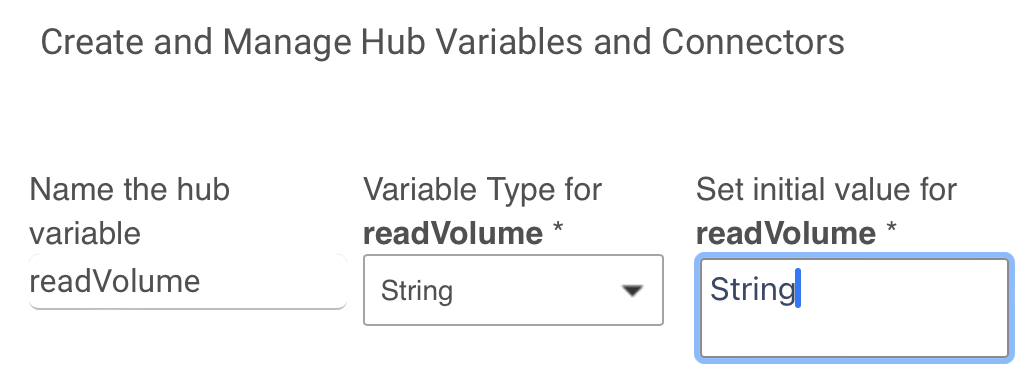
First, you will need to create a variable to store this information:

Settings -> Hub Variables -> New Variable

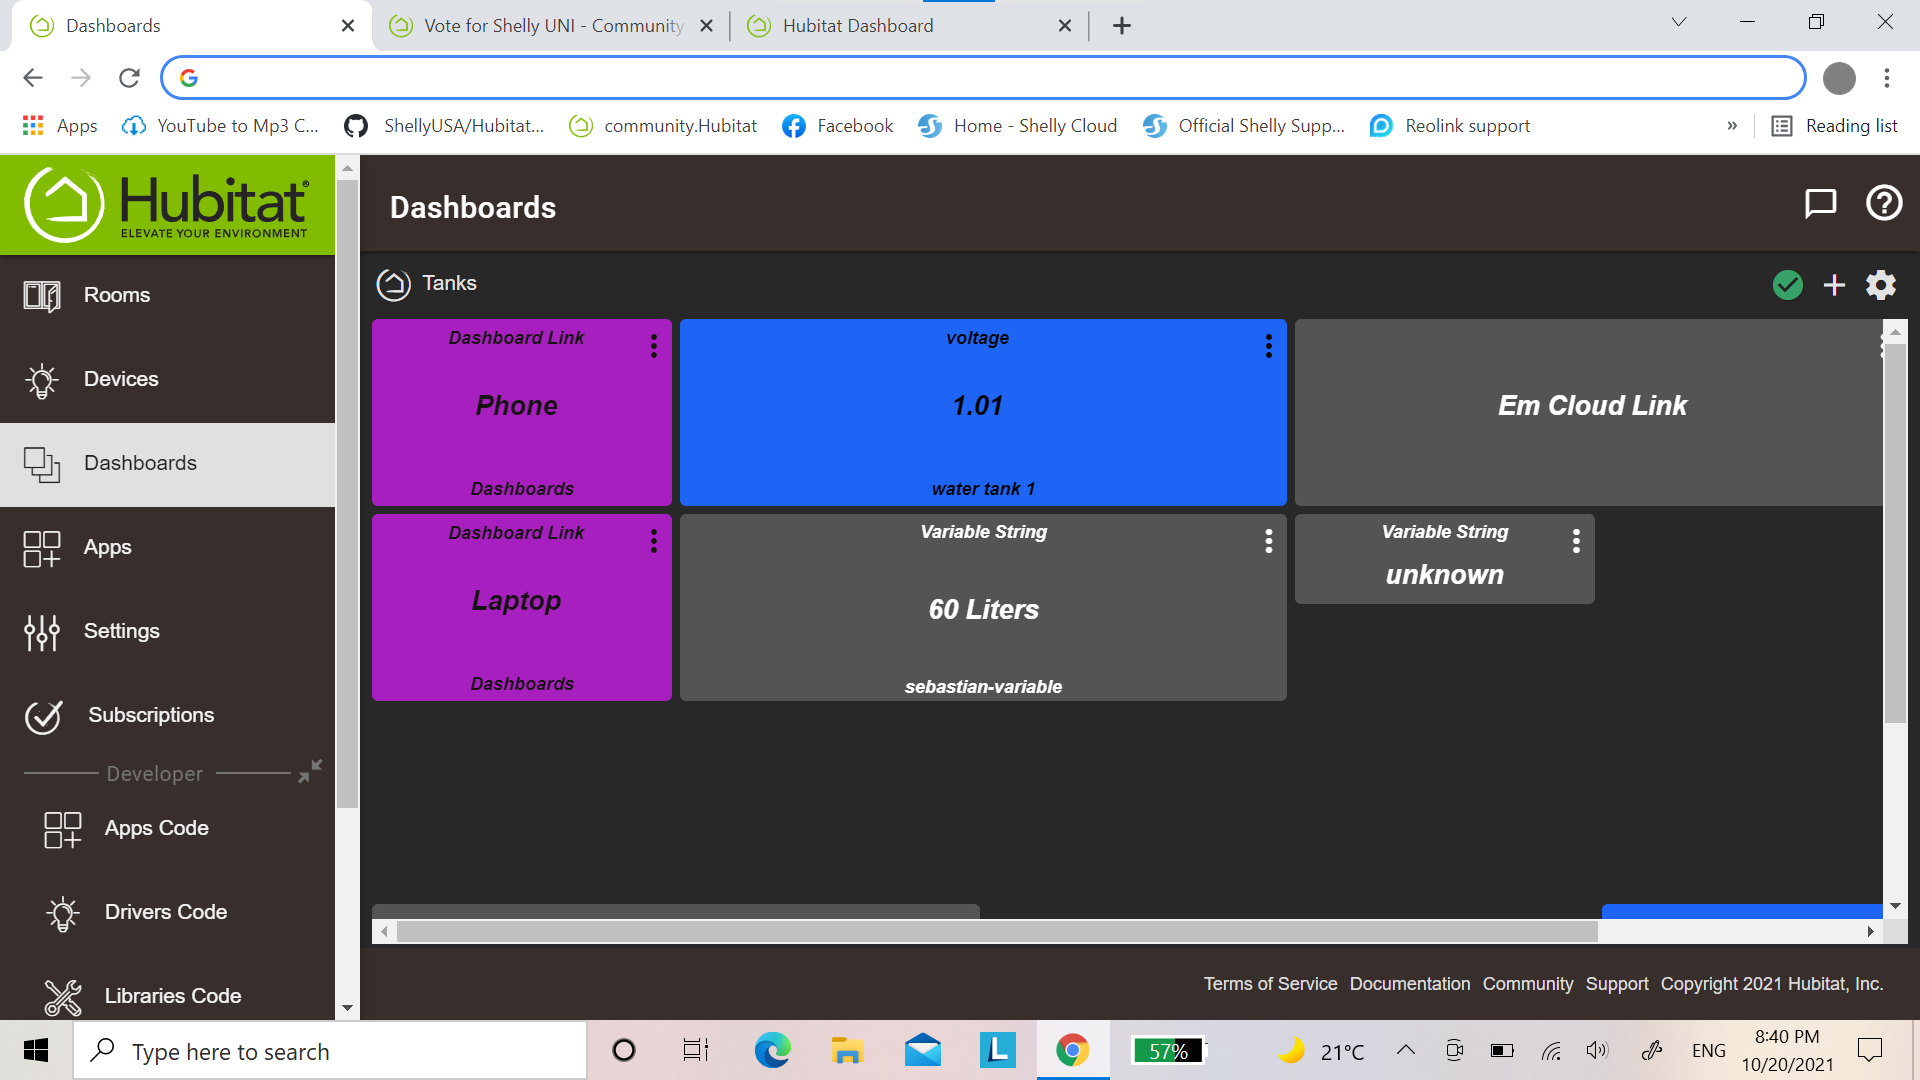
Once you have created it, you will see “Connector” in the “Connector” column. Click on the text and it will create a connector variable which you can then use to add it to your dashboard.

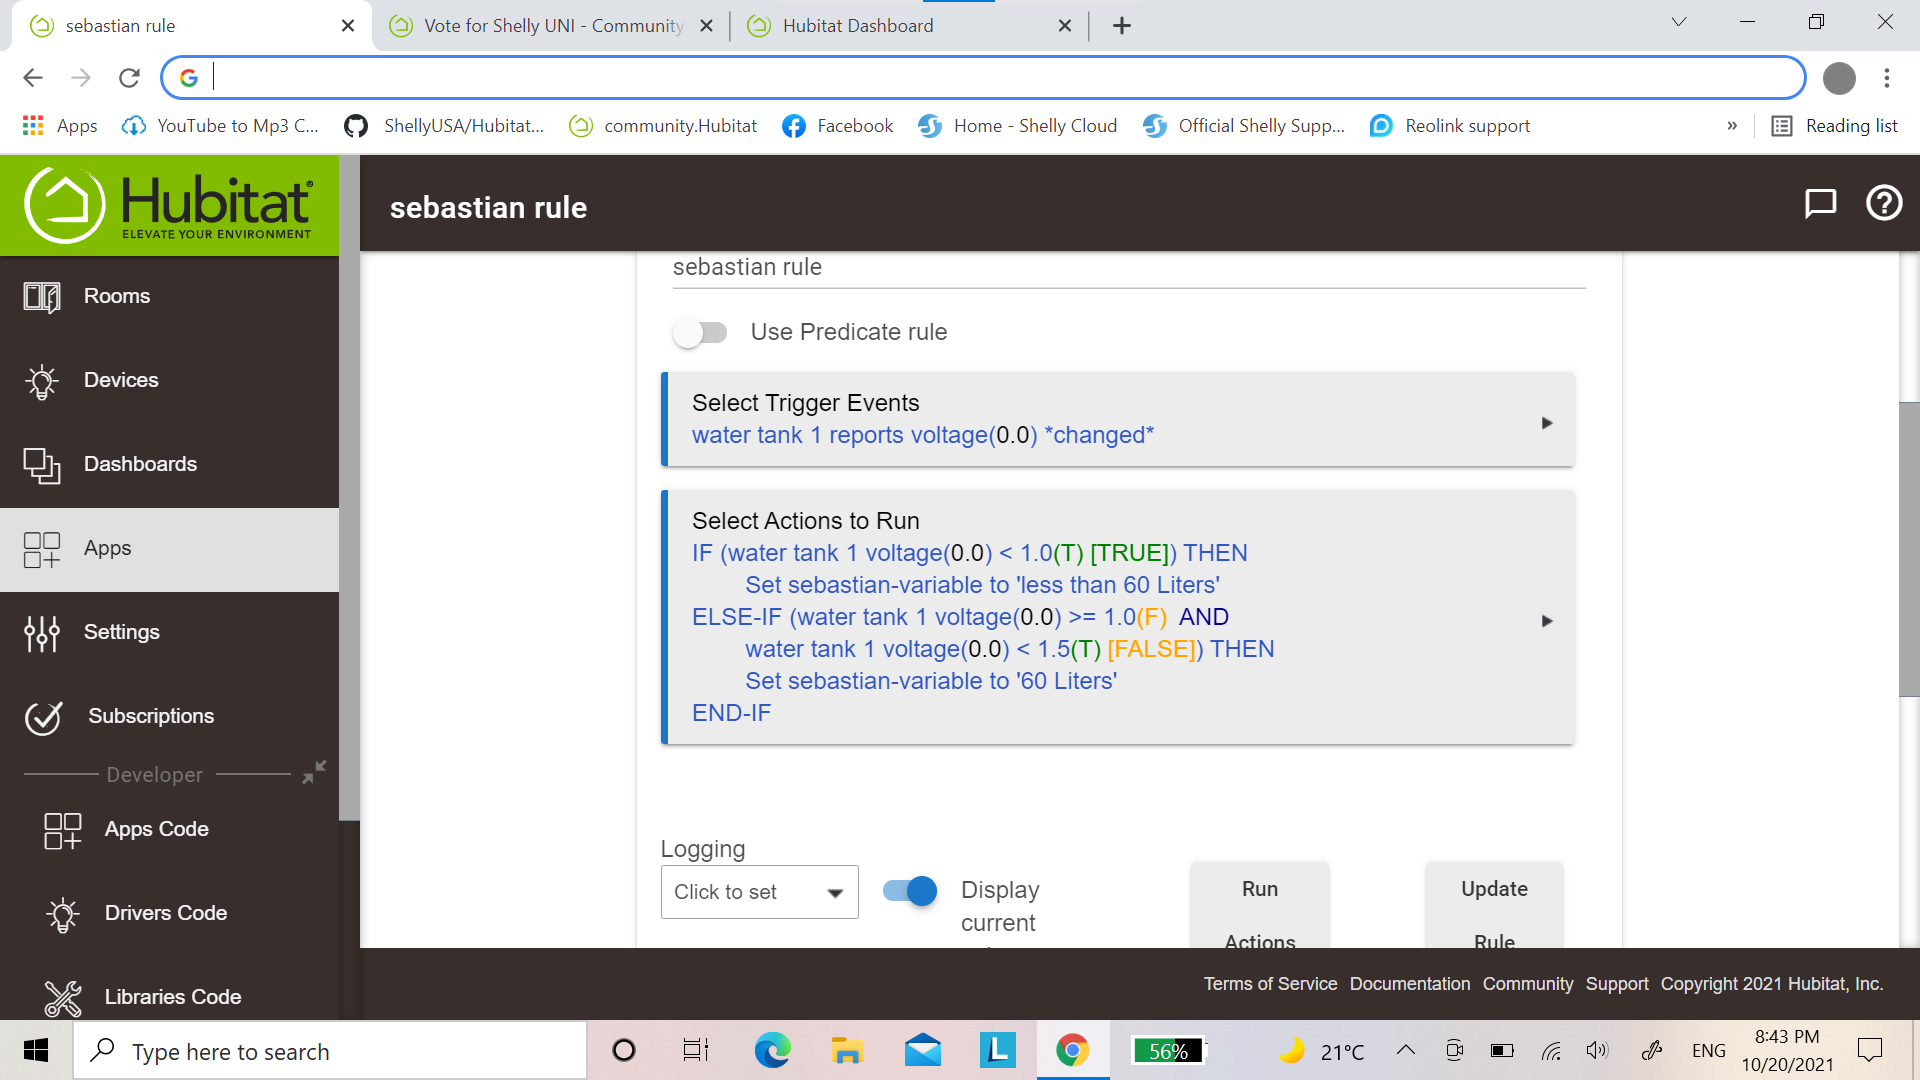
Then, go to Rule Machine and create a new rule.

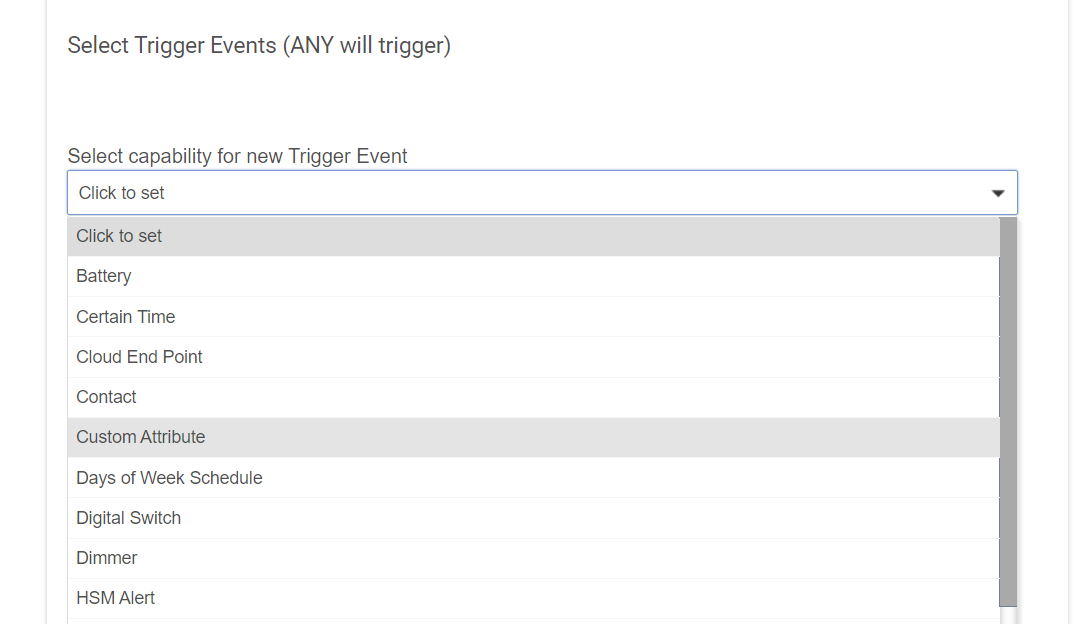
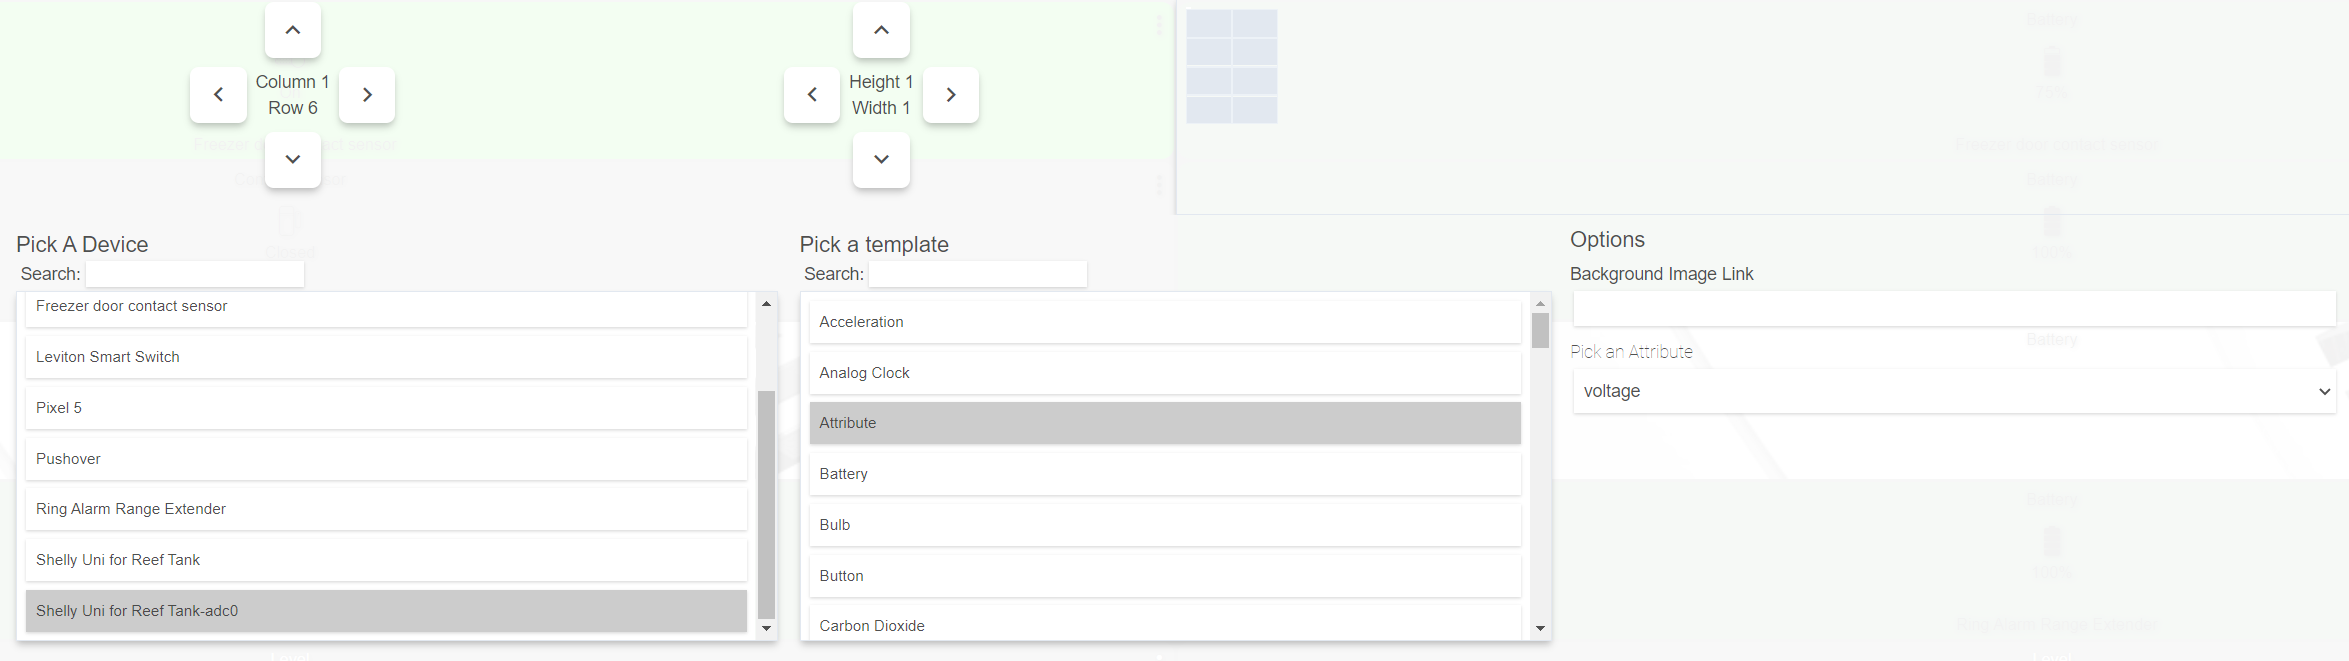
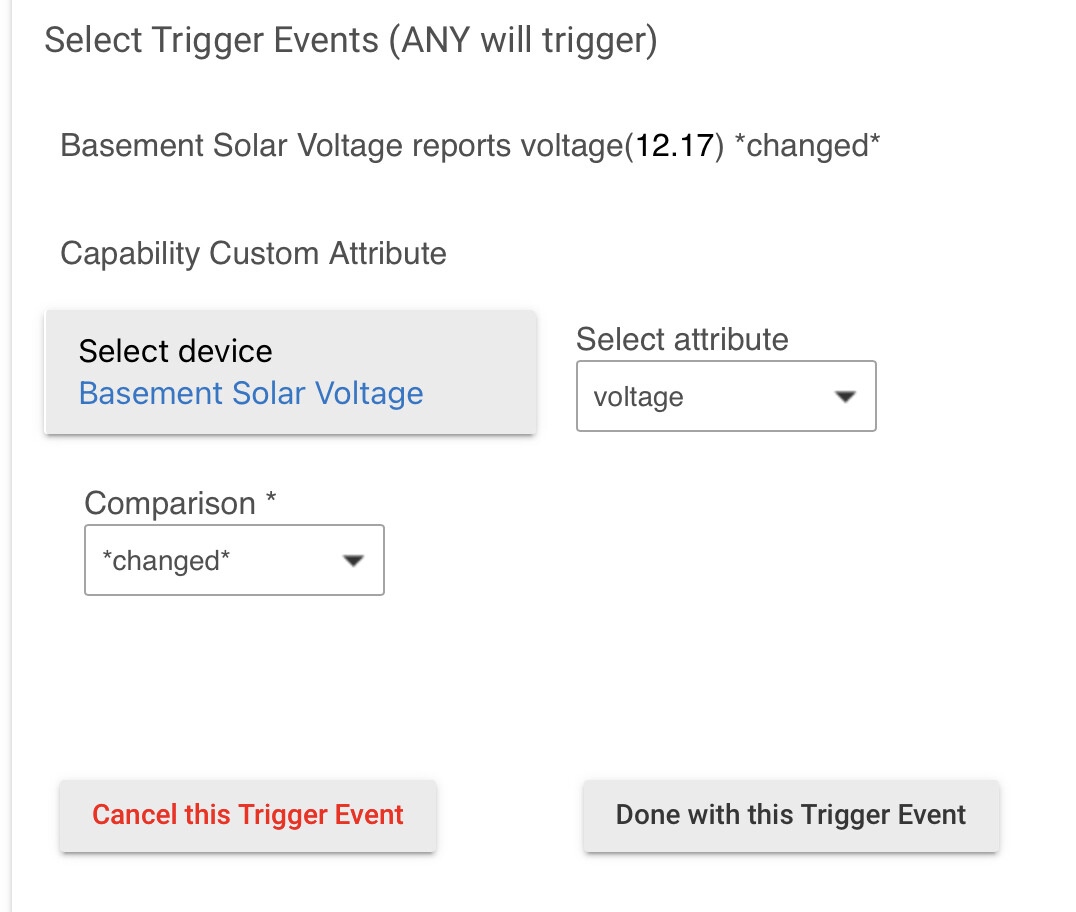
Under “Trigger”, you will want to indicate what will make the rule run, what will trigger it. You will chose the Shelly UNI device’s voltage attribute, and have it trigger each time the voltage changes:

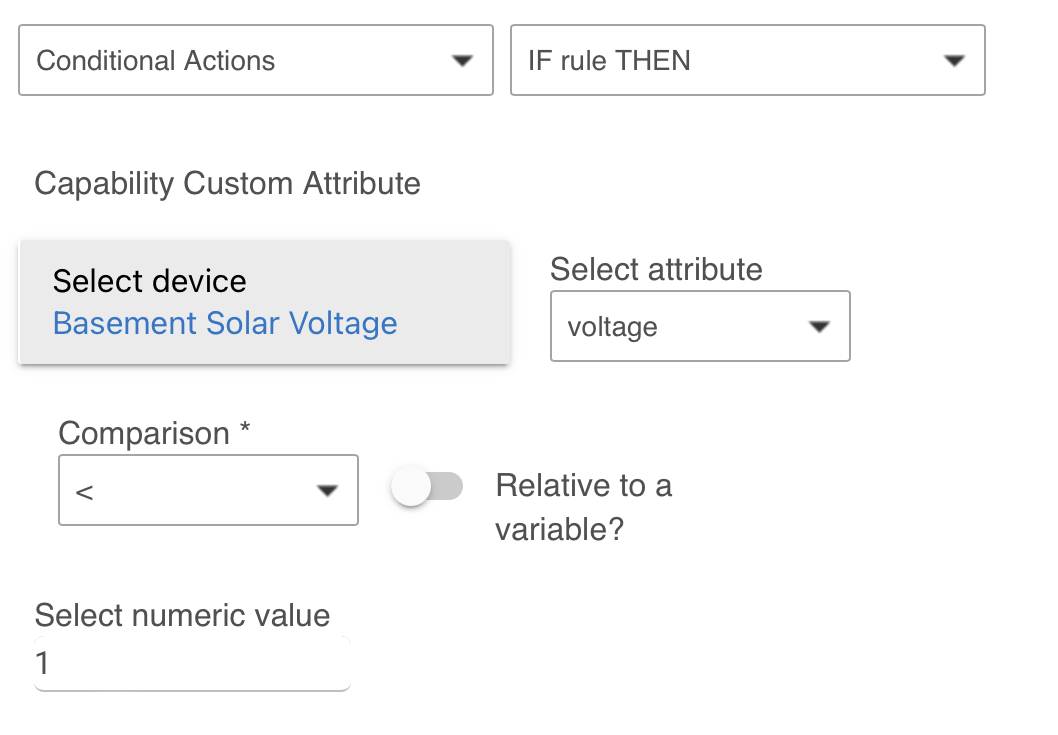
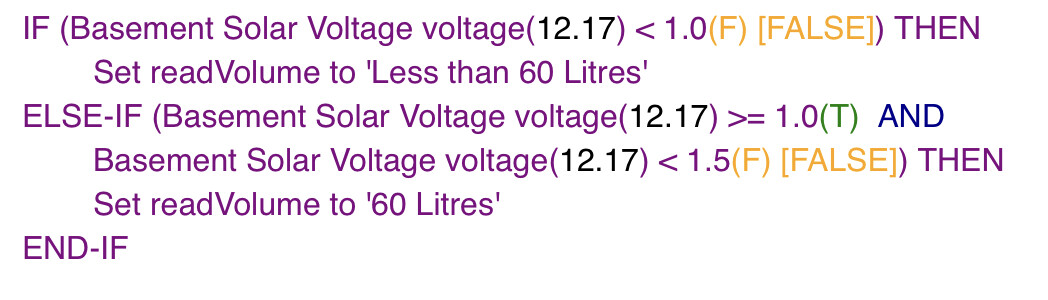
The next step will be to create the Actions that will run. This is where you will add your conditional (if) statements:

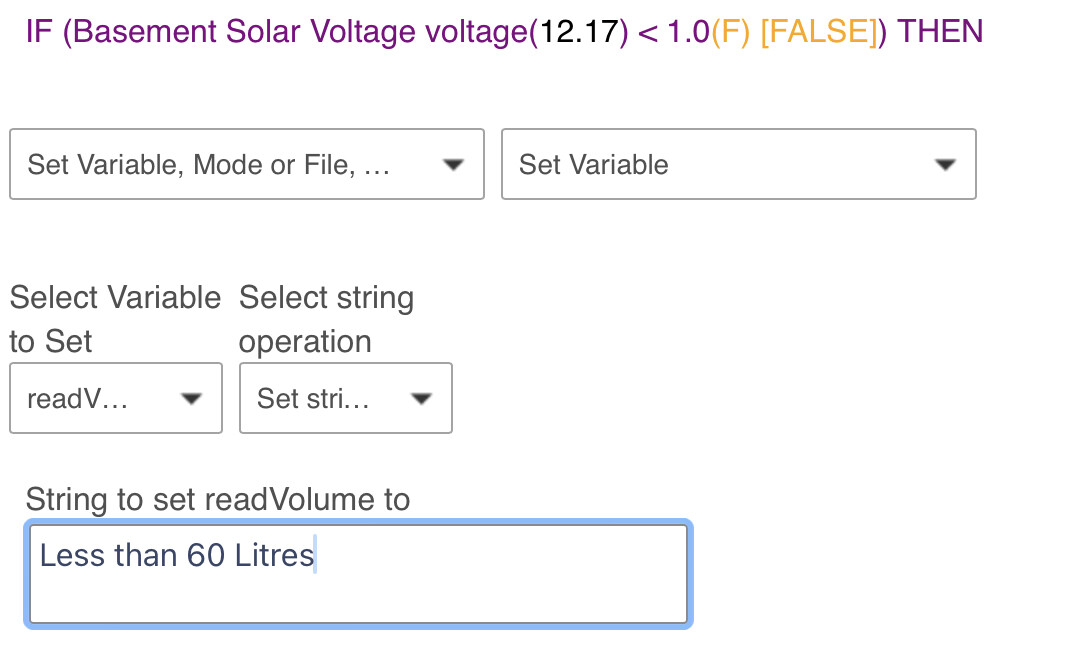
Under that conditional statement, you will store the text you want displayed in the variable you created above:

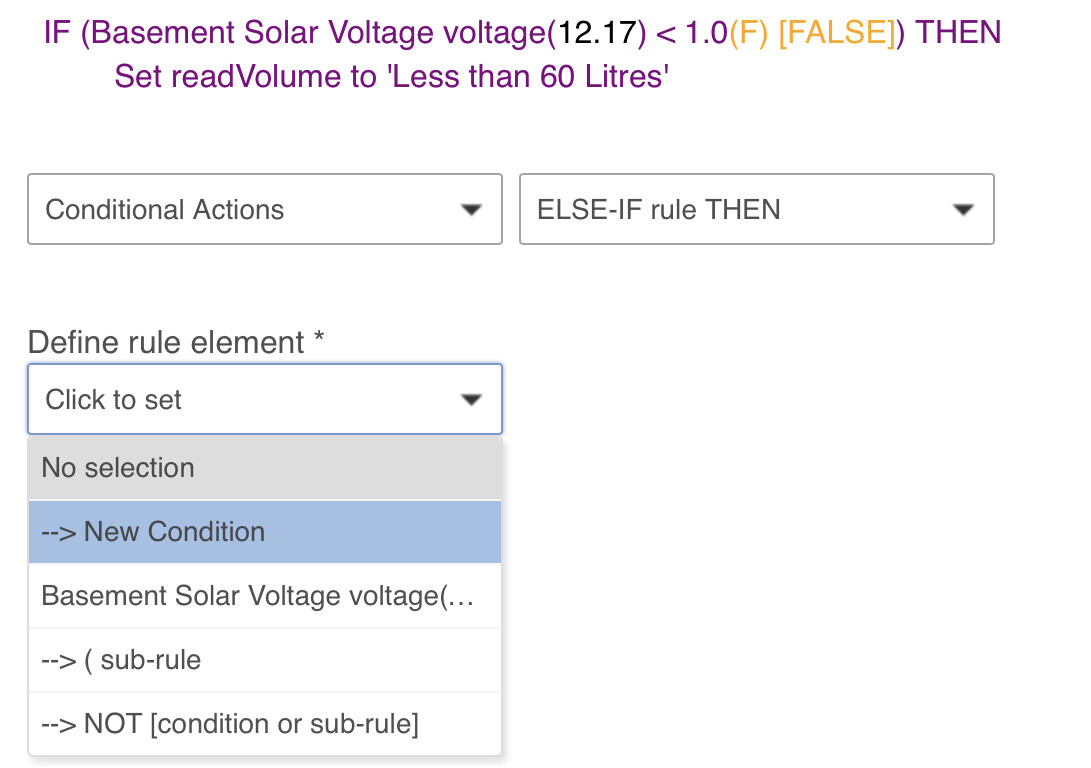
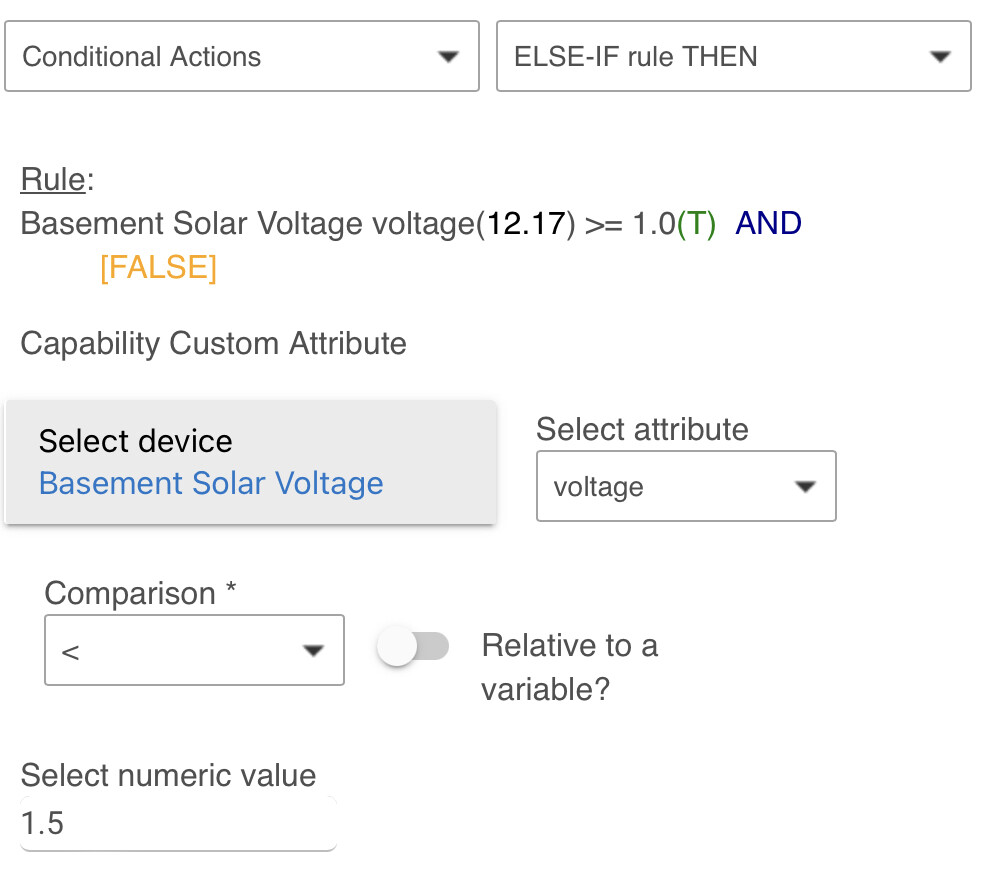
You will then create some alternate conditions using “Else-If” to have it display different message between the next voltage values:

Under that alternate conditional statement, you will store the text you want displayed in the variable:

When you added all your finished your rule, add an end-if.

You can also add an “ELSE” statement at the end instead of your last “ELSE-IF” condition.

After this is done, you can add your variable to a dashboard of your choice. Since it was created as a connector, it will be available in your device list. When the variable changes, the connected device will also change.

2 Likes

oh,thanks a lot for this clear lead and efforts and time spend writing this for me,much appreciated Sebastian :grinning_face_with_smiling_eyes:

i will follow your instructions and try this tonight and let you know the results.
:+1: :+1: :+1: :+1:

1 Like

thank a lot Sebastian ,it works as you explained.
thank you for your time spent and efforts,much appreciated. :+1: :grin:


2 Likes

I've been using the Shelly Uni driver very successfully for tracking voltage through the ADC input. Today I purchased some DS18B20 temperature probes and connected them to a Shelly Uni through the data sensor input. I can read the temperature value in the Shelly app, but I can't seem to pull it into Hubitat as a dedicated current state of child device like I do for voltage with the ADC input. I do see the following within the State Variables of the "Common" child device:

ext_temperature={0={tF=77.90, hwID=3bfb6ff20e9c4cbf, tC=25.50}}

So the temperature value is coming in, I'm just not sure how to use it. I use WebCore, so I'd like to be able to get the temperature value into WebCore and then trigger off of it. Any thoughts? Am I missing something obvious?