[Release] HubDuino Bed Occupancy/Presence Sensors

All,

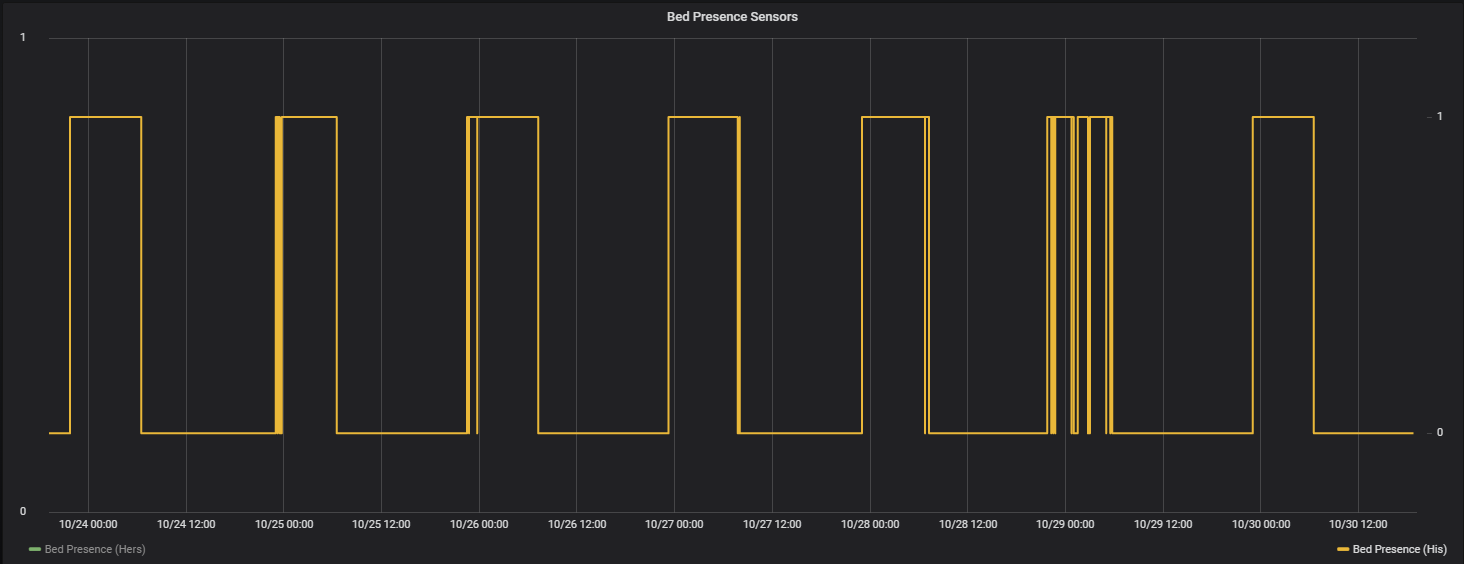
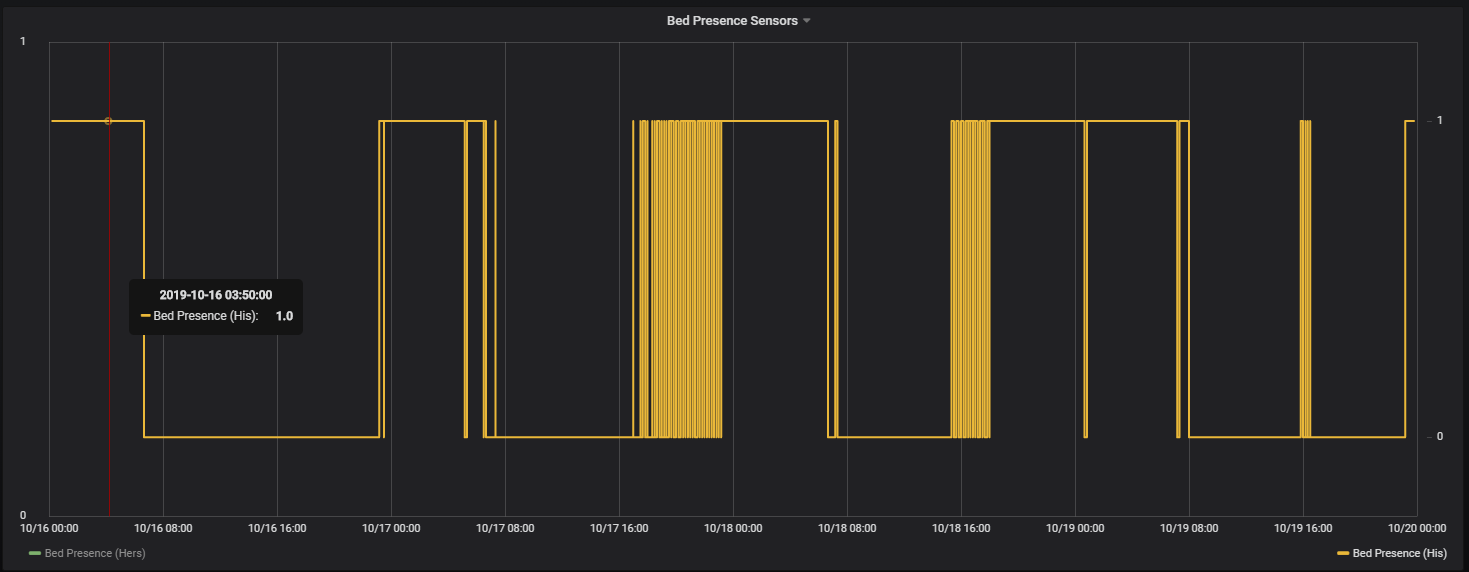
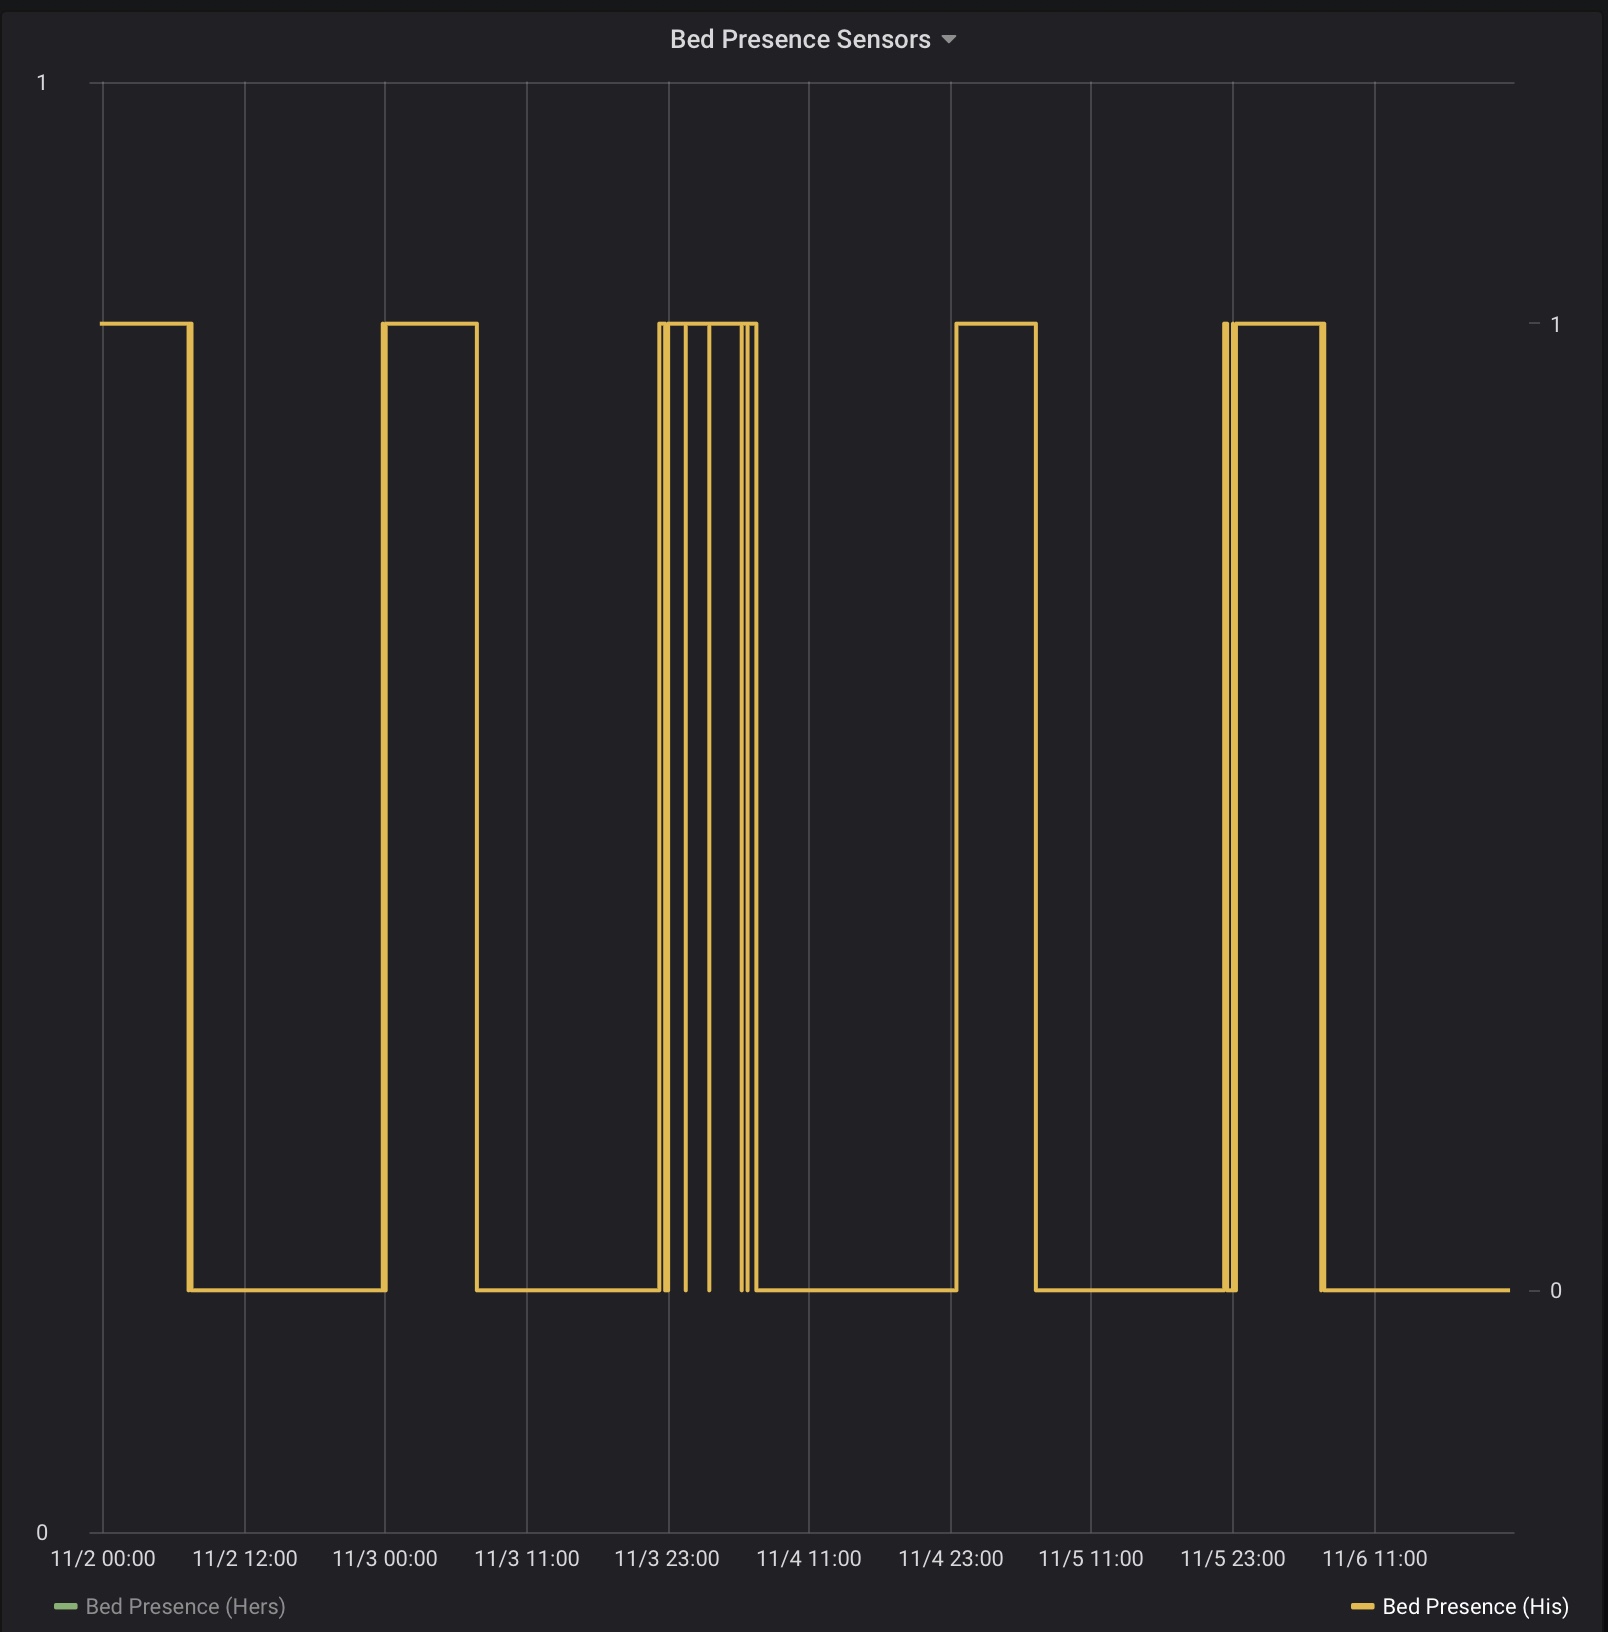
I have been wanting to figure out an automatic way of knowing whether or not my wife and I are in bed or not. This would allow for some additional automations, like automating Hubitat Safety Monitor arming at night, automatic path lighting in the middle of the night, notification of sleep walking, etc... This might also be useful for ensuring children are where they are supposed to be :wink: Or for knowing if elderly loved ones are following their normal routine.

I have added a new Device Class to ST_Anything called IS_Presence. This class simply monitors a digital input to see if the signal has changed from high to low (very similar to a IS_Contact sensor device.) Using this new device, a Child Presence Sensor Hubitat device will be created for each sensor. This Presence Sensor device can then be used to trigger any automations that you desire in Hubitat.

The real trick for this project is the hardware. I found an example from a Home Assistant user that I thought would work well with my memory foam mattress/solid platform. This design uses a 24" long Force Sensitive Resistor, which provides decent coverage for a variety of sleeping positions. It also allows for multiple FSR's to be used on a one bed, to detect two distinct occupants.

This is the model of FSRs that I purchased from SparkFun. I believe Adafruit also sells these, but does not sell the same connector.

https://www.sparkfun.com/products/9674

UPDATE: A user has informed me that the FCI Clincher connector below may not be the best idea for attaching wires to the FSR strips. Soldering is NOT recommended as the heat will melt the FSR plastic. So, you may want to simply try using a standard female jumper wire pair and see if you can get a good solid connection with the FSR.

image

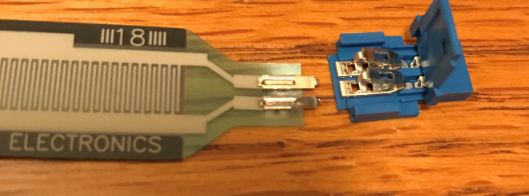
Here is the connector that simplifies the wiring to the FSR (as soldering is known to damage these sensor strips.) Crimping this connector on to the FSR does take some work, but once attached seems to work well.
WARNING: To use these connectors you have to snip off the small "pins" from the FSR strip, making it impossible to go back afterwards.

https://www.sparkfun.com/products/14194

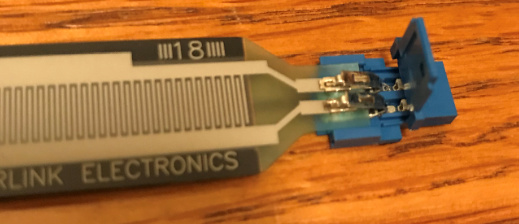
And here is what it looks like as the connector is attached to the FSR strip. This is not exactly a simple align, crimp, and forget. It takes some time and effort with a pair of pliers to get this connector crimped and then even more work to get the plastic cover to stay latched. As I mentioned above, please try using a standard female jumper wire connector instead and see if you get a good connection.

In this first picture, the 'pins' have already been snipped off of the FSR's electrical connection.
image

FSR inserted into the connector.
image

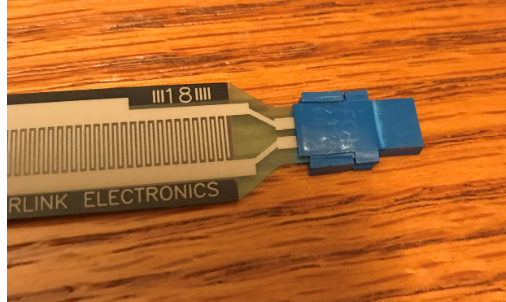
Connector crimped and closed.
image

Since this is a fairly unique solution, wiring diagrams are not readily available online. I created a Fritzing diagram to explain the wiring should you like to attempt this project. Note - the 10k resistors shown are simply a starting point to adjust the amount of force required on the strip to cause a change in the presence status. Feel free to try various values to find something that works for your specific needs. I believe the user's weight and type of mattress will factor into the resistance that works best to prevent false status changes while rolling over in your sleep. I would probably stick to a range of 1k to 22k resistors, as higher values resulted in no change detected whatsoever.

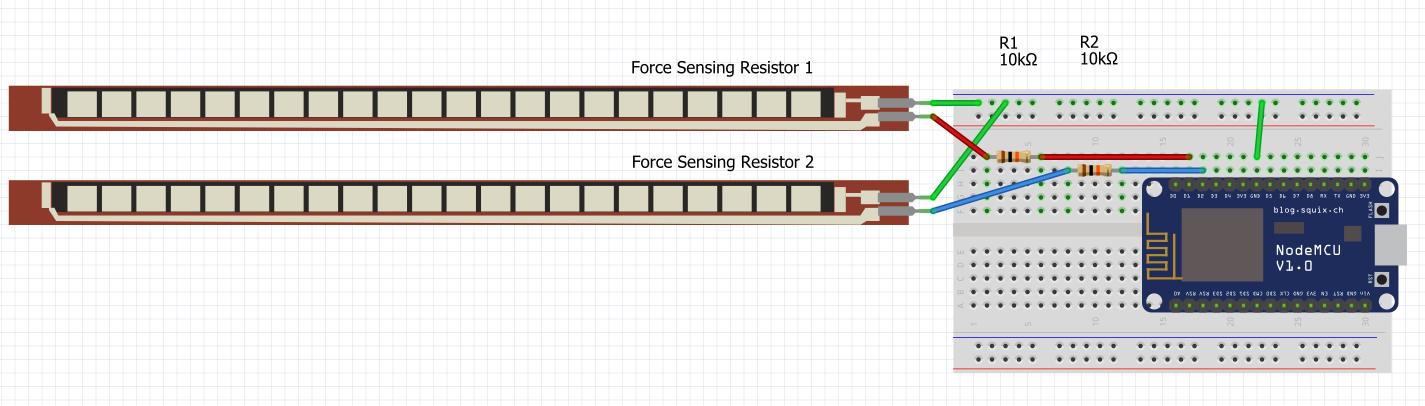
Finally, I have created an example HubDuino Arduino sketch to help you get started. This example implements two sensors and matches the wiring diagram above.

I would like to thank @marktheknife for helping to inspire me to complete this project which I have had on the back burner for a few months.

If you have any questions or suggestions, I would love to hear them. If you try this project, please let us all know how it works for you. I can always tweak things to improve the reliability based on feedback from the community.

Have Fun!

19 Likes

Great write up! I did something similar years ago on Homeseer with a cheap pressure mat, a resistor and a door/window sensor. Had some under the mattress, in front of the kitchen sink (under a mat) and outside under a mat at the front door. Even tried to put some under the kitchen chairs but that never works too well. Gonna have to find that post again!

You're going to cost me money! :wink: lol

Thanks :grin:

2 Likes

Really nice writeup. And I will concur that the automations are super useful. I'm blind as a bat, and having dimmed passage lights come on when I stumble out of bed at 2AM has saved me from many a fall (3 cats provide plenty of obstacles).

I have one of those SleepIQ beds, and fortunately there is a community cloud integration available in this thread.

Your local integration is much nicer though.

1 Like

Wow, that is an awesome project. I use the Withings sleep pads. Not cheap (I recall 80 bucks each, ouch). They work really great although sadly just via IFTTT so a 3-5 second delay. So I get out of bed and pause. Stand naked in the dark. The suspense is awesome. Hmm will it work? When? Lights come on dim. Walk to bathroom. Ha ha ha.

But the diagnostics they do on sleep quality are really really cool. Snoring. REM. Duration etc. It's great. I've realised my wife is getting much better sleep than I am lol. That needs to stop! I feel justified to request breakfast in bed ha ha ha.

I think Withings now offers this same level of diagnostics on at least some of their watches. I'm impressed with their products and it's nice to know they are back in the hands of the originator after being bought back out from Nokia.

Just for anyone's morbid interest...

2h44 to go to sleep?!?
Damned Hubitat forum.

1 Like

This is something that's been on my todo list for months.. Do you find the FSR's to work better than strain gauges + HX711 underneath the bed feet? For a time, I even considered messing around with Velostat, but that's just unnecessarily complex..

I have not tested those other solutions. I can tell you that my wife would not be very happy with the HX711's under the feet of the bed. Both due to aesthetics and the fact that it turns the entire bed into a massive scale.

The strain gauge attached to the bottom of the wooden slat idea would not work for my application due to my bed's design. I have a memory foam mattress on solid platform/box spring. The wooden slats don't flex much as the vast majority of the weight load is transferred directly onto the bed's side rails.

I have a similar kind of bed - memory foam layer on top of a regular mattress+box spring.

I think I like using your method better. Do you have each of these strips length wise on the bed on both sides? Do you get any false alerts from the weight of comforters/pillow etc.?

Also - the FSR's do go directly under the bedsheets correct?

I have the FSR between the mattress and solid platform/box spring. My 'box sping' is not a traditional box spring. It has zero moving parts, no springs. It is just a large queen sized box that raises the height of our Tempurpedic mattress. So, it provides a solid platform for the FSR to rest upon. These are not designed to flex really. They just detect the pressure applied to them.

As for the orientation...I have not settled on a best practice yet. Right now I have it lengthwise, following the length of my body, and at a slight angle so it covers more positions if I roll from side to side.

I just installed this on yesterday, so I don't have much data yet.

Thanks for the info. Sorry if this is stupid - just trying to understand how this setup works:

So, there's constant pressure on the FSR already from the weight of the mattress above the FSR? I'm assuming the resistors are mean to compensate for this?

I had a similar thing once on my couch where I used a pressure mat connected to a dry contact sensor. The problem was that the pressure mat would get "stuck" occasionally even after the weight was removed. Curious if this will be an issue, so please keep us posted on how well this works for you long term.

The weight of the mattress alone is not enough to trigger the FSR in my testing. The weight of the mattress is well distributed and it really is not that heavy in my case. Adding a person to the bed triggers it immediately.

Yes, the resistor simply changes the amount of force required to reduce the overall resistance enough to trigger the digital input. I tried with a 22k resistor at first, which worked on the workbench with me pressing on the strip with my fingers, but it would not trigger at all when deployed under the mattress. I dropped the resistor value to 10k and it seems pretty robust.

1 Like

Has anyone tried the fairly inexpensive pressure pads that have been talked about extensively for other applications - mostly over on the ST forum. I use these to trigger lights when I stand in front of my sink and my wet bar. I think they would work for a bed too?

Also, I have a sleep tracker under my matress to do diagnostics on sleep but unfortunately they don't offer an API. I have been waiting for one but it never happened. I wonder if one could be hacked together somehow...

Are you talking about these?

If so, they don't work well for beds unless directly under the bedsheets (which is uncomfortable). If it's under the mattress, I think the pressure of the mattress will be too much and it will always be in a stuck state.

FWIW the Withings pressure pads calibrate themselves (I guess according to the weight/pressure when out of bed) and apparently keep doing this on a regular basis. I have literally no false readings unless we stack clothes etc on the bed while cleaning or tidying. I'm very pleased with them, just a shame they are quite expensive.

Just following up, how's this setup been working for you? Do you think it works long term?

Truth be told... I am not 100% sure...:wink: I have not created any automations that use this yet, as I just received the second FSR strip for my wife's side of the bed. I did have one day where the FSR was toggling "present" and "not present" repeatedly for a few hours. Once I detected it, I simply sat on the bed and then got back off of it. The problem has not happened since. So, I am going to probably tweak the extra resistor value slightly to try to eliminate that issue altogether. Other than that, it has worked perfectly each time I have checked it. I'll need to think about the logic regarding the proper way to use this, as I really do not want to disturb our sleep.

2 Likes

Please keep us posted. This may be my next project.

So, I pulled some data via Grafana which shows some interesting data. I still only have 1 sensor collecting data as shown below. The results appear very good over the past week. The noisy signal from Monday night is actually accurate. I was prepping for a medical procedure Tuesday morning which required me to get up numerous times... :wink:

Data from earlier in the month does show a few occasions where things got very 'chatty' for a while. Again, I have not tried any fine-tuning of this yet. Once I add the second sensor I will try to dial things in a little more to prevent false alarms.

My Arduino code does allow for a certain amount of 'debounce' in the signal processing...However, increasing that too much via software will cause increased delays in detecting a change in value. So, it depends on the use-case.

I am hopeful I can tweak the detection via hardware changes and sensor placement to improve reliability. Lately, it has been very reliable with no changes having been made...:thinking:

3 Likes

Before I pull the trigger to buy the components I wanted to check in one last time to see this solution has remained reliable and if you were able to get your wife’s FSR setup.

I haven’t worked on her side yet. We’ve been too busy. I should have some free time this weekend.

Here’s what my side has looked like over the past 5 days. Not perfect, but I also haven’t tweaked it yet. It might just be sensor placement as well.

Not bad. My wife is terrible with turning things off or remembering to press the bedside Pico buttons so hoping to automate these based on this project. Will likely pull the trigger and utilized one of my spare ThingShields and Arduinos.

1 Like