[RELEASE - BETA] - "YoLink™ Device Service" app and drivers to connect Hubitat™ to YoLink™ devices

With the latest driver updates (available now via HPM), this is the best you're going to get without using CSS:

  • The first row is using the standard dashboard templates for the leak sensor attributes (signal doesn't have a defined template).
  • The second row is using the specific attributes (as shown on the tile header):

Using CSS, here are some examples you can achieve:

I highly recommend using the recently released "Simple CSS Editor" available on HPM:

The CSS and tiles are out of numerical order, but the tiles show are in the order:
44 28 47
37 33 36 39
40 41 42 43

CSS:

/* tile-44 Settings */
#tile-44 .tile-title { visibility: hidden; }
#tile-44 .tile-title:after { visibility: visible !important; position: absolute; left: 50%; top: 50%; transform: translate(-50%, -50%); overflow: hidden; white-space: nowrap !important; content: "Washer Leak Sensor" !important; }
#tile-44 .tile-secondary:after { visibility: visible !important; content: "%" !important; margin-left: -3px; }
#tile-44 .tile-secondary:before{ visibility: visible !important; content: "Battery" !important; }

/* tile-28 Settings */
#tile-28 .tile-title { visibility: hidden; }
#tile-28 .tile-title:after { visibility: visible !important; position: absolute; left: 50%; top: 50%; transform: translate(-50%, -50%); overflow: hidden; white-space: nowrap !important; content: "Washer Leak Sensor" !important; }
#tile-28 .tile-primary:after { visibility: visible !important; content: "Percent" !important; margin-left: -4px;}

/* tile-33 Settings */
#tile-33 .tile-title { visibility: hidden; }
#tile-33 .tile-title:after { visibility: visible !important; position: absolute; left: 50%; top: 50%; transform: translate(-50%, -50%); overflow: hidden; white-space: nowrap !important; content: "Washer Leak Sensor" !important; }
#tile-33 .tile-primary:after { visibility: visible !important; content: "%" !important; }
#tile-33 .tile-secondary { visibility: hidden; }
#tile-33 .tile-secondary:after { visibility: visible !important; position: absolute; left: 50%; top: 50%; transform: translate(-50%, -50%); overflow: hidden; white-space: nowrap !important; content: "Battery Level" !important; }

/* tile-36 Settings */
#tile-36 .tile-title { visibility: hidden; }
#tile-36 .tile-title:after { visibility: visible !important; position: absolute; left: 50%; top: 50%; transform: translate(-50%, -50%); overflow: hidden; white-space: nowrap !important; content: "Washer Leak Sensor" !important; }
#tile-36 .tile-primary:after { visibility: visible !important; content: "°F" !important; }
#tile-36 .tile-secondary { visibility: hidden; }
#tile-36 .tile-secondary:after { visibility: visible !important; position: absolute; left: 50%; top: 50%; transform: translate(-50%, -50%); overflow: hidden; white-space: nowrap !important; content: "Temperature" !important; }

/* tile-37 Settings */
#tile-37 .tile-title { visibility: hidden; }
#tile-37 .tile-title:after { visibility: visible !important; position: absolute; left: 50%; top: 50%; transform: translate(-50%, -50%); overflow: hidden; white-space: nowrap !important; content: "Washer Leak Sensor" !important; }
#tile-37 .tile-secondary { visibility: hidden; }
#tile-37 .tile-secondary:after { visibility: visible !important; position: absolute; left: 50%; top: 50%; transform: translate(-50%, -50%); overflow: hidden; white-space: nowrap !important; content: "Water Detection Status" !important; }

/* tile-39 Settings */
#tile-39 .tile-title { visibility: hidden; }
#tile-39 .tile-title:after { visibility: visible !important; position: absolute; left: 50%; top: 50%; transform: translate(-50%, -50%); overflow: hidden; white-space: nowrap !important; content: "Washer Leak Sensor" !important; }
#tile-39 .tile-secondary { visibility: hidden; }
#tile-39 .tile-secondary:after { visibility: visible !important; position: absolute; left: 50%; top: 50%; transform: translate(-50%, -50%); overflow: hidden; white-space: nowrap !important; content: "Signal Strength" !important; }

/* tile-40 Settings */
#tile-40 .tile-title { visibility: hidden; }
#tile-40 .tile-title:after { visibility: visible !important; position: absolute; left: 50%; top: 50%; transform: translate(-50%, -50%); overflow: hidden; white-space: nowrap !important; content: "Water Detection Status" !important; }
#tile-40 .tile-primary:after { visibility: visible; !important; }
#tile-40 .tile-secondary { visibility: hidden; }
#tile-40 .tile-secondary:after { visibility: visible !important; position: absolute; left: 50%; top: 50%; transform: translate(-50%, -50%); overflow: hidden; white-space: nowrap !important; content: "Washer Leak Sensor" !important; }

/* tile-41 Settings */
#tile-41 .tile-title { visibility: hidden; }
#tile-41 .tile-title:after { visibility: visible !important; position: absolute; left: 50%; top: 50%; transform: translate(-50%, -50%); overflow: hidden; white-space: nowrap !important; content: "Battery Level" !important; }
#tile-41 .tile-primary:after { visibility: visible !important; content: "%" !important; }
#tile-41 .tile-secondary { visibility: hidden; }
#tile-41 .tile-secondary:after { visibility: visible !important; position: absolute; left: 50%; top: 50%; transform: translate(-50%, -50%); overflow: hidden; white-space: nowrap !important; content: "Washer Leak Sensor" !important; }

/* tile-42 Settings */
#tile-42 .tile-title { visibility: hidden; }
#tile-42 .tile-title:after { visibility: visible !important; position: absolute; left: 50%; top: 50%; transform: translate(-50%, -50%); overflow: hidden; white-space: nowrap !important; content: "Temperature" !important; }
#tile-42 .tile-primary:after { visibility: visible !important; content: "°F" !important; }
#tile-42 .tile-secondary { visibility: hidden; }
#tile-42 .tile-secondary:after { visibility: visible !important; position: absolute; left: 50%; top: 50%; transform: translate(-50%, -50%); overflow: hidden; white-space: nowrap !important; content: "Washer Leak Sensor" !important; }

/* tile-43 Settings */
#tile-43 .tile-title { visibility: hidden; }
#tile-43 .tile-title:after { visibility: visible !important; position: absolute; left: 50%; top: 50%; transform: translate(-50%, -50%); overflow: hidden; white-space: nowrap !important; content: "Signal Strength" !important; }
#tile-43 .tile-secondary { visibility: hidden; }
#tile-43 .tile-secondary:after { visibility: visible !important; position: absolute; left: 50%; top: 50%; transform: translate(-50%, -50%); overflow: hidden; white-space: nowrap !important; content: "Washer Leak Sensor" !important; }

/* tile-47 Settings */
#tile-47 .tile-title { visibility: hidden; }
#tile-47 .tile-title:after { visibility: visible !important; position: absolute; left: 50%; top: 50%; transform: translate(-50%, -50%); overflow: hidden; white-space: nowrap !important; content: "Washer Leak Sensor" !important; }
1 Like

Thank you for all the detailed explanations @SteveBarcus !

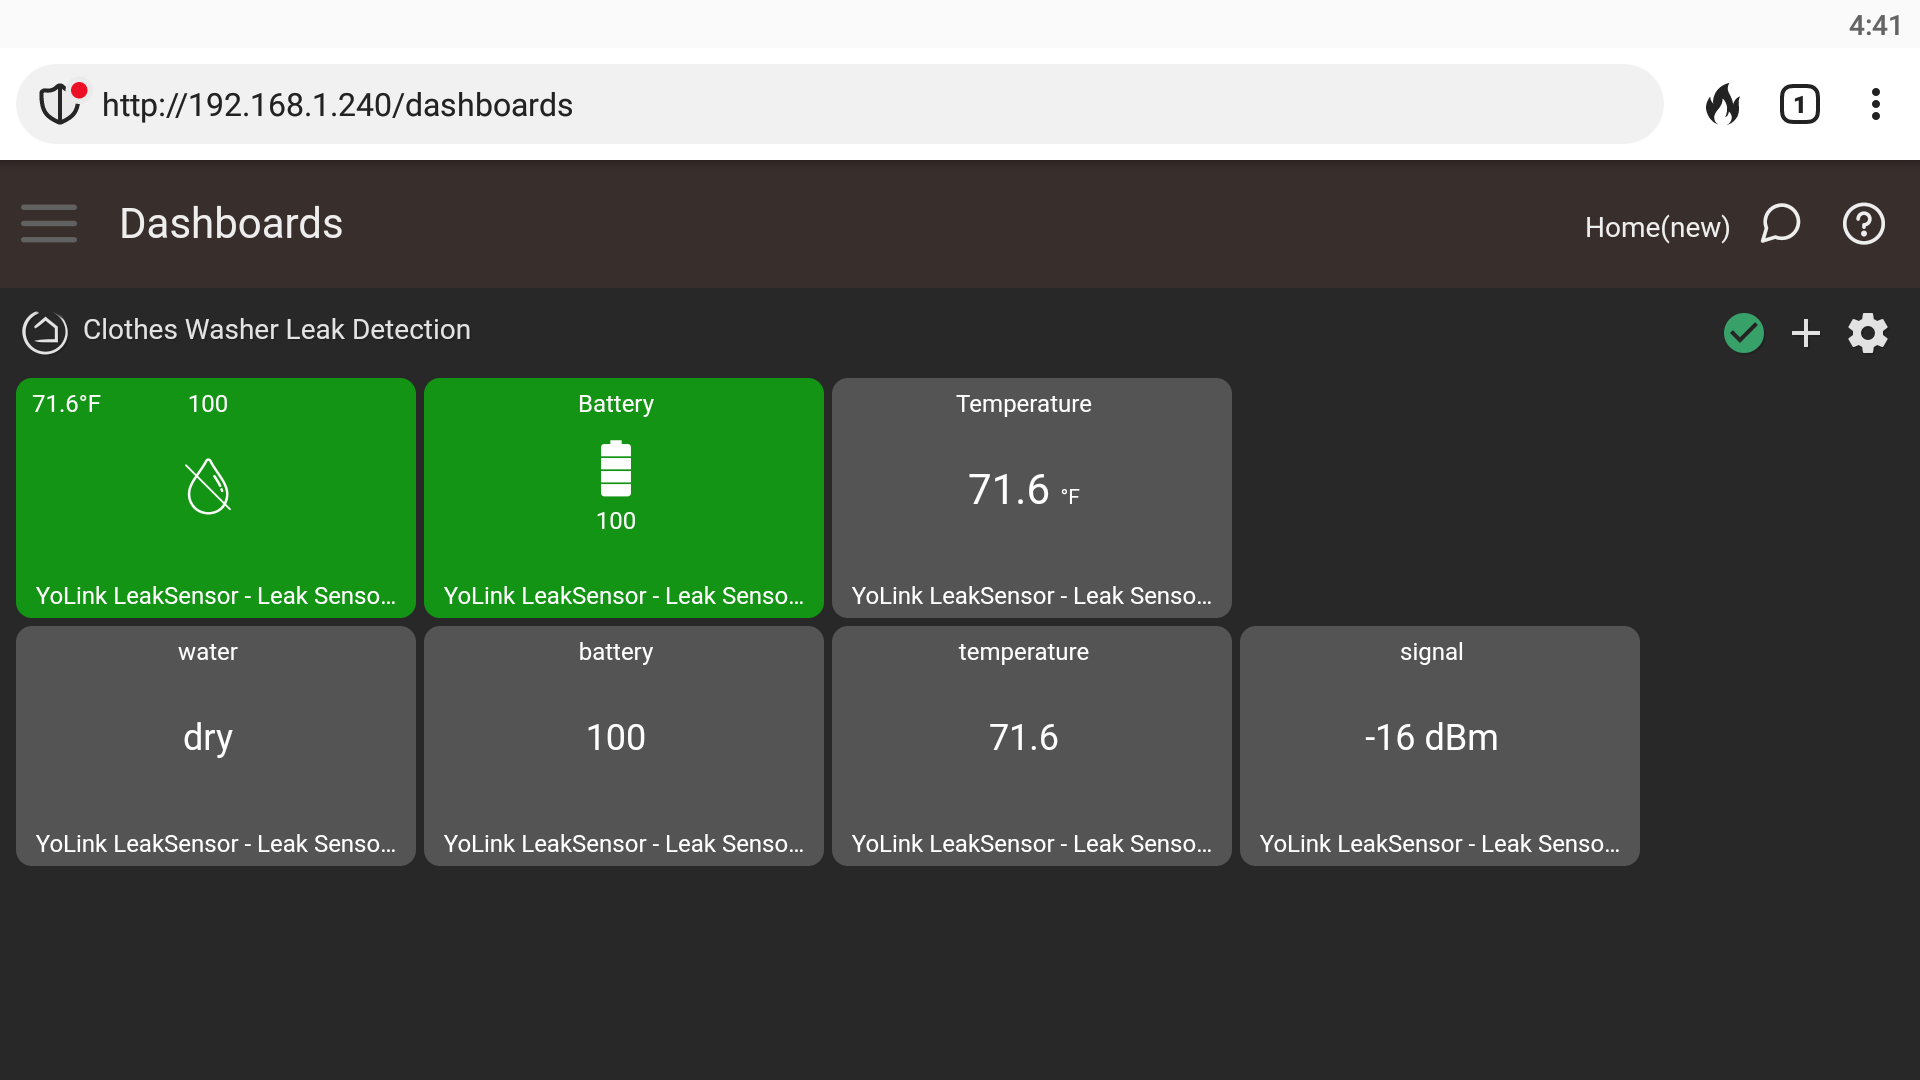
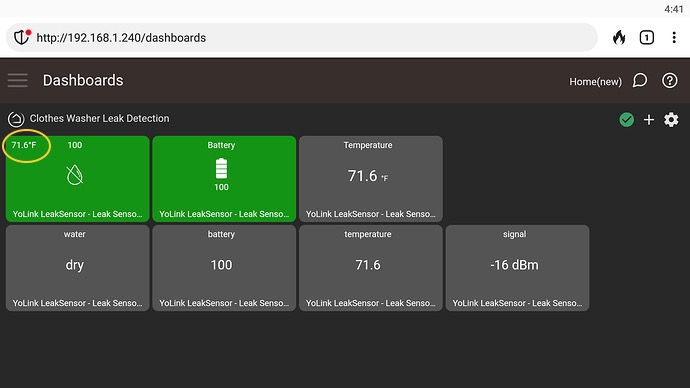
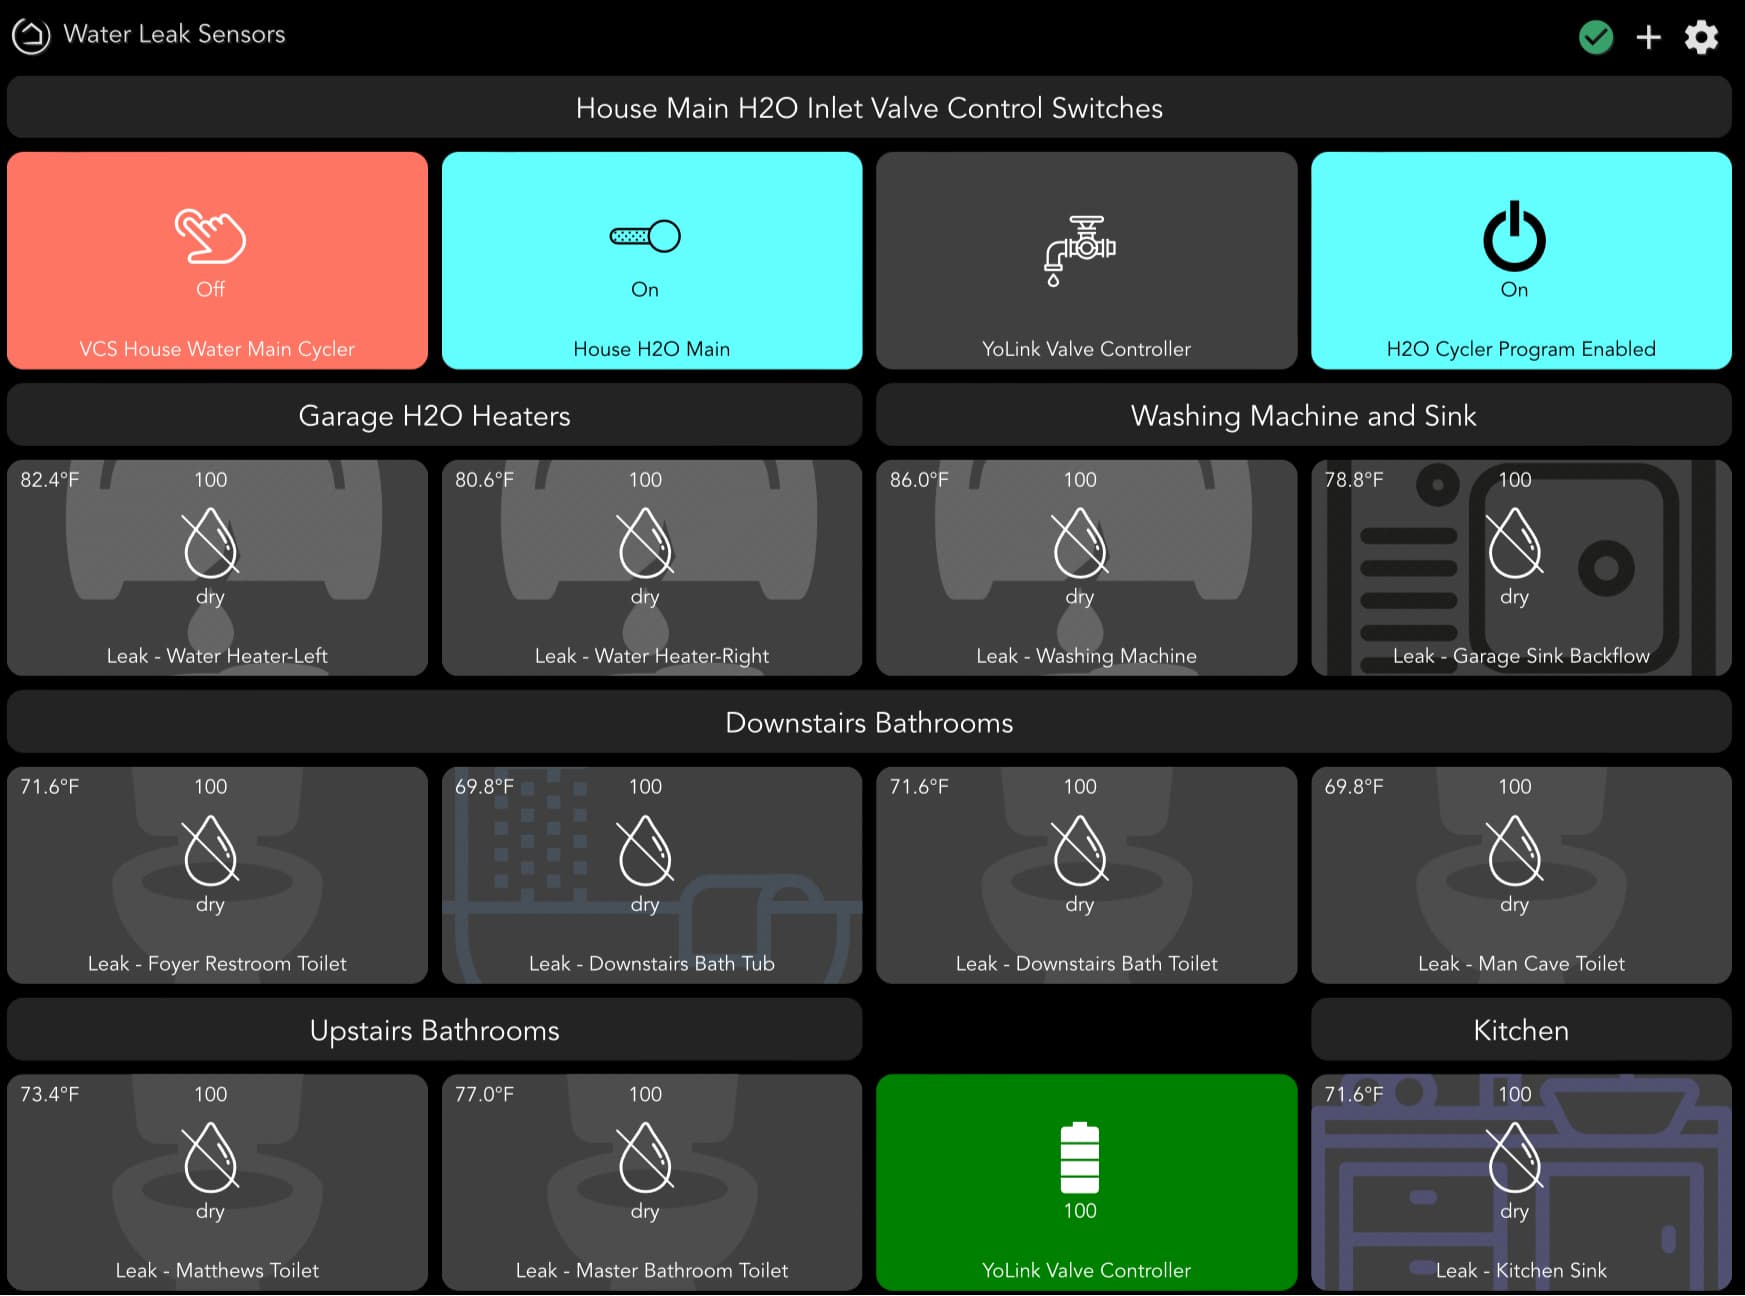
I am using the standard dashboard template (in my case, the “water” template) as shown in the first tile in the first row (the one I marked with a yellow oval) of your example using the standard dashboard templates:
image

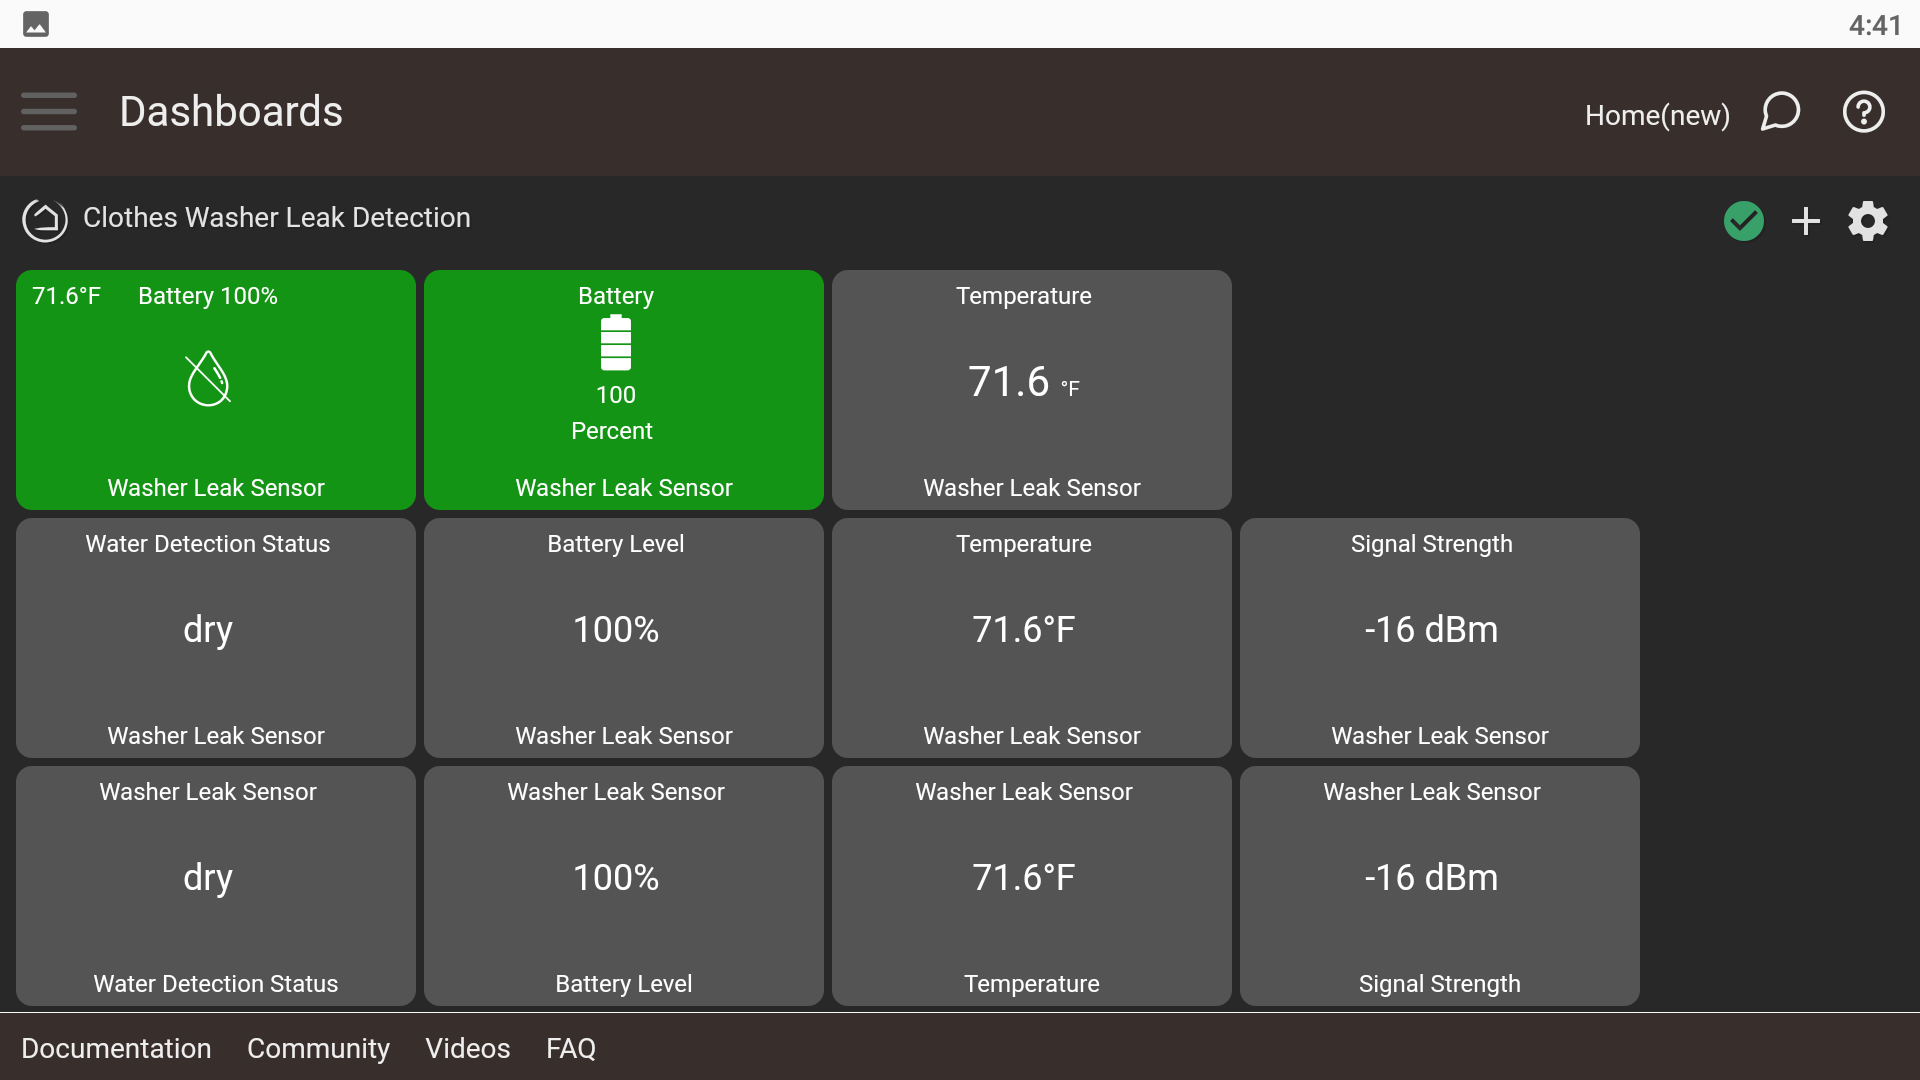
However, my tiles look like this (using the “water” template and having added a background image for each tile of course):

The difference is that my tiles do not append the ^F to the temperature (which I would like to do) as is seen in your upper left most standard tile example. I believe I am on the most current version of the device drivers as downloaded from HPM (I think the attribute shows up as 2.0.4 when I click on the device driver attribute which was downloaded 3/23/2023?). As previously noted, I am using the “water” template.

At any rate, in addition to not showing the degress fahrenheit notation after the temperature, my water leak sensor tiles also seem to include not only the icon symbol for “dry” (the water drop with a line through it), but also the word “dry” spelled out underneath the icon (which I like). I am still not sure why this is the case.

BTW, I generally try to use the standard tiles in my Hubitat dashboards without CSS modifications since I have had trouble in the past getting the CSS modifications to automatically transfer to my other mobile devices so that my tiles would have the same (or similar) appearance when accessing my dashboard remotely using my phone or other devices. Is there an easy way to do this without having to specifically alter the CSS on each device individually? I apologize if this has been covered before but I was not able to find a good set-by-step guide in the forums. TIA for all your help and for the great work you have done on this app.

Looking at the CSS @SteveBarcus included, he has used some of the text manipulation features in my CSS editor, adding the F and (I think) hiding the word dry. I don't believe you could do these through the built-in options in the dashboard UI.

In terms of using CSS, could it have been situations where you needed to import a CSS file where you had issues , or where some external file was referenced, like a font or image? Those can often be avoided by including the CSS text in the dashboard directly or storing files in a location accessible by each device. If you want to explore this some more probably not worth clogging up @SteveBarcus 's thread, we can chat on either my topic or the noob's CSS topic, then post back here with the outcome, if any.

1 Like

Thank you @sburke781 . Will follow up in your thread when I get a chance. The reason why I was confused is that @SteveBarcus mentioned that the top row of his example tiles were utilizing the standard tiles (without any CSS modifications). Perhaps he had forgotten that he had appended the *F to these tiles as well. TIA for your help! I am really appreciative of guys like you and SteveBarcus for all you do to help out the community!

1 Like

Did you click the "Check Mark" on the dashboard to reload it after installing the new driver?
Since the standard templates are part of the firmware, I assume that might also affect what and how things are displayed. I'm at Hubitat firmware version 2.3.5.123.

2 Likes

I will try that. I am now at Hubitat firmware version 2.3.5.124 (just updated this evening). Will have to make a “test” tile though as I want to pick up the “*F” but do not wish to lose the “dry” notation under the icon. Thanks again!

Edit: Thanks. That did the trick! Everything looks great now (picked up the *F and retained the “dry” “wet” notation under the respective icon!).


Thanks again!

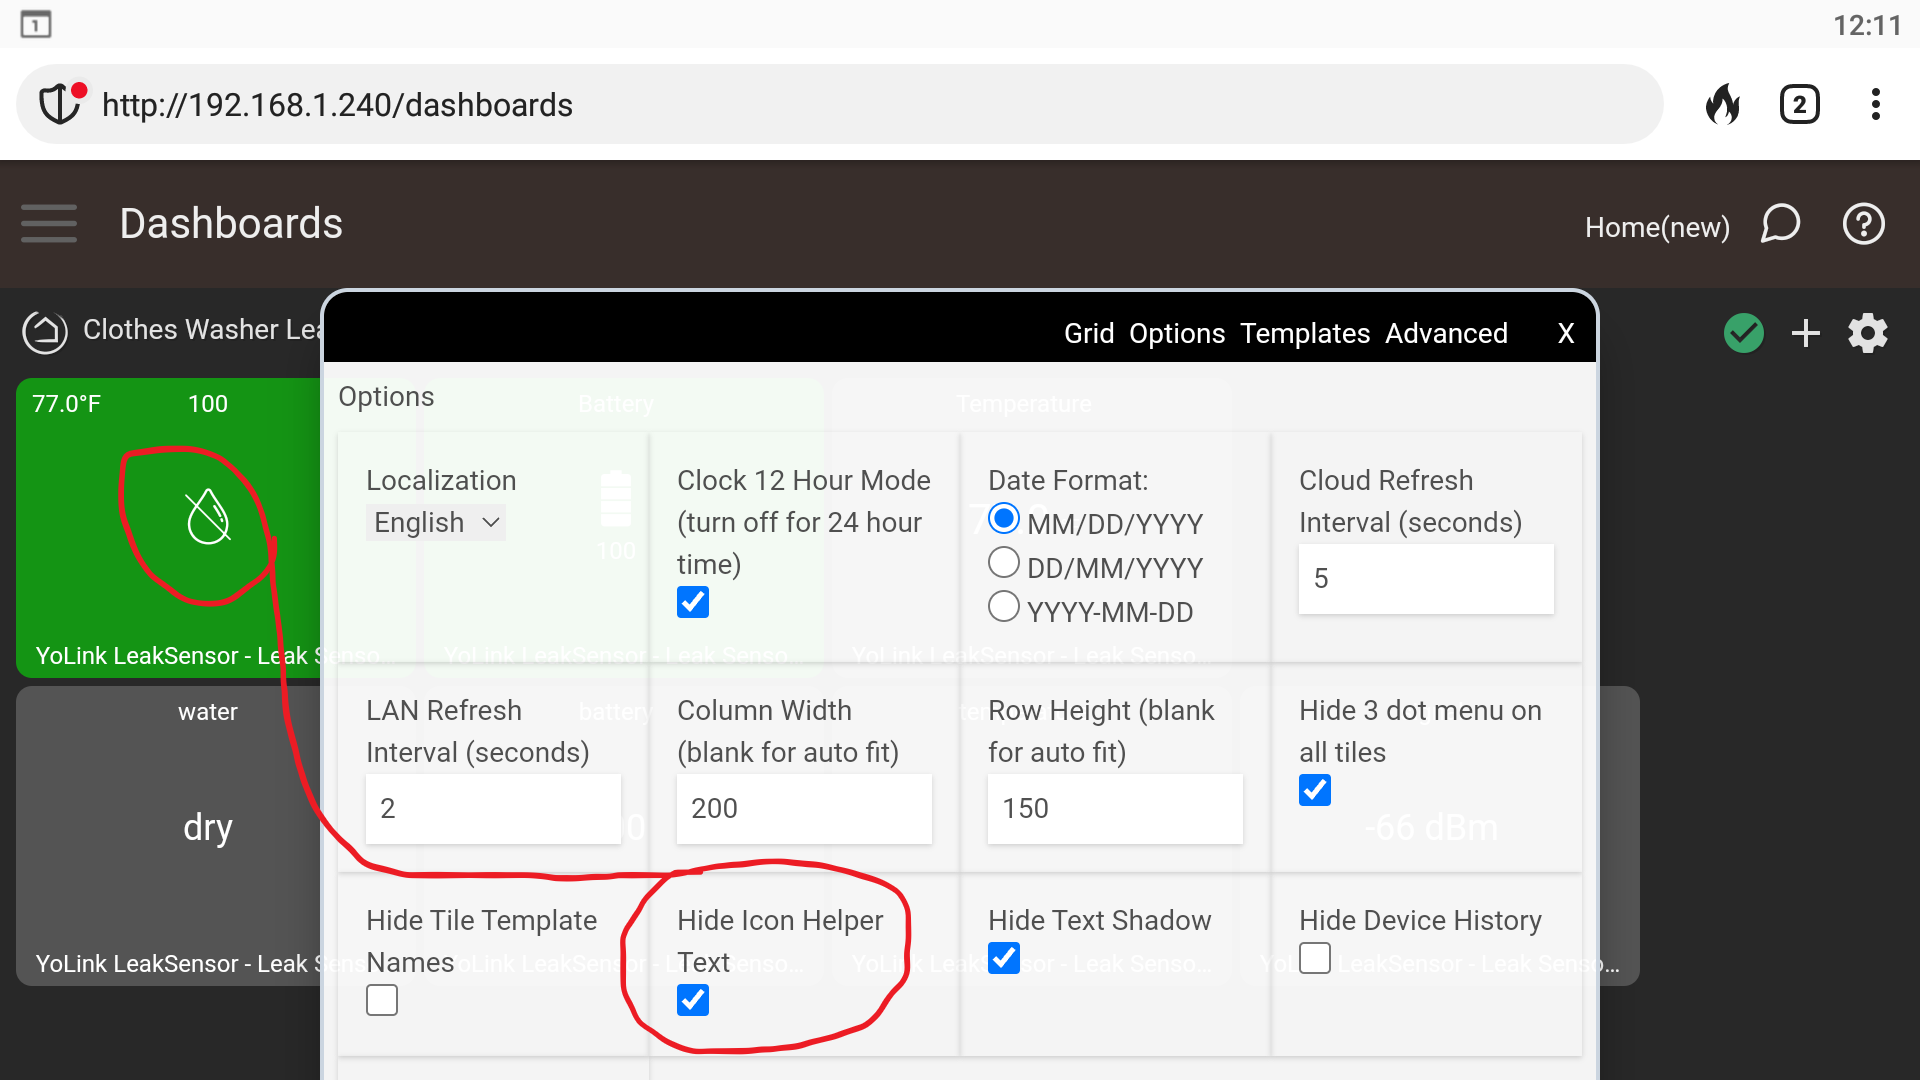
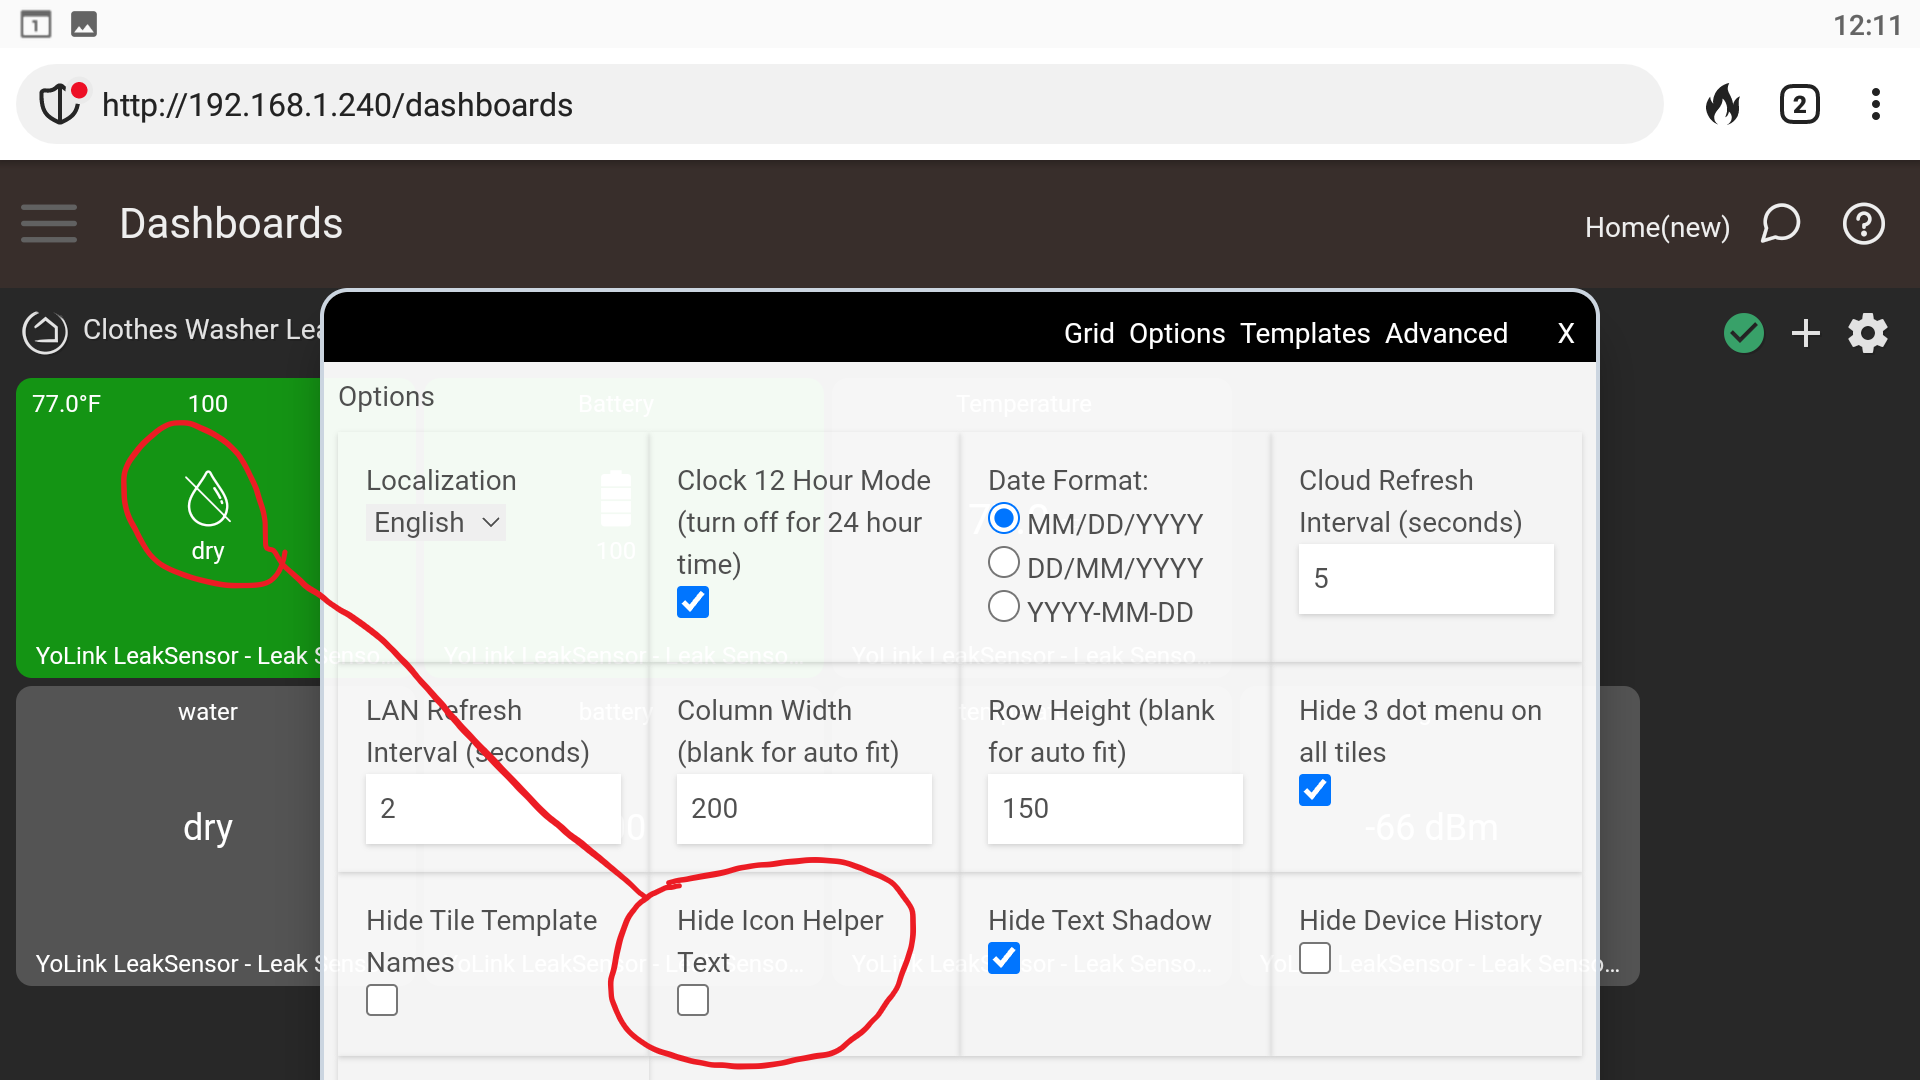
The reason my tiles using the standard "water" template didn't show the status (dry/wet) below the icon was because I had the "Hide Icon Helper Text" option checked:

After I unchecked it the text showed up:

2 Likes

Motion detector triggering when sensor checking in with hub. I have a rule triggered based on motion in my garage to turn on the lights:

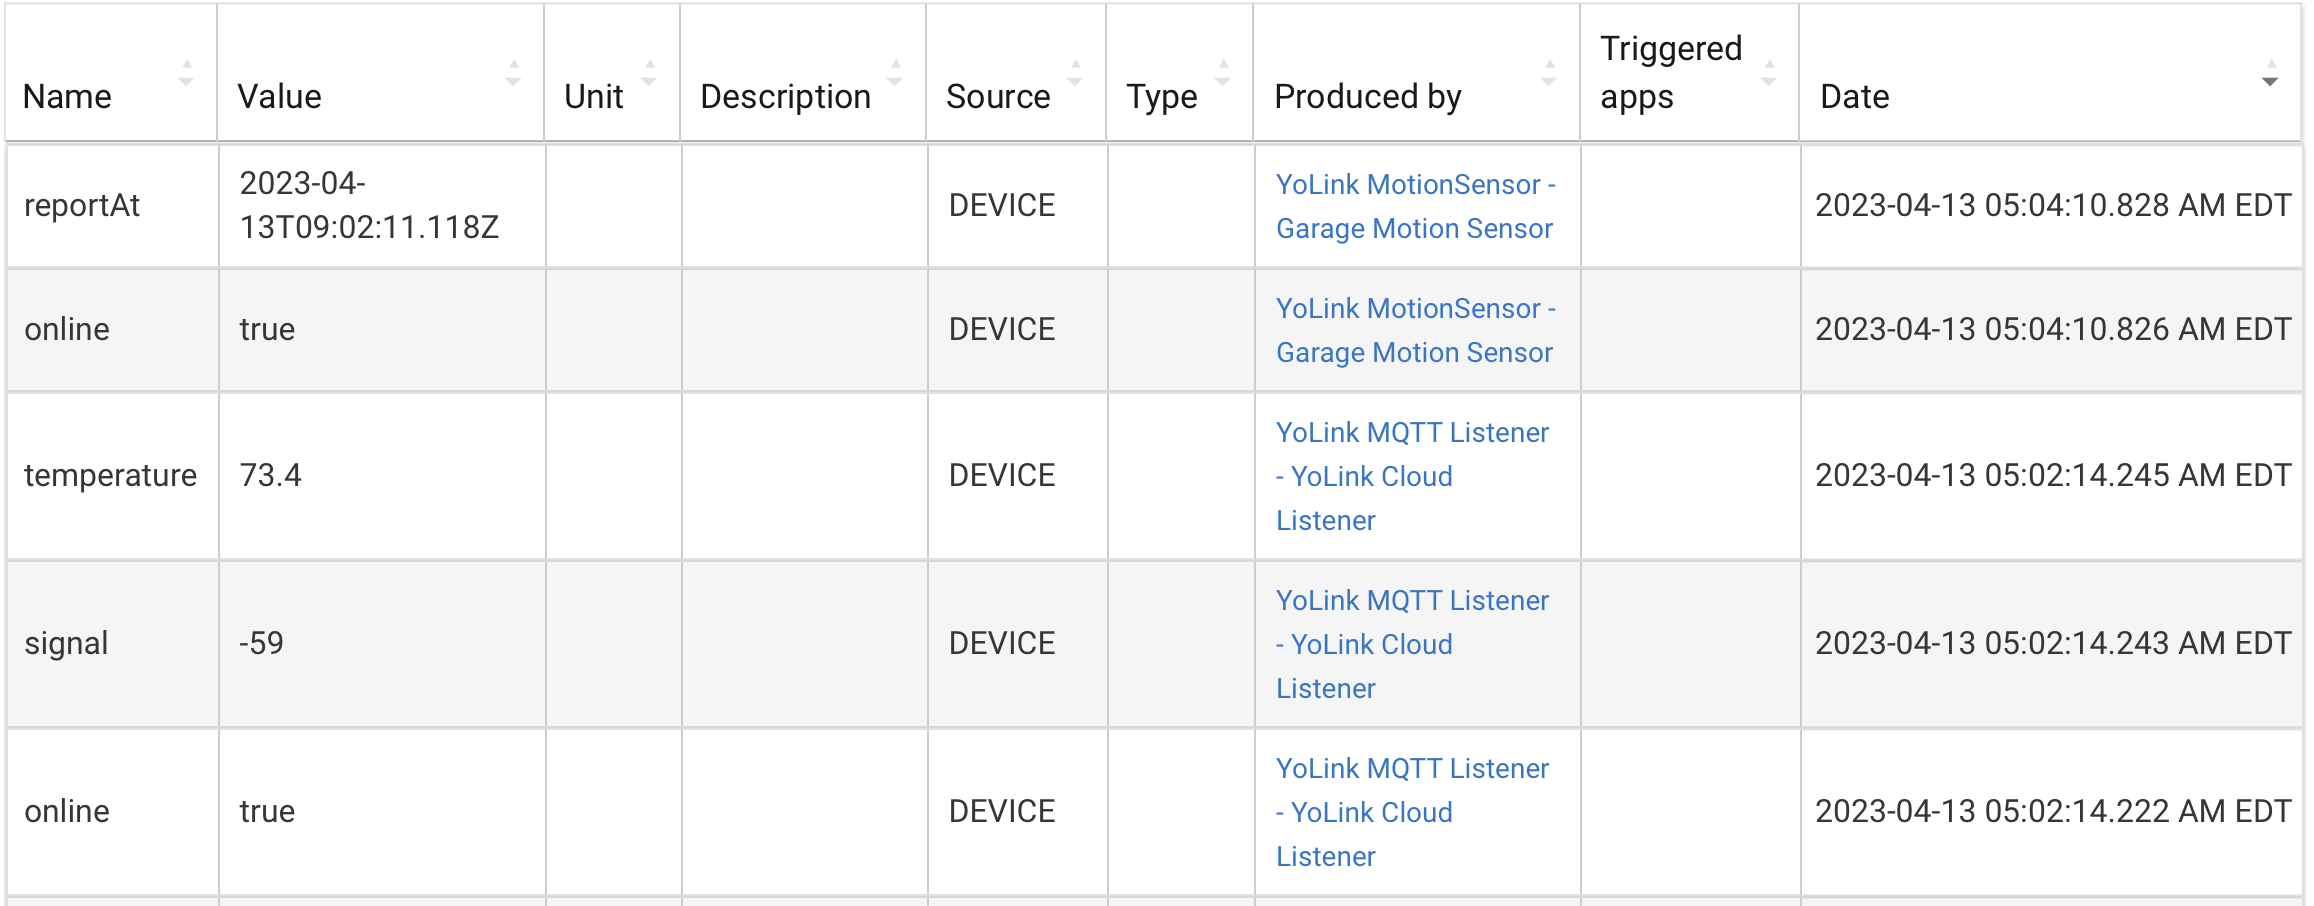
I notice every morning when I wake up that the lights are on. I checked the logs and I see that the sensor is checking in at the exact times the lights are turning on:

So I am not getting motion yet the rule is firing. Am I doing something wrong or is something else happening here? Thanks.

Is there something that I can do to not get this error message?

Can't tell from these entries. Edit your Garage Motion Sensor Device, set "Debug" to "true", click the "Debug" button to turn on debugging. When the problem occurs again, go into the Hubitat logs and send me the log entries from the Garage Motion Sensor from that timeframe. Thanks.
Sorry for the stupid question, but you do have a rule to turn the lights off right?

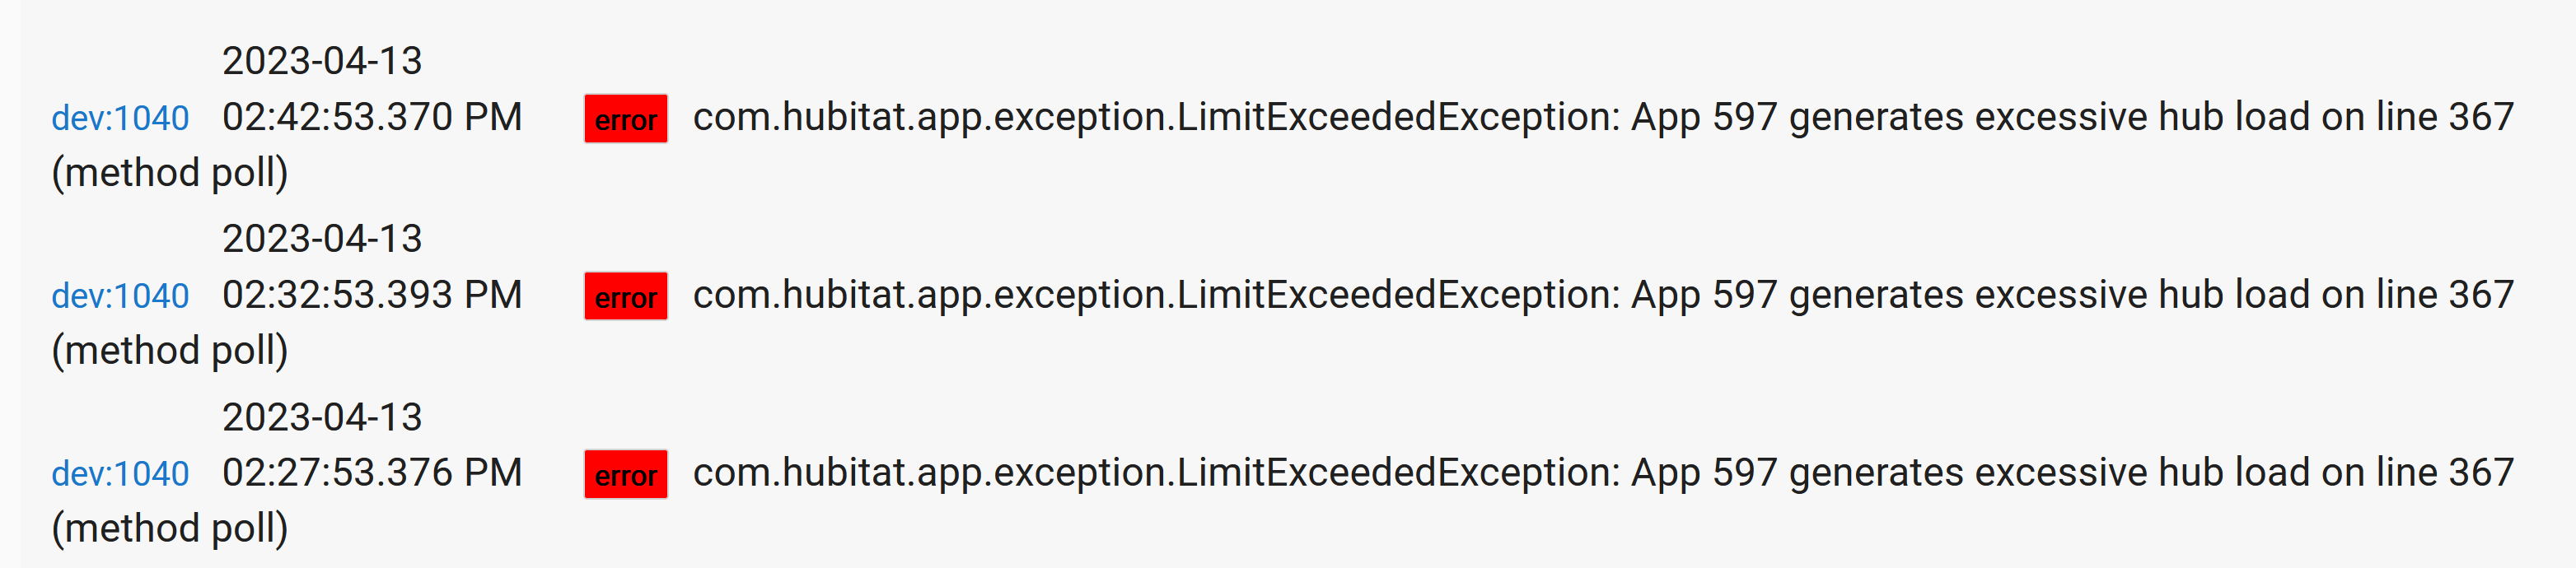
These look like the errors caused by an outdated app and drivers.

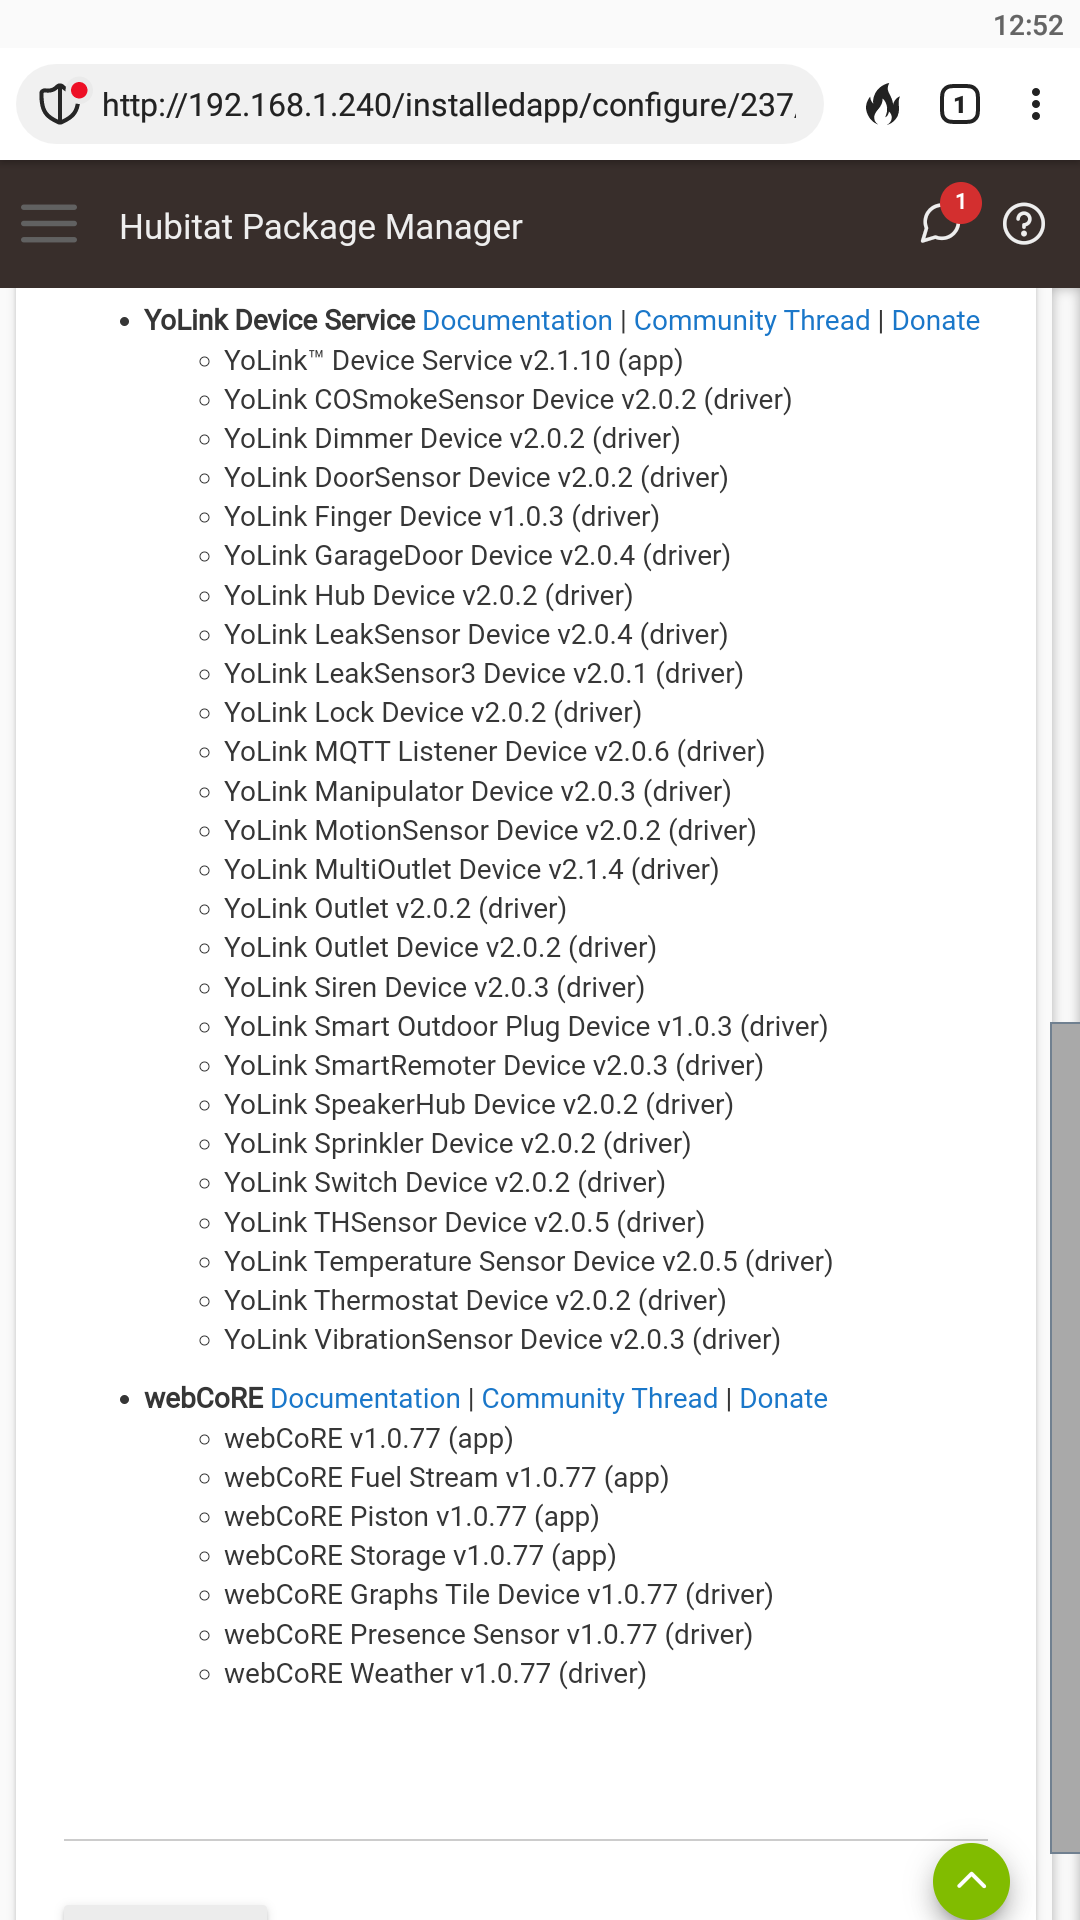
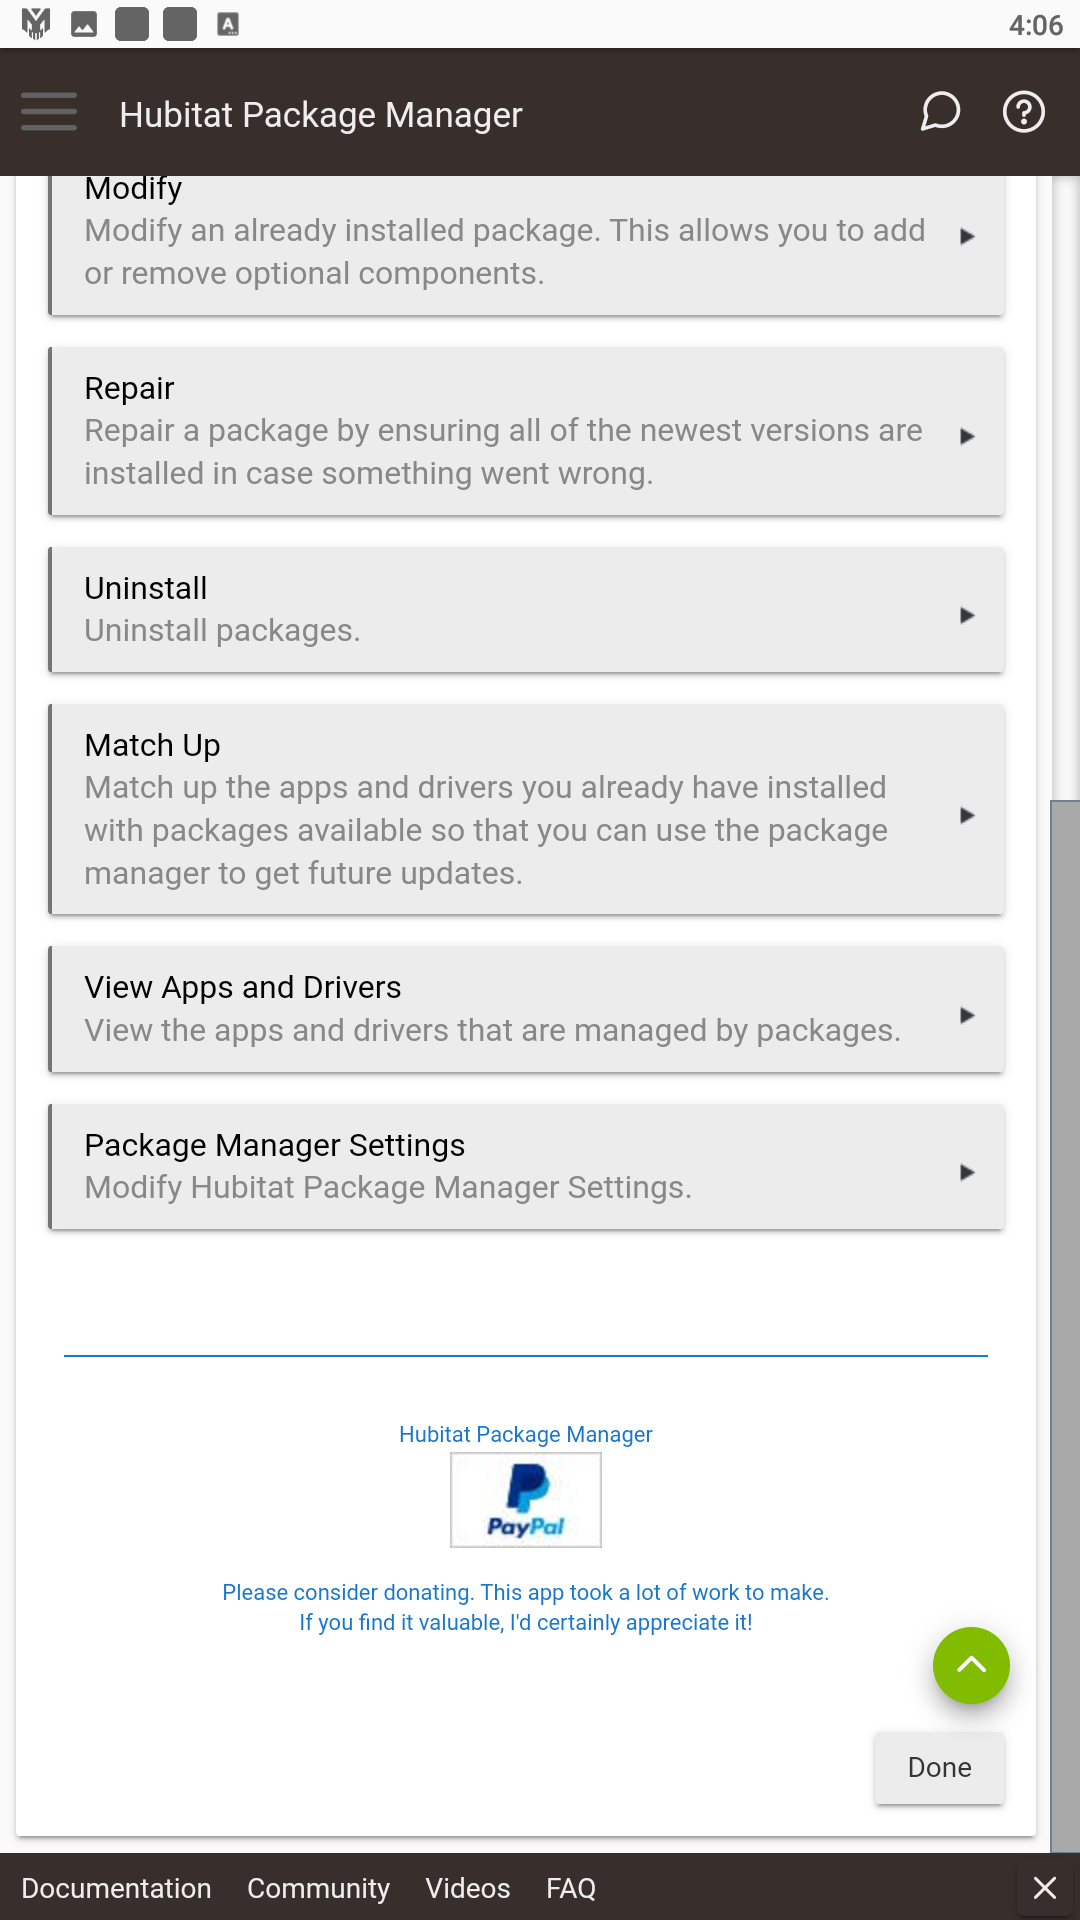
Go into the Hubitat Package Manager (HPM):

  • Select "View Apps and Drivers"
  • Scroll down to the "YoLink Device Service"
  • Insure your app and any drivers shown match this list of the latest app and drivers. If not, select the HPM "Update" option, select the "YoLink Device Service" and complete the update:

Hi,
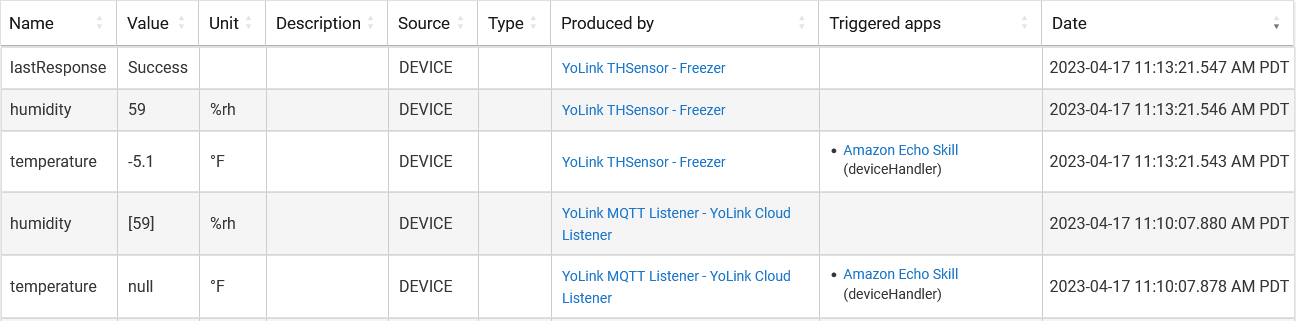
I am still getting log errors with the X3 T/H sensors. Also, I'm randomly getting "null" temperature showing in my dashboard tiles, even though the temperature is reading correctly in the YoLink app. See events:


It seems that it is getting data from both the sensor and the cloud listener, and the errors are from the cloud listener.
And log:

And YoLink Device Service log:

Thanks,
Adam

I just recently got one of the X3 sensors for testing. There will be a driver update coming to fix this. Thanks.

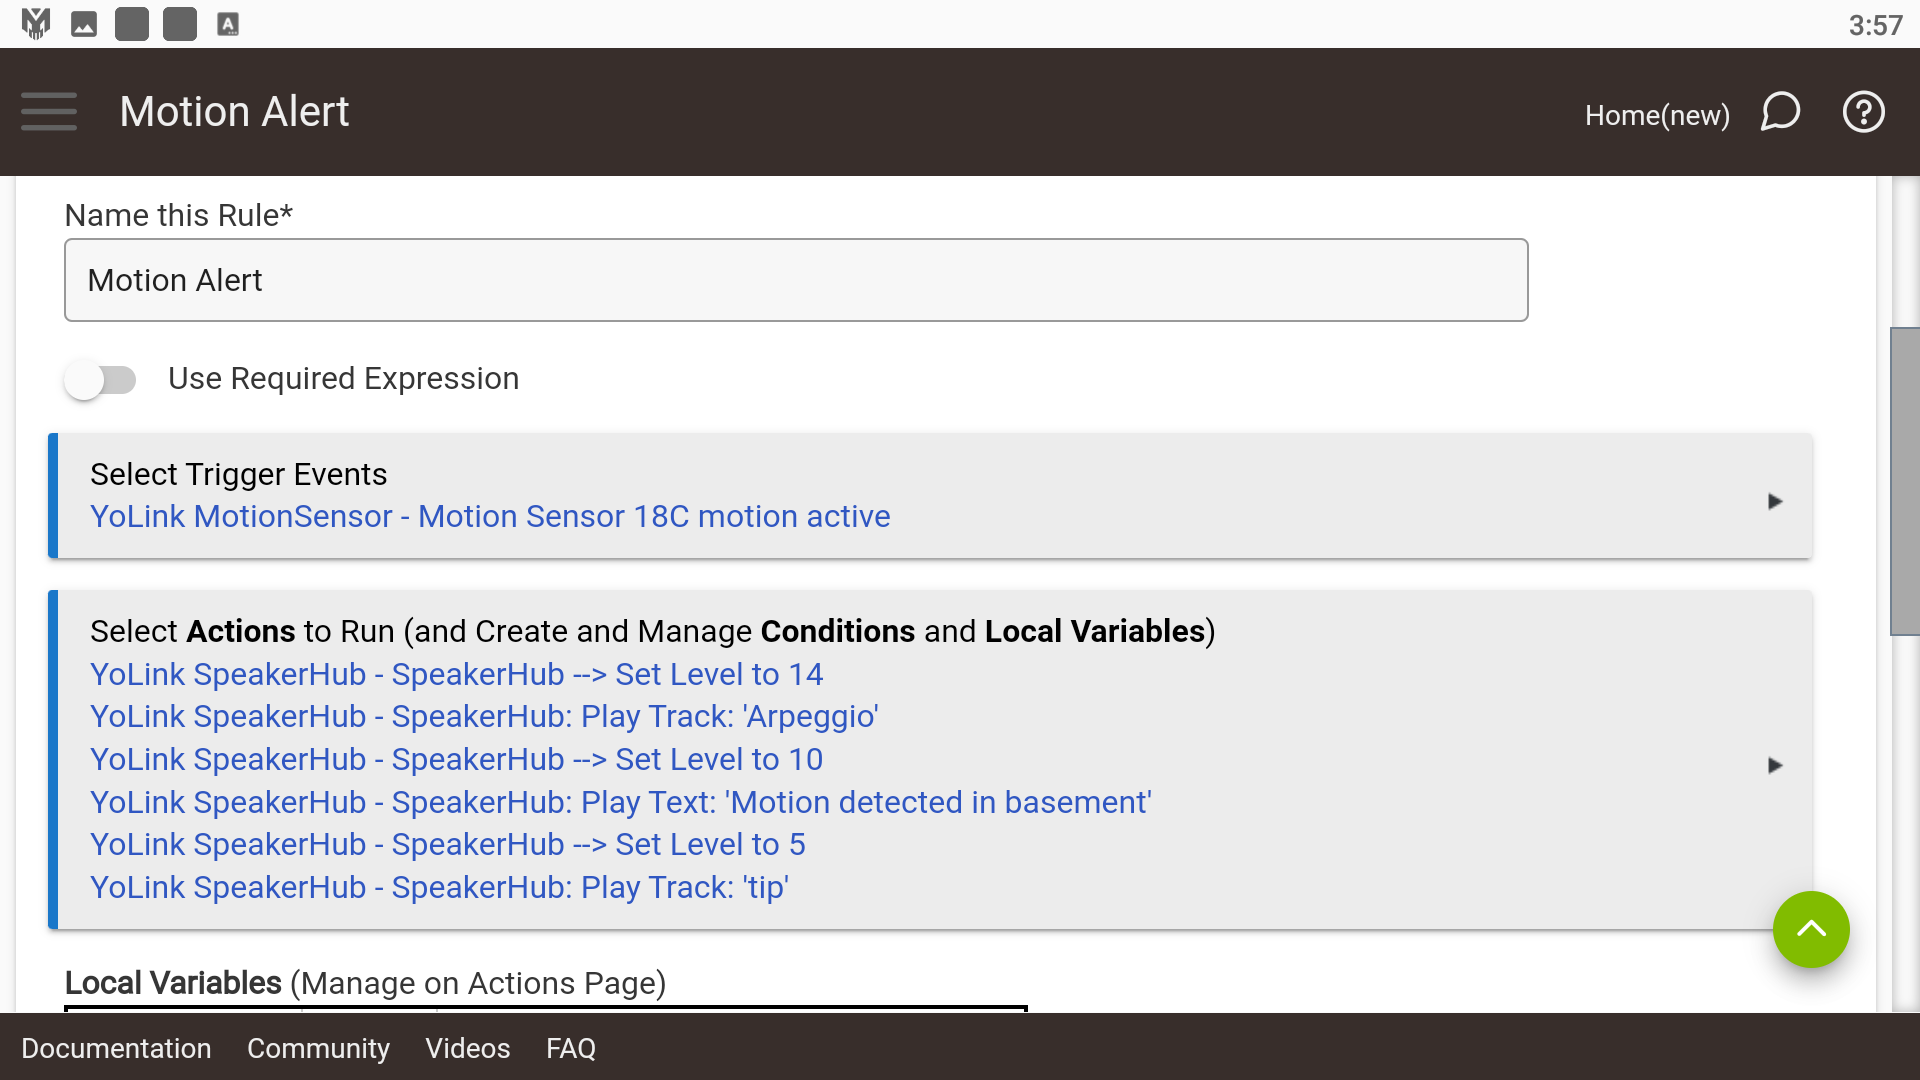
Does anyone know if there is a way we can use the tracks that the Yolink Speakerhub has in rules? I'm able to use a Speakerhub as a speech device, but calling for a particular track like "Alert, Warn, Tip, Whoop etc does not seem possible. I can only get those to play from the device page URL, nowhere else.

Maybe a stupid question. But where exactly is the Device Service App - I don't see it under Apps ? Under HPM ? Nopes, nothing. I have added a few new YoLink leak detectors and Hubitat does not list them. How do I add them ?

Have you added it via "Add user app" yet? once you do that it will bring up the app page, then you can choose what devices to ad.

Guess it's getting late... Should have figure it out.

I did not see anything along those lines in the instructions. Must have missed it.

Thank you.

Unfortunately, Hubitat Rules don't support the capabilities of an "Audio Notification" type device. I'll modify the driver to support "Music Player" capabilities to allow this and release it soon.

With the new driver updates, this would be an example of a Rule:

Follow this process when adding a new device or devices:
1. Add the device(s) to your YoLink Hub via the mobile app and view the device's Details to insure it has the latest firmware. Use the YoLink mobile app to verify that the device is functioning correctly before installing it on your Hubitat.

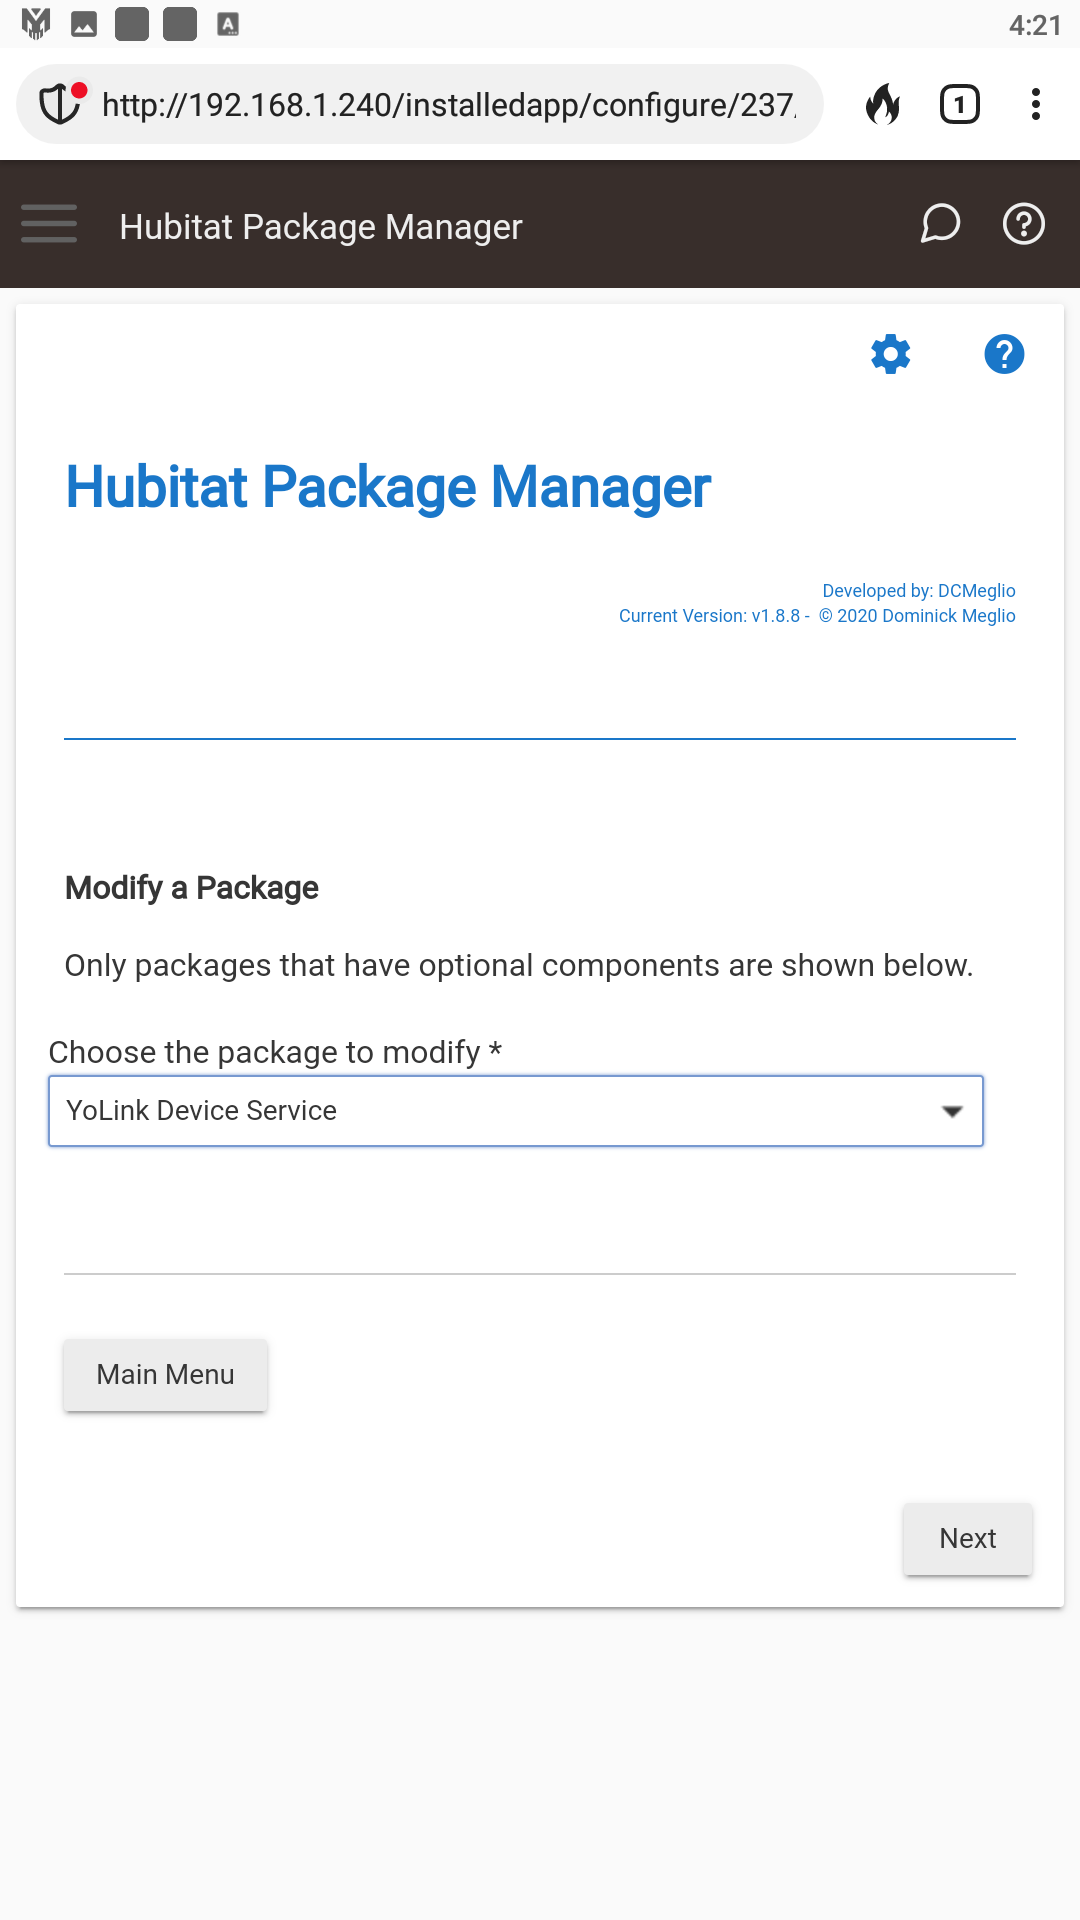
2. Insure that the "YoLink Device Service" is showing under "Apps":


If not, install it as follows:

3. Insure that the "YoLink Device Service" is up to date:

  • Open HPM under "Apps" and select the "Update" option:

4. Insure that all the drivers that you need are installed on your Hubitat as new drivers are constantly being released or you might not have installed them at the time you first installed the "YoLink Device Service" app:

5. Open the the "YoLink Device Service" shown under "Apps":

Continue through the application until you reach the devices page and then click on the drop-down list of devices to select those to be installed/uninstalled. Make sure you scroll the list of devices and not just the page as the box might be longer than the page. Newly added devices should show up as unchecked. Check them and continue running the app to completion:

Excellent! thank you, donating on Paypal now