What is Samsung Automation Studio:
Samsung Automation Studio is a Node-Red pallet that Samsung has created to help with integrating their home automation options. It has the ability to integrate with Bixby and Smartthings using the new Smarthings API. This allows the ability to using polling methods in Node-Red to retrieve state back from Smartthings, but also allows the ability to create a Endpoint Webook that will allow Smarthings to push Device state changes to Hubitat.
Why would you want to use it.
This tool is probably one of the easiest ways to create simple automatons that will talk directly with the Hubitat Platform. The use of Node-Red as an intermediate server allows for the simple translation to make automatons between Smartthing and Node Red and in tern hubitat much easier.
What are the requirements for this integration
The minimum to enable Samsung Automation Studio to function is as follows.
- A always on server that can run Node-Red
- A install of Node red that uses Node.js 14
- The Node red pallet node-red-contrib-hubitat installed
If you want to enable the ability for Smartthings to push events to Samsung Automation Studio on your Node Red instance, and therefore to Hubitat you will need to enable endpoints that will require the below items to be available
- A reverse proxy like Nginx proxy manager
- A ISP and router that can do port forwarding for Port 80 and 443. If you already have this configured adjustments will need to be made so that Nginx can manage those ports
- Either a static ip at home, or a Dynamix DNS service like DuckDNS
Setup Example
For the purpose of simplicity I am going to describe the setup using a Raspberry Pi4. I have completed this install myself, but is far from the only way to complete this task. Most of these steps can be adapted to other OS's, and some steps can be skiped depending on what you already have deployed. But if you just want to start from scratch on a raspberry pi this will get you setup. My primary configuration runs using Unraid on my Home server with a VM for Node red configured as described here and Nginx Proxy running under Unraid in a Docker. This is just one easy way to get a functional environment setup.
- Install Raspberry Pi OS on your Pi4
First is to install the OS your desired Raspberry Pi. I would suggest you follow the instructions provided on the raspberry pi website. The regular Raspberry Pi OS is fine to use for this purpose.
Once the OS is installed on your flash card, put the card in the Raspberry pi and boot it up. Log into the Raspberry Pi with SSH and run the below command to fully update the Pi.
hint: if you add a file just called ssh to the boot directory on the PI you can run it headless and don't every need to log into the desktop to complete the setup.
"sudo apt-get update && sudo apt-get upgrade"
This command will take some time to complete. It will actually submit two commands and you will need to enter Y for the 2nd part to continue. So be ready to respond to that confirmation.
- Second you will need to install Node JS
We need to ensure that Node.js 14 is loaded as the default install of Node-red will install a older version. This can be accomplished easy with the two commands below.
"curl -fsSL https://deb.nodesource.com/setup_14.x | sudo -E bash -"
"sudo apt-get install -y nodejs"
- Now you need to install Node-Red
Fortunately Node-Red has a nifty script for installing on a raspberry Pi. It is documented at https://nodered.org/docs/getting-started/raspberrypi
Copy and past the below command to run a script that will automate the process of the install.
"bash <(curl -sL https://raw.githubusercontent.com/node-red/linux-installers/master/deb/update-nodejs-and-nodered)"
That script will check several things including the version of Node.JS running You should see that it skip the install process of Node.js because it is more current then what the script would install. Once the script completes and you are back to a command prompt we still to need start node red. Start node red with this command
"node-red-start"
Once that command is submitted you should see your SSH session scroll with messages indicating that the server has started. You should now be able to use your regular computer to access the Node-Red front end. Access Node red by typing in http://ip-or-name-of-pi:1880
Confirm that it is accessible. Once we know it is up, submit this command to ensure that it will start with the Pi after the next reboot.
"sudo systemctl enable nodered.service"
At this point you should have a working Node-Red instance and at this point if you don’t want to have Smartthings push events to Node-red to update Hubitat we can move onto finishing up node red setup for use. For event based pushes from Smartthings continue.
For event triggered updates from Smartthings additional setup is needed.
For Smartthings to let a remote service know when a event occurred immediately you need to use a Webhook web app. This gets registered with Smartthings in the Developer workspace and once setup smartthings will push those events that are subscribed to too your remote application that runs from Node-Red. Samsung Automation studio does have a very basic way to provide this functionality. But to enable it there is really one big hurtle to overcome. How do you get Smartthings to communicate to your local Node Red device consistently and reliably. First you need to always be identifiable on the internet. This is normally done with the use of a service called DNS or Domain Name Service. This means when smartthings says to go to myhome.com the DNS will tell Smarthings where it is. This can be accomplished in a few ways, but the method i am going to discuss is with a Dynamic DNS service called DuckDNS. Once you have a consistent way to get to your local server Smartthings also requires the connection to be secure and use SSL/TLS. This can seem a bit difficult at first glance but actually isn’t bad at all. We will accomplish this with a application called Nginx Proxy Manager.
- Setup DUCKDNS
Duckdns is a free service that will allow you to register a subdomain under there main duckdns.org domain for free. You can do up to 5 for different hosts if you wanted, but one should be sufficient for this need. Go to www.duckdns.org and setup an account. Once that is completed register a new domain name to be used. When you setup your subdomain take note of the token provided as you will need this later in the steps to automate updates to your dns entry
Now Follow steps from https://www.wundertech.net/how-to-setup-duckdns-on-a-raspberry-pi/ to setup a cron job to keep DNS entry updated.
This cron job and script will make sure the dynamic DNS entry is always kept up to date.
- Install Docker
Nginx Proxy manager requires docker to install. For that reason we need to install docker next. This can be completed with the below 2 commands
"curl -sSL https://get.docker.com | sh"
"sudo usermod -aG docker pi"
- Install Nginx Proxy Manager
Nginx Proxy manager requires a few more steps so I am going to link to the tutorial I used just to get it installed. Follow these directions and it should install fine
This is all you may need as far as software for Node-Red with Samsung Automation Studio to communicate with Smartthings.
Node Red internal Setup
Node red is just the engine, but you still need the node red pallets installed to be able to do the automation tasks we will likely want. Specific to this purpose you would want to click on the sandwich icon in the upper right and the click on “Manage palette”. This will display the list of pallets installed and give a tab you can click on to install new ones. You will need to install at least the Hubitat Pallet and Samsung Automation Studio Pallet. They are names as below
Node-red-contrib-hubitat
Node-red-contrib-samsung-automation-studio-nodes
I would also suggest you review the Node Ned Pallet:Common-Choices
Setup Simple Polling
To setup a simple polling flow from smarthings to Hubitat is probably the easiest method to get data back to Smartthings. with about 4 nodes. A inject node to trigger the pooling action on a regular interval, The Smarthings "My Device" Node, and "State" node, and a hubiat Command node. The flow will resemble this.
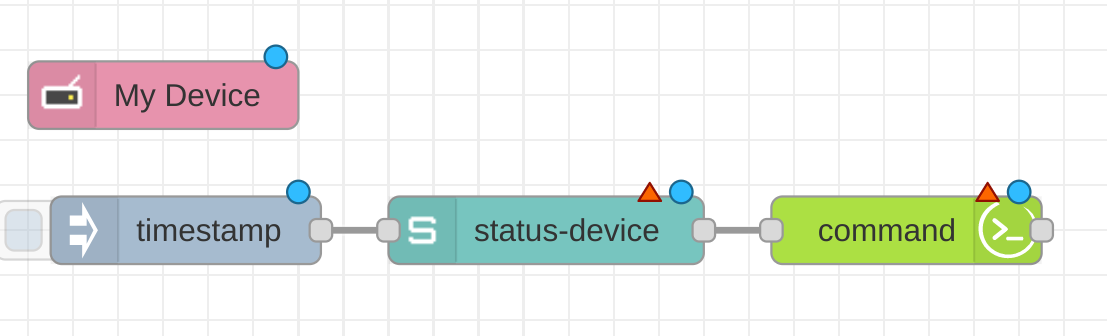
The purpose of each node is as follows. The My Device Node will contain your samsung PAT or personal access token. This node will tell the flow what Smartthings devices it can access. The Inject node should be set to repeat at a interval and set the polling interval. The State node will tell the flow what device to pool and either to retrieve only a specific status's or multiple. The Hubitat Command node will then be used to send the command to Hubitat to update the hubitat device.
Setup Webhook Endpoints in Samsung Automation Studio and Nginx Proxy Manager
To start this setup you will need to do a few things and they are as follows.
- Create the Samsung automation studio Endpoint in Node-Red.
- Enable forwarding through Nginx to your new Endpoint in Node-Red.
- Register your new endpoint with Samsung's Developer Workspace to enable access to the app.
Once these steps are completed you can setup the app in the Smartthings app and start to send data to the endpoint. Follow the below steps to create the endpoint in Node Red.
Create Samsung Automation Studio endpoint in Node-Red
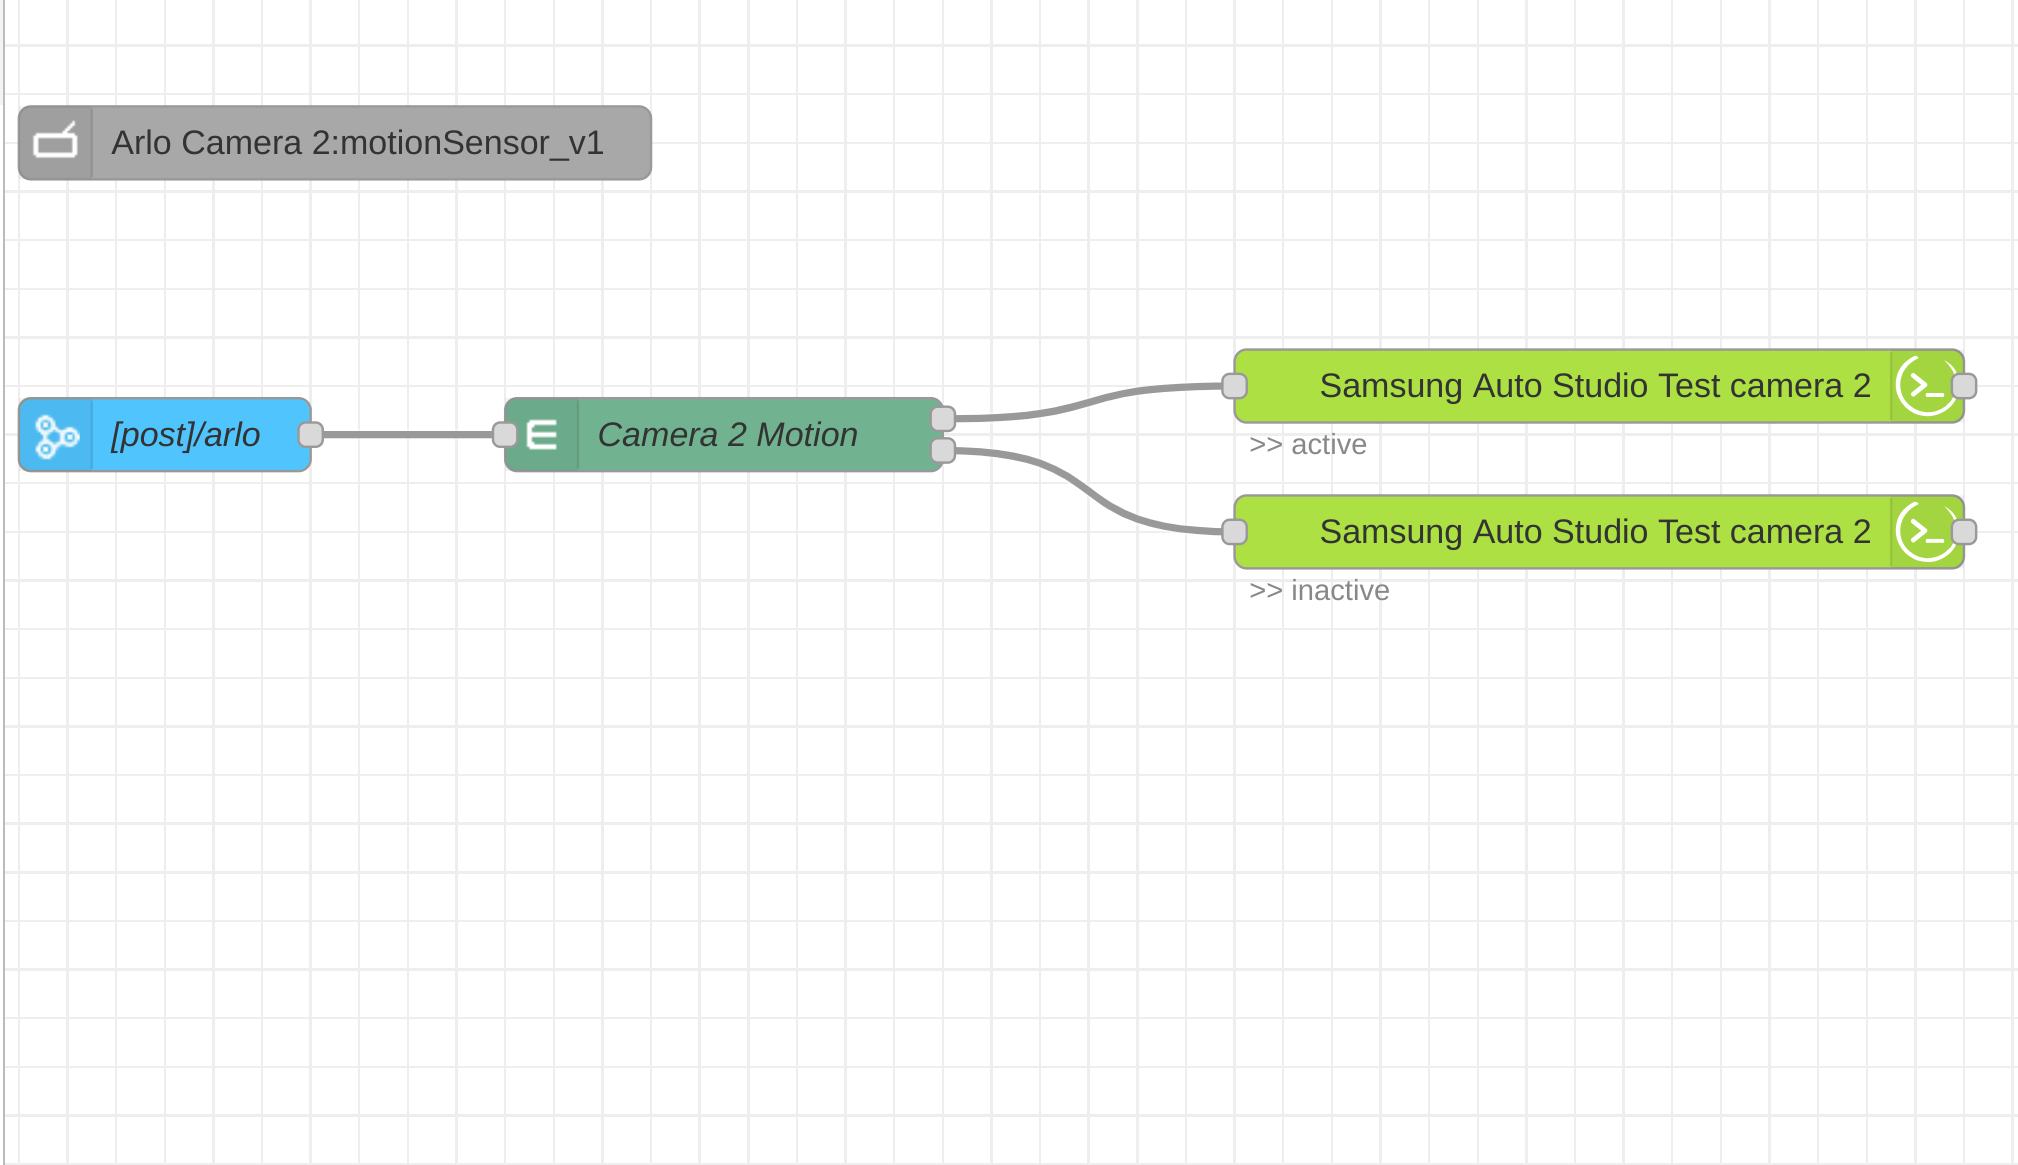
A Samsung Automation Studio endpoint really requires 3 nodes to work properly. They are a Automation Node, Device profile node, and Event Node. The automation node will tell the flow what the endpoint URL will be that runs on your Node Red instance. The Device Profile node will tell Smartthings when it is executing the Smartapp install what the device type is to allow you to select as the trigger for your event or action. The event node is what will sit behind the endpoint and what Node red will use to capture the message from Smartthings and then pass the data to other nodes to execute a action. These nodes will capture the event and then you follow the Event node with the further automation you want to trigger based on that event.
This is an example endpoint flow that is setup for Smartthings to send motion events for a Arlo camera and then trigger a update to a virtual Motion device in hubitat.
Nginx Setup for Webhook Endpoints
Think of Nginx Proxy Manager as a traffic cop. It will sit on the edge of your home network connected to the internet and only forward the web traffic you want to internal resources such as the automation Endpoints . Along with being that traffic copy it will also provide the external connection with a encryption technology to ensure that your data stays private between your server and Smartthings.
Before we setup Nginx it needs to be accessible from the internet through your router. Update your router or edge network device to enable port 80 and 443 with port forwarding to go to your Raspberry Pi that we are setting up. This varies based on your home equipment.
Nginx should be accessible from your pi at http://raspberry-pi-ip:81. By defualt Nginx Proxy manager management interface runs on port 81. Go the log in page for Nginx Proxy manager and open up the admin interface. Once logged in click on the Host option across the top menu and then select "Proxy Hosts". This will take you to a new screen and you should have a button on the right to "Add Proxy Host". This will display the main dialog to add a dummy host for accepting the routing for your server connections. Fill in the information on this page as follows. Substitute your host name you registered with DuckDNS with the one I have in this setup.

Loopback is used as the forward location as a dumy location to create a unusable route. We really don't want this to work and we really want to just enable access via custom locations. So once this is filled out click on the custom location tab so we can create a location for each endpoint. The image below is a example setup for a endpoint. Replace xxx.xxx.xxx.xx with your raspberry pi's IP or Host name. Replace endpoint in the location and forward location with the endpoint folder specified in Node-Red.
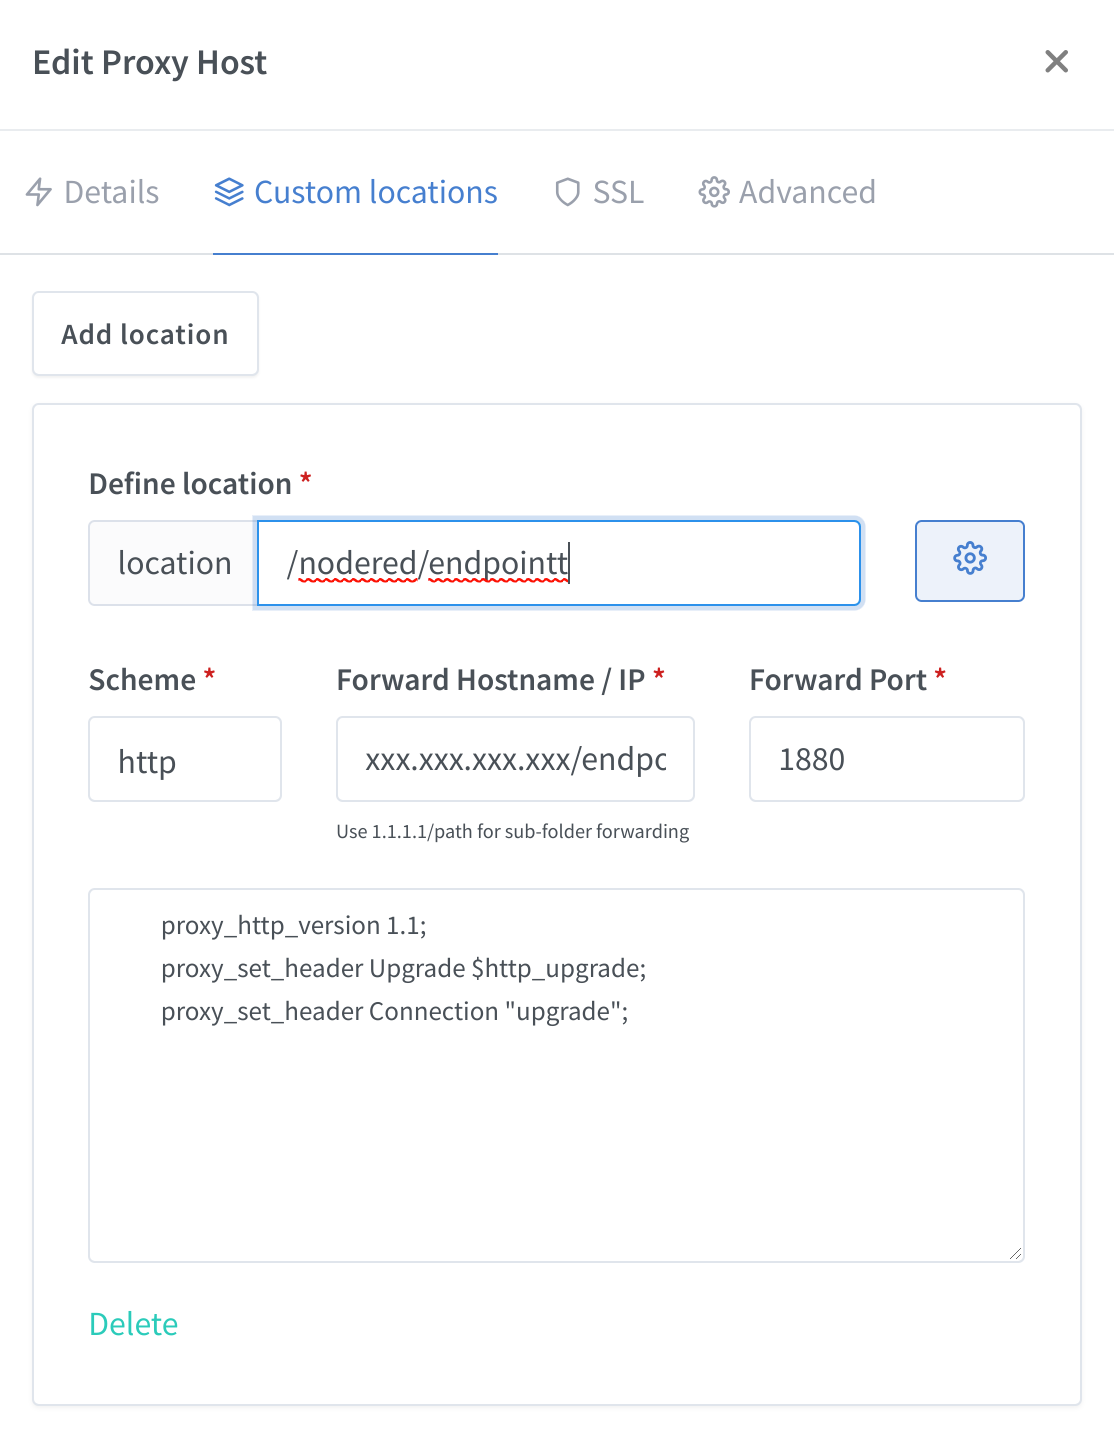
Create a custom location following this method for each endpoint you want to setup.
The last thing we need to setup in Nginx Proxy Manager is to enable secure connectivity. This is done by clicking on the SSL Tab. Select the options as shown below and click on SAVE.
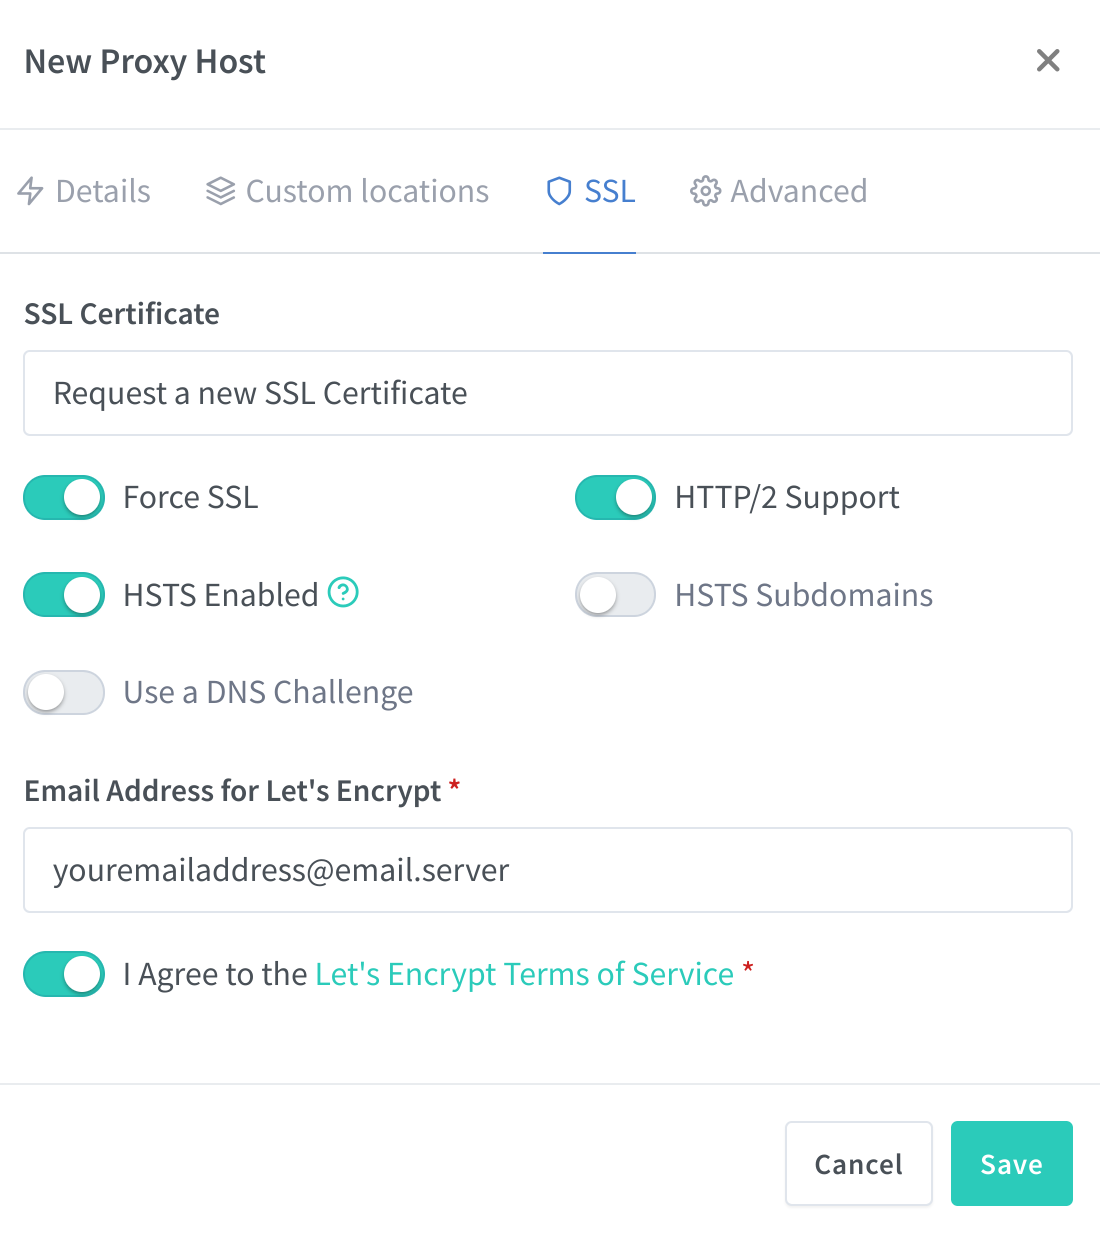
After you click on Save, Nginx Proxy manager will reach out to Let's Encrypt and retrieve a certificate for you and finishing setting up the reverse Proxy to enable the connectivity.
The last step is to now add this endpont to a Samsung developer work space.
Go to Samsung Developer Workspace and log in. Setup a account if you do not have one already. Once logged in click on "New Project". This will take you to a screen where you can select from two different project types. Click on the "Continue" link under "Automation for Smartthings App". This will take you to a screen where you can specify name of the automatoin you will create for the work space. Enter a name and click on the "Create Project" button. The project will be created and you will be taken to the Project overview Page. Click on the Register App button in the center of the screen. This will give you the option to select two different types of apps. Click on the option for Webhook Endpoint. This will enable a new section below were you just clicked. Enter the URL for the endpoint you created. It should be something like this if https://yoursubdomain.duckdns.org/nodered/endpoint. Load the full url of the endpoint and click Next in the lower right corner. Now provide a name for the app and a description that you may see in the Smartthings app. Select the top 4 options in the permissions section for deviceprofile and various device permissions. Scroll to the bottom and click on "Next". The next screen is unimportatnt so just click on "Save". The next display will provide some keys that are not relevant for this setup so just click on button to go to the project overview.
This time you see the Project Overview The middle section will display a little different. You will likely see a section above where the URL is listed for the endpoint created earlier. Click on the link for "Verify App Registration" and wait. Assuming you have Nginx setup correctly, and the Duckdns entry is writing to your home internet IP. A dialog box should pop up and then go away after a short period of time.
Now click on the blue button to "Deploy to test". This will make your new app available to you only
At this point you are almost ready to install the smartapp just created in the Smartthings app on your phone. You need to put your phone in developer mode. Follow these steps provided by Smartthings Enable Smarthings Developer Mode
Now restart the Smartthings app on your phone, and go and install the app as you would any other.
This seems like allot but it really isn't hard, just allot of steps. I would also say once you get the framework done, it is much easier to deploy new endpoints our services as you like
