That was it. Original was defective. New Bridge working perfectly.
5 Likes
How do you pin this, lol. That first part was crucial (on the Lutron Telnet/exporting)
I finished reading this topic and I still do not understand how to add a pico. I added the Lutron Integration app, and pasted the integration report, which includes the pico remote I paired with the Lutron Smart Bridge Pro. But I do not see the pico in the devices list. I can see the events generated in the log when I push buttons on the pico. Again, I do not see the pico in the device list.
What am I missing?
Is there a step-by-step guide, from beginning to end, on how to add a pico device to Hubitat?
Thanks.
I added picos the same way I added my other Lutron devices.
Get the ID from the integration report, then in the Lutron integrator app, give the new pico a name, select the type of device from the dropdown menu and then input the device’s ID.
1 Like
You don't paste the integration report. You note the integration id number of each device, and enter them in this format:
p,14,My Pushed/Held Pico
q,15,My Fast Pico
etc. You find 14 or 15 in the integration report. The SmartBridge is 1, and then each device you add to Lutron gets a successively higher number.
Ah. Thanks, that makes more sense! I first did Mark's way, as I only had one device for now.
Hey folks, I'm seriously considering purchasing the Hubitat Elevation hub, but had some questions about the Lutron integration. I'd be coming over from Vera, were until recently, we had access to the standard hub.
So from what I have read on this thread, my options are (1) buy the PRO Lutron hub, or (2) bridge through a smarthings hub. Is this correct? If so, which is recommended and why? I should say my exclusive use, at this point, of Lutron involves the Serena Shades. I am not concerned about the pico remotes frankly (should I be?). I only have one anyway, and have a bunch of the Aeotec/Aeon lab remotes already.
I do not have a smarthings hub in service at this location, but I guess I could buy one on ebay for this purpose. Also, is the ST hub actually needed, or merely the account to link them together? I have a ST in service at a different location which I could relocate on a temporary basis if that would work.
Thanks in advance for all opinions offered.
I’m changing over from ST because I’m tired of their platform instability.
If you buy a Lutron pro bridge, it’ll work with hubitat on your local LAN. The ST-Lutron integration is through the cloud.
Especially if you’d have to buy a new ST hub anyway, I really think it makes no sense to integrate hubitat and Lutron this way. Just buy a Lutron pro bridge.
3 Likes
Thanks for getting this topic up. I got my Lutron hub in and @EdwardN this helped tremendously as well as the @mike.maxwell tip of looking for the device ID in the logs.
Curious though, on one of the device types for the Pico that is available about "release"? What is the use case for that one? I used the "held" version for my Pico.
Also is there a Pico with generic markings for non-lighting use or how is everyone identifying button use on your Pico remotes?
Some button devices can send 2 events for a pushed action. One event on push and another on release. This allows flexibility with how an app can respond. The easiest use case is with lighting where the switch or bulb supports the changeLevel function. When the button is pressed it can begins the level change and continues until the button is released. So essentially we can emulate the function of regular dimmer controls (without the janky method of sending multiple brightness events).
In the built in button controller app and ABC, you can have one thing happen when you physically push a button and something else happen when you physically release it. Your imagination is the only limit on how else it could be used.![]()
1 Like
In addition to what @stephack said, for the Picos, the Fast Pico driver will send a "press" event immediately when you press the button, where as the "regular" Pico driver will wait until you release it so it knows whether it was under the "held" threshold or not. If you don't want to make use of the "held" events, things will just happen that much faster. You can still make use of the physical holding action as he mentions by, say, configuring a light to dim continuously while the button is effectively held (i.e., between the generation of the "press" and "release" events).
1 Like
There are three 5 button Pico variants that I'm aware of:
The Standard lighting one is commonly available for <$16. The other 2 are are approx $40. There's also a variation of the standard lighting Pico that includes a night light in the center "Favorite" button. I'm sure there are others including the custom engraved units but they're outside my "reasonable price" threshold.
1 Like
This will only work reliably for buttons 2 and 4 on a 5 button Pico, the raise/lower buttons.
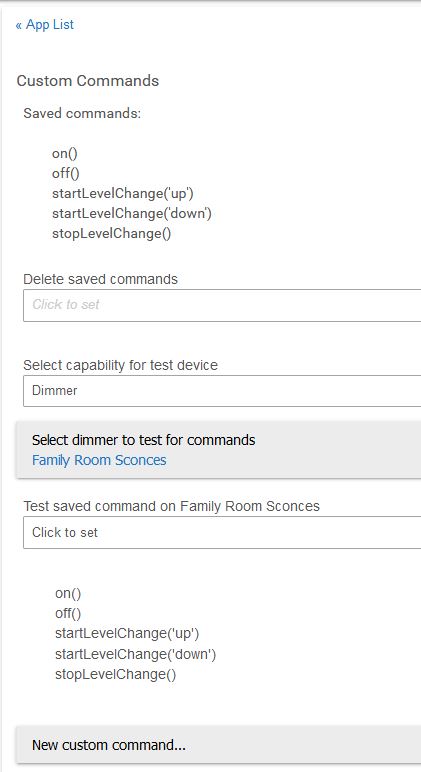
Does anyone have a screen shot showing the Button Controller App configuration to use buttons 2 and 4 as dimmers? That is really cool!
Here's how mine looks:
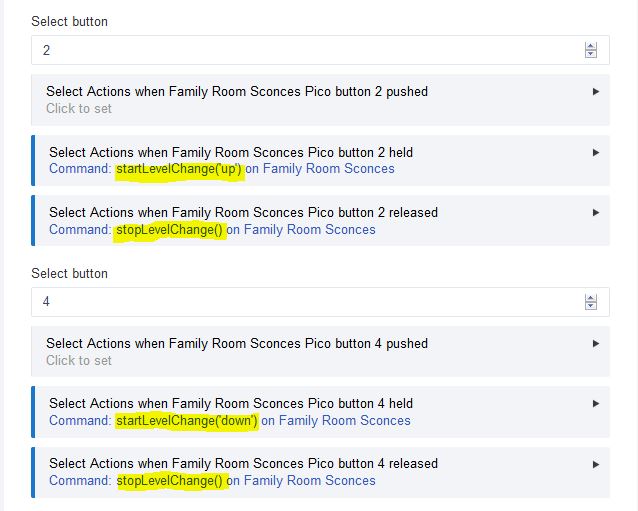
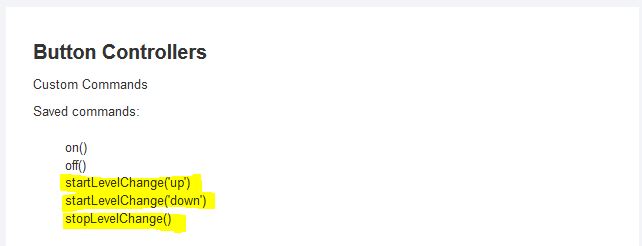
Note that the highlighted commands are the three commands that you'll need to create in the button controller:
1 Like
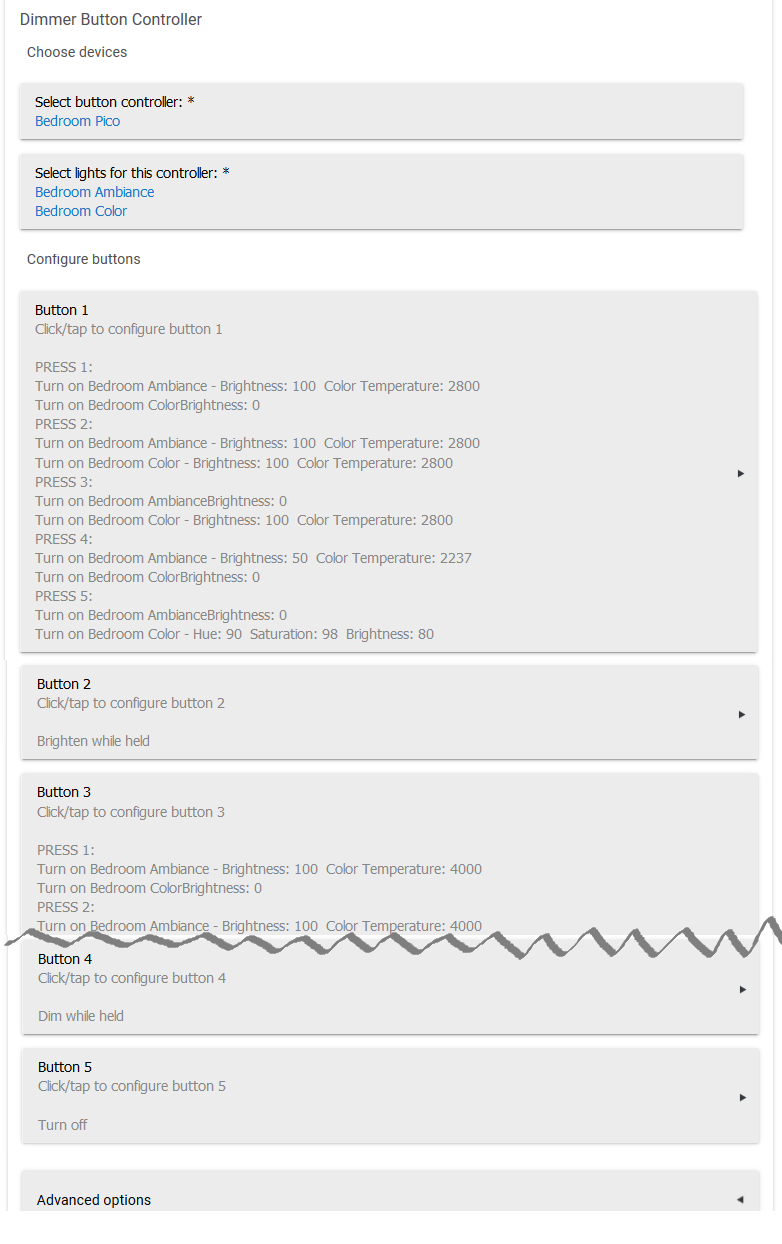
I see there is a screenshot from Button Controller above. If all you're interested in is lights and you don't mind custom apps, I might put in a plug for my Dimmer Button Controller app, which looks roughly like these slightly truncated screenshots:
and:
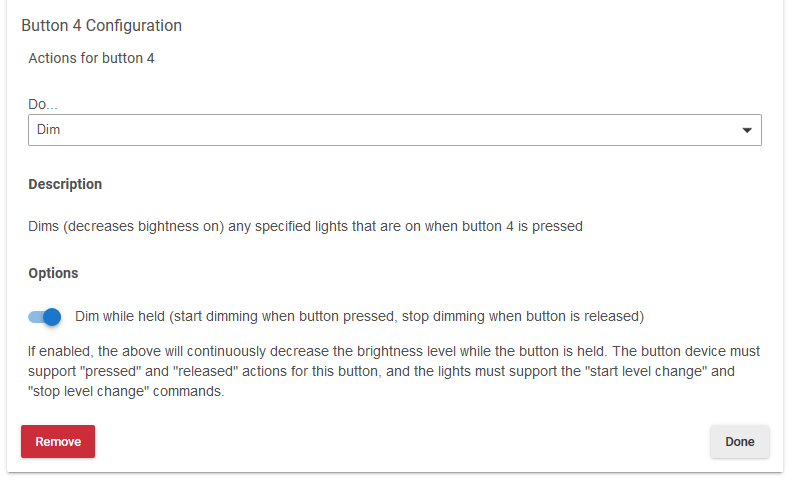
The magic happens when you enable the option "Dim while held" in the second screenshot; behind the scenes, this listens for a "pressed" event on the button and sends the startLevelChange command then, then listens for the "released" button event and sends stopLevelChange. (If not enabled, it will step the level up/down on a press, which is less sexy but should work with any dimmer/bulb.) I plan to expand this soon to work with "held" and "released" devices like the Osram dimmer. Notably, it also only does this to dimmers/bulbs that are already on. Most apps, mine included, work by setting each selected dimmer to a new level a certain amount higher or lower than the current one when you do a step-up/step-down style of dimming; this one is different in that it won't do that for dimmers whose switches are not currently on (as setting a level will always turn the switch on, even if it was not before, and I wanted to avoid that--my situation is using this with smart bulbs in multi-bulb fixtures where not all are necessarily always on). I'm not sure if the startLevelChange and stopLevelChange commands behave the same, but this also checks for that there.
1 Like
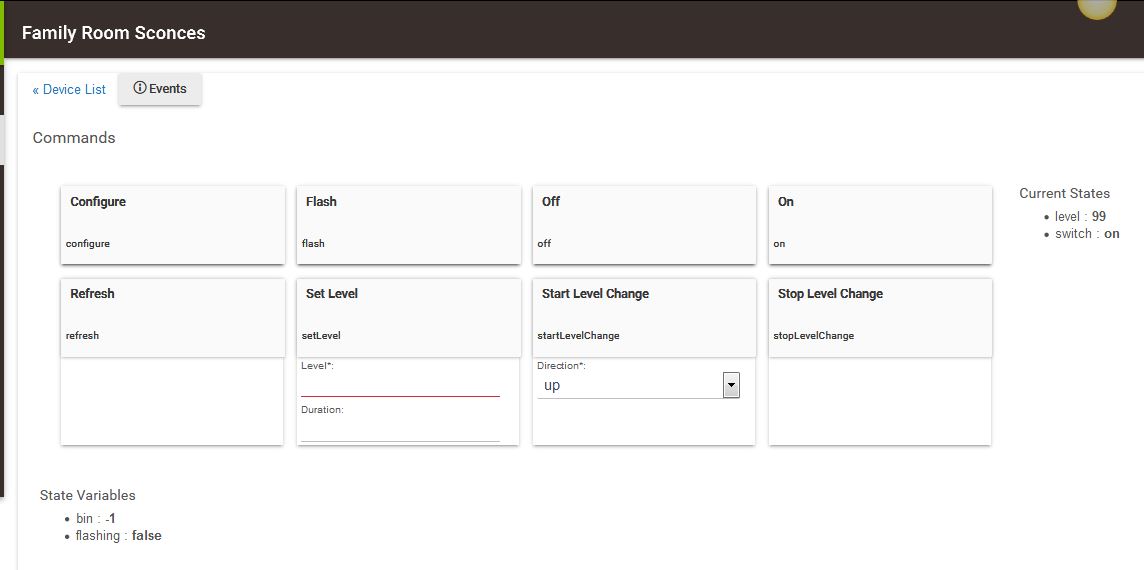
Thank you for posting the screen shots. I have two more questions. The first is can this be used with Caseta dimmers (or do Caseta dimmers support the startLevelChange commands)? The second is what did you select as a test device. I receive the following error when I try and use a dimmer as the category and either a z-wave bulb or a Caseta as the device:
java.lang.ArrayIndexOutOfBoundsException: 2 (addCustomCommandPAGE)
I don't own any Caseta dimmers so I can't answer whether Caseta dimmers support startLevelChange. I'm using a GE dimmer.
I'm not at home at the moment, but going from memory...
-
Go devices page and then click on the device you want to control with the Pico
-
Does the device have buttons for startLevelChange and stopLevelChange? If it does, you can test by clicking the startLevelChange button. I think it requires a string parameter so use either 'up' or 'down' without quotes.
If this works, you should be good to go with the Pico--just be sure you've added the custom commands.
Caseta dimmers are definitely supported and I believe that any device using the generic zwave and generic zigbee driver would be supported as well. Unfortunately I've never configured these outside of the ABC app so I can't speak to the error.