Guide on How to Create a Password Protected Tile

Note - The instructions below detail how to make a password protected tile to disarm HSM, but you could make it do anything you desire. Disarming HSM seems to be a popular choice and the reason I originally made the rule.

Over the last couple years, I have helped several users create a password protected dashboard tile to disarm HSM. This is something I created in Rule Machine, cause I did not like the way the HSM pop-up menu worked. @BrianP improved on my original rule and now it works slick. Unfortunately, the threads that illustrate the required steps are fairly convoluted and hard to read. I am always happy to help, but at this point, I think it is just best to create a new easy to follow thread. So here goes...

Below is a video of what gets created. Note the proper disarm code in this example is 3574, any other code that gets entered does nothing, except for reset the tile to read "Enter Code:"
https://www.youtube.com/watch?v=0-M_EAw654I

Step 1: Create a Hub variable (Hub variables can be found on the settings page). Make this a string variable, name it "Disarm", set its initial value to "Enter Code:" and create the variable and the connector. (Note,, if you are NOT making the tile for the purpose of disarming HSM then name it something else, realize whatever name you chose is the name that will show up on the bottom of the dashboard tile).
Screenshot from 2021-10-06 18-51-42

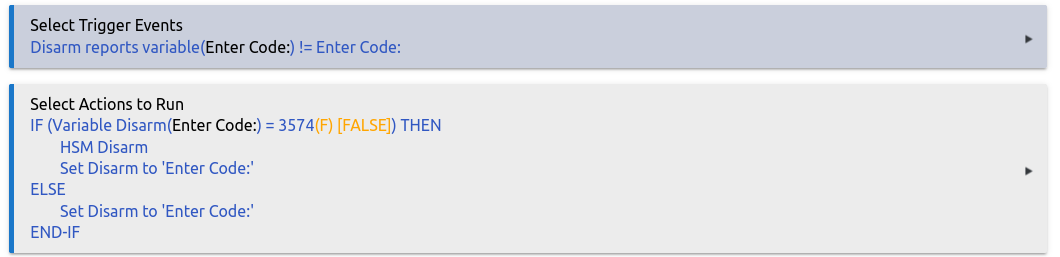
Step 2: Create a new rule in Rule Machine. First make the trigger, this is fairly straightforward in any version of RM, other than 5.0. So if you are still on 5.0 you might want to upgrade to RM5.1 or later. I will show how to do it in RM5.1

As you can hopefully see in the above screen shot, you select "Variable" as the capability of the new trigger event. Once you do that, the device you select is the variable you made in step 1 above. The comparison is "!=" which means "not equal". So your trigger therefore fires every time your variable is not equal to "Enter Code:"

Step 3: Make the actions section of the rule. If the variable is equal to your desired alarm code, then disarm HSM and then set the variable to "Enter Code:". If the wrong code is entered (the "Else" part of the rule), do not disarm HSM, but set the variable back to "Enter Code:" If you are making the tile to do something other than Disarm HSM, then simply replace the "HSM Disarm" action with any other action(s) you desire.

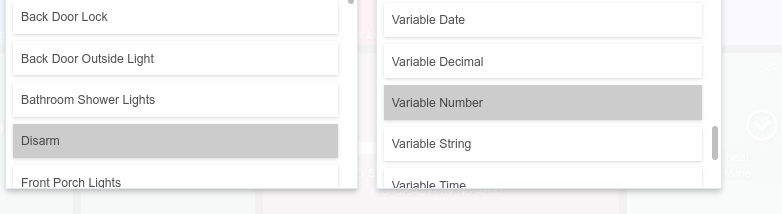
Step 4: Add the tile to a dashboard. Make sure you first go to apps and select the dashboard you want to add the tile to. From here you need to allow the variable connector to be added to the dashboard (all devices you want to add to a dashboard first have to be authorized to be used by that dashboard). Once you have authorized the "Disarm" variable connector to be added to your desired dashboard, then go to the desired dashboard and add the tile. When you add the tile to the dashboard make sure to select "Variable Number". You might be tempted to add it as "Variable String" because you created a string variable. But if you set it to "Variable Number" then when you press the tile a numberpad pops up instead of a keypad. Nice if your code is numeric. Thanks to @BrianP for this tip.

That's it. Hope it works for you.

6 Likes

This is slick. I was thinking last night that it woud be great to have a pin protected tile for something I'm working on. Thanks for the write-up.

2 Likes

Perfect! It works exactly as described. Thank you for your time.

See this needs to be connected to be code manager somehow like most other systems like this. The users setup and manageable but can lock and unlock arm and disarm

In my example posted above the "Select Actions to Run" section of the rule is fairly straightforward, but it can be created as detailed and creative as you want. The above screen shot is not my actual implementation of the "Actions to Run" section of my rule. In my rule, different things happen based on different codes being entered. Some codes will only work during certain times, and I receive instant notifications when certain codes are entered. This is all easily possible with some fairly straightforward changes to the action section of the rule shown above. Not sure what other lock code manager features would be desirable?

Realistically, I don't expect users who implement this password protected tile, to use it very often. I almost never use mine to disarm HSM, even though that is what it was originally made for. My HSM, is automatically disarmed when a valid lock code is entered on my door lock. I have also played around with disarming HSM based on presence.

I once had my smart lock go unresponsive (dead batteries, network issues) along with reliability issues with presence detection. To make a long story short, the wife comes home with no way simple way to shut-off the alarm (yes there is a HSM pop-up menu, but for various reasons neither I or my wife like it). After that experience I made the above tile, cause I wanted to keep my Hubitat, LOL. In the past year, my wife and I have not even used the tile once to disarm HSM, but it is there if it is needed. And when it is needed, it is needed!

"Honey, if you get home and none of the automations turned off the alarm, and the bells are a ringing and the dogs are barking, just press this button and enter the code"

It doesn't get simpler than that.

The user management / code you enter should not need to be set using a rule there should be integration to disarm using codes from the built in lock code manager system.

Any other home automation basic security system use the setup I'm talking about. You add you son or wife as a user and she has certain access and gets a code for the doors and alarms ECT......

And that is exactly what happens is 99.9% of the time when I disarm my HSM. 99.9% of the time when I disarm my HSM, it happens because a correct code was entered into my smart door lock (which is managed by the built in lock code manager system).

And so does HE, you need to realize my post above is about a desire to not use HE's built in disarm options that have the functionality you talk about. But rather to make a password protected tile do whatever you want, when a specific password is typed into the tile. My post is NOT about how to disarm HSM with HE, but is rather about an option to do so.

That is the great thing about HE, it comes with the industry standards you talk about, but if you want to create things above and beyond that, it is also possible.

Ohh well that's my issue is that it does not use the lock code manager on the dashboard when you disarm unless you buy a keypad, I don't understand how they can't have the pad built into HSM tile when disarming.

Just found this - Very cool. I created momentary switches connected to drawer latches that I could unlock from the screen on my desk. Now I can PIN protect those drawers and protect my ̶c̶a̶n̶d̶y̶ ̶a̶n̶d̶ ̶s̶o̶d̶a̶ sensitive documents.

1 Like

When I do this on Android phone, my keyboard pops up, not the number pad, and I had it set to Variable Number. I had to change to Variable Decimal to get it to open the number pad.

1 Like

I'm run Fully Kiosk browser on a Fire8 tablet, which is blocking the keypad pop-up. Anyone know the setting in FKB to enable this? I can't seem to find it.
The keypad pops up fine if I use the Silk Browser to connect to Dashboard but will not work in FSB.

Thanks

I do not know the solution to this problem. (I run FKB on a regular android tablet). I would suggest starting a new thread or asking the question in an Amazon tablet and/or FKB thread.

Thanks for the post. I have the tile generally working with a code. I am on the latest Hubitat and RM 5.1.

When I try to select the "Variable" it does not appear with the devices, as shown in this thread, I have to select "Tile Type: Variable" first, then select the variable ... that works. But then there is no selection for "Variable Number" so I don't get a number-pad?

Can someone help me on what I am missing please?

OK ... I think that I can answer my own question. It appears that I missed the RM Connector feature creation. As most of you probably already know, creating a connector for the variable then also makes the variable appear in the dashboard Device list ... and then I can set it as a "Variable number" ... and the Tile works as expected.