Looks like the level thing is possibly my fault, the brightness correction is supposed to be disabled but looks like it is still adjusting it. I thought I tested this before but now I see its doing the same thing for me.
UPDATE
[2.0.2] - 2023-12-10
Set fallback log level to Info when not set yet
Fixed issue where not actually disabling brightness correction
That did fix the problem when changing the minimum brightness. But I can't help but wonder if there is something wrong with my new Zen30 800. I had to set the minimum brightness to 45%. That is actually dimmed pretty low. But it seems like they go from really dim to really bright very quickly because of this with not a lot of in between.
I have a Zen30 700 in the other bathroom with 3 different model bulbs. That switch currently has the minimum set to 15% and that is very dim. I have it set to come on at 3% (so around 17.5%) at night as a nightlight. I took those 3 bulbs and put them on the Zen30 800. On this switch (with no minimum set), at 35% is the lowest they come on.
The 3 bulbs on the Zen30 800, when connected to the Zen30 700 will dim down to 20% (again with no minimum set) and then turn off just below that.
Summary: 3 bulbs on a Zen30 800 switch will only dim down to 45%. The same 3 bulbs when connected to a Zen 30 700 switch will dim down to 20%.
So my conclusion is that either the dimming function works differently between the 700 and 800 series Zen30 or the new switch I got is not working correctly. Is anyone with both able to test this? Make sure the minimum and maximum values are not set.
I have a 800LR and a V3 sitting here on my test bench (a piece of cardboard on top of some bins ). I have a pretty nice bulb in the 800LR, I can dim it down to 1% and it still lights up. I will test it in the v3 and post an update.
At 100% I get 120V @ 60Hz
At 70% I get 92V @ 60Hz
At 50% I get 53V @ 60Hz
At 40% I get 42V @ 60Hz
At 30% I get 5V @ 180Hz
At 20% I also get 5V @ 180Hz
At 5% I get 3.2V @ 180Hz
So I went back and tested at 31% and I get 13V @ 60Hz. So it dims by reducing voltage until 31% and after that switches to lower voltage and higher frequency. I am curious and will check the Zen30 700 sometime later.
You have a much better way to test than I do.
So it turns out the 800LR had a total junk non-dimmable bulb on it, 1% worked but then after around 50% it was all the same, this is often the case for "non-dimmable" rated bulbs which still dim, just not properly.
The good one was on the v3, and below around 20% would be no light on the v3. I moved it over to the 800LR and was able to take it down to 10% on that switch and it looks slightly dimmer than the v3 can even make it go. I tested 50% and 100% on both as well, there was a good difference on both switches. Its hard to tell between 50-100 where the true max is because at some point (any bulb) is so bright it is hard to tell if its getting brighter still or not. Its a TCP 800lm 2700k bulb I got free through a WI energy program, I used two of them in my hallway for a while and they seem to be good quality. Smooth dimming and no flickering.
No none dimmable drivers "are" NOT dimmable. They don't "dim" all your doing is stretching the Driver so much that it's giving up. I see this mis understanding all the time in my job.
A LED driver is not a PSU the job of a constant voltage driver (none dimmable) is to ensure the voltage to the lamp is constant and smooth by reducing the supply it's fighting and keeping the out going voltage the same. Untill you hit a point that the incoming voltage is to low for it to work any more and the light "dims". That doesn't make it dimmable. All you doing is nackering the lamp/ driver and likely the dimmer as well.
Constant current drivers allow the voltage to be regulated whilst keeping the current the same and ensuring the voltage that is reduced is smooth and not choppy. This is why LEDs last long it about the quality of the driver more than the lamp as it's the driver which takes the pounding to protect the LED.
Jeff, could you please consider changing this to be "Error" or "Warn" instead of "Info"?
I have changed these over and over again, and it seems like every time the hub updates or I reboot they get set back to Info for some reason. Maybe it was due to a database restore I did earlier today before the hub firmware update? In any case, my logs are completely clogged with Info stuff and I would like to not have to repeatedly reset the log levels.
I am sure I had "none" logging selected before the last couple driver updates, so not sure why it would decide that I had not set logging?
This last update the logging options changed from the normal on/off toggles to the log level. Once set it should remember the setting, like all other settings. Further updates to the driver or hub firmware should not revert the setting.
The actual default setting in the menu if unset, would be debug. If you save prefs it would do debug for 30 mins by default. I wanted it to start out in debug for a new device install so you can see all the setup info in the logs. The fallback level should only come into play if you update to this new style driver from the old one and never save prefs, I did not want people to be stuck on debug indefinitely.
I should have made it check the old setting and used that as the default for updates, did not think about that. I will try and figure out a better way to do it going forward.
In the meantime if you want to set a couple of the device back to Warn and try it out, they should never revert back to Info on their own, unless of course you restore your database back to before you changed it. Let me know if you find otherwise.
I just installed a zen71 and it added into Hubitat just fine. It automatically detected as a zen71 switch , but i also already have the zen switch advanced driver installed (I used it for another switch before)
Overall question is : why should I/do I need to use this advanced driver vs what’s now (I don’t know if it was before?) built into hubitat?
The hub is supposed to select the custom drivers by default if installed but it is a bug I have been trying to get fixed for some time now...
Anyway, it exposes all of the advanced settings of the device and also my favorite feature is the level correction so that if you set a min/max brightness it will look like 1-100% on a dashboard / apps.
The system driver just gives you basic functionality and a few critical settings.
Yep that is the one I have installed and I installed it via HPM. Looks like it was updated (possibly on 19th?) on my hub to 2.0.2
Yeah too bad it doesn't select your driver by default. Also too bad it's not integrated into core hubitat? Zooz+Hubitat seem well integrated and active.
So after I set up each of my switches (more to come!), just go to device details then select your driver, update/save, then click configure and go from there?
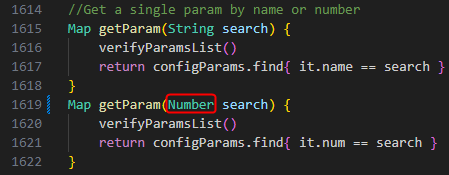
@jtp10181 big thank you for the great work here. Just updated to [2.0.2] - 2023-12-10 for my Zen72 fw:2.10 on HEC7 v:2.3.7.141. Noticed a blocking error when trying to use setParameter via UI and API
[error] groovy.lang.MissingMethodException: No signature of method: java.lang.String.call() is applicable for argument types: (java.math.BigDecimal) values: [11] Possible solutions: wait(), any(), wait(long), take(int), each(groovy.lang.Closure), any(groovy.lang.Closure) on line 775 (method setParameter)
Partial workaround via UI by setting then saving the param via executeConfigureCmds, but blocker for using setParameter.
Has anyone had a zooz switch the have in smart bulb mode / disable local and zwave control quit providing power to the light fixture?
I've only had this happen, twice now with a zooz26. I have control disabled, providing power to a couple outside smart bulbs. First time was a month or so ago, then again yesterday I see the lights aren't working. Fiddling around with the switch, I realize it's not powering the lights.
Seems like the switch looses it's setting and goes back to default behavior.
What do you have these settings at? I would suggest doing a 1 min auto turn-on and also forced to On. Then if it looses power it should come back ON, and if it gets turned off somehow it should turn itself back on again.
I have had a zen26 disable smart bulb mode when it came back up after a power outage. Zwave control was still enabled though. I also has the setting to restore last state enabled.