Alternative Lutron Integration Setup Method

This is an alternative method to setup a Lutron Integration. Instead of entering each device interactively in the Lutron Integration app, you can enter a list of your Caséta or Ra2 devices in a simple CSV format.

Conversion from interactive setup method to configuration list method

If you have already setup your Lutron Integration using either the interactive device entry method, or the previous alternative method, when you select to use the "Use configuration list" method it will automatically convert from the previous setup to the new configuration list. Once having done this, you may not go back to the interactive or previous alternative method -- nor should you have any reason to go back.

Create or edit the configuration list

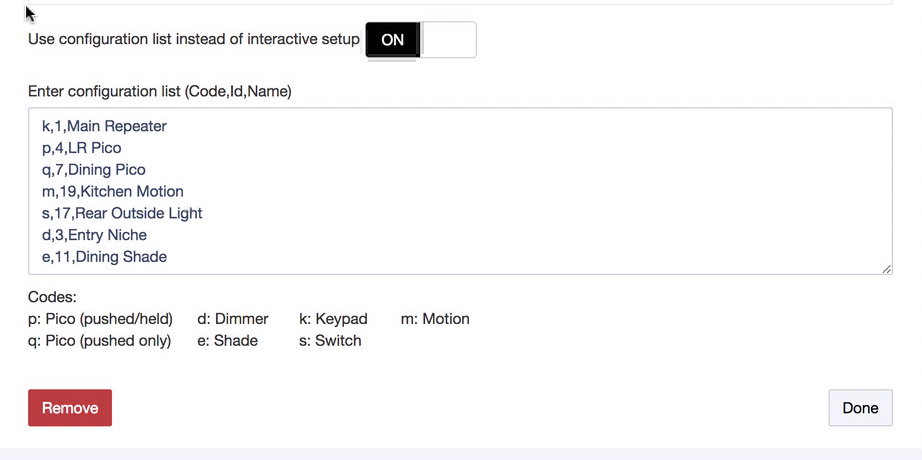
When you create the configuration list, use the format shown below in the example. You replace the example list of devices with your own list, using the same format. Each list element consists of a single letter to denote the device type, the integration id for the device, and the name you want to use for that device in Hubitat.

When the Lutron Integration loads it will create all of the virtual child devices for each of your real devices, and it will fetch the current state of every switch and dimmer in your system. After that, it simply responds to events from Lutron and Hubitat as you'd expect. A shade device is really a dimmer, but with different UI words to fit a shade.

How to update your integration setup

You may edit the configuration list as you add or change devices. After making changes, simply hit Done.

Example Configuration List

3 Likes

So, now that I've updated my config can I delete the "Drivers Code" or is there something hanging on to that?

I deleted mine, no problem

Yes, once you've made the conversion you can delete the Driver Code you had created earlier, and the device named Lutron Devices. Those are no longer needed.

Outstanding. I backed everything up first, deleted the Devices device and then the Driver Code. Worked amazingly well given my less than stellar history with the Lutron configuration changes :wink:

Thank you!

1 Like

@bravenel : Can you offer some guidance on RadioRA 2 "Radio Powr Savr Wireless Occupancy Sensors"? I have a few Ceiling units (LRF2-OCR2B-P) and a single wall unit (LRF2-OWLB-P). A telnet session into the Main Repeater typically gives me a pattern like the following when a sensor is triggered by occupancy:

 ~DEVICE,8,2,3          # Device Id = 8 is the LRF2-OCR2B-P sensor
 ~OUTPUT,18,1,100.00    # Zone Id = 18 is managed by an RRD-6NA dimmer
 ~OUTPUT,18,29,10
 ~OUTPUT,18,30,1,100.00
 ~GROUP,12,3,3          # Room Id = 12 (aka Group Id) is where the sensor is located

and a pattern like the following when the area is no longer occupied.

 ~DEVICE,8,2,4
 ~OUTPUT,18,1,0.00
 ~OUTPUT,18,29,11
 ~OUTPUT,18,30,1,0.00
 ~GROUP,12,3,4

What's the right way to populate the Lutron Integration configuration list?
I have tried a few combinations (similar to the following), but neither the Occupancy Sensor's nor the Impacted Room's device page reflects occupancy status.

 k, 1, Main Repeater
 m, 8, My Occupancy Sensor
 d, 18, My Dimmed Zone
 m, 12, My Impacted Room

I'm not sure whether to include the Occupancy Sensor, the Impacted Room or both in the configuration list. Is "m" (motion) correct for the sensor? the impacted room?

While I do not see motion status when on Hubitat device pages, I do see the telnet activity in the Hubitat log.

dev:357 2020-01-24 10:03:56.207 pm inforcvd: GROUP,12,3,4
dev:357 2020-01-24 10:03:56.108 pm inforcvd: OUTPUT,18,1,0.00
dev:357 2020-01-24 10:03:56.045 pm inforcvd: DEVICE,8,2,4
dev:357 2020-01-24 10:02:51.807 pm inforcvd: GROUP,12,3,3
dev:357 2020-01-24 10:02:51.711 pm inforcvd: OUTPUT,18,1,100.00
dev:357 2020-01-24 10:02:51.646 pm inforcvd: DEVICE,8,2,3

At one point, I believe I briefly had (and saved) a working combination. Any initial progress was fleeting.

Genuinely appreciate your insight!

It looks like you have the Occ Sensor mated to My Dimmed Zone in the Lutron system, right? You might consider removing that, and doing it in Hubitat. Unless, of course, you always want that exact behavior from motion active/inactive.

What you showed for the setup is almost right, except remove the spaces after each comma. That would be the reason it doesn't work as expected. If all you want is the motion sensor, then just include it.

Awesome. The spaces after the commas were the issue. Interesting that there's no syntax checking or whitespace cleanup. [Perhaps some users need commas in names? Or leading/trailing whitespace in names?] Once I have all the RA2 controls registering correctly , I plan to move most of (if not all of) "the smarts" out of RA2 and into Hubitat.

This topic was automatically closed 365 days after the last reply. New replies are no longer allowed.