V2 Iris Keypad setup howto needed

I think you hit the nail on the head. I see all these boxes with lines indicating that I should enter information I want in them. Then I don't know how to get it to take until I click on one of the box headers above the text I entered and it took. Now I am told I should not have done so but used an app separate from the device setup to accomplish what I did. It is far from intuitive. However, I am rapidly getting up to speed. I have most of the functionality of my Iris system now being handled by Hubitat, including turning on a couple of lights using two V2 Iris smart plugs.

It is just too bad that all my 1st gen Iris contact sensors, motion detectors, and cameras will be essentially useless at the end of the month. I will hang on to them in the hopes that when Lowe's releases the information, enough will be available for the 1st gen devices to be usable again.

The only exception might be the cameras which may be able to operate as IP cameras over WiFi or hard wired connection. Streaming video might be out but it may be possible to configure them to capture still images or a video stream to the computer. It is tricky, but I have been able to do both using VLC. Unfortunately, the cameras do not appear to have the capability to use a micro-SD card although a slot is there.

There is a group called SystronicsRF who are working on a hub that can use Iris Gen1 devices. But they just entered beta. Don't trash those little gadgets, but don't hold your breath either. I'm thinking I might eventually use them in one of my properties and do Hubitat for the others.

1 Like

Very interesting! It will be interesting to see when it becomes available and at what price.

Iris users also sent a bunch of V1 devices to Hubitat, fingers crossed.

Let me know how you make out with the CT101, this is gonna be my next project as well. I'm hoping its gonna be as easy as the install on Iris.

Click the link icon right below the post youโ€™re interested in, then the โ€œ+ new topicโ€ option that pops up.

Maybe I did it wrong but that did not actually move the stuff to another thread as I've seen it done before. That's a link not a "split"

No, that allows you to post another topic based on the one you're interested in. Splitting can only be done by admins.

:man_shrugging: IMHO the end result is pretty much the same, a new topic is started and the relevant info from the old topic is available right in the first post.

As @SmartHomePrimer said, anyone can do that but only admins can actually move individual posts (which may or may not happen).

Ah I see, I must be thinking of how discourse handled this in the ST forum. You could still see the actual post you linked to in the new thread (I think, havenโ€™t been to the ST forum in months now), whereas with HE it appears to be just a text hyperlink. Agreed, that is less useful.

I copied the CT-101 Radio Thermostat Setup Howto information to a new topic. I am going to delete it here since it is not pertinent to the Keypad setup.

I agree with StephenH on the documentation for keypad support for the transition from Iris to Hubitat. This is may first day on Hubitat & have not accomplished much at all. All I want Hubitat for is a simple Iris door contact sensor, an Iris/Utilitech Siren, and the Iris Gen2 Keypad.

I have all of the above devices paired, along with LCM & HSM apps...but that's as far I can get.

For the life of me I can't figure out how to get the keypad to arm/disarm the contact sensor via a 4 digit code from the keypad.
Can someone here tell me:

  1. Can the Iris Gen2 Keypad be programmed to arm/disarm the contact sensor via a 4 digit code input by me as well set HOME, AWAY, PANIC? If so, where is this code set in LCM?

  2. Can the keypad be used to turn off the siren? If so, where is this done? I got the siren to sound 15 seconds after the contact sensor was opened, but can figure out where to turn the siren off.

I see in this thread where you're not supposed to set the codes in the keypad device once it is paired but rather use the LCM app. Some of the fields in the LCM app I don't understand.

Again, this is my first day at trying this all out and have not accomplished much...tired and frustrated now. I just want a simple security system with Hubitat with a couple of Iris contact sensors, 2 keypads, and a siren.
Is this possible with Hubitat? Is there a "Dummies Guide to Hubitat?" LOL

Thanks for any pointers!

1 Like

Okay, this is certainly not intuitive. The LCM is for setting up your 4 digit codes. The HSM is where you set how it works.

When you go into the section of the HSM that covers "Configure Arming/Disarming/Cancel Options" there is a section for "Use keypad to arm/disarm." Under that are two options: "Use this keypad(s) for arm/disarm, partial for Home" and "Use this keypad(s) for arm/disarm, partial for Night. The second is the one I use. Arm is for all sensors. Night is for contact sensors only (wouldn't want the alarm going off when one of us has to get up during the night). I don't have a specific "Home" mode configured. Away and Night are all I need. essentially, I would prefer that Hubitat simplify this to just "Away" and "Partial" since I don't see much difference between what I would set for "Home" and what I have set for "Night." To me, Home is pretty much the same as "Disarm" as I would want the smoke/CO and glass break sensors active even if we are home but I don't necessarily want the contact sensors active and have to disarm them every time I want to go in or out during the day.

I have three contact sensors active along with five motion detectors plus the smoke/CO detector and the glass break sensor. I also have the Utilitech siren.

Since Hubitat does not support cameras (yet), I just used two phones we are not using, a Moto X and a Moto G, both 1st gen, with the Alfred app to provide the video support my Iris cameras have been providing. It will be more steps to arm/disarm everything as I don't necessarily want the cameras active all the time, just when we are away. However, now I have all the functionality that I had with the Iris system, so I am content.

So I migrated from IRIS with 128 devices... So far so good for things like automatic lighting, etc., but I have the same issue as mojoman2600. I have everything setup in HSM but the keypads don't seem to do anything other than arm... Once I arm it and it goes off, I cannot disarm it from the keypad. Is that normal? I have to turn off the siren and flashing lights manually... Also, I get the delay for the full armed away system to give you time to get out... But I want it for "partial" also. I often use partial when I leave the pets inside so they don't trigger the motion detectors... However, I can't set it and run out as its immediate...But that's really not related to the keypad... Can someone explain if the keypad can be used similar to IRIS? Or are we relegated to a dashboard? My in-laws come and go throughout the day and were accustomed to using the keypad... With their own code... Can anyone help with a simple tutorial?

Not here yet, but on the way. Hub platform 2.0.7.x is in beta testing.

TUTORIAL: Set up Lock Code Manager, and Hubitat Safety Monitor to use your keypad devices for arm and disarm of your system.

  1. ) Start by pairing the devices that accept key codes. Usually that will be locks and the v2 or v3 keypad. (If they are not paired correctly they don't quite work. The v2 keypad seems to pair halfway sometimes. If you suspect that problem, try these pairing instructions:
    Iris v2 Keypad )

2.) Install Lock Code Manager (LCM) in Apps section.
3.) In LCM, make users and assign them codes. Also check off the devices you want them to have access to. The devices should appear in a dropdown box for you to check off.

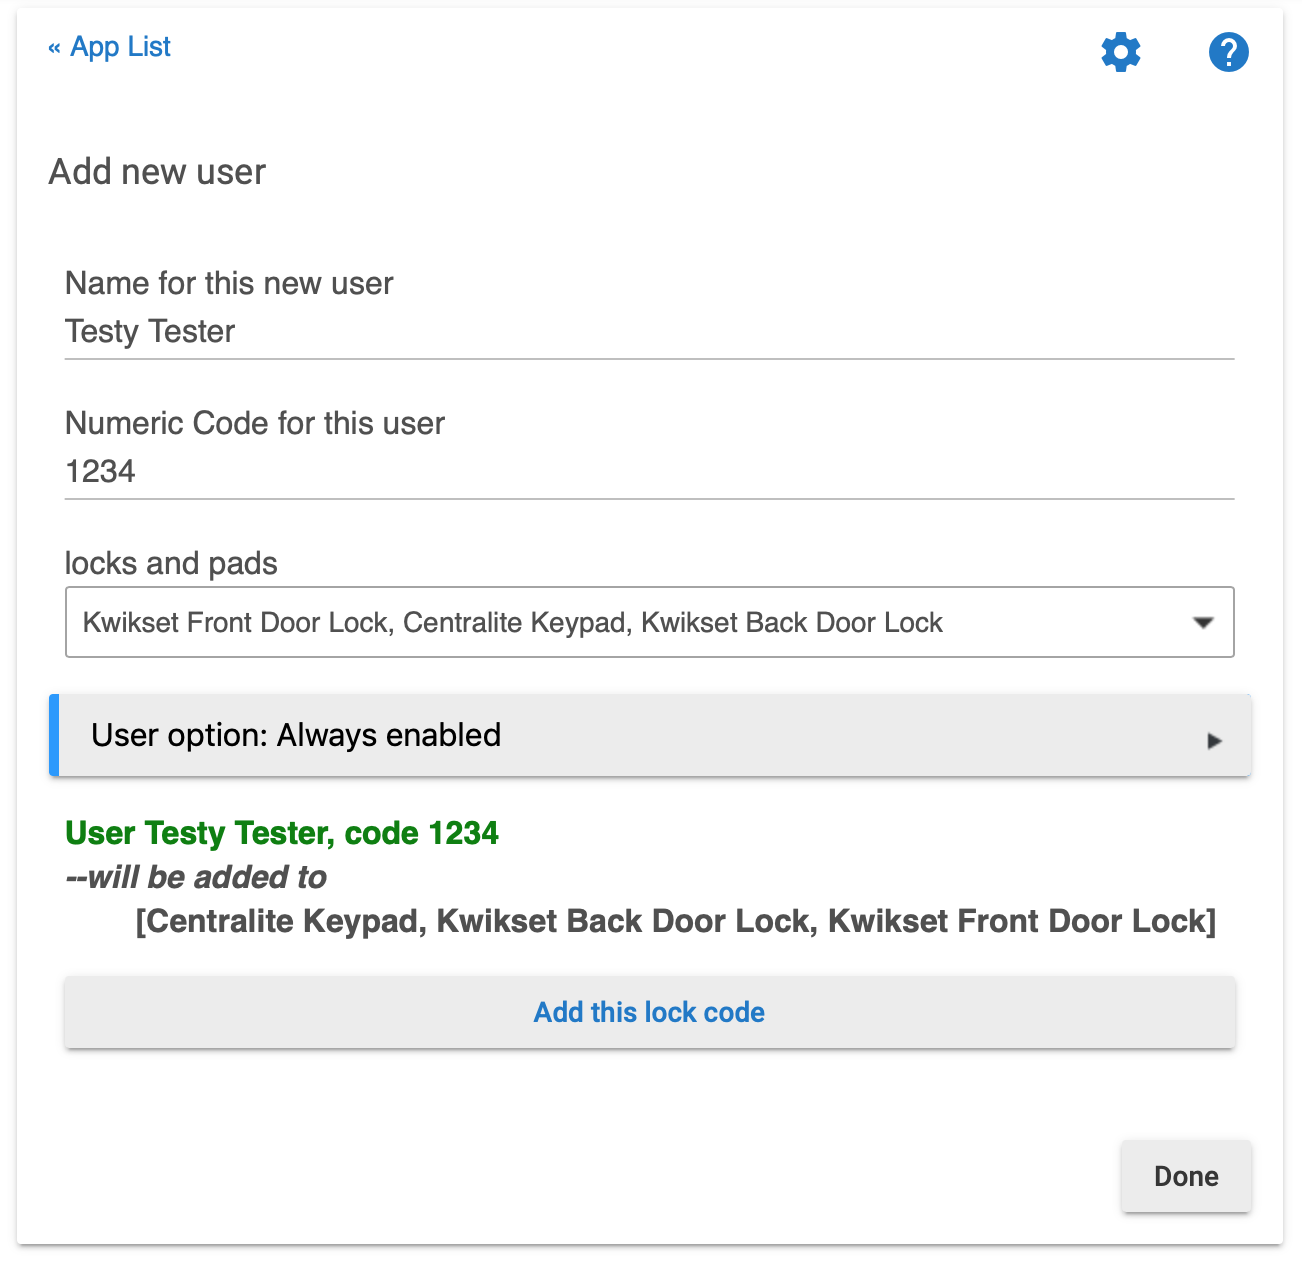
IMPORTANT: When using Lock Code Manager, DO NOT CLICK "DONE". That is an error in the interface which really means "cancel" :wink: Instead, click outside the dropdown and you will get a thing to click on instead which adds the lock code, the user and their devices. You should end up with something that looks like this:

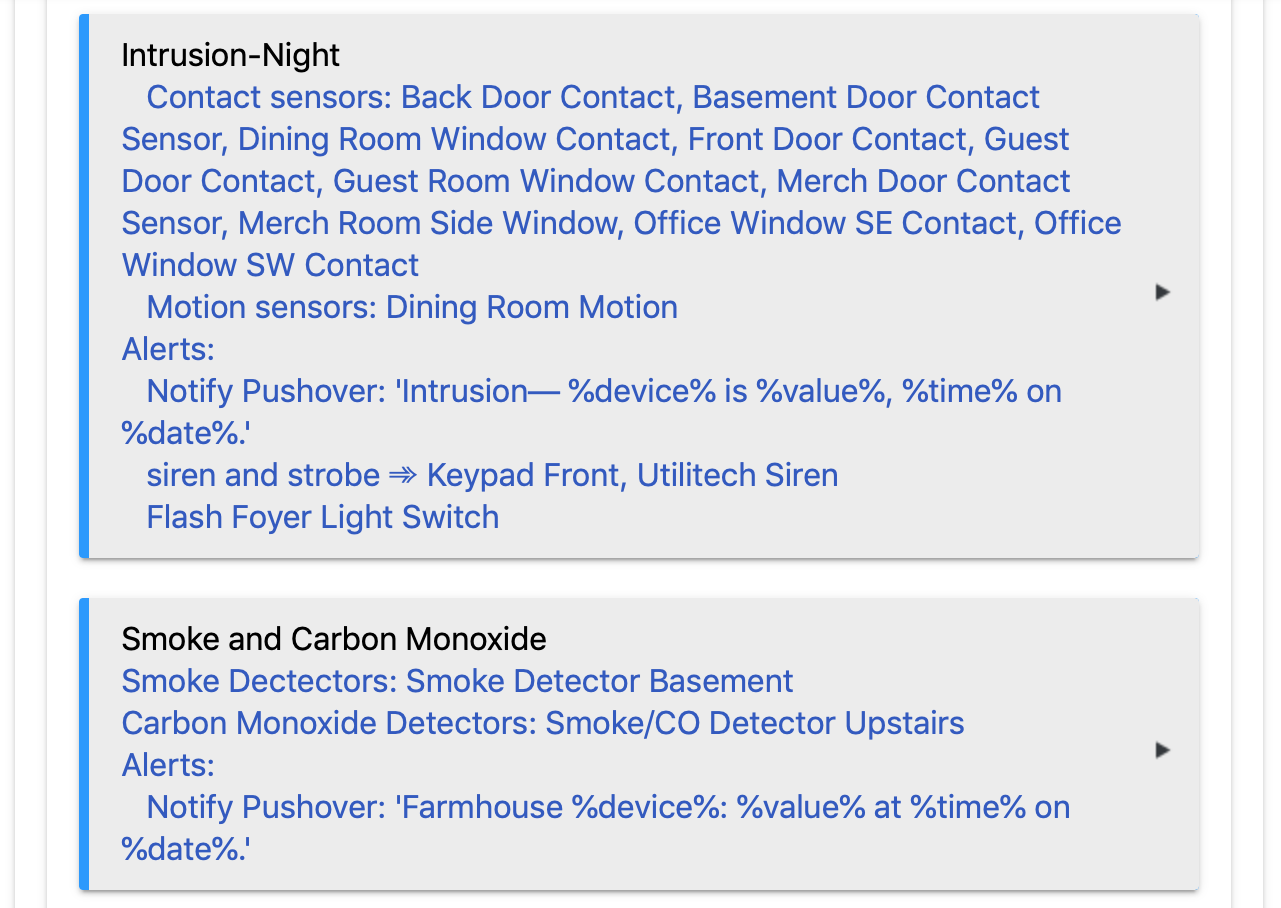
Install the Hubitat Safety Monitor App if you haven't yet. I honestly can't remember if the "modes" in this ("Home" "Night" etc.) are pre-defined or if I had to set them under Settings > Locations and Modes > Modes Tab. In any event, here are the things I have specified to happen in each of these modes:


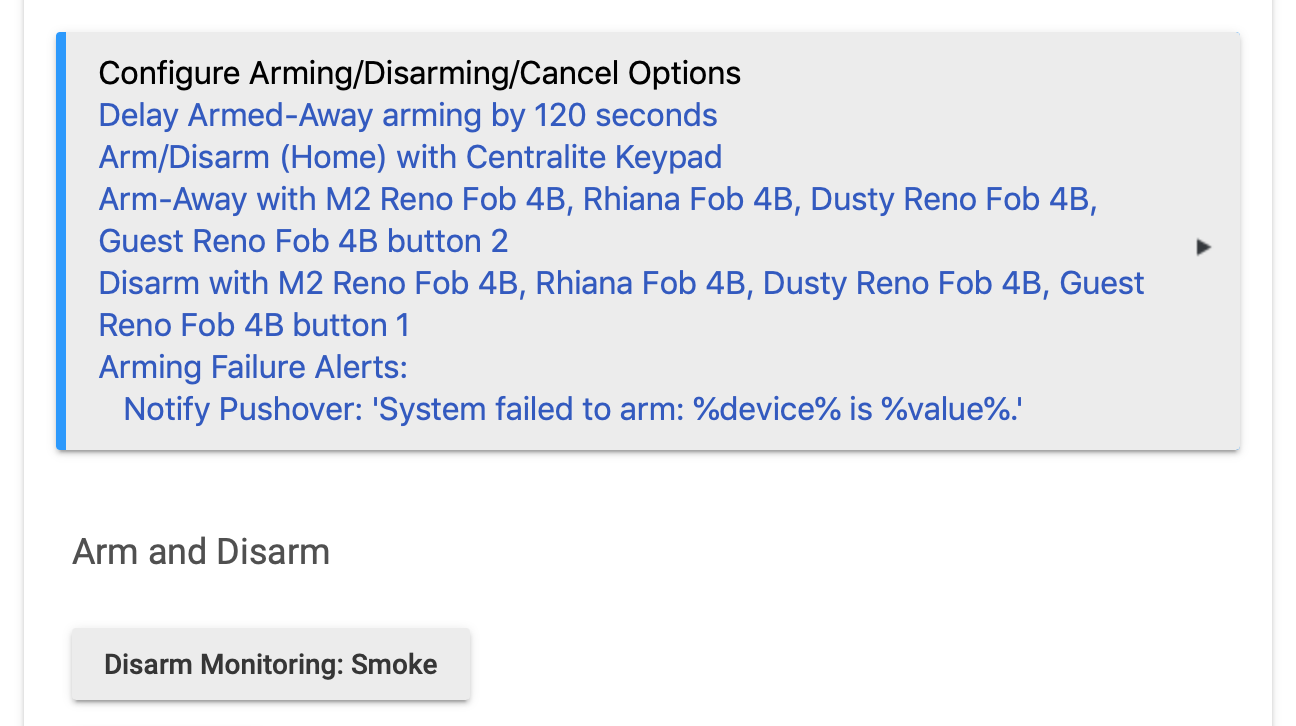
The part below "Configure Arming/Disarming..." is where you select the keypad for use in arming and disarming with the codes you put in Lock Code Manager: It's also where you can specify a delay on exit or entry. Also, you will notice references to "Pushover". Pushover is a nifty app you can pay a few bucks for that allows Hubitat to send alerts to your phone. Finally, you will see that I also use key fobs for arming. If you have any of those, set them here.

Here's a look inside the "Configure Arming/Disarming..." section. You can see I selected the keypad as the device to use.

I've been told that if you use the slider "Use disarm to disarm all" it will shut off all your alert devices. Since I want my smoke detectors working all the time, I don't use that.

"Use this keypad for arm and disarm, Partial for Home"... or Night. Here, they are referring to the physical "Partial" button on the keypad. So, it means "when you push the "partial" button on the keypad, do you want to execute the actions you specified under "Home" or under "Night"?

After you execute these steps, the LCM and HSM apps know how to run the keypad in what most of us consider the normal way. The ON button arms to the "Away" settings. The "Partial" Button Arms to the Home or Night settings you picked above. OFF with your code disarms. No further configuration should be needed. If this does not work, you may have a partially paired keypad. Return to step one!

Just to make you feel better, it took me weeks to wrap my head around the myriad ways to accomplish things in Hubitat. The system works really well, but the interface is still in Alpha if ya ask me. And the lack of Just Do-it-This-Way, step-by-step tutorials is painful. I hear they are working on the interface now, though.

In the mean time, I hope this helps.

4 Likes

Not an error. Doesn't mean cancel. The interface was changed in version 2 and is intentionally not dynamic. Therefor you must click in a blank area as you mention. This refreshes the interface and you then get "Add this lock code"

Done is there for once you have completed all settings. It's a common element throughout the Web UI and it makes more sense in some apps than others.

Yet, if you click "Done" when you are on that screen, it aborts the addition of the new user. I spent an entire week messing that up before someone clued me in. If it's intentional, it's diabolical. Also, it seems to create "ghost" entires for me, without names. TO delete them I had to go into the keypad driver and specify the "Code #" to delete them...

UPSHOT: Do not click that "Done" button!

1 Like

Yes, while true, this "feature" is completly documented in this apps online help docs...
In any event, done has been renamed to cancel where appropriate in the 2.0.7 platform update, due out soon(ish)...

1 Like

And sadly, I read that same documentation, and STILL clicked "Done" at LEAST four times before realizing I was killing the process. I vote for "diabolical".....because "Done" buttons MUST be pressed.

1 Like