The Noob's (in)complete guide to CSS for Hubitat

Found it! For everyone who is trying this, here's the CSS:


div.md\:w-1\/2:nth-child(2) > div:nth-child(1),
div.md\:w-1\/2:nth-child(4) > div:nth-child(1),
div.md\:w-1\/2:nth-child(5) > div:nth-child(1),
div.md\:w-1\/2:nth-child(7) > div:nth-child(1),
div.md\:w-1\/2:nth-child(8) > div:nth-child(1),
div.md\:w-1\/2:nth-child(9)  {
   display:none
}

Here's the result, now I need to figure out how to align the boxes.

Boom!


/*--------------------------------------Modify HSM Pop-Up---------------------------------------*/
/* Remove Extra Options from HSM Pop-Up Menu Child(2) is Arm Nights, Child(4) is Arm All Rules, Child(5) is Disarm All Rules, Child(7) is Arm All, Child(8) is Cancel All Alerts */
.flex-row div.md\:w-1\/2:nth-child(2) > div:nth-child(1),
.flex-row div.md\:w-1\/2:nth-child(4) > div:nth-child(1),
.flex-row div.md\:w-1\/2:nth-child(5),
.flex-row div.md\:w-1\/2:nth-child(7),
.flex-row div.md\:w-1\/2:nth-child(8)  > div:nth-child(1),
.flex-row div.md\:w-1\/2:nth-child(9) {
    display: none;
    font-family: Trebuchet MS;
    width: 100%;
}

/* Adjust pop-up window size */
.popup-content {
    width: 40%;
}

/* Adjust button size */
.flex-row div.md\:w-1\/2:nth-child(1),
.flex-row div.md\:w-1\/2:nth-child(3),
.flex-row div.md\:w-1\/2:nth-child(6) {
   width: 100%;
   font-family: Trebuchet MS;
   font-weight: bold;
}

/* Remove Events and Alerts */

div.text-lg > div.w-full.flex.p-2:nth-child(2) {
  display: none; /* or visibility: hidden; */
}

Inspired by @william2's post. Here are two updated templates for Light Switches and Smart Bulbs.

I wish I could figure out how to make the dimmer into a half-doughnut but honestly it's probably not worth the hassle.

ON:
image

OFF:
image

3 Likes

Both the Garage Door and Pool Gate tiles are templates Garage and Door Status. Both are sensors.


On the top left of tiles show 100% which is battery level.

But CSS shows it is temperature? should battery? HE bug?

@Haven @william2 can you please link me the post that shows how to get light icons like that. That looks awesome!

Would love to do it to all my switches and dimmers.

Here you go.

just a short scroll down :upside_down_face:

1 Like

not sure if im blind. but im looking for these light templates

They could be a bulb or a dimmer, can't remember the exact names.

i like how the transparent icon has a yellow outline glow when its on.

1 Like

You can see how to make the outline glow when the light is on by looking at the CSS for the switch.

1 Like

I came here looking for css to resize an image of an image tile or an image in an attribute tile, but I could not find anything. Since I figured it out, I thought I would share it here.

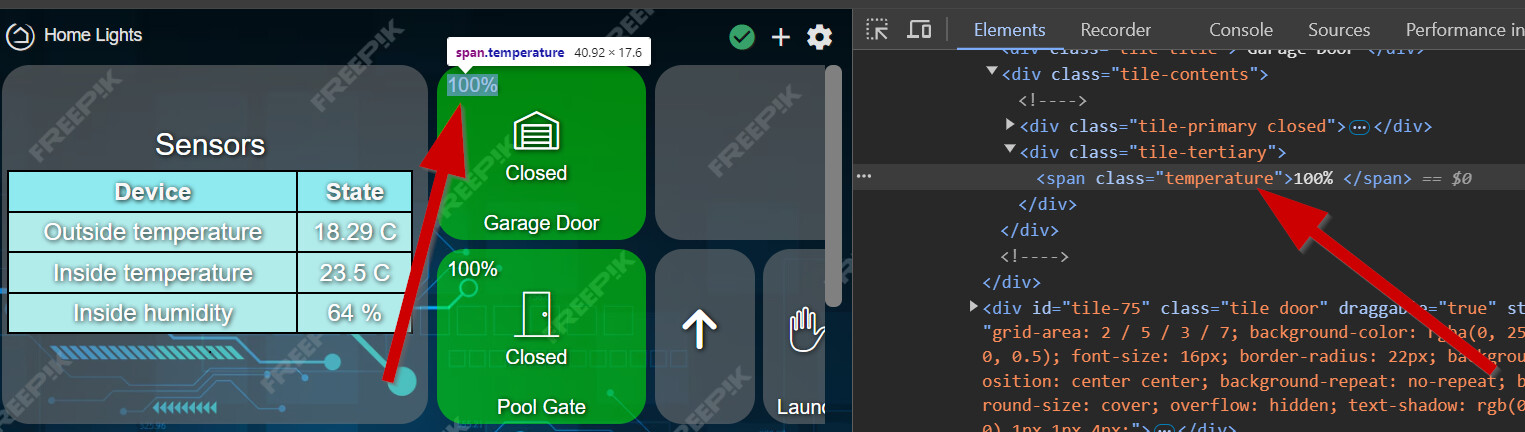
I am playing around with using image tiles and attribute tiles as changeable dashboard backgrounds, so I wanted to change image position and size, and make the background go away, and put it behind the other tiles. Here is what I am using:

Image Tiles:

This puts the image tile behind all others, and gets rid of the tile background that can show through the edges:

/* Make Image tile with background transparent and behind others */
#tile-114 {
z-index: -10 !important;
text-shadow:none;
background-color:transparent !important;
border:none;
}

I use this to change the image location and size (note that I am only using left position, width and height, but you can add right, top and bottom offsets if needed):

#tile-114.tile.image {
left: -10px !important;
width: 1320px !important;
height: 735px !important;
}

Attribute Tiles:

Same idea, I use the same as above to make it background transparent and behind other tiles.

For the resize, the css is just a bit different for attribute tiles:

/* Image Resize Attribute */
#tile-32 .tile-primary .image {
left: -10px !important;
width: 1300px !important;
height: 650px !important;
}

And I use this to hide the title on the attribute tile:

#tile-32 .tile-title {
visibility: hidden;
white-space: nowrap !important;
overflow: unset;
}

This based on me making dynamic 3D dashboards that change with the lighting scene, and time of day. I detailed it all in this post if anyone is interested:

3D Dynamic Dashboards

1 Like

Here's one I haven't been able to figure out: is there any way to make the background color of a tile linked to an RGBW bulb match the current color of the bulb itself? IE, if the bulb's currently yellow, the tile background would be yellow, and would change when the bulb color changed. Thanks!

Hi - just developing my first dashboard and already got some great tips from here.

I have a tile that reads a variable from an attribute of a device (it is a time e.g. 17:30:00). When another tile (a virtual button) is pressed, this gets updated. Is it possible to make the dashboard tile change colour for a few seconds when it receives the update?

Thanks

To change the color of the TILE based on the individual device's state, you can use the :has pseudo class:

#tile-5:has(.tile-primary.off) {
    background-color: rgba(255,0,0,.5) !important;
}

#tile-5:has(.tile-primary.on) {
    background-color: rgba(0,0,255,.5) !important;
}

Note that the way Dashboard (legacy) renders the HTML DOM at the moment the only location within the tile regarding the device state is for the class tile-primary. Dashboard's logic then adds the device state as a class to this element.

With the MDN pseudo class has you can determine if the parent tile for your device has the child element contained within and then change your parent tile's background accordingly.

This differs in using the JSON customColors attribute where the state background color applies to all devices using a specific template, not individual devices.

2 Likes

I'm trying to do a transparent overlay. I can't get the css to work.

Nothing happens if I do this:
image

What am I missing?

this works:

image

Had to add "!important" after each line

Hey everybody, I just stumbled back into this topic and found the animations... I for the life of me can't get them to work

Here's my CSS what am I doing wrong? or did something change so this no longer works?

Edit: Figured it out I'll leave this here so if anyone else stumbles across this they aren't using the .on any longer to get this to work I had to do 3 lines for each fan .low .medium .high (which worked out better cause you can change the timing

Here is what I did

/ Spin animation keyframes Use a "-"below if you want to make it spin the directions of the arrows/
@keyframes hubitat-spin {
from { transform: rotate(0deg); }
to { transform: rotate(-360deg); }
//
/* Apply to the tile image (by speed) /
#tile-0 .low { transform-origin: 50% 50%; /
spin around the center / animation: hubitat-spin 10s linear infinite; / 10 seconds per rotation /}
#tile-0 .medium{ transform-origin: 50% 50%; /
spin around the center / animation: hubitat-spin 5s linear infinite; / 5 seconds per rotation /}
#tile-0 .high{ transform-origin: 50% 50%; /
spin around the center / animation: hubitat-spin 2s linear infinite; / 2 seconds per rotation */}

1 Like