Indeed it does! I have it set up on the Uni device page. Now trying to figure out how to get this driver to see it.
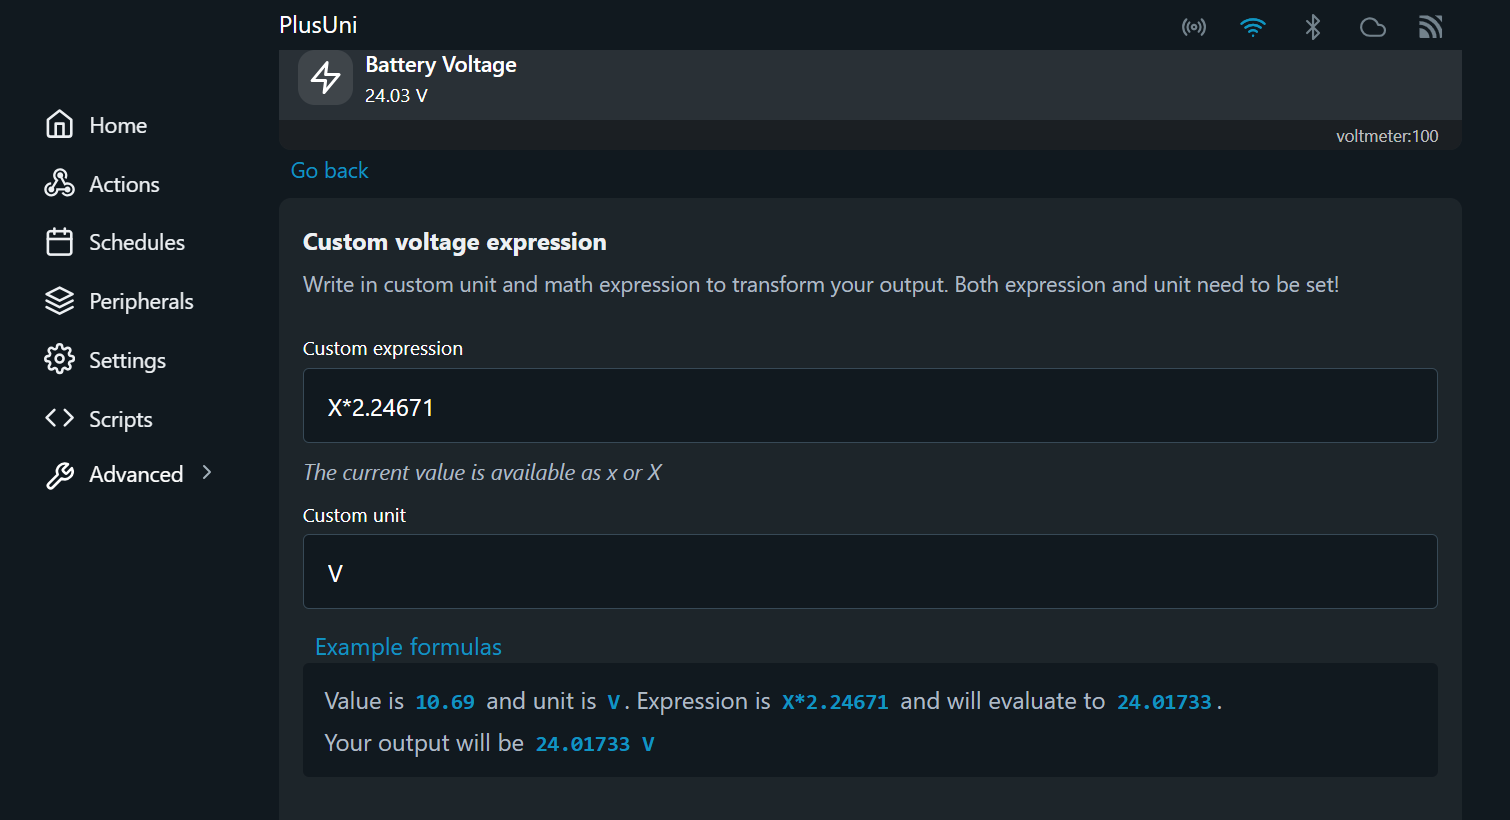
Using a formula on the Shelly device page to get real voltage after using ADC in voltage divider:
Indeed it does! I have it set up on the Uni device page. Now trying to figure out how to get this driver to see it.
Using a formula on the Shelly device page to get real voltage after using ADC in voltage divider:
2 things:
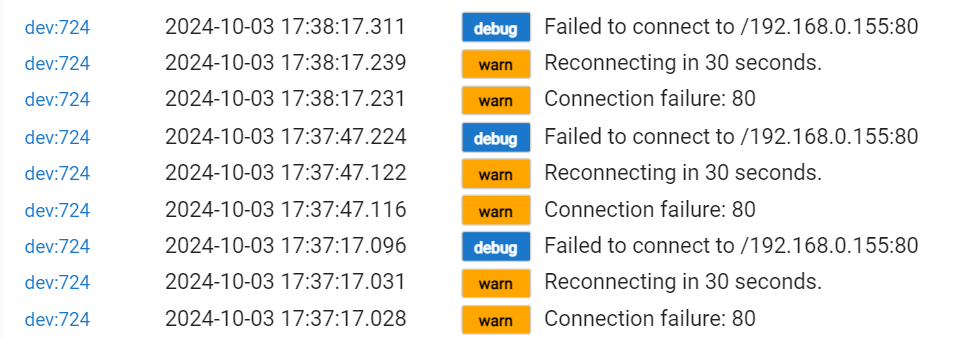
Lots of failures to connect. I was lucky and watched it and when it did connect for a brief moment I hit configure and it got the child devices. Don't know why it wont stay connected in the device handler. The web interface stays connected all the time with rssi -50.
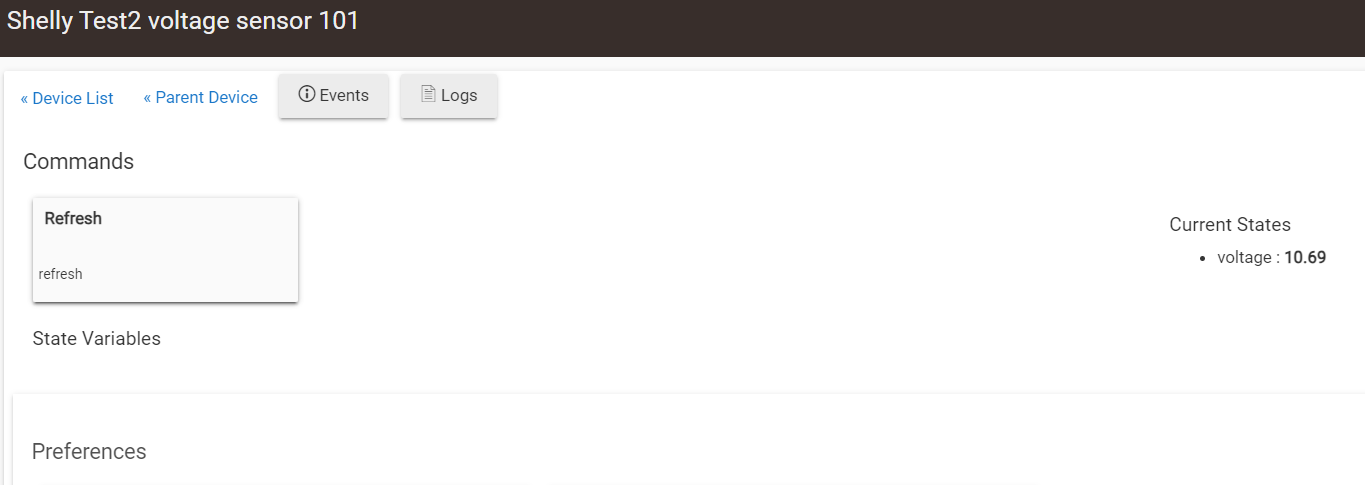
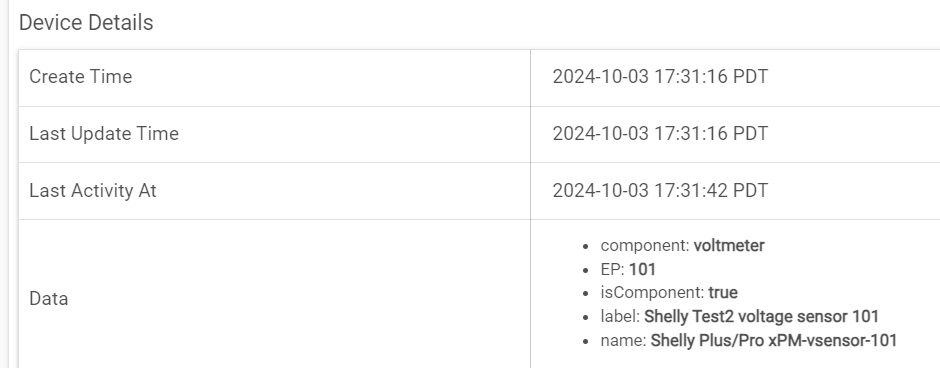
The voltage:101 device is not reporting the voltage using the web interface voltage formula. It reporting the raw voltage. Not the voltage I want in the above post.
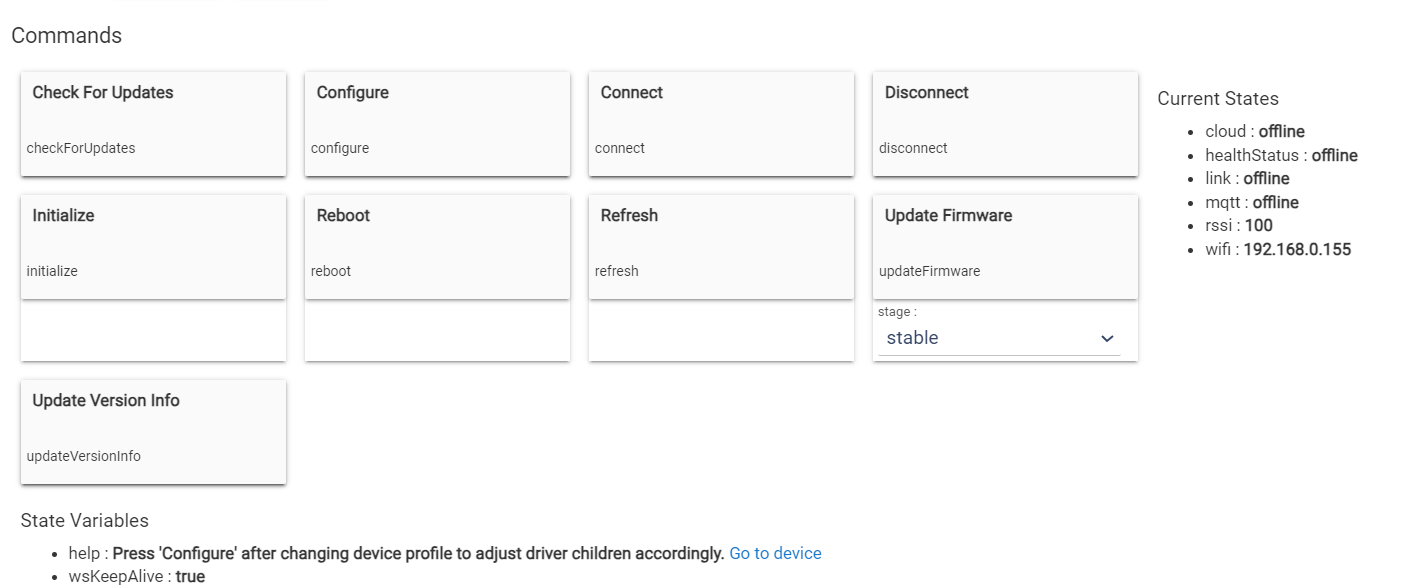
Does this mean anything? 100, not 101.
UPDATE: Got the WiFI connection thing sorted out, was using an IP address that was already assigned, what a dumb as$...
So now the issue still is getting the item #2 above sorted out to report the voltage from the web interface formula voltmere:100, not the raw voltage.
For the voltage sensor child device evaluated value were not available.
Now driver is updated and should get it. Just update the driver.
As for the voltage sensor driver using stock virtual device driver with only a single voltage attribute, the logic is next:
If evaluated value is reported -> attribute is set to the evaluated value
else if non-evaluated value is reported -> attribute is set to the raw value
The unit of evaluated value is ignored. Attribute is always updated as voltage in V (volts)
P.S.: Reconfiguration is not needed.
Confirmed, its now reading the correct voltage. Many thanks!
Does this driver require an MQTT server? I'm trying to avoid that. I also have a Shelly 1 Mini Gen 3 but am using the ShellyPlus Generic driver by Sebastian Yepes Fernandez (via Hubitat Package Manager). This doesn't require MQTT, but it also doesn't appear to display the current state of the switch, at least not on the Devices page. Does the Shelly-as-a-Switch driver display the current state of the switch?
None of these uses MQTT.
All drivers in this thread use either http or http+websocket
ShellyAsAswitch is for Gen1 devices mainly. It might work with Gen2+ devices if they do provide Gen1 http endpoints.
Gen2+ are:
Shelly Plus is using http polling to get switch info (latency depends on polling interval)
ShellyPlusPro-xPM is using websocket (nearly instant feedback but at the cost of heavier hub load; shellies are chatty)
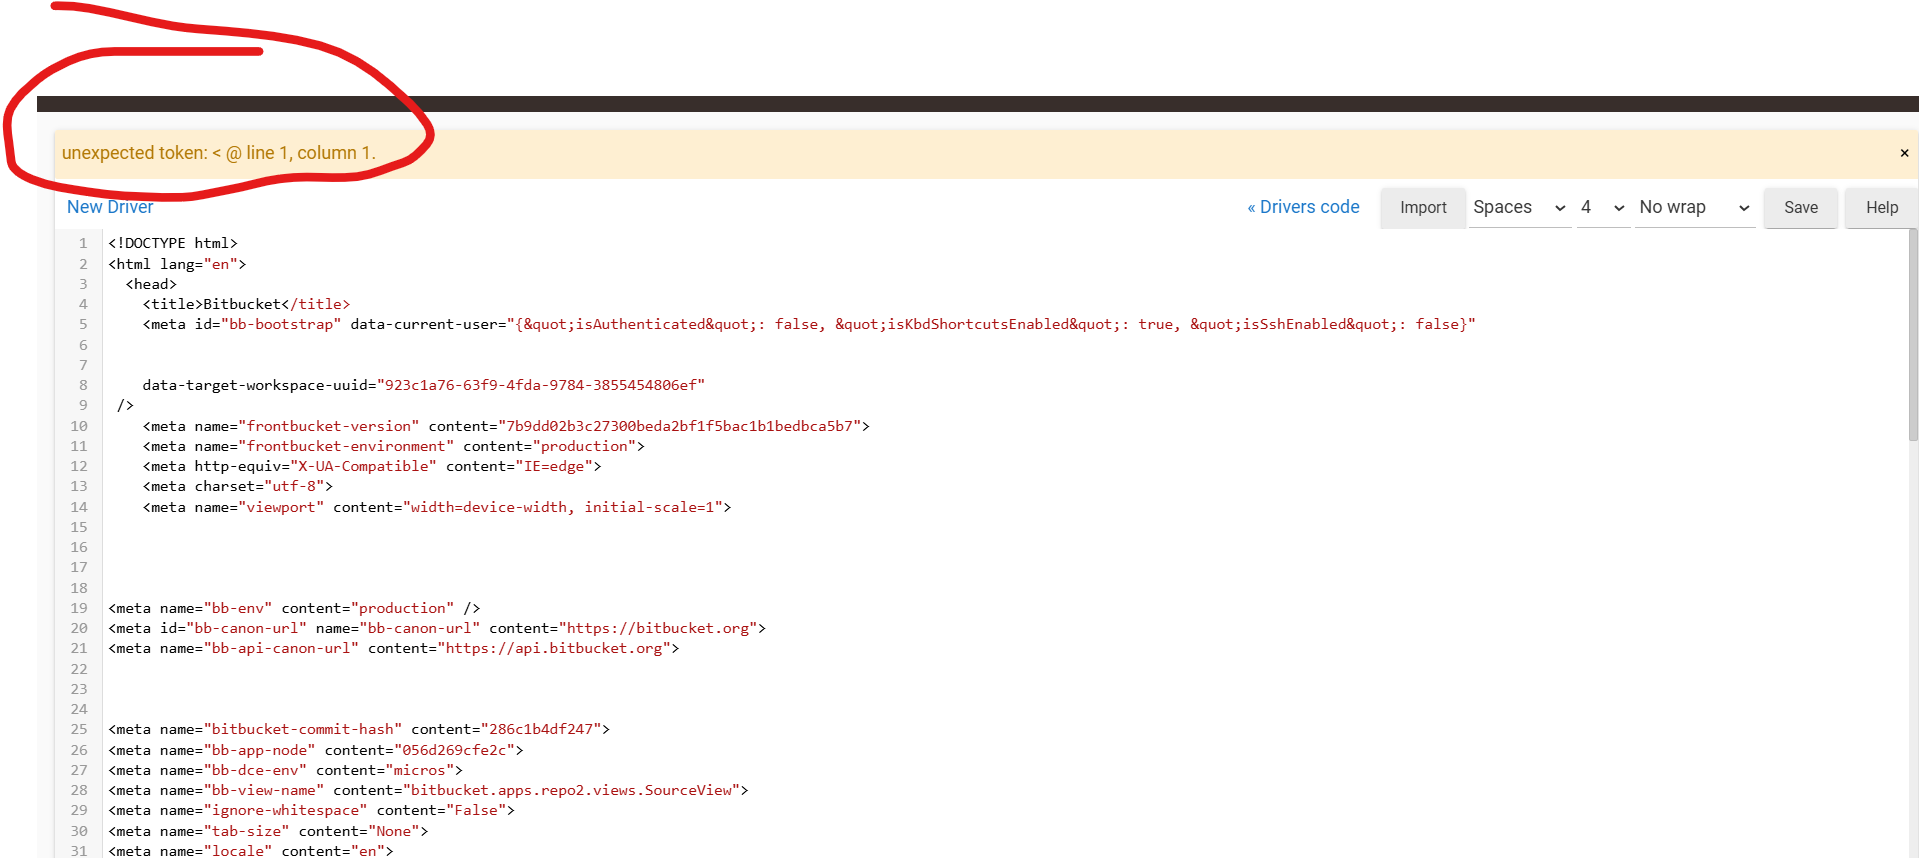
Hi, I'm trying to import the bundle in my Hubitat and I have this error:
Can you help me with that please ?
Thanks!
Hello Alex,
The imported text doesn't look like a groovy script source code of the driver.
My guess is that you tried to use a url from bitbucket page of the ZIP archive directly.
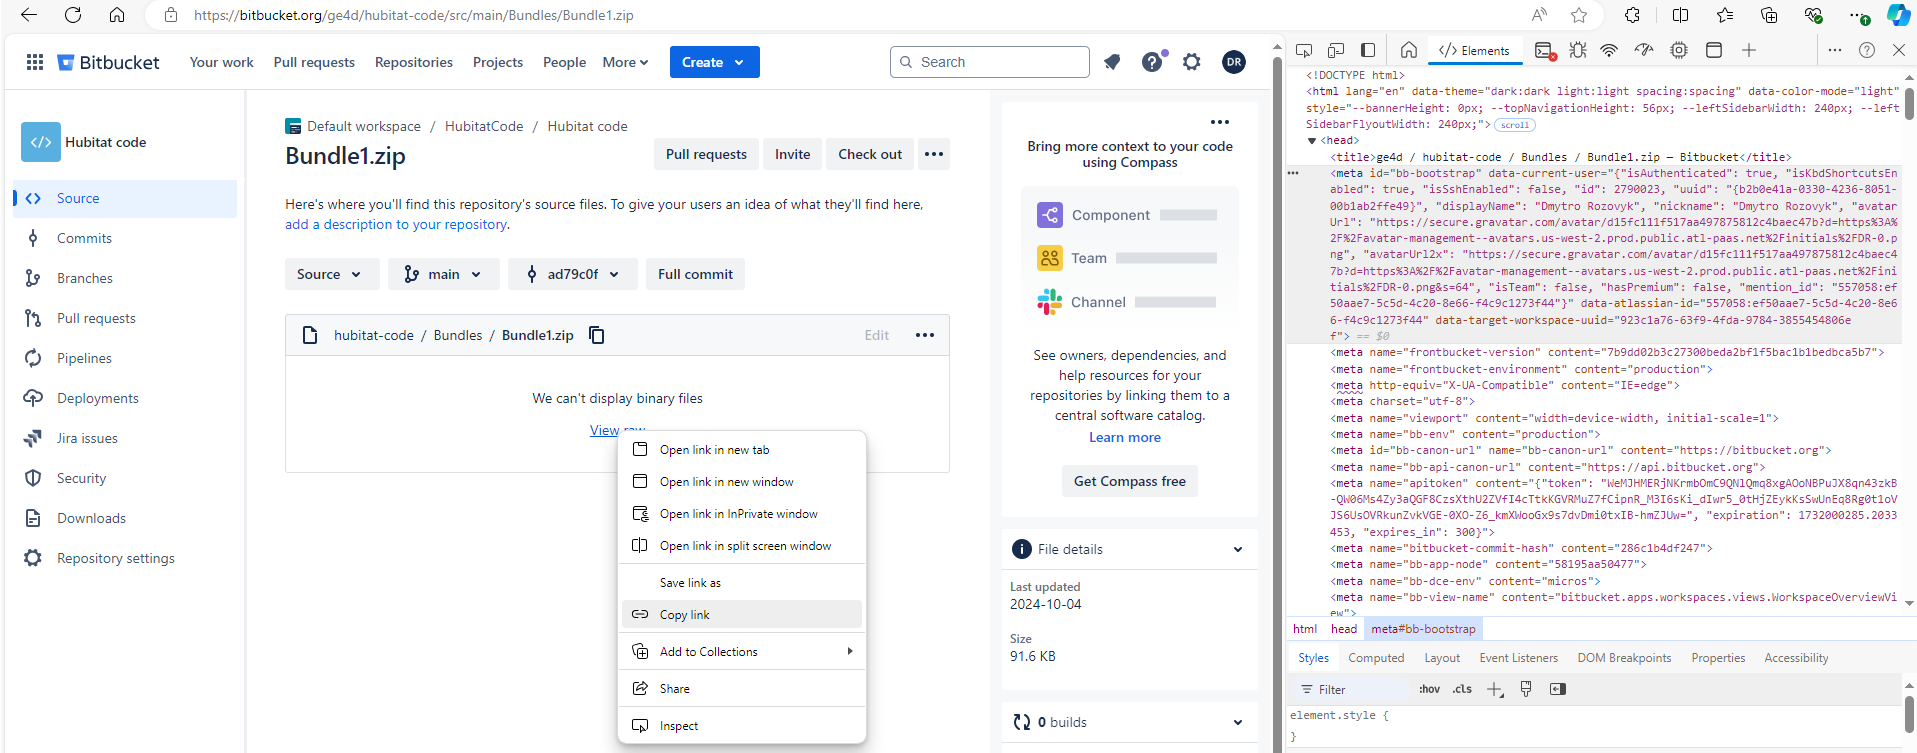
The bitbucket file browser web interface works in a way that by this url you get bitbucket page source code insted. There should be 'View raw' button (rather a hyperlink text) in the middle of the page. Right-click on it an select "copy link". That should be a direct link to the latest version of the bundle archive.
Thank you so much! My other problem was that I was trying to import the budle in the Driver Code thumbnail instead of the Bundle thumbnail...
So I've been able to correctly import the bundle. My problem know, is that I can't see the probe temperature in the Hubitat device commands... or elsewhere.
But let's begin from the start. I've bought a Shelly Wave 1PM, a Shelly Plus Add-On and a DS18B20 Temperature sensor kit Stainless Steel Probe. My goal is to be able to monitor the water temperature of my water boiler furnace. Am I on the right track? Do I have the right devices combination? Which "*Type" do I need to chose in order to see and use the probe temperature in Hubitat Apps.
I'm sorry, I'm not a programmer and I'm a pretty new Hubitat user.
I saw that you are from Ukraine. I can't imagine what it's like to be invaded like this by an aggressor who shoots at us without regard for human life... All my thoughts are with your people.
First of all thank you for your kind words)
As for your device case: I see one problem from your description - you have a ZWave device version (Shelly Wave 1PM). My driver is targeted at Wi-Fi version (Plus/Pro/Mini/Gen3 without Wave word in model name).
I'm not sure this thread has any references to ZWave version drivers.
An addon module shold be supported (on a Wi-Fi device). I made my driver to rely on a Shelly components. So in absolute most cases even newer Wi-Fi Gen2+ devices expected to work (with majority of their functions supported)
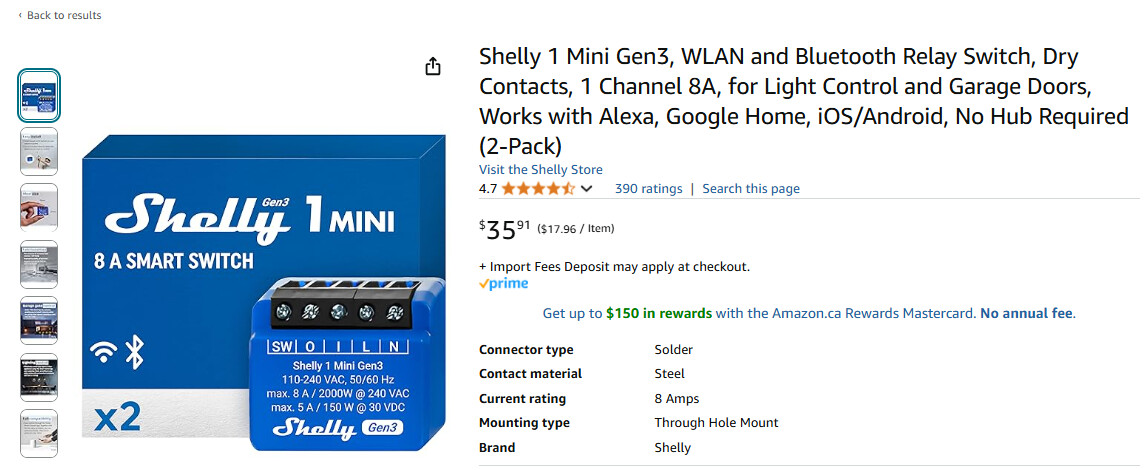
Ok thanks! Would you recommend this one ? Shelly 1 Mini Gen3, WLAN and Bluetooth Relay Switch, Dry Contacts, 1 Channel 8A, for Light Control and Garage Doors, Works with Alexa, Google Home, iOS/Android, No Hub Required
Or this one ?
thanks!
If you want to use Shelly Add-on, you need some Plus device. AFAIK minies have no connection/interface for add-on module.
If the goal is to only measure temperature, basically any Shelly Plus should do the job (1, 1PM, 2, 2PM, I4). If you want to also get the ability to control something then depending on number of embedded relays you need a corresponding single or dual channel model (with or without power monitoring).
Important note on controlling options - you need to take maximum load into account
Single channel versions have 16A limit while dual channel versions have 16A in total or 10A per channel whichever limit is hit first.
Thanks again for your time! I do not know yet how to connect a wifi device to Hubitat, since I've only connect Z-Wave and Zigbee devices, but I'm confident to find out when the new device ordered today will arrive.
You simply need to create a virtual device. Then replace driver to one of your choice, set IP and press 'Configure'. That's it.
And howe does the " decupelt mode " work
i cant make it act like a sensor and relay sepretly and since i have smart bulbs i cant just use it a standart relay
Hello,
Could you describe your issue in a little more detail?
What device do you have?
What steps did you made to try to make input and relay act separately?
Good evening again, I now have the time to try to adapt this to my use.
As I see it, what I need is for the child that is created to be created with Generic Component Metered Dimmer instead of Generic Component Metered Window Shade.
I have many rules created from when I used a shelly 2.5 as a blind and read the level value not the position value.
I think you should modify the main driver so that despite detecting it as a roller, it creates the child as a dimmer.
Could you help me with the necessary modification for this?
Greetings and thank you very much
I can guide you to modify it up to your need.
This code is responsible for roller child device creation (around line 344)
componentMap.cover?.each({
        Short coverIndex = it
        coverDevice = getCoverDevice(coverIndex)
        if(null == coverDevice) {
            coverDevice = addChildDevice("drozovyk", "Generic Component Metered Window Shade", getCoverDeviceNetworkId(coverIndex),  [isComponent: true, name: getCoverDeviceName(coverIndex), label: getCoverDeviceLabel(coverIndex)])
            coverDevice.updateDataValue("component", "cover")
            coverDevice.updateDataValue("EP", coverIndex as String)
            logInfo("Spawned child device for the cover ${coverIndex}")
        }

        validDeviceNetworksIDs << getCoverDeviceNetworkId(coverIndex)
    })
You can find a dimmer child device creation in the very same way near by
This line:
coverDevice.updateDataValue("component", "cover")
is responsible for the later code to choose what component command set to use when you alter child device. I suggest you to keep it like it is.
To make it work for a dimmer used over cover/shutter device you need to modify this function:
void componentSetLevel(cd, level, transitionTime = null) {
    // endPoint = '0' - self, '1..' - children
    Short endPoint = cd.getDataValue("EP") as Short
    if(null != endPoint) {
        logInfo("Received setLevel(${level}, ${transitionTime}) request from ${cd.displayName} (EP${endPoint})")
    // ToDo:
    //    transition_duration: transitionTime
    component = cd.getDataValue("component")
    if(null != component) {
        if(component == "light") {
            sendShellyCommandHTTP(CmdLightSet(), [id:endPoint - 1, brightness: level])
        }
        else if(component == "rgb") {
            sendShellyCommandHTTP(CmdRGBSet(), [id:endPoint - 1, brightness: level])
        }
        else if(component == "rgbw") {
            sendShellyCommandHTTP(CmdRGBWSet(), [id:endPoint - 1, brightness: level])
        }
    }
}
Here you need to add corresponding command call from this function
void componentSetPosition(cd, pos) {
// endPoint = '0' - self, '1..' - children
Short endPoint = cd.getDataValue("EP") as Short
if(null != endPoint) {
    logInfo("Received 'setPosition(${pos})' request from ${cd.displayName} (EP${endPoint}); will fail if device is not calibrated")
    sendShellyCommandHTTP(CmdCoverGoToPosition(), [id:endPoint - 1, pos: pos])
}
These functions are callbacks from child devices when buttons are pressed or commands are triggered. Some other dimmer related calbacks might also need to be extended with sending 'cover' commands
To make dimmer level attribute show correct value from your device you need to check this function:
private void parseShellyCoverStatus(params, endPointDevice)
The name is self explanatory. It's responsible for parsing shelly cover component reply and forwarding data to child device attributes. You need to change it so send 'level' attribute instead of 'position' attribute.
Amazing work on this driver package. Thank you for providing it for all to use!
I have a Shelly Plus 2PM with Add-on, and am trying to get the temperature from a NTC 10k thermistor. It is setup as a voltmeter and the child device creates & updates with the voltage perfectly. I set it up to create 1 virtual temperature sensor, but it's value is always 68. Is it supposed to be tied to voltmeter output?
Download the Hubitat app