@Navat604 And if not, even though I'm sure @josh would want to add the capability, couldn't you just simply add a virtual button and RM trigger to refresh Life360, then add the virtual button to SharpTools?
1 Like
Unfortunately it's not showing up under Actuator or sensor either.
@SmartHomePrimer, yeah, that's my alternative for sure. I am just trying to avoid more virtual device. I am hitting 250+ physical devices and probably 30 virtual devices already. It's getting crowded. Thanks for your suggestion for sure.
LOL. I have 63 virtual devices. What's one more! 
Seriously though, if management is getting unwieldy, @stephack has some code that organizes them. Sorry can't recall the name right now.
It's called a Virtual Container. I was planning on sharing this simplified version soon but since you mentioned it here I went ahead and posted to github.
https://github.com/stephack/Hubitat/blob/master/devicetypes/stephack/Virtual%20Container
Pretty simple driver. I use it to group similar virtual devices together and also use it in one of my Sonos apps where each virtual device is a separate playlist that I can cycle through.
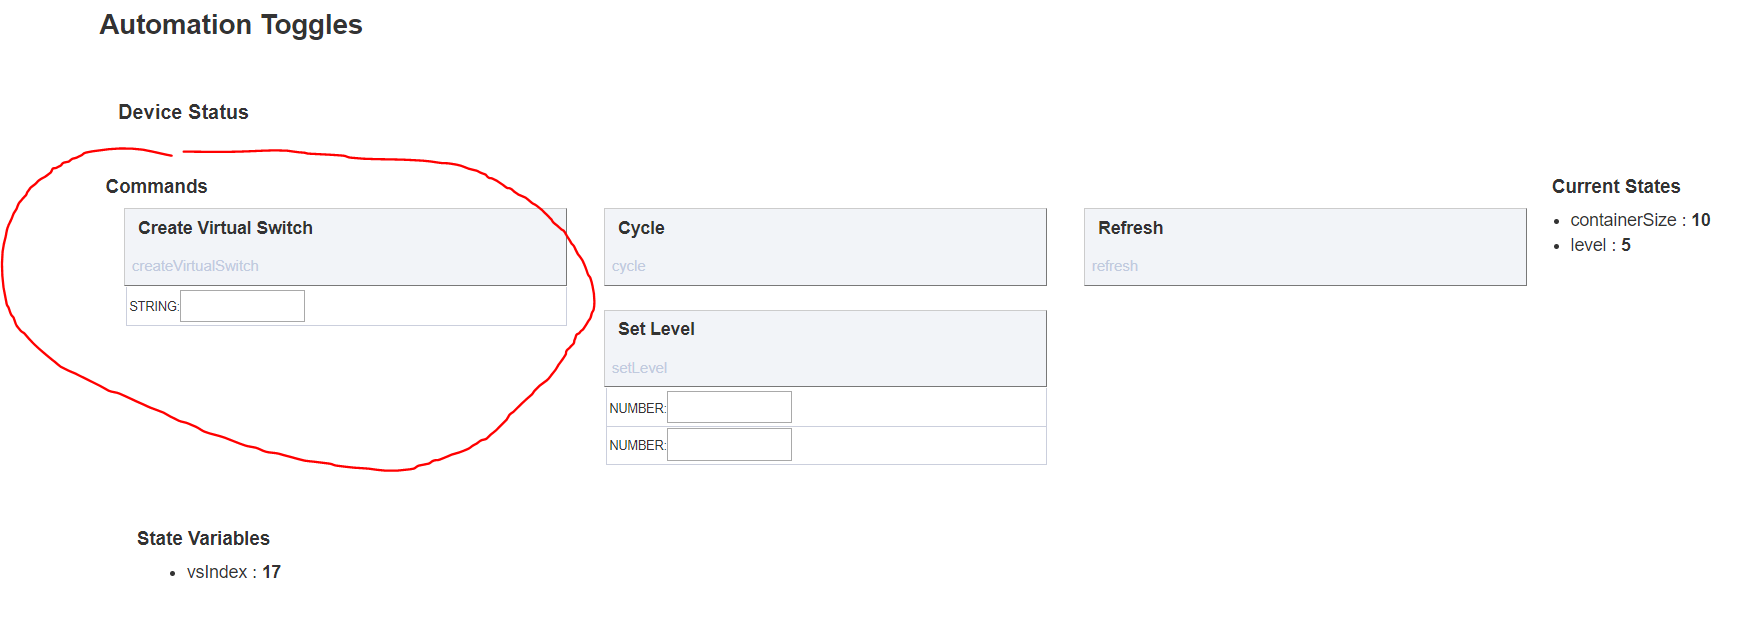
- Create a new virtual container device. I name it based on what makes the child devices similar. For instance, I have a container that holds a few of my enable/disable buttons called "Automation Toggles".

-
Add virtual child device by clicking the Create Virtual Device button and name it appropriately using the input box below the button.
-
The cycle button simply cycles through each device 1 by 1 and turns it on. It can be used as a custom command in RM if needed. All child devices in a container are sorted by label by default.
-
The Virtual Switch driver for each of the child devices is just the Hubitat built in Virtual Switch driver. So if you need one of them to be a momentary switch, just open that child device and set the Auto Off accordingly.
I will create a separate post for this eventually to share with the community. Hopefully someone finds it useful.
3 Likes
Thanks Stephan. Didn't mean to force you to do anything ahead of planned schedule 
1 Like
Lol...just another of the 20 incomplete things I'm working on and adapting to Hubitat. I keep getting distracted by hub updates, Lowes sales  and RL. Hard for this scatterbrained to focus on one thing at a time.
3 Likes
Ha! I think it's the nature of tinkerers. We all have that to-do pile. 
1 Like
Today's SharpTools.io platform update includes a bunch of awesome new features including new tile security options, additional dashboard customizations, thermostat colors, and several updates around fullscreen/kiosk mode. Check out the following post for more details:
Today's release includes a new View (Kiosk Mode) option in the ... menu of each item in the dashboard list which hides the top navigation and bottom-right menu button. You can also append ?kiosk=true to a dashboard URL if you already have a dashboard URL saved or bookmarked somewhere.
(Similarly, if you open a dashboard in kiosk mode, the kiosk parameter is added to the URL so you can add it to your homescreen or bookmark it with kiosk mode in tact)
When [ ] fullscreen is tapped on an iOS device, you'll now be put in kiosk mode (as described above) and a dialog will pop up describing Add to Homescreen. The login screen on an iOS device in Add to Homescreen mode will also gray out the Google Login and provides a link explaining how to link a password or phone login to your account.
In addition to the new 'Keep Screen On while in Fullscreen Mode' setting coming to Fully Kiosk 1.27, you can also use the new View (Kiosk Mode) option noted above. Also, if you have the Fully Kiosk JavaScript API enabled or Fully 1.27 or newer, when you tap the [ ] fullscreen button, you'll be presented with the option to use Kiosk Mode instead of the browser's native fullscreen.
When you use the new kiosk mode or put a device into fullscreen, the ... floating action button in the bottom right will also disappear. ![]()
There are a bunch of new options around tile security in today's release, including PIN protection. All tiles on a dashboard can be marked as view only or PIN protected... and individual tiles can be marked as Control, View Only, Confirmation Prompt, or PIN protected.
5 Likes
Many thanks to implement our suggestions, this update is awesome! 
I will update my dashboard and eliminate Smarttiles completely finally!!
2 Likes
Fantastic update @josh. I personally dont need the Pin option but love the fact I can set tiles as View only and Prompt to prevent accidental activation of certain devices. Tiles spacing and background color options were 2 things I didn't know I needed as well. Those small visual tweaks make big difference in how my boards look.
Keep up the good work.
1 Like
Awesome stuff, really liking the way sharptools lays everything out, still can't believe the hubitat dashboard doesn't have an option to adjust thermostats...
Hi All,
I have some motion sensors that report tempreature. I was displaying the tempreature in actiontiles and trying to recreate the same in sharptools, but these always show the motion attribute. Any ideas?
I'm seeing the same with my Iris motion sensors. With other devices I can choose a secondary attribute but not with these motion sensors. @daniel.john.edge what type of motion sensors do you have?
1 Like
Mix of hue (paired directly) and SmartThings sensors
Have you tried the Hero Attribute layout?
While you are editing the dashboard:
- Tap the
...menu on the tile and select Change Layout - Select Hero Attribute from the list
- Tap the
...menu on the tile and select Edit - Adjust the options accordingly selecting your desired Primary Attribute and optionally selecting a secondary attribute.
The secondary attribute list is empty in SharpTools for these devices or something else?
1 Like
I see where the problem was for me. When I tested I had one tile setup with the standard layout and the other with the Hero. When I opened the Tile Editor for each one I was presented with different options. It is working as designed...my mistake.
1 Like
Thanks for the update!
Any way to get the dashboards to scale with different size screens? I have set up a portrait dashboard for all the phones in the house and a landscape for the tablets, however when viewed with different sized tablets ie:7" in the master and then 9" in the kitchen the tiles all rearrange and nothing looks the way it should.
@tlrfreak, it's cool that you are also using the dashboards on your phones as well, but you may want to create different dashboards for the tablets in your master and kitchen. So you can customize them to fit the tablets screens better and with different tiles. I have large camera views (media tiles) on my main tablet mounted, so I can see from distance, but they are not on my "phone" dashboards.
As James mentioned, it's usually recommended to create a dashboard targeted to your desired device size.
Alternatively, you can use the zoom/scale function native to your browser (if it has one) to scale the view. For example, you might design the dashboard for your tablets to fit the 7" and then zoom in on the 10" to match the screen scale of the smaller device.
On Fully Kiosk Browser, this is available under Settings > Web Zoom and Scaling... uncheck 'Use Wide Viewport' and the 'Initial Scale' option should come available. I've found that it varies by device what the default scale would be - on my phone it was around 300 whereas on a 10" tablet it was closer to 175. You'll have to play with the scale to find the right value that zooms things in enough to match your 7" (or vice versa).
1 Like

