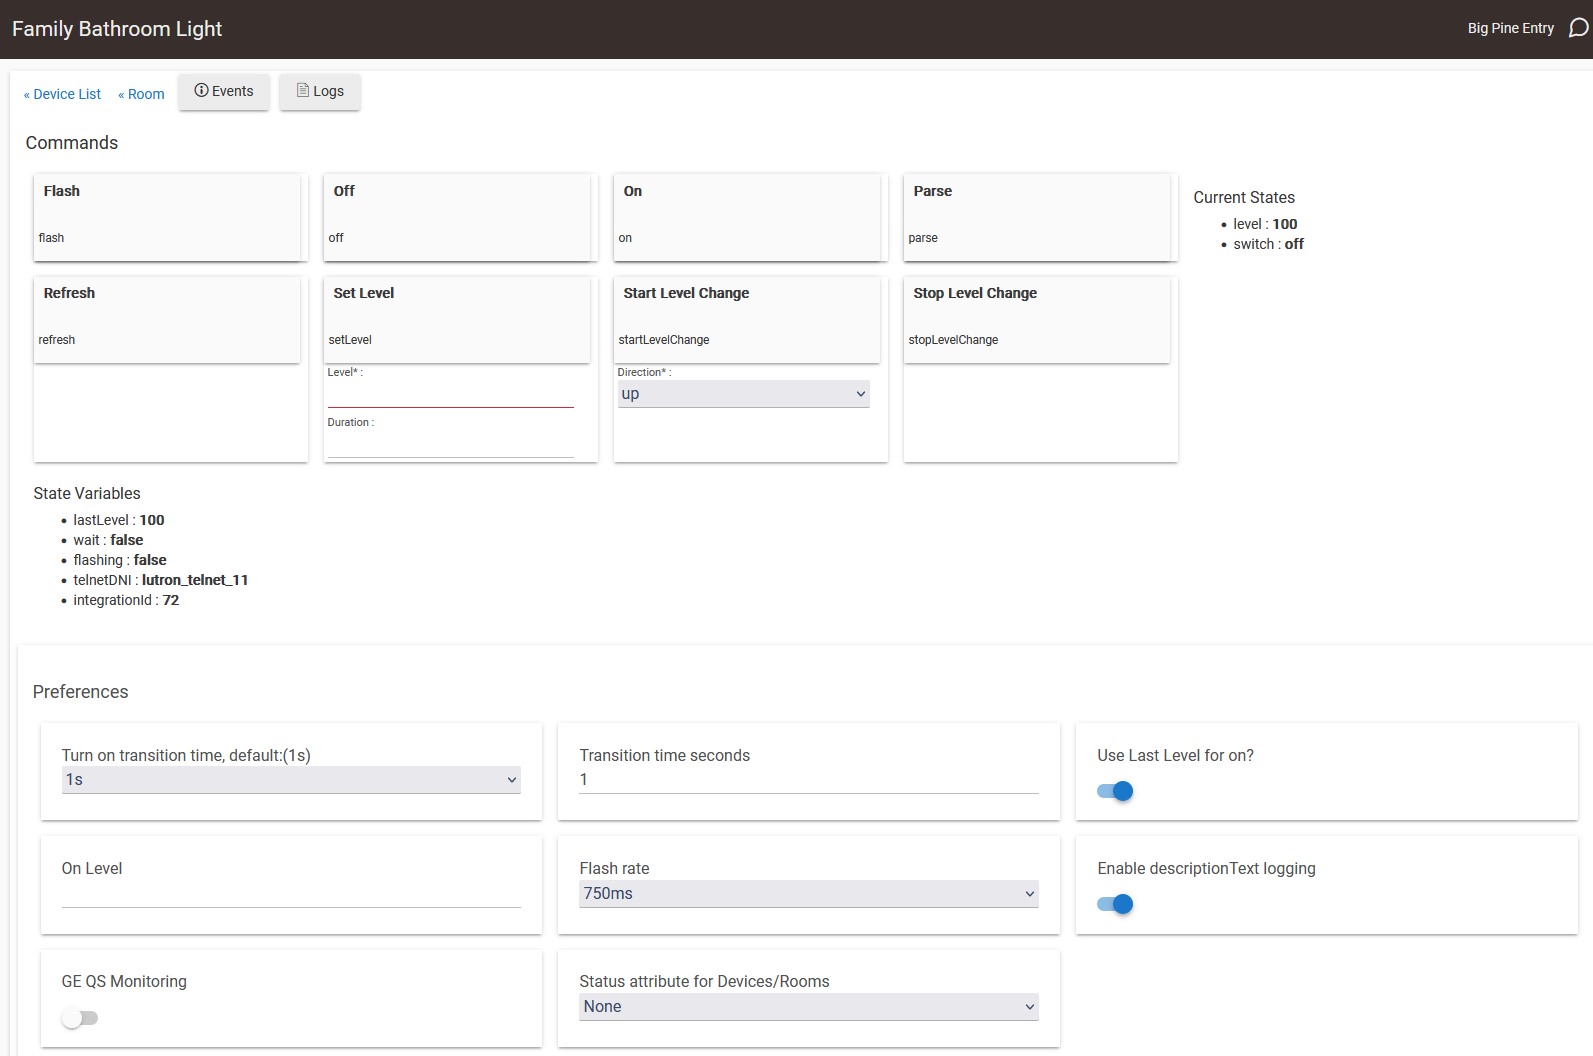
OK, that seems to work, but I have another small issue. I have a combination of Lutron Switch and Lutron Dimmer devices in my home. The dimmer has a level parameter, while the switch does not. I can't seem to figure out how to treat them differently in the same tile (e.g., switch on == 100%). Is that possible?
Just to clarify.
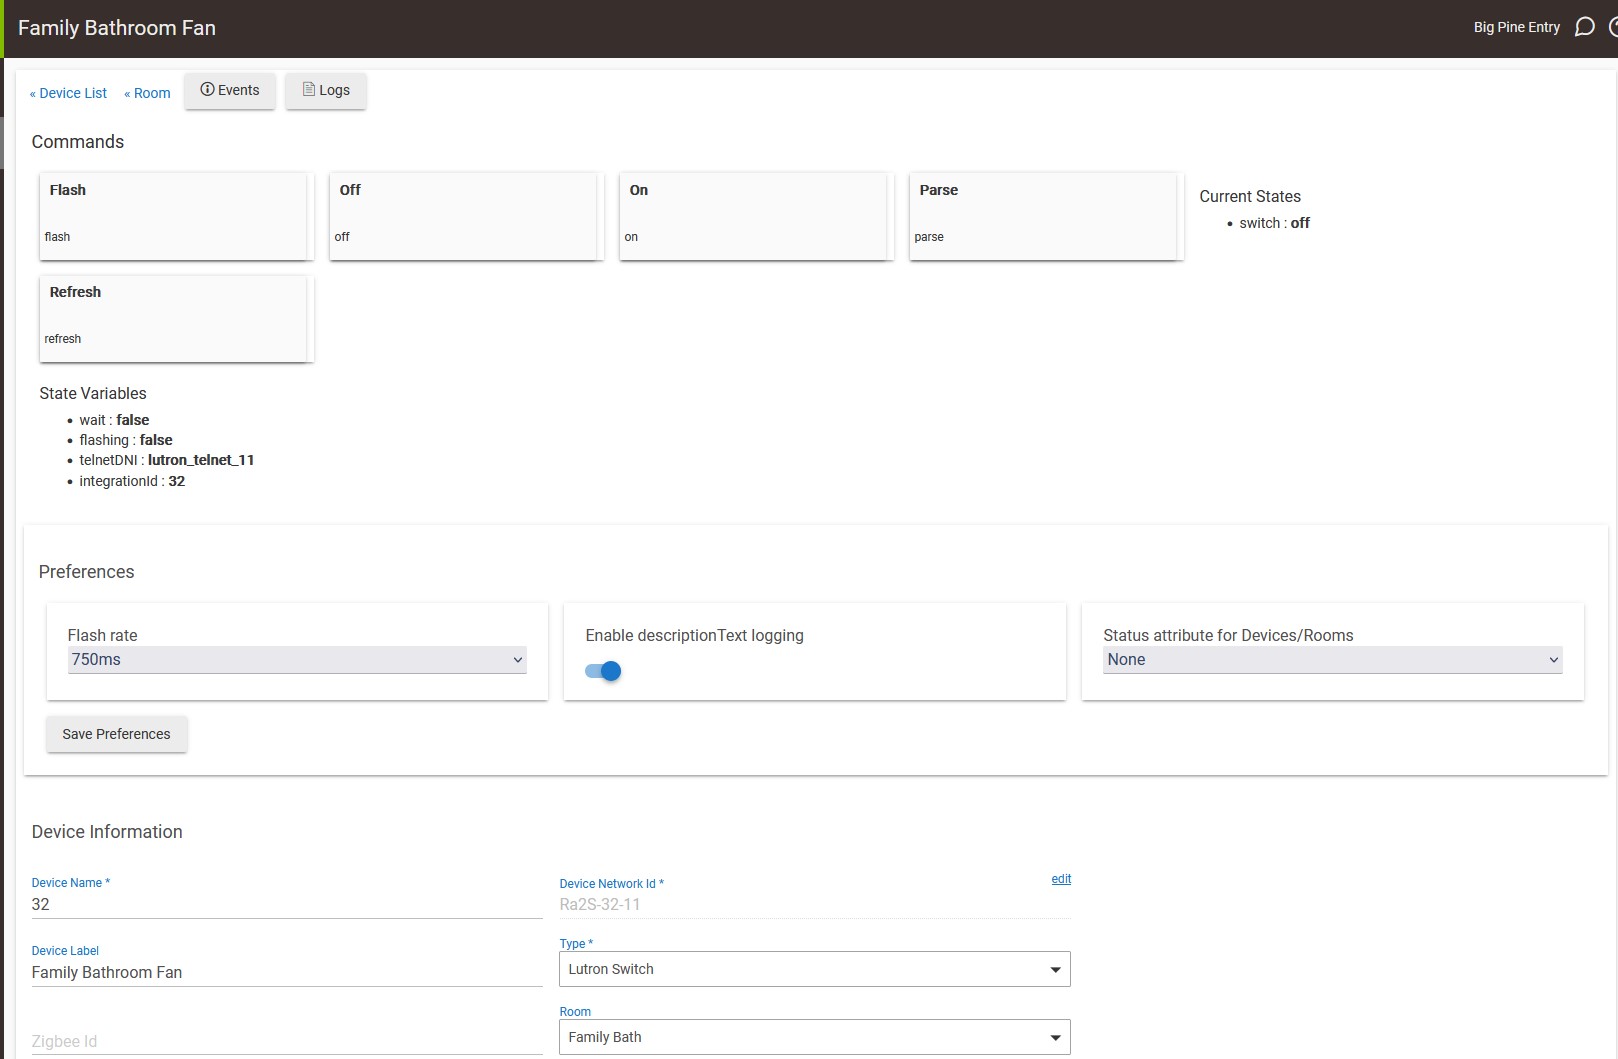
Lutron switch has only switch attribute?
Lutron Dimmer has switch and level attributes?
Hi @garyjmilne, so far TB has been awesome, thanks for the great work.
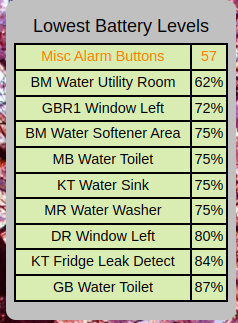
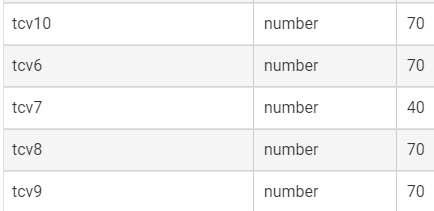
I noticed a small issue with the attribute monitor. I'm monitoring batteries and I have the suffix set as %. I also have 2 thresholds setup to make <= 60 to be orange, and <=40 to be red. That all works however the % doesn't show up on any of the values under the threshold. I didn't see any place to add it. Did I miss a config somewhere or is it a little bug?
That is what I thought. Sorry, Tile Builder can only evaluate a simple numeric or text comparison. What you are looking for would be a compound comparison of two variables to generate an outcome. It is something I'll give some thought to for a future release.
It's not a bug as it is actually by design. Consider a similar situation where you decided to use the word Low for all batteries under 50%. You would not want it to appear as Low%.
So the solution is that when you specify your replacement value of %value% in the highlights section, you simply specify it as %value%%.
Does that make sense.
OK, thanks... I realize that adding this would be a fairly tall order, and it's not a show-stopper for me (still find these tiles useful).
Was wondering, though, can you sense the difference between "level" being nil (in the case it isn't defined) vs being set to 0? If so, maybe there is something there that can be exploited.
Ah, gotcha, I get it, thanks for clarifying; I'll give that a try.
EDIT - That 'worked' with one nuance, if I put %value%% (which makes sense, 'value' + %) I get a double % (i.e. 55%%), If I just put %value% it works fine.
If an attribute is null, such as when you query the switch for the level attribute then it will display the selected Invalid Attribute String.
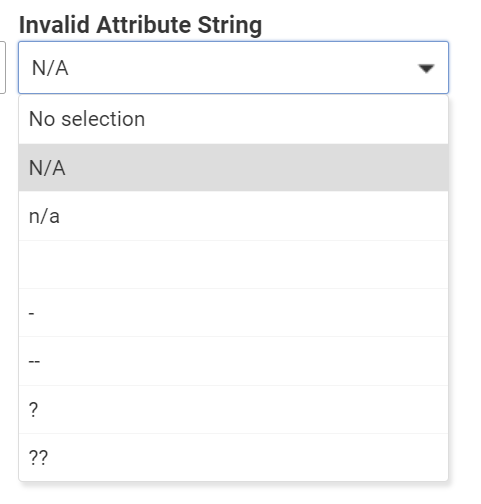
If it is 0 then that is what will be displayed.
I'm glad that is working. Perhaps I was thinking of the Grid module as that is where I have spent most of my time recently.
I updated and it did fix the issue!
I've broken it again though. ![]() Currently running 1.5.0
Currently running 1.5.0


I have debug turned on in the app, but its not showing the entries like I'd expect:
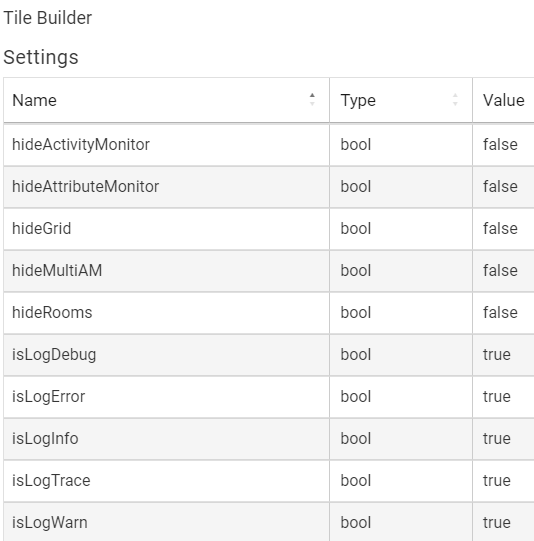
I do see entries from other apps in the logs though:

Any thoughts?
If posting all the details isn't helpful, let me know. I have a SW developer background and am trying to provide useful info.
@garyjmilne
thanks for this great app. I'm trying to understand the limitations.
If I get it correctly, the free version has a 3 device per room limitation and the licensed version extends this to 10 devices per room. But I have rooms with more than 10 devices (12 bulbs , 2 spots , 2 switches some sensors and some custom devices, about 20 in the living room)
So , only choice is to represent my living room with 2 rooms ?
is that correct ?
any better method ?
also, I can't see any device profile to use with shades. Am I missing it ?
Those details are very helpful. Nothing jumps out at me so I will have to see if I can recreate it with the values that you provided. Should be an easy fix once I identify the problem. I think I'll have time to take a look tomorrow.
Each app has it's own debug entries in the more section. I think you are turning on the logs just for the parent but the actual error is occurring in the child.
That is correct on the limits for the number of devices per tile. I made the design decision that these tiles would all be less than 1,024 bytes and thus allow them to work natively within the Hubitat app without a VPN or any other crutches. That was why I enforced a tile size limit for rooms but only a warning for the other modules.
You are correct that splitting the rooms is one method, Living Room North and Living Room South gives you 20 items. But there are other solutions.
-
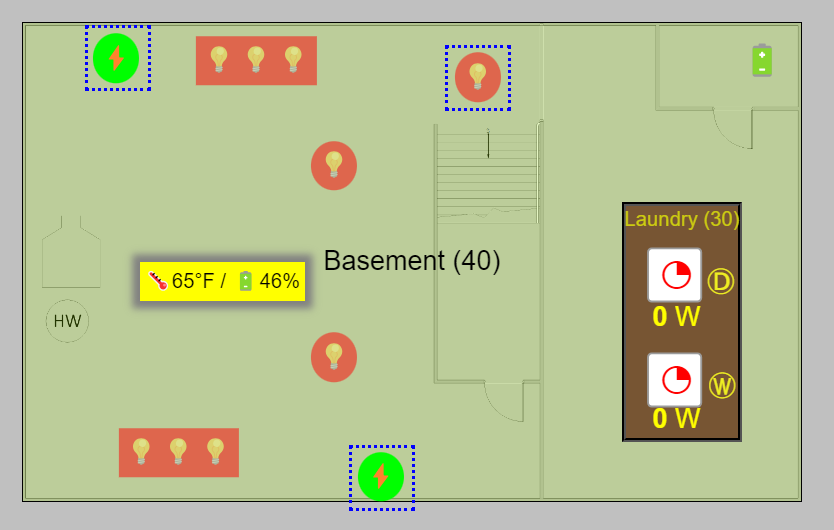
My basement had too many devices\data to place in a single room. So I did the basement and then added the washer\dryer as a separate room. The washer\dryer and read only so it's no big deal.
-
You could have two rooms the same size and put them on different layers. Place the read-only attributes into one room and publish it to layer -2 (z-index). Create the other room the same dimensions, make it transparent and publish it to a higher layer (z-index) and place it on top of the first room. Any clicks (blue boxes) will be intercepted by the highest layer and work as you would expect but you will still be able to see the effects on the lower layer.
-
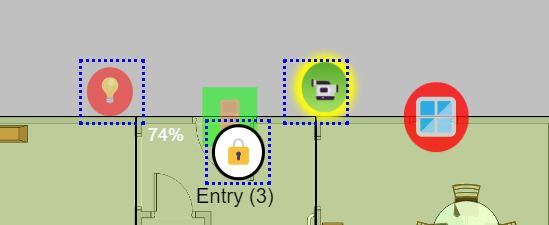
You can publish elements outside of the walls of the room by using values outside the range of 0% - 100% as shown in this example with the light and camera outside of the rooms they are published in.
Thus you could make items published in room A appear to be located in room B and get around the 10 device limit that way. But I'd recommend one of the other two methods in your case where you had maybe 20 devices.
Let me think about shades and get back to you. Can you think of an eMoji you would like to see added to represent an open shade and a closed shade?
I added a copy of the debug log statement and added the value of another variable to see if that was null.
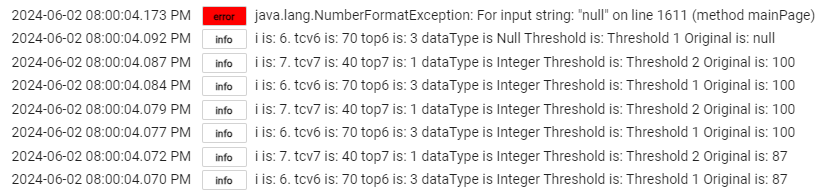
It died on the 15'th call to that function (e.g. There were 15 pairs of checks for Threshold1 /2). I think that's about the number of devices I had.
Thanks, looks like the value it is receiving is a null. I'll add some handling to fix it.
thanks. I am not a dashboard expert so forgive me if I don't understand it at one shot.
The methods 1 and 2 you wrote are basically same. On the first one the second room is just smaller and is placed within the first room. On the second on, both rooms are exactly same size and second one is on top of the other.
If I got this correct, my question is : how do we place one room on top of the other (or inside the other) Let's say I want to put the second room inside the first one as in your first example. How can I place it like that ?
And, most important; how do you make something other than "read only" ? For example, I have a simple room with 3 bulbs. They are configured with bulb profile , but I can't change their state. So I thought everything is "read only" in your app. But according to what you wrote, it is not like that. How can I make my bulbs "not read only" ?
"How do we place one room on top of the other?"
This is a fairly well known characteristic of the classic Dashboard. You simply use the three dot menu

to have the tiles occupy the same space. For non-Tile Builder tiles you have to edit the CSS to set the Z-order and transparency. Tile Builder gives you easy access to both of these properties.

Adding controls
Have a look at the Tile Builder Rooms Help which you can find here.
It is also linked at the bottom of the application.
Starting on page 37 you will find instructions of adding controls. In the screenshots I provided earlier and the one below, those objects with the blue dotted boxes around them are controls which I can activate by touching them. This uses the same tile overlapping method described earlier but in this case the controls are in front of the rooms so they receive any touch events.

Find this highlightValue function around line 1546.
Place this code in there:
    //Save a copy of the original value if it is non-null
    def originalValue
    if ( attributeValue == null || attributeValue == "" ) originalValue = "N/A"
    else originalValue = attributeValue.toString()
so that it looks like this and then save it.
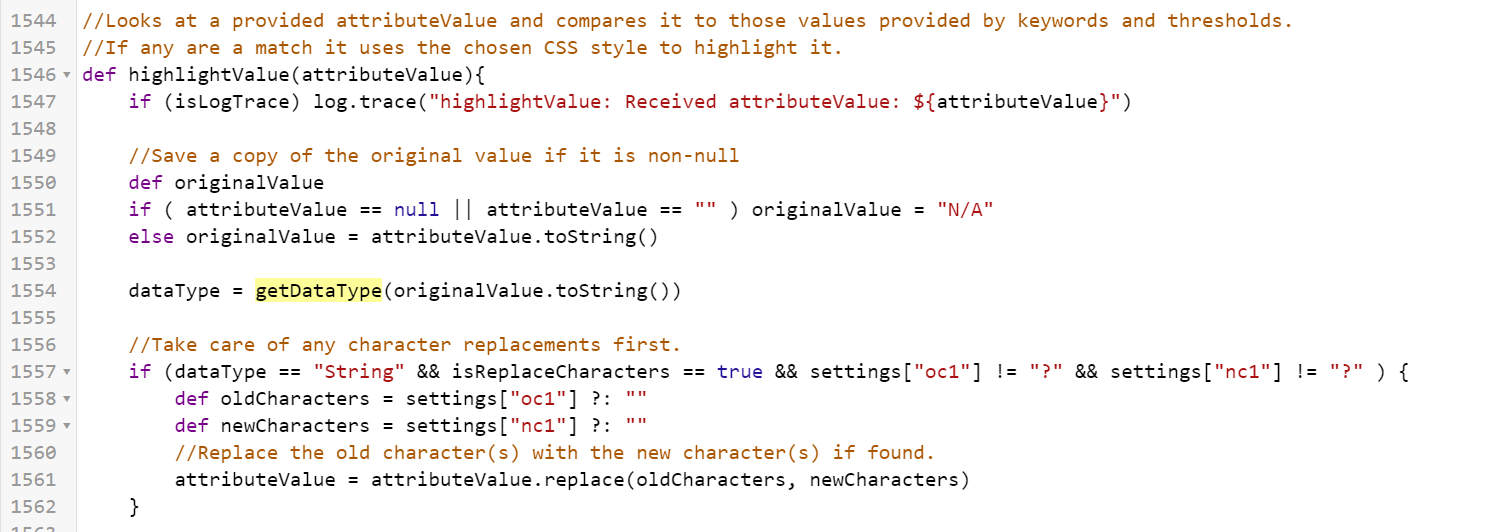
The problem arises when one of your devices has a null value for whichever piece of data is being requested. With this code, if it is a null value it should return the string "N/A".
Let me know how that goes and I can publish an update.
That fixes the issue. Thanks for the quick response!
1 Like

