Thanks for your fast response! You are right of course, updated my hub to the latest version and installed with no issue.
1 Like
FYI to everyone. I got back from my 5 week trip on the weekend. Just taking care of some household things but I’ll be working on any outstanding items by around the middle of the week. Thanks for your patience.
6 Likes
Rick, I found a bug in my testing when using Keywords. This will be fixed in the next release in about a week or so.
1 Like
I am moving everything over to TB from TM and there is one thing, a nice to have, that TM had.
I know I could probably do it with virtual switches and a bunch of mess but linking a cloud endpoint to a tile line was pretty useful in TM.
Touch the door lock line desired and voila, open or close the door from the tile. I used Bitly to keep the cloud URL it short.
Maybe this is already possible here and I just don't know it yet?
1 Like
You can embed links in any text field. This is discussed in the original Tile Builder AM docs. In this example a link was added to another dashboard, but it could be anything.

As @dnickel mentioned, using bitly to shorten the URL can save significant space which is important if you are trying to keep the tile below 1,024.
So this would work but I would have to have 3 separate one line tiles which defeats the purpose of your great app? The current TM tile where I have 3 lines in a single tile all have a different URL when touched.

I did not realise that you needed multiple links per tile.
I'm guessing that you are using Attribute Monitor as that is where most people start. But if I were approaching this problem I would use the Grid module. That lets you layout your table anyway you want it with maximum flexibility and is perfect for this type of situation where the rows of data are static and just the value changes. Here is a simple overview.
I only have one lock at the moment so I just repeated that.
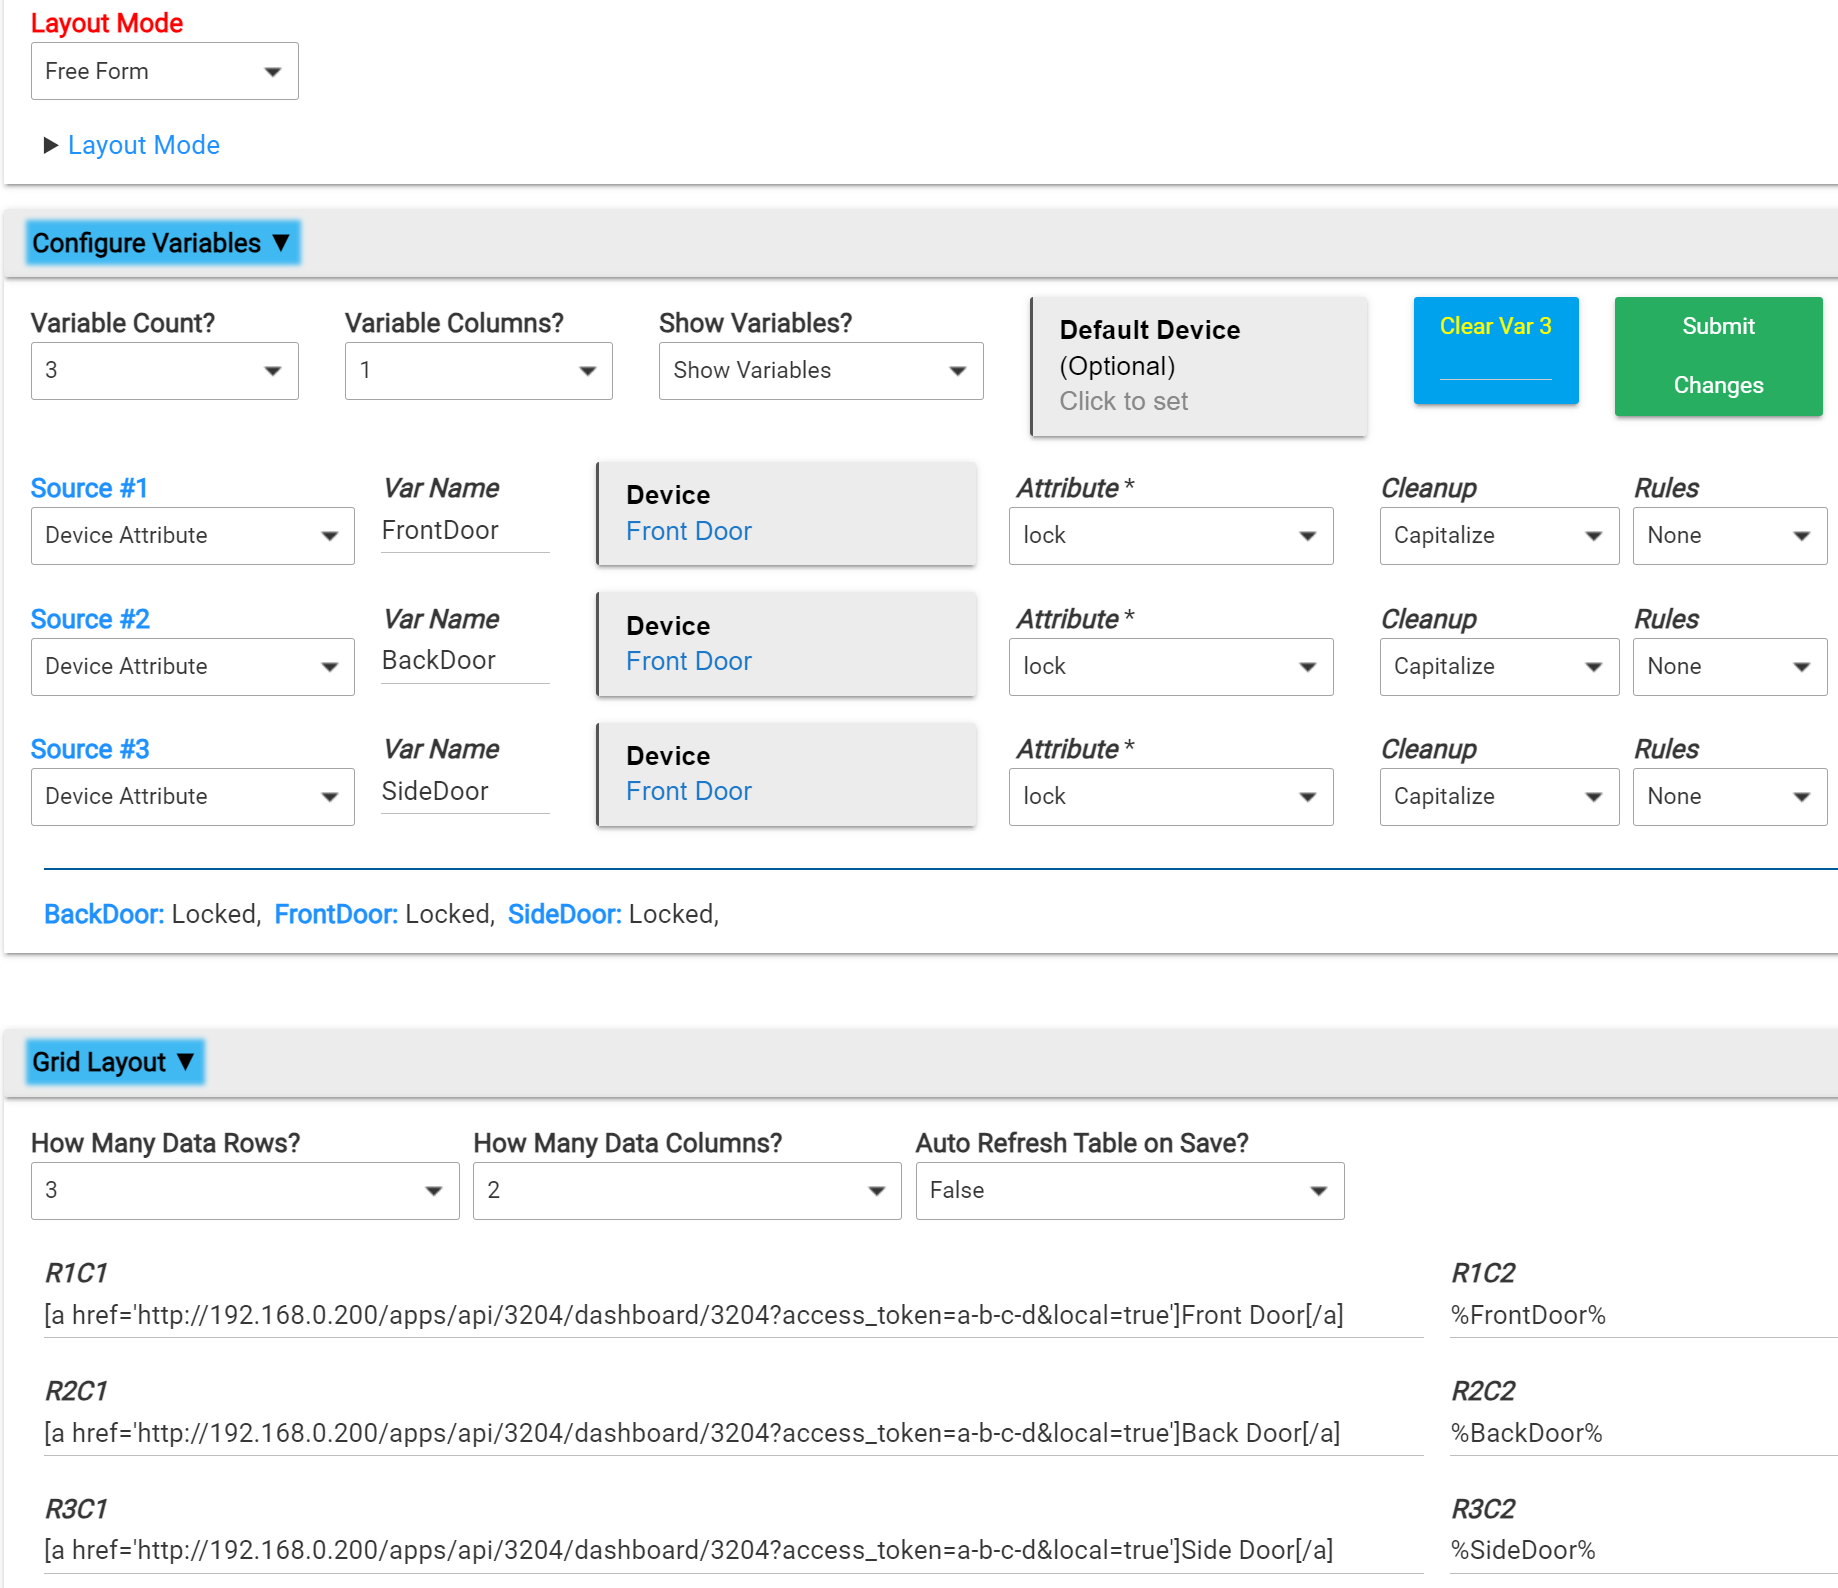
The result is:
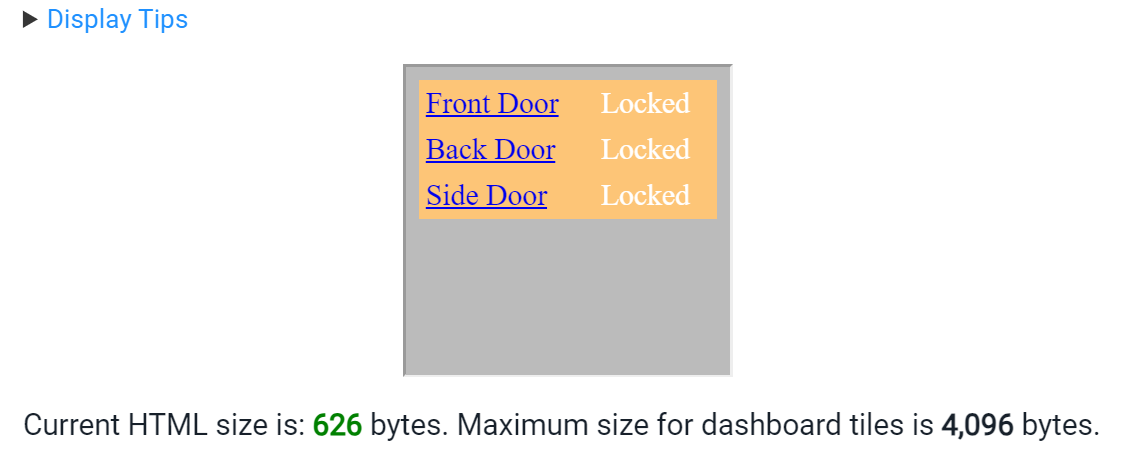
and plenty of space left for other bells and whistles.
I don't know if you are using the free version or the advanced version, but Grid is part of the advanced version. You can instructions under the Licensing Tab in the parent app if you are interested.
1 Like
That looks exactly like the TM version.
I haven't been into the Grid as I'm just gettin gused to the freeware side so see if it will do everything I want, i.e. replace the TM functionality.
Looks like you might be in for key sale ![]()
1 Like
Yes, you are not the first to want to replicate an existing look and feel because it's familiar. But you can do a whole lot more if you wish to.
Be sure you check the documentation, you'll find a link at the bottom of each module. It is quite extensive, over 100 pages across all the modules.
1 Like
Thanks for the great start tutorial. I had a look at the docs but it's unclear if I can emulate the old Tile Master 2 functionality.
For one thing when I use a Bitly URL the dashboard turns into the text returned from the endpoint - I think. Then I have to reload the Dashboard. Can I supress this response?
Reading the docs I think this is an iFrame issue? I recall that mention when I first startng using Tile Master.
e.g
"id":"2046","name":"Front Door Lock","label":"Front Door Lock","type":"Generic Z-Wave Lock","room":"Entrance Hall","attributes":[{"name":"lockCodes","currentValue":"{"1":{"code":"1234","name":"Dave"},"2":{"code":.....
The other thing I'm not sure I can do which may be beyond my html skills. ![]()
In TM the device label is static. the second column changes from Locked to Unlocked following the attribute. The word Lock has an Unlock URL attached and the Word Unlocked has a Lock URL so you can toggle the lock depending on its state.
The only way I can see in TB is to have 3 columns and have Name, Lock URL, Unlock URL
2 Likes
It should be able to as I'm playing by the same set of rules as Tile Master but I could not tell you how off the top of my head. Give me a week to experiment with it. If I get it working I'll write up a doc as others have asked for this same functionality.
Tile Builder Grid - Release 1.0.8
This is not the bigger release I was hoping for as I have not had much time lately for various reasons. This is just a maintenance release, but it does allow for a very interesting capability that I will document in a follow-up post in the next day or two.
Grid: Version 1.0.8
Bugfix: Keywords not working properly, needed Break statements to exit correctly.
Bugfix: Eliminates "double refresh" resulting from the "Refresh" action.
Bugfix: Removes debugging Log entry.
Still working on the bigger update which will offer a variety of date\time related formatting options as well as access to some device properties such as lastActivityAt or deviceID for example.
So if you tried Keywords in grid and could not get it to work correctly please try again and let me know if you have an issue.
2 Likes
New Releases: Tile Builder Parent 1.4.9 and Tile Builder Grid 1.0.9
The updates to the Tile Builder Parent only contain additional information for some of the help fields, mostly related to Tile Builder Grid.
The updates to Grid make it easier to add some limited control to a device group using Maker API as the intermediary. This post will explain how to do that.
- Install the Maker API
- Select the devices you want to authorize
- Copy the device command string which will look something like this.
Get Device Commands (replace [Device ID] with actual subscribed device id
http://192.168.0.200/apps/api/3685/devices/[Device ID]/commands?access_token=6f018dbf-2b96-4df9-92cc-521197f27aad
Go into Tile Builder Grid using the Layout Mode of Device Group and select the device to turn off and on.
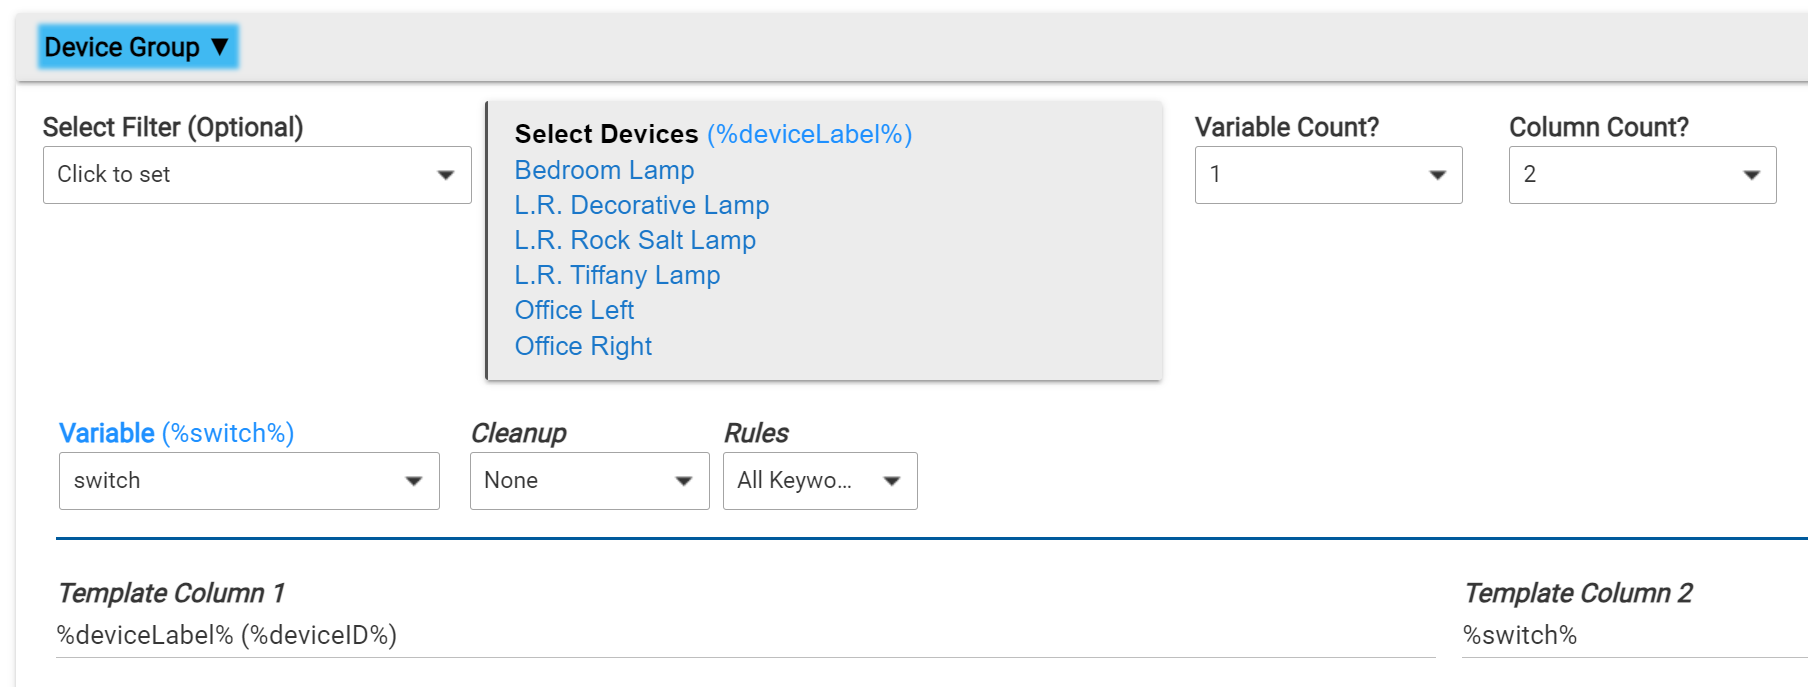
Important: For the variable %switch% the Rules are set to All Keywords.
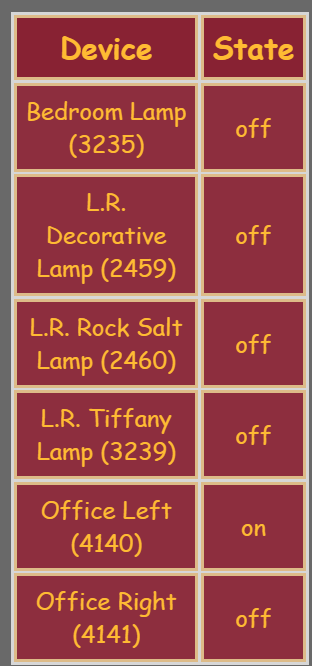
Your table will look something like this.
We are now going to replace the off and on values with links to the MakerAPI to toggle the switch. To do that go to the Highlights Tab and enable 2 keywords as shown.

The value of off will be replaced with:
[iframe name=a width=0 height=0 frameborder=0][/iframe][a href=http://192.168.0.200/apps/api/3685/devices/%deviceID%/on?access_token=6f018dbf-2b96-4df9-92cc-521197f27aad target=a style=opacity:0.5;text-decoration:none]💡[/a]
The value of on will be replaced with:
[iframe name=a width=0 height=0 frameborder=0][/iframe][a href=http://192.168.0.200/apps/api/3685/devices/%deviceID%/off?access_token=6f018dbf-2b96-4df9-92cc-521197f27aad target=a style=opacity:1;text-decoration:none]💡[/a]
For your environment you must make these changes:
- Change the IP address to your own
- Replace the MakerAPI id to your own (3685)
- Replace the command with your own
- Replace the Access Token with your own
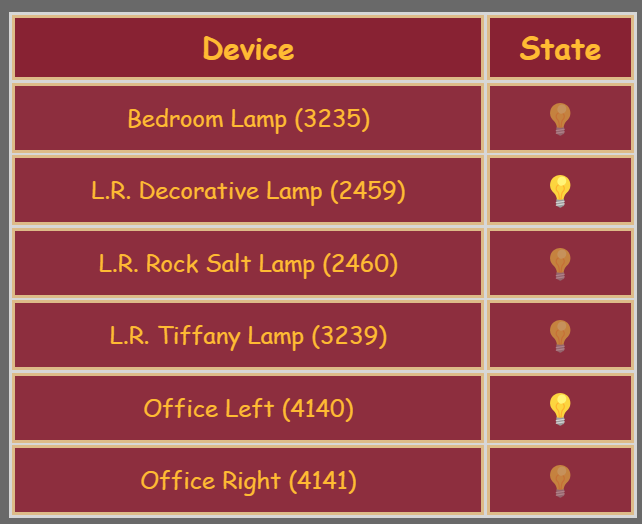
What will happen is that any listed device that reports the state as off will be replaced by a bulb icon that displays at 50% opacity (off state) and is a link to turn it on. Any device that reports the state as on will display a bulb at opacity 1 that is a link to turn it off. The %deviceID% will be replaced for each device so that each device has it's own link. You can of course use your own choice of icons, text, size, opacity etc.
This part [iframe name=a width=0 height=0 frameborder=0][/iframe] simply creates an invisible frame and sends the output from the Maker API to that so the Dashboard appearance is normal.
Once the device changes state Tile Builder will generate a new table with the appropriate appearance and links. I've included "(%deviceID%)" in the description field for demo purposes but it is not required for operation.
To make the dashboard Tile as responsive as possible be sure to set these values to 0.

Note: In this example if I turn the lights off and on in the Tile Builder Grid designer I would need to do a refresh for the table to be updated. This refresh happens automatically when the using the dashboard.
This technique is also documented under Highlight Notes as shown below for future reference.

Because %deviceID% is only available in Grid at present this same technique would not work in other Tile Builder products exactly as is. However, you could insert a complete Maker API URL into any text field using the above technique you would just have to replace %devicecID% with the actual device ID that you want to control. In this case you can use Bitly or something similar to shorten the URL.
Because the Maker API URL's are long and unique the Tile Builder output is quite large. In the above example it was around 2Kb and is stored on the filesystem vs the Tile Builder Storage Device attribute.
1 Like
mornin Gary! I'm not taking advantage of the new Grid features, but of course I do all I can to stay up to date with your work.
This morning after HPM ran updates - I'm now logging an error on a grid child tile I use:
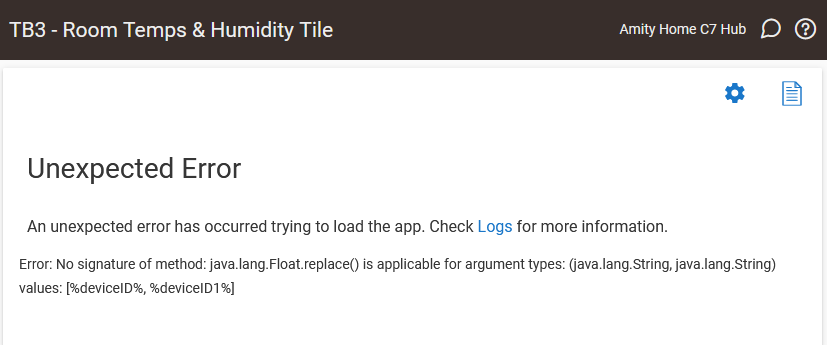
The error in Logs is:

Aah, datatype mismatch.
Can you try replacing this:
myValue = myValue.replace("%deviceID%", "%deviceID" + index + "%")
With this:
if (myValue instanceof String && myValue.contains("%deviceID%")) {
myValue = myValue.replace("%deviceID%", "%deviceID" + index + "%")
}
on line 896.
1 Like
resolved me - app opens, tile correct and no errors in log! thank you G!
1 Like
See this post for suppressing the response to MakerAPI link clicks using Tile Builder.
1 Like
I have updated Tile Builder grid with this bugfix. I did not rev the version number. If you have already updated to 1.0.9 using HPM and encounter this error (should be rare) you will need to do a repair to get the latest version installed on your hub.
1 Like
In the tile grid (Device group) I cannot find or select the %heatingPower% that Thermostat's support.
Other termostat variables like temperature - humidity - etc... is displayed okay in the grid.
In Grid there are 2 modes of operation. Device Group and Free Form.
Device Group is used when you are creating a table of devices with at least one common attribute, such as a group of lights for example. Those choices are limited to those capabilities and attributes published here.
Free Form is when you are selecting each individual attribute that you will place onto the table. An example of this might be a weather tile where each attribute is only represented once vs repeating. In Free Form mode, the app lets you pick from all attributes of the selected device. Here you will find all the standard attributes from the above list, as well as any other custom attributes the driver supports, in this case heatingPower should be visible.
I saw you had posted about being unable to access the Help file. If you continue to have trouble let me know. One thing to know is that the Grid Help file really only talks about features introduced with Grid but does not cover all the basics which had been introduced with Attribute\Activity Monitor. You can find that here.
1 Like

