Basically you tie it to where ever your button wires terminate. If it's a newer (yellow button) you'll need a dry contact to security 2.0 which is available for $20 at garadget.
2 Likes
Those work really well. I have a few of them in the Higher plants on top of the kitchen cabinets and in the planters out on the patio. The wife loves them and we aren't drowning plants anymore! Plus that Ecowitt rabbit hole can get pretty deep if you are into the weather and environment monitoring. I recently replaced my GW1101 with the GW2000 because the GW1101 started repeatedly dropping off the wifi. I have the GW2000 set up on a POE splitter, so I shouldn't have those issues anymore. I still have a ways to go before i get to the bottom of that hole.
2 Likes
The Zooz ZEN16 is then unit of choice. There are no specific instruction for the interface I used. This type of integration is my profession so, for me, it was extremely easy. There are other solutions that don't require soldering but this is what I did that was pretty straightforward, you will need to take apart a spare, working (already linked to both your doors) GDO and solder wires across each button. Then connect those wires to the relays.
Button 1, wire 1 connect to - Relay 1 - Com
Button 1, wire 2 connect to - Relay 1 - N/O (Normally Open)
Button 2, wire 1 connect to - Relay 1 - Com
Button 2, wire 2 connect to - Relay 1 - N/O
Package the parts into a housing of your choice, or just leave it out. I put all mine into a little plastic project box and mounted it on my garage wall.
Then use the Zooz garage door app to setup your doors.
2 Likes
Is the advantage of the Ecowitt over a regular Zigbee temp sensor the longevity of the battery? I've tried to avoid adding Gateways whenever possible.
Well, that and reliability. I have the Ecowitt WH31 temp/humidity sensor — which admittedly is indoor/outdoor. It's in my freezer — i.e. inside a metal box — in the garage. It's sitting naked on a shelf in the freezer. I have the GW2000 base (upgraded from the GW1000). The base is in the room I use as an office, which is across the house from the garage. The sensor has never dropped. Even the upgrade to the new base was a piece of cake. I just plugged in the new one, and all of the sensors automatically started communicating with it. And I've never changed the battery.
2 Likes
Biggest problems I have with Hubitate dashboards are:
- Safari on my older iPads running them have to be refreshed periodically or they don’t work.
- Sometimes there is a delay between when the button is pressed and the change in the device’s state is relected
- You have to do a lot of CSS stuff if you want to change things, like how a button looks, what the display name for a device is, etc.
Does this help with any of those problems?
1 Like
Hi Krishna,
#1 Tile Builder creates various tiles but it still uses the native Dashboard infrastructure. But I recall reading a thread recently where a bug with Dashboard refresh had been found and a fix was forthcoming which may apply to you.
#2 The delay you see is most likely Hubitat waiting on a confirmation from the device that it has changed state before it updates the dashboard. For the same reason as #1 it would not really change this. However, Tile Builder is native and works directly with Dashboard without any intermediary such as MakerAPI or a dedicated app. For this reason the updates to the Dashboard are very fast and seamless when they occur.
#3 Yes, it does help greatly with this.
Tile Builder Rooms contains a standard block of CSS that you paste into your dashboard. After that you use the UI to leverage that CSS to create the output that you want. All of these rooms were created entirely with the UI.

If you were referring to one of the Table Building modules you will find that the UI is pretty rich and offers a great deal of flexibility. These do not use any standard CSS and are entirely self-contained HTML\CSS.
I hope that answers your questions.
1 Like
Minor updates to TB Rooms.
Version 1.1.0
Added z-index control for whole tile.
Added additional icons.
Added standard CSS for handling background image tiles.
I was able to eliminate all of my added CSS lines for z-index as well as the lines I added for configuring the image tiles. They are now part of the standard CSS.
2 Likes
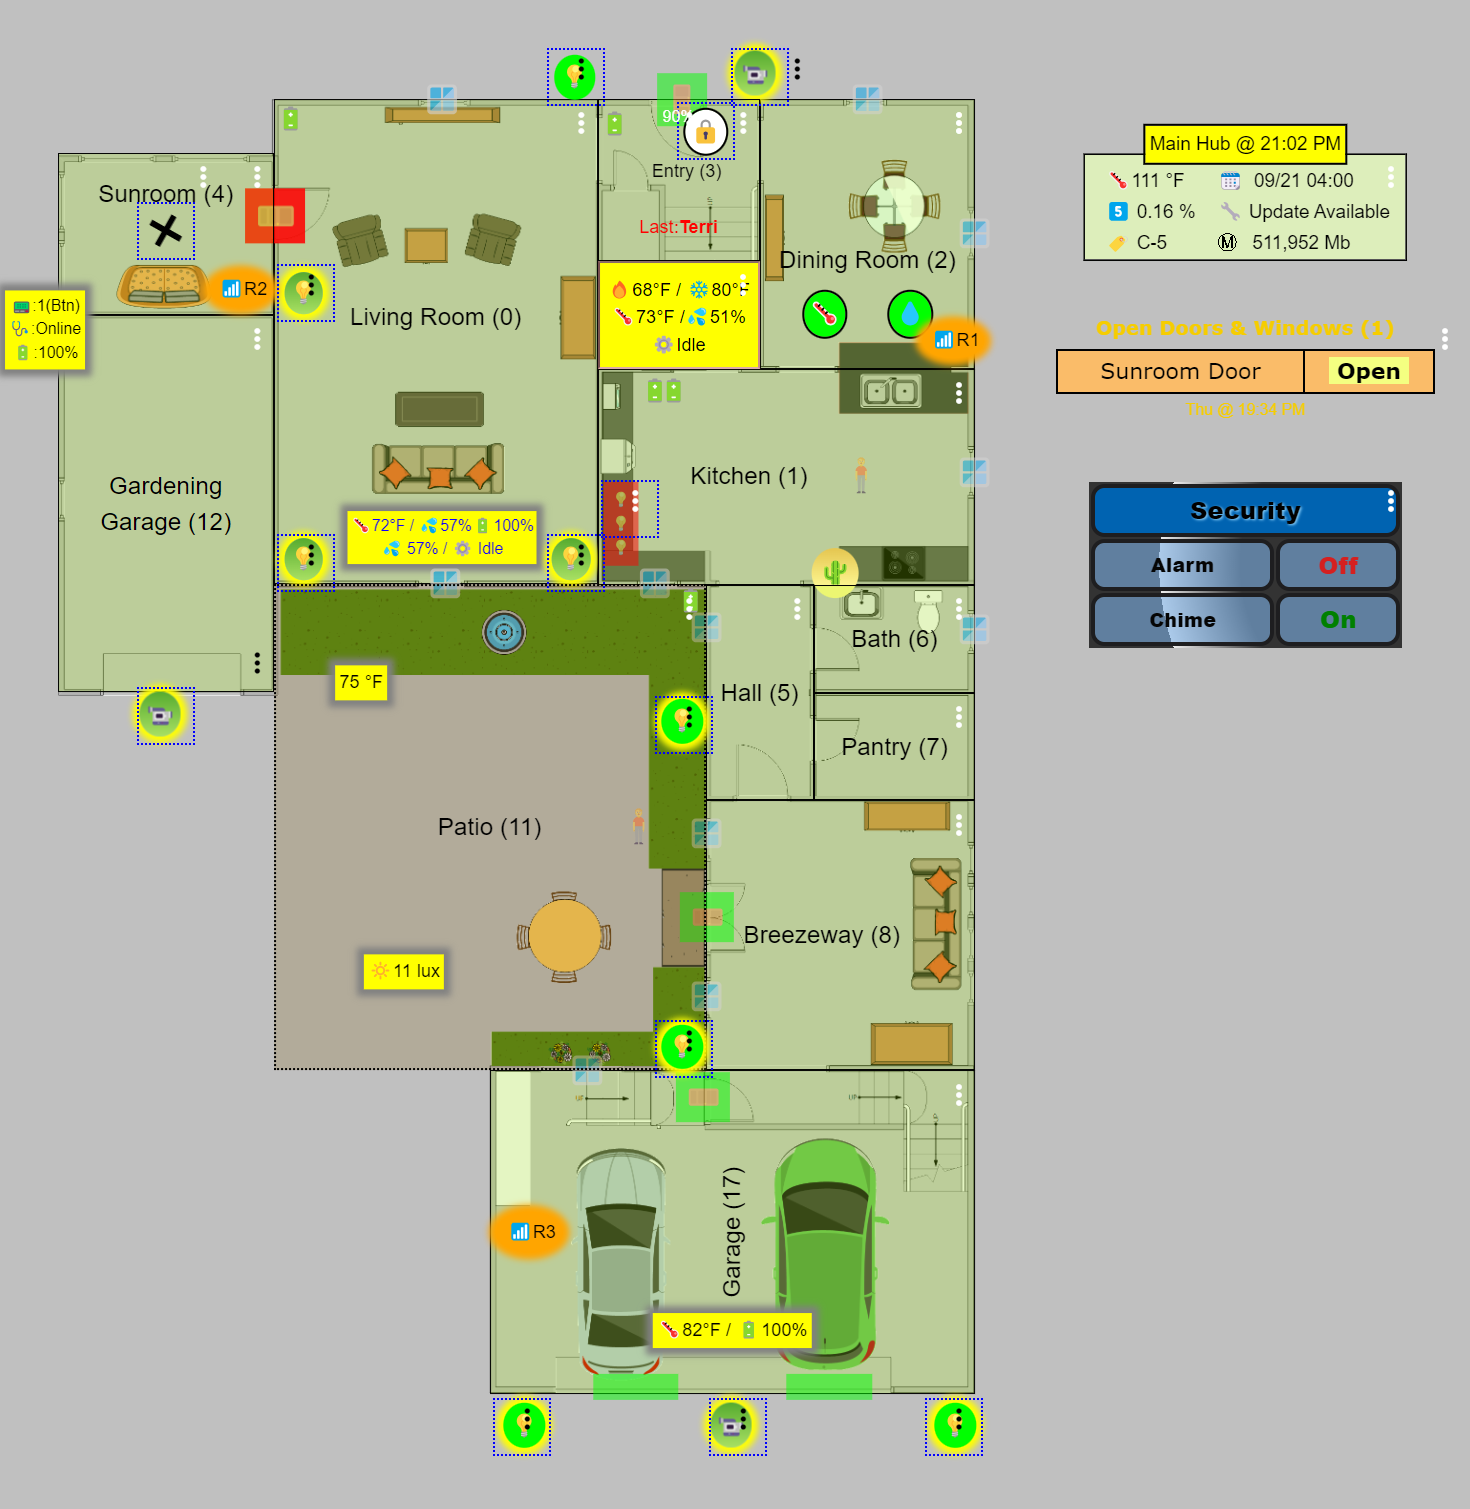
If you haven't done this already, for those of you using the background image/overlay process there is a way to have non-square rooms look good in local mode while at least showing the rooms in remote mode (when the background image isn't available). Using @garyjmilne's great write up you can set the background of the dashboard to color A and set the background color of your base image to color B. Then you can set all the tile feature colors (walls, background, title (if you want)) to color B. So when you're in local mode all the tile walls disappear but in remote mode you get at least a basic room layout. And then when someone figures out a 100% way to cloud host an image you won't need to alter any tiles.
Local

Remote
3 Likes
Looks really good Mark. Do you have it sized for desktop or tablet?
What limits are you running into?
Thanks, It's setup for a tablet. I still have another floor to do and to add some other dashboard links and such but it's certainly coming out pretty good. No show stopping limitations to speak of other than the known ones (i.e. the cloud pic storage). Maybe separating the walls to give them their own z-index for a little more flexibility? Actually, as I type this, instead of making the z-index a drop down list can it be a separate field so you can set the number to whatever you want?
This comes from back to the old, old line numbering basic programs, leaving big gaps in the numbering for easier changes... I've found more flexibility using CSS with the z-index, I set the background to -1, the tiles on 5, blanking tiles used for visually removing walls (I stopped needing them but just in case) are on 10 and all the controls are on 15. This way if there's a special case(s) I can easily move anything in front of or in back of anything else.
1 Like
Heya - having a blast with TB - all modules fit differing needs and I've gotten full value.
2 Feature requests -
Vertical Iconbars - in certain cases of small rooms, instead of trying to jam an icon bar into an area, I'd get more mileage if I could stack them
so = temp - humidity - motion
vs.
temp
humidity
motion
In my case a guest bathroom is tall but not wide and it just jams up and messes up my feel.
2nd request - the reliance on background image having to require HE is ... painful. Add background image to the tile? Thanks for consideration!
A heavy user - Shu
2 Likes
I’ll give that some thought. Always a balancing act between size and value.
2 Likes
Icon Bars do not have an inherent shape, they take on the shape of the content.
To get a vertical Icon Bar just add a [br] at the end of each append statement.
I’d need to play with that to see what the size impact is. You also cannot have a background color and background image on the same object. Depending on the trade offs it may require a separate Div.
Have you looked the guide I posted for fitting background images to tiles. I find it pretty easy and the latest css will automatically put the tile in the background and force the content to fit the tile.
What do you find painful?
1 Like
I don't know if anyone has tried this yet, but I came across a cool thing you can do with iFrameAdvanced. Admittedly with a bit of tweaking the CSS in the iFrame device and the dashboards, you can create pop-up windows for items on Room Builder. This is my layout and the home theater has some features I configured on another dashboard.
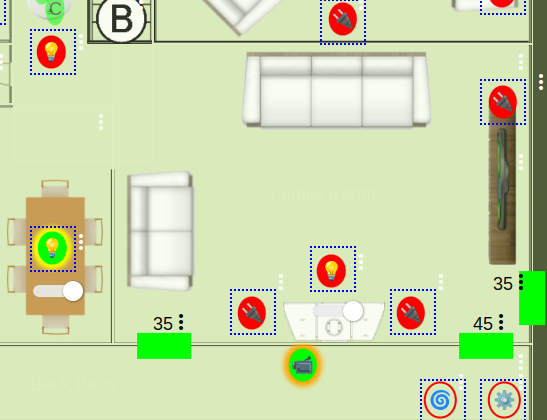
I created an iFrameAdvanced device pointed to my home theater dashboard and put it's launcher tile over the home theater. Now pressing the home theater brings up a pop-up control window...
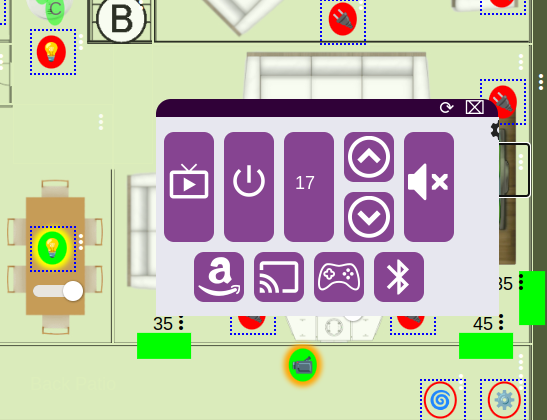
I just got this working so I'm sure there are easier ways to configure it but I thought I'd share the possibility.
3 Likes
I'm seeing a 404 error when trying to create a new room (add a new room). I'm using the latest version via HPM Version: Tile Builder Parent v1.4.2 (9/6/23)

1 Like
Hi Joe, that error means that you have not installed the Rooms module. Go into HPM, select Modify for Tile Builder and then add the Rooms module.
That should take care of it.
I've thought about adding that capability directly into Tile Builder. The iFrame Advanced driver is pretty simple but I think it only handles 1 iFrame if I remember correctly.
that was it - thanks!
Yes, a device per popup dashboard is needed. I would've thought that adding an iFrame device within TB would push it well over the 1024 limit. As it is now a single iFrame device is already over 900.

