This is absolutely amazing! T4HE= "Thanks for having expertise"
I have Xiaomi Mijia BLE Temperature and Humidity Sensor. After installing tasmota32-bluetooth-httphook.bin I am able to read the temperature and humidity in the device website. But how do i get the temparture and humidity to hubitate? is there any custom device driver i could use? if not is there a simple of way of modifying a custom template for using with it?

In the Parent Device, what is the timeout and is it configurable for the "Presence" attribute?
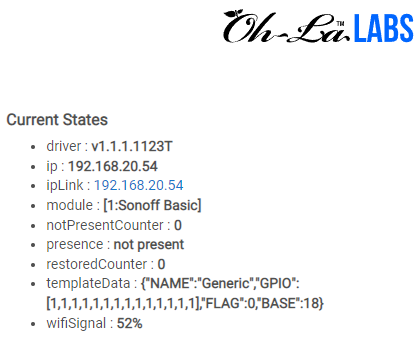
Current States
- driver : v1.1.1.1123T
- ip : 192.168.68.237
- ipLink : 192.168.68.23
- lastCheckin : 2022-01-16 21:40:26
- module : [1:ESP32-DevKit]
- notPresentCounter :0
- presence : present
- restoredCounter : 1
- templateData : {"NAME":"ESP32-DevKit","GPIO":[1,1,1,1,1,1,1,1,1,1,1,1,1,1,1,1,0,1,1,1,0,1,1,1,0,0,0,0,1,1,1,1,1,0,0,1],"FLAG":0,"BASE":1}
- wifiSignal : 100%
I am using
App is : 2020 Markus Liljergren
driver: Markus Tamsota Universal parent Version: v1.1.1.1123T
child app Tasmota - Universal Multi Sensor (Child) markus Version: v1.1.1.1123T
Since this is an unsupported driver, your best bet for this device would be with Home Assistant...
I have this working and can drive the Sonoff Basic from the child device page, but I dont see the change reflected there when toggling the on/off state from the devices tasmota page, or using the HW button.
Im using stock tasmota 8.5.1 firmware (more recent versions fail to join my wifi network)
Any pointers?
I saw @Obi2000 post above about the 8.5.1 drivers not reporting status changes when manipulated using hardware buttons so I have now flashed OBI2000 10.0.0 HTTPhook FW:
I still get the same issue, now the status doesnt change in HE Device page when toggling on and off from there either even though the device itself responds. Forcing a refresh never changes the status either:

Im using the Marcus' parent driver v1.1.1.1123T:
In the App the device always shows as Status - Timeout:

Ive been testing using the "Generic Component Switch" child device driver installed by the app, but also tried changing to the "Tasmota Generic Switch" (v1.0.5) device driver from obi2000s repository. When changing to the "Tasmota Generic Switch" the device stops responding all together.
What am I missing here guys?
Did you put the hubitat ip on the HTTPhook page on the config of the device?
The lack of development of Tasmota with HE pushed me to Home Assistant. Since I have around 70 tasmota devices, and needed a special version that was no longer supported to work with an app that the developer was banned from HE sealed the fate for me.
I'm still using HE for z-wave, but moved/removed all my zigbee and Tasmota IOT devices to HA. Before you get to far down the Tasmota road with HE, understand that you are working with an app that will never get an update or any support. Good Luck!
2 Likes
Hi,
I'm having a go at using Tasmota to create a power meter reader - (see my other post showing what I've done and what issues I've hit here: Creating a power meter by counting pulses with LM393 and Tasmota - #2 by jamesxheath)
It requires me to compile Tasmota with the following compile options:
#ifndef USE_SCRIPT
#define USE_SCRIPT
#endif
#ifndef USE_SML_M
#define USE_SML_M
#endif
#ifdef USE_RULES
#undef USE_RULES
#endif
I've realised that (of course I now realise)) I have to use firmware with httphooks in.
I can't find the modified source for Tasmota for anything higher than 8.3.1 - I did find a bin with script included for 9.4, but I think that something else is missing.
Could someone point me to the modified source (or if it's easy, compile a vn for me with the defs above!!)
Or alternatively point me in the direction of a better way to use an LM393 and wemosD1 to make a power meter reader
Thanks,
James
Have you looked at hubduino? More work but sure it'd be possible.
I do actually have that set up for some arrays of temp sensors - I set them up whilst on SmartThings, before I'd started using Tasmota. I've ported them over, and was thinking of tearing them down & moving them to Tasmota - but you're right - it ought not to be too hard to write from scratch.
I'm just slightly astounded that it would seem that no-one has DIY'd an energy meter for Hubitat before.
Looks like I better get the arduino dev environment back up & running.... shame - Tasmota has generally been brilliant for stuff so far.
I was using T4HE but decided to go pure Tasmota (due to the support issue) and integrate it via node-red.
I want to get away from as much 3rd party drivers as possible.
@kuzenkohome how painful was that to set up? I've been scared by node-red. Any pointers to a guide for Node Red <> HE?
Cheers,
James
If your capable of flashing tasmota node-red should not be that difficult for you.
Are you windows or linux oriented? NR can run on both. You need an always on machine to host NR, That's why the Raspberry Pi (or a variant) is so popular as very low power consumption.
I've done both (wwin10 as daily driver) but my servers are linux as I purchase/use refurbed pc's and linux is less resource intensive. You could also use a Raspberry Pi and that's what I started with, Originally I setup Zigbee2MQTT on a Pi to support some devices I had purchased that didn't work well or not at all on Hubitat. Then added Pi-Hole and later node-red. Ended up with 4 Pis running, Along the way I decided to consolidate to a single dell mini desktop (4th gen core i5 8gb ssd ~$100) cost was about the same as a Pi, case, sd card & power supply)
Node-red runs on top of Node.js (which is a javascript interpreter). Javascript was originally browser based and node.js moved it over to the server.
Here is a guide to installing node & NR on windows. Installing Node-RED as a Windows Service
If you want to use Linux then you have to decide on which Linux distribution your going to use first. Ubuntu, Debian, Arch, Redhat, etc. Raspberry Pi os is based on Debian as is Ubuntu. I use a desktop version of Linux (Debian based Linux Mint w/xcfe gui) mostly just for convenience of a gui although I do use the command line for many things. Just like windows still has a command line.
This is a rudimentary explanation (sorry if you know this already).
Node-red is based on "messages" & "nodes", Messages are packets of data (containing strings, numbers, etc.) passed between nodes which are single purpose javascpript based "programs" that perform some manipulation on the message. You "wire" together these nodes with other nodes to form "flows" which then perform a desired larger function. A flow can be thought of as a complete program.
Individual nodes can do math, logic, manipulate strings, interface with sensors, files, databases, etc. There are basic nodes that are installed with node-red and then others that can be added to your node red "palette" (tool box) to extend node-red with more capabilities. The left "Angel" node is part of a collection of Hubitat specific nodes created by a hubitat user. Same for the right "angel" Tasmota specific node. The center node is a "change" node and is a basic node installed with NR.
Here's simple Hubitat to Tasmota device flow with 3 nodes. The "Angel" node is a device node that connects to a Hubitat virtual switch, it monitors the status of the switch (on currently) and outputs on/off changes in the state of the Hub virtual switch, It wires those changes to the "Hub to Tas" node which converts between commands HE uses and Tasmota uses. Finally it feeds the "angel" Tasmota flashed device to turn it off or on.

There are some threads on this forum about node-red that can get quite lengthy and indepth.
If you need some further assistance just ask. The nice thing about NR is you can share any and all parts of a node/flow.
2 Likes
Hi Guys,
I've flashed a Sonoff M5 switch with tasmota and added it to hubitat with Marcus's driver.
Everything seems to work as expected, however the status in hubitat does not update when the switch is physically pressed.
EXAMPLE:
Hubitat indicates the switch is off.
I then press the switch on the wall and light comes on.
The switch in Hubitat remains as off, despite the physical button press
Is there a solution to this? I still learning, so please be gentle! 
You should start by checking if the IP of your hub is registered on the Tasmota device. This can be found under Configuration -> Configure Hubitat / SmartThings ->
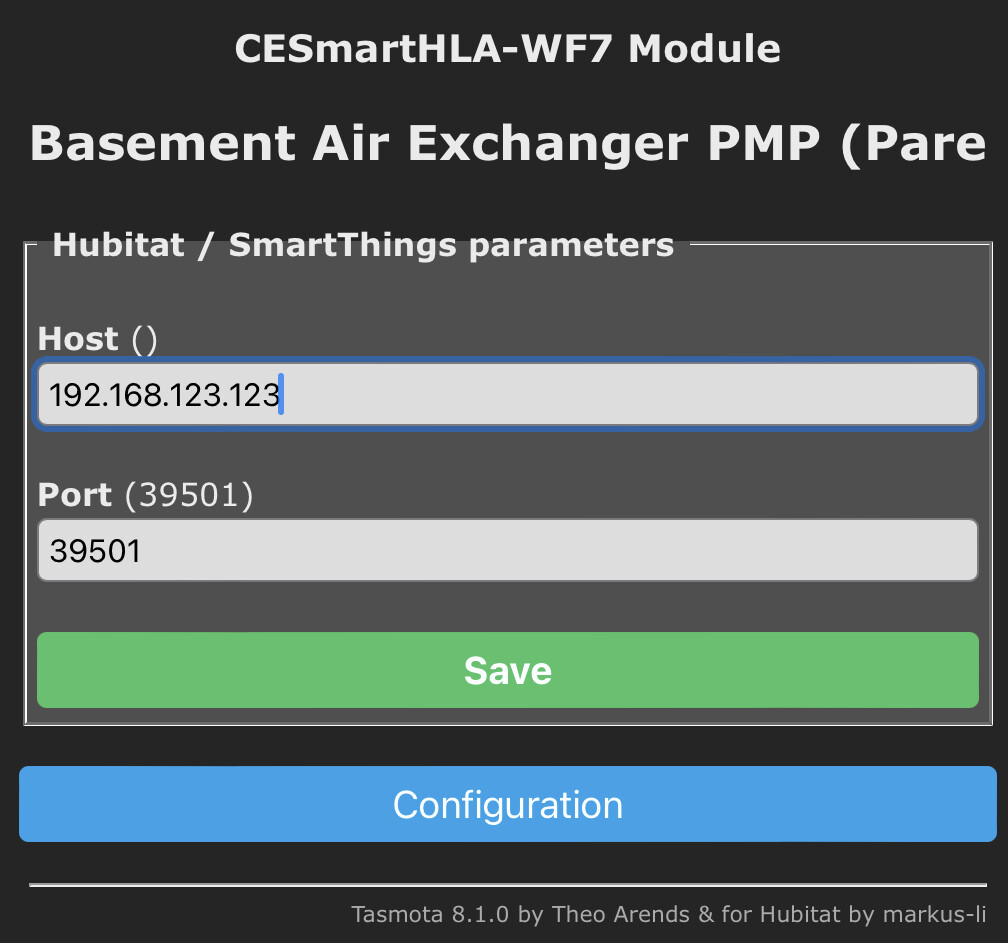
Here, 192.168.123.123 would be your Hubitat Hub’s IP address.
His app should set that up automatically, but if it didn’t, it would need to be entered manually.
I am certainly no expert on this but have been using Markus’s app and drivers successfully ever since I got Hubitat. Do you have the http hook set up in each of your devices?
Wow, speak of lighting fast responses!
I guess the answer to bot questions has to be no / I don't know...
@Sebastien
I have not set that up, but the Configuration menu doesn't seem to mention Hubitat / SmartThings. Here's a screenshot of the menu:

@moh
Sorry, but have no idea what that is - could you explain a little more?
EDIT:
I am not sure if it makes a difference, but I flashed my device by using this guide:
1 Like
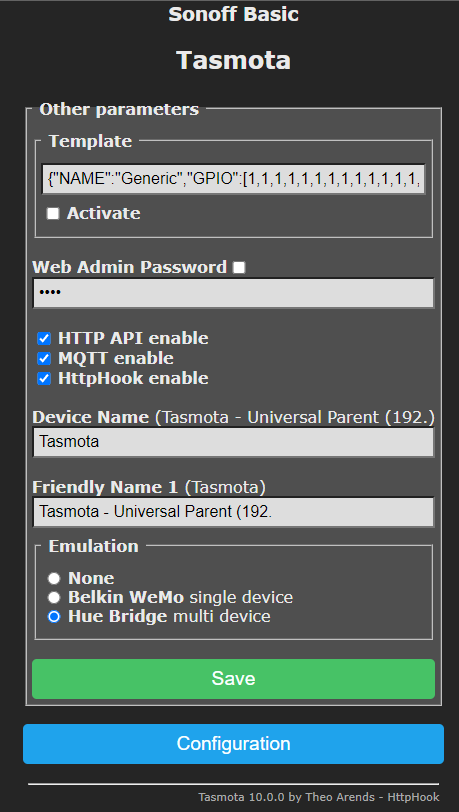
Using Markus’ driver and the T4HE app, I think that you must flash using Tasmota with httphook. When you look up the IP of your Tasmota device, on the main menu, click on the Configuration button then in the Configuration page select the Configure HttpHook button:

Then you will get to the window where you can put in the http of your hub:
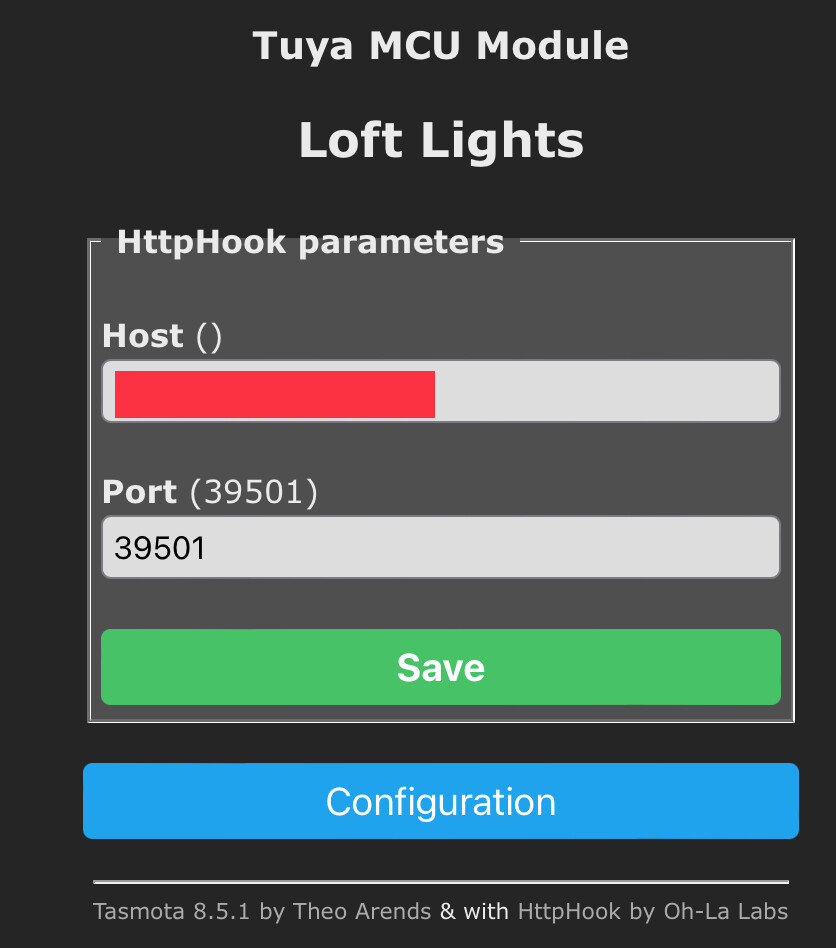
(Place your hub’s IP address in the area marked in red. . .red was added be me).
With Markus’ driver, you could only go up to Tasmota v8.5.1 and you must flash your device using the version of Tasmota that includes “with HttpHook”. See the bottom of my first screen shot to get the specific name of the Tasmota flashed so you can look it up on Github. I believe that someone else did do a modification to the HE Tasmota driver, however, where you could use a “normal” version of Tasmota (or a later version of Tasmota) but I am unfamiliar with this (that may be why @Sebastien’s instructions refer to:
Hope this helps.
1 Like
It appears that you are using a version of Tasmota that does not have HTTPHooks. There is an additional field in this version to put your Hub IP address. Here is a link to a Versions 9.4 and a 10.0 with HTTPHooks. Try one of these. Hubitat/Tasmota/Firmware at master · Obi2000/Hubitat · GitHub