Introduction
This driver is for smart watering devices from Linktap (https://www.link-tap.com) with local network integration through the use of a MQTT broker. Linktap is currently working on a version of the firmware which allows local network integration using MQTT protocol. With this approach, Hubitat can issue commands and receive updates from Linktap devices without communicating outside the local network.
** UPDATES **
18 Jan 2022: The drivers are now available through Hubitat Package Manager as well.
18 Jan 2022: v1.1 released, which adds MQTT broker reconnection capability, as well as attributes that accumulate total water volumes on daily, weekly, monthly and yearly basis
23 Jan 2022: v1.2 released, Fixed issue with water volumes, added command for submission of rain data to gateway, changed child device logging
The default integration option officially supported by Linktap is through API exposed by their cloud server. This option though limits the possibility to integrate with Hubitat as it requires to open a local network port to listen to status updates from Linktap’s cloud server. On the other hand, it does not require an MQTT broker. I have also developer a driver for this integration option which you can find in a different post.
Pre-Requisites
- One or more Linktap gateways setup in the local network. Gateways need to be setup using the Linktap App
- A running MQTT broker in the local network. The drivers were tested using Mosquitto MQTT broker (https://mosquitto.org)
- The beta version of the Linktap firmware with MQTT support installed on your gateway(s). You can contact Linktap for this, they were very helpful and supportive, and you should not have an issue to get them to push this firmware to your device
Supported Features
The initial version of the Hubitat drivers support the following capabilities:
- Recognize and create automatically in Hubitat all watering devices already setup and connected to a gateway
- Register a new watering device to an existing gateway
- Delete a watering device from one of the gateways
- Receive and store watering device status:
4.1 Connection status
4.2 Connection signal strength
4.3 Battery status
4.4 Flow meter connection status (for G2s)
4.5 Valve status: open/closed
4.6 Currently setup type of watering plan (e.g. instant)
4.7 Current watering session details (duration, remaining, flow rate, water volume)
4.8 Physical button lock (child lock)
4.9 Alerts - Start watering
- Start watering with parametric duration (in seconds)
- Stop watering
- Setup a scheduled watering (for a specific start date/time and duration)
- Delete a scheduled watering plan
- Enable/disable alerts from the device
- Clear/dismiss previously issued alerts from the device
- Retrieve current gateway date/time
- Device wireless test
- Send local rain data to gateway for rain skipping functionality
MQTT Connection Management
- Allows scheduling a connectivity test every x seconds
- If connectivity has been lost, the driver will automatically try to reconnect
- You can specify the number of reconnection attempts. When this is reached, the driver will give up and reconnection should be performed manually
Watering volumes calculation
- 4 new attributes to display daily, weekly monthly and yearly water volumes
- Attributes are reset (respectively) at midnight (daily), sunday (weekly), 1st of the month (monthly) and 1st january (yearly) through a scheduled execution of a handler method
Not supported features
Linktap provides the option to have both cloud (App) and local (MQTT) integrations active. While several features work, especially related to device status and watering start/stop, simultaneous control through the two methods can create behavior inconsistencies, especially in what refers to registration/deletion of end devices. If you intend to keep the cloud integration active when setting up local integration, I strongly recommend that you setup all devices through the app only, and not through Hubitat.
The following features are supported by the Linktap gateway firmware, but not implemented in the Hubitat driver:
- Other types of watering plans (e.g. Calendar, 7-day, Odd-even, Interval, Month). The input parameters for setting up these types of plans are complex and not suited to Hubitat UI, Rule Machine, etc.. If someone has a specific need, happy to evaluate the possibility of implementing some of these in the future.
The following features are not currently supported by the Linktap gateway firmware through MQTT integration:
- Eco mode
- Rain control
- High flow alert
- Low flow alert
- Device model cannot be determined
The following features while supported have not been thoroughly tested (I only own one gateway and device):
- Multiple gateways
- Multiple devices per gateway
- Alerts besides the water cut-off
- Sync gateway time request
Installation
You can use Hubitat Package Manager (HPM) or manually as described below:
- Copy the code for the two drivers into Hubitat:
1.1 Linktap MQTT Controller
1.2 Linktap MQTT Taplinker - Create a new Virtual Device of type Linktap MQTT Controller
- Enter the correct parameters for the configuration of the controller
3.1 Broker IP: IP of the MQTT Broker
3.2 Broker Port: Port of the MQTT Broker
3.3 Username: Username for the client to connect to the MQTT Broker
3.4 Password: Password for the client to connect to the MQTT Broker (note: I have not tested anonymous connection to MQTT broker, if required let me know to try to support it)
3.5 Log Level:- 0: Error only
- 1: Also Warnings
- 2: Also Information (recommended)
- 3: Also Debug
- 4: Also Trace
- Press Save Preferences
- Connect to MQTT Broker by pressing the MQTTConnect button. Status and errors (if any) will be printed to log
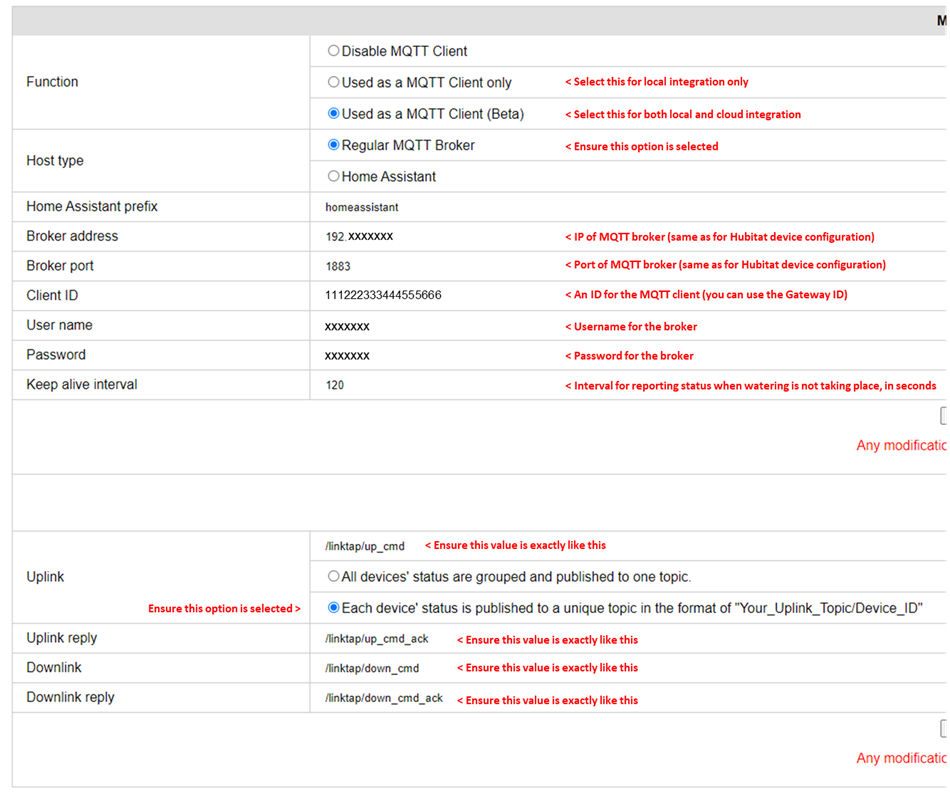
- Configure each Linktap gateway (very important):
6.1 Open the gateway configuration page, by entering the IP of the gateway in your local network in a browser
6.2 Update the options as below, pressing Submit after filling in each table
6.3 Reboot the gateway (button at the bottom of page) - After rebooting each gateway, it should send a handshake message to the broker, which Hubitat will use to create all devices managed. These will appear as child devices of the Controller device
- You can change the name of the device if needed, it is not used for identification purpose (e.g. you can use Backyard, Patio, etc.)
- If you add later new devices through the App, you should also reboot the gateway to ensure the devices will be created in Hubitat also
Usage
In each child device, the supported commands and associated input parameters are available for execution. These should be self-explanatory, but if not feel free to drop a message below for any questions.
Notes:
- Gateway ID always shows the first 16 digits without dashes
- Device ID means the first 16 digits, without dahses, except when registering a new device, where the full 20 digits should be used (without dashes)
- The driver implements a state variable to register or delete new child devices, to ensure actions are only applied in Hubitat after confirmation by the gateway. It prevents issuing a new registration or deletion command until the previous has either confirmed or failed. In case something goes wrong, there is a command in the Controller to erase the state variables and allow a new command to be sent.
- You can also set/reset manually the water volume attributes through the driver
- You can also post to the gateway rain volumes (past and forecast). This will then be used by the gateway to skip scheduled waterings according to the rules you set in the app. This will only work for watering plans set in the app, not scheduled instant watering created through the driver. This is useful in case you have access to local observation (e.g. a personal weather station) and forecast data and want to use it instead of the weather service used by Linktap.


