I'd be interested and pictures on how you adapted it to your water meter.
Sorry if this is the wrong place to put this......


Also w hubigraph you can create cool charts with almost no effort...some amazing code
2 Likes
Is there a way to talk to the arduino from the driver ...
I'd like to add a command "give current values"
This is more of a learning thing and not critical but I've added a virtual switch that tells to get an initial reading, when you turn off the virtual switch, I wait 70 seconds to get final reading...It would be cool to send a command down to get current reading without having to wait.
You can simply call the Parent Device's "refresh" command, which will cause the Arduino to send status updates for each of the defined devices.
I am a little confused by what you're trying to accomplish though... care to explain a little more?
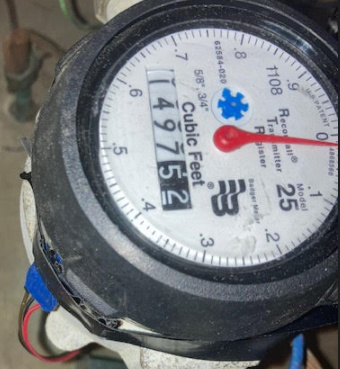
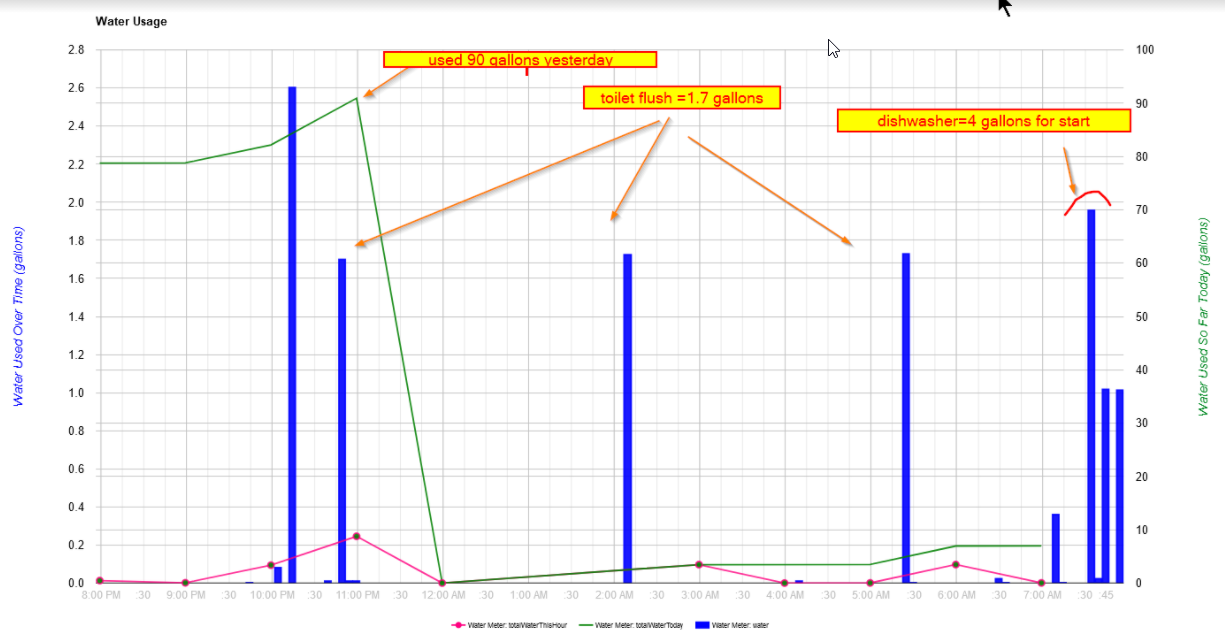
sounds silly probably....but i AM graphing all the data as its reported but I thought it would be cool to be able to get a verbal report of a given instance of using water, so for example I press the "measure water" tile on my dashboard, then do something like flush the toilet : )
Then turn off the "measure water" tile and the echo says "You used 4.3 gallons" Make any sense?
Ha, funny thing....you helped me by i think changing the code so that this device did not send up the 5 min updates...which was giving me extra readings that i did not understand...did that affect the responding to the "refresh" because I implemented and added a delay of 20 sec and I dont get the new reading....
Correct - REFRESH no longer works for the PulseCounter device, specifically for the reason you mentioned above. ![]()
To get accurate flow/usage data, the data needs to come into Hubitat on a regular schedule, which you can adjust by tweaking the polling interval in the Arduino sketch.
was the 5 min refresh coming from the driver ? or was the arduino code sending up the refresh automatically every 5 mins ?
It was in the Arduino code.
Explained in these two posts.
Just found this tread as I am looking to replace the code I wrote for my garage door circuit using a Mini D1. I was using MQTT, IFTT and google assistant on my phone to control it. As IFTT has gone paid... looking to re-do it and integrate with the Hubitat I now have.
Is v1.1.7 still the most recent version or has this been abandoned (as this version is almost 3 years old)?
I did see some comments about detecting if the door was moving. I came up with two ways of detecting that. The better (I didn't implement) would be to put an ardruino compatible current monitor on the power cord for the garage door opener. The way I did it, as I had it, was to but a vibration monitor on the board. As it sits on top of the garage door opener.. it can tell when it is moving. I also had code that if you said close when it was already closed.. it would ignore it.
I also have a DHT22 for temp and humidity... I don't care that it isn't the most accurate sensor. just want to know if it gets to the point of a potential fire in the garage. I also used a screw in outlet/light bulb holder. I put a second 5 v transformer on it, and using a voltage divider am able to monitor if the lights are on in the garage.
At some point, I'll put a smart switch there.. but this works great for monitoring any electrical outlet that isn't on a smart switch.
If interested, I'd be happy to share code and circuit once I get it Re-built (if this is still supported and planned to be for a while) and go this integration.
I am not very religious at creating releases in my GitHub repository... The code is still actively maintained and has had many updates over the past 3 years. Just be sure to grab the latest code from the main repo.
2 Likes
Hey guys, I converted some of my custom ST_Anything DH's to Hubitat and posted on Github. So far I've converted Contact, Temperature, and Voltage. There will be more coming. They have more options and max-min attributes. 24hr last update time enable. The Contact DH has many selections besides Open/Closed, like Off/On, Empty/Full etc.. The Readme instructs on how to install. Don't bother @ogiewon if you have issues with these, bother me.
Temperature Example:
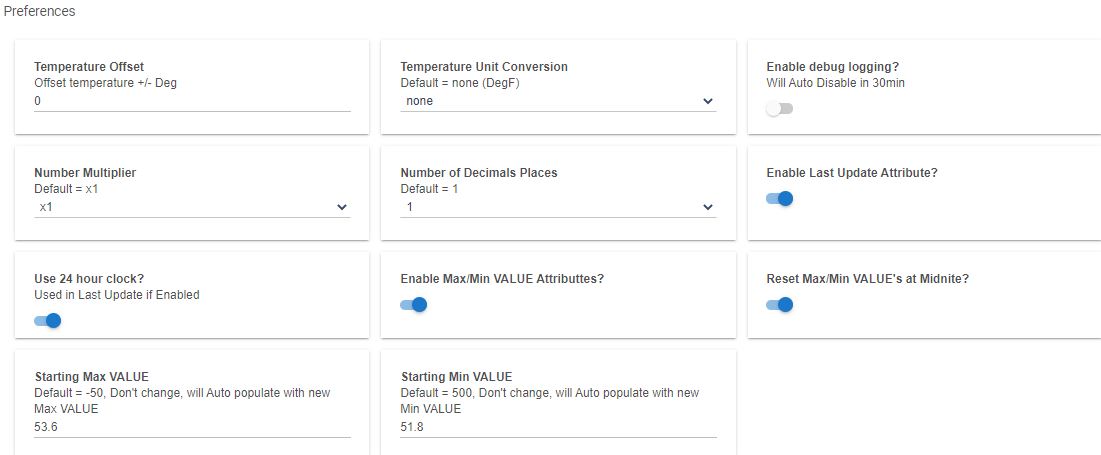
The min max attributes values are neat so you can see where thing topped out or went low during the day.

5 Likes
I tried searching this huge topic, but kept finding just the code line
- long offset - REQUIRED - the polling interval offset in seconds - used to prevent all polling sensors from executing at the same time
Could someone please give details on the OFFSET parameter for polling sensors? Is the offset from time of construction?
So, if I have 8 polling sensors that I want offset 2 seconds apart would I put 2 for each sensor, or 2 for the second, 4 for the third, 6 for the forth, etc.?
EDIT:
I looked into PollingSensor.cpp to answer my own question (should have done that first!).
If I am reading the code correctly, the offset is initiated on the first call for checkinterval by making it LATER by the offset amount the first time. m_nOffset is then set to 0 so it does not affect the calculation any longer.
Therefore, I surmise that I do the latter of my initial ask.
2 Likes
Exactly!
1 Like
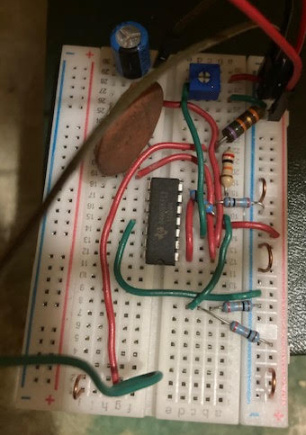
@ogiewon great app the possibilities are endless with this!!! I am having an issue with my first use case however...
I have an arduino uno with Ethernet running the sketch to talk to hubdunio on my HE hub. I have a relay attached to the arduino and can control the relay using the buttons via the child device, so I believe I have everything communicating properly.
My issue is that I am trying to have it control my garage door, basically wire the NO (normally open) connections from the relay to the same place my wired garage door opener wires in. I have had this work in past with an APC AP9340 device that acts as the relay, but my garage gets cold in winter and that system is unreliable when cold, or the device is just starting to go belly up so trying to come up with replace,ent with stuff I already have
When the arduino boots, I want it to have the relay de energized until child device (not sure which one at this point) is turned on which will cause the NO contact to close for half a second, and then turn the child device back off opening the relay again.
What I am seeing is that the device is always energized causing it to be closed, and when I “turn on” the child device it is de energizing the relay causing the contact open for a moment and the re energizes causing it to close again. It seems to be doing the opposite of what I want. I have tried Child Door Control, Child Relay Switch, Child Switch and none are doing what I need. It seems to be the opposite of what I am trying to do.
Appreciate any advice on if this is possible.
Yes, there are a few parameters that can configure the device’s default startup behavior.
At the top of every device’s .h and .cpp file in the ST_Anything library, is the documentation for that particular device.
If you’re using both a relay to “press the garage door button” AND a wired contact sensor to know the open/closed status of the garage door, I’d recommend using the IS_DoorControl device. This device is basically a S_TimedRelay and IS_ContactSensor device combined in one.
//******************************************************************************************
//  File: IS_DoorControl.h
//  Authors: Dan G Ogorchock & Daniel J Ogorchock (Father and Son)
//
//  Summary:  IS_DoorControl is a class which implements the SmartThings "Door Control" device capability.  It features
//			  an automatic-turn-off time delay for a relay to actuate a button press.  This is useful for controlling
//			  a garage door.  Use the input to monitor a magnetic door contact sensor.  Use the output to control a relay to
//			  "press the garage door button" to open/close the garage door.
//
//			  It inherits from the st::InterruptSensor class and clones much from the st::Executor Class
//
//			  Create an instance of this class in your sketch's global variable section
//			  For Example:  st::IS_DoorControl sensor3(F("doorControl1"), PIN_CONTACT_DOOR_1, LOW, true, PIN_RELAY_DOOR_1, LOW, true, 1000, 1000, true);
//
//			  st::IS_DoorControl() constructor requires the following arguments
//				- String &name - REQUIRED - the name of the object - must match the Groovy ST_Anything DeviceType tile name
//				- byte pinInput - REQUIRED - the Arduino Pin to be used as a digital input
//				- bool iState - REQUIRED - LOW or HIGH - determines which value indicates the interrupt is true
//				- bool internalPullup - REQUIRED - true == INTERNAL_PULLUP
//				- byte pinOutput - REQUIRED - the Arduino Pin to be used as a digital output
//				- bool startingState - REQUIRED - the value desired for the initial state of the switch.  LOW = "off", HIGH = "on"
//				- bool invertLogic - REQUIRED - determines whether the Arduino Digital Output should use inverted logic
//				- long delayTime - REQUIRED - the number of milliseconds to keep the output on
//				- long numReqCounts - OPTIONAL - number of counts before changing state of input (prevent false alarms)
//              - bool useMomentary - OPTIONAL - use momentary output (true) or standard switch (false) (defaults to true)
If you’re just wanting a momentary relay output device to just “press the button”, I’d use the S_TimedRelay device.
//******************************************************************************************
//  File: S_TimedRelay.cpp
//  Authors: Dan G Ogorchock
//
//  Summary:  S_TimedRelay is a class which implements the SmartThings "Relay" device capability.  It features
//			  an automatic-turn-off time delay for a relay to emulate a button press.
//
//			  It inherits from the st::Sensor class and clones much from the st::Executor Class
//
//			  Create an instance of this class in your sketch's global variable section
//			  For Example:  st::S_TimedRelay sensor1(F("relaySwitch1"), PIN_RELAY, LOW, true, 1000, 0, 1, 0);
//
//			  st::S_TimedRelay() constructor requires the following arguments
//				- String &name - REQUIRED - the name of the object - must match the Groovy ST_Anything DeviceType tile name
//				- byte pinOutput - REQUIRED - the Arduino Pin to be used as a digital output
//				- bool startingState - REQUIRED - the value desired for the initial state of the switch.  LOW = "off", HIGH = "on"
//				- bool invertLogic - REQUIRED - determines whether the Arduino Digital Ouput should use inverted logic
//				- long onTime - REQUIRED - the number of milliseconds to keep the output on, DEFAULTS to 1000 milliseconds
//				- long offTime - OPTIONAL - the number of milliseconds to keep the output off, DEFAULTS to 0
//				- int numCycles - OPTIONAL - the number of times to repeat the on/off cycle, DEFAULTS to 1
//              - byte finalState - OPTIONAL - leave in X state after finishing sequence 0 = off, 1 = on , Defaults to 0
Try different combinations of the “startState” and “invertLogic” to get things behaving correctly when the Arduino boots up, and for normal operations. For a garage door, you definitely want to use the normally open relay contacts, to avoid the exact issue you’re describing.
Thanks that seemed to do it !!!! The number of arguments was different in the ethernet sketch than the number in the .cpp /.h files. Messing with the startingState and invertLogic arguments was the way to go !!! It's working perfectly now !!!
Here is what I am using to initiate the doorcontrol "sensor"
static st::IS_DoorControl sensor15(F("doorControl1"), PIN_DOORCONTROL_CONTACT_1, LOW, true, PIN_DOORCONTROL_RELAY_1, LOW, false, 500, 1000, true);
I'm still slightly confused on the numReqCounts argument as I am apparently using it above at 1000 but not sure why other than it was in the example in the .cpp/.h files.
Thanks again @ogiewon for a great addition to my HA arsenal !!!
This is the number of consecutive times through the loop() routine that the digital input for the contact sensor has to be in a different state before Hubitat will be notified of the change. This is to prevent false/duplicate reports of changes of state.
That would make sense then, I had a till sensor on the contact sensor for this and would notice it frequently went from open to close a couple times before I had that argument in place. After it was in place I didn't notice it bounce once .
1 Like
Has anyone had success with OTA programming Hubduino code with a NodeMCU? I have a couple of devices I want to install that require going in the attic and another requiring a ladder. I have tried to do it, but I may not have it set up properly. If I need to update the SSID or code, I do not want to have to bring the device to my computer.

