I forgot about that. SmartThings does list them under rgb, per the SmartThings driver I believe. You can change the driver in HE to rgbw (except garden spots, just saw your other post) after the bulbs appear. Regarding your mesh issues; I would remove the Tradfri bulbs and see if that helps since they are repeaters. @SmartHomePrimer had to move his over to Hue because of mesh issues they caused. I’ve had a very stable mesh with around 60 Sylvania rgbw bulbs on my second HE hub, but they are all the newer Smart+ ones and all updated to the latest firmware.
1 Like
I forgot to mention that my zigbee used to lock up when I had 6 peanut plugs connected. In the routing table, every time I refreshed the page the routes would be different.
I am currently getting a Warning label next to my Hoobs Instance. I can't seem to find an error though and everything is working correctly. Any ideas?
Today, I decided to create a new custom driver. For some reason, it is overwriting another driver that I had created a while ago.
It keeps the old name (xiaomiWindowSensor) but the other details are the new ones.
I figured I must have put in the wrong name when I created, so I created it again, and again, it overwrote the same driver.
Any ideas what would cause this?

Going to start to transition from Smartthings to Hubitat. I think I will do it gradually using HubConnect. I just ordered a C-7 hub that I would use as the "server" . Do I need to use another C-7 as the coordinator or can I use an older Hubitat hub?
You don't need a second Hubitat for that at all; HubConnect is bidirectional and can send and receive device events from ST or another Hubitat (i.e., in both directions). One hub somewhere has to be the "server," though that's more or less an arbitrary designation given the previous fact. SmartThings can only be a "client," however, so in your case you have only one choice for which hub to make the server: Hubitat.
You can connect two (or more) Hubitat hubs together with HubConnect, too (or any combination of Hubitat and ST hubs). Some people choose to make one Hubitat hub in this case a "coordinator" that doesn't do Zigbee or Z-Wave and just performs automations with HubConnect or virtual devices. That hub may or may also not be designated as the "server." But that's another story--maybe one you can explore if you end up being one of "those people" who want more than one Hubitat for some reason. 
Thanks for clearing that up. One last question. Since it may be a couple weeks till I get the hub, should I wait for V2 of Hubconnect or just use the current version since I will only be using Hubconnect for a transition period?
I'd just use v2 as is. It's technically release candidate stage, but it's pretty stable and probably didn't make it to official "final" status only because the author is away for a bit per his summer norms. That being said, 1.5 is also fine (and a tad easier to get to), but if you end up using it longer than you expected, it's unlikely to get bug fixes, and you'll have to follow specific upgrade instructions since a couple things are different enough that you need to pay attention when upgrading.
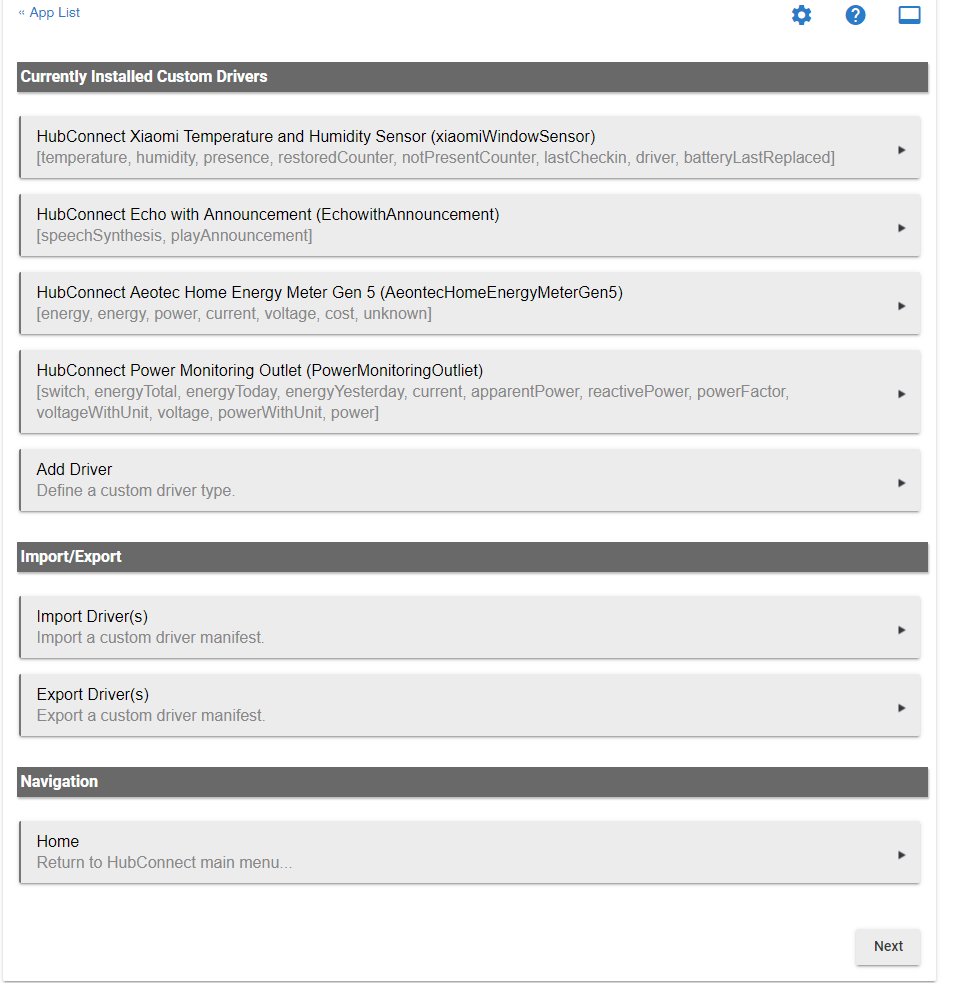
I have a follow-up to my initial custom driver issue... Since I started using the other two drivers (for a new Water and a new Temperature sensor), the device status of the devices using the custom contact sensors (that I named Xiaomi Window Sensor) will no longer refresh on the client hub.
I noticed that all those drivers had the same value in the "parent.syncDevice(device.deviceNetworkId, " xiaomiWindowSensor ")" parameter (Value that I think should have been different in italics ...) I wonder if it makes a difference that the value was the same in 3 different drivers...?
I updated the NetworkId parameters so they would each had a different one, but that didn't seem to make a difference.
I then decided to see if using the default Hub Connect driver would work better and found that it did. However, I lost all the other capabilities/attributes that I was looking for, presence being a key one.
So, I added the attributes I needed in an updated version of the Hub Connect Contact Sensor Driver. It now reports the values, but only when I press "Sync" which is a problem, as I cannot see the live status of those sensors...
I am now at a loss... Not sure what else I can do to debug this problem... I rebooted both hubs and updated them to the latest update (2.2.2.126), but that didn't appear to change anything...
@csteele, Is this something you would have seen before? Do you or does anyone else have recommendations on the next steps to help debug/resolve this?
In case it may help, here is the updated Contact Sensor driver which will only refresh when pressing the Sync button:
HubConnect Contact Sensor
/*
- Copyright 2019 Steve White
- Licensed under the Apache License, Version 2.0 (the "License"); you may not
- use this file except in compliance with the License. You may obtain a copy
- of the License at:
-
http://www.apache.org/licenses/LICENSE-2.0 - Unless required by applicable law or agreed to in writing, software
- distributed under the License is distributed on an "AS IS" BASIS, WITHOUT
- WARRANTIES OR CONDITIONS OF ANY KIND, either express or implied. See the
- License for the specific language governing permissions and limitations
- under the License.
*/
metadata
{
definition(name: "HubConnect Contact Sensor", namespace: "shackrat", author: "Steve White", importUrl: "https://raw.githubusercontent.com/HubitatCommunity/HubConnect/master/UniversalDrivers/HubConnect-Contact-Sensor.groovy")
{
capability "Contact Sensor"
capability "Temperature Measurement"
capability "Battery"
capability "Refresh"
capability "PresenceSensor"
	attribute "battery", "string"
	attribute "batteryLastReplaced", "string"
	attribute "driver", "string"
	attribute "lastCheckin", "string"
	attribute "lastClosed", "string"
	attribute "lastOpened", "string"
	attribute "notPresentCounter", "string"
	attribute "restoredCounter", "string"
	attribute "version", "string"

	command "sync"
}
}
/*
installed
Doesn't do much other than call initialize().
*/
def installed()
{
initialize()
}
/*
updated
Doesn't do much other than call initialize().
*/
def updated()
{
initialize()
}
/*
initialize
Doesn't do much other than call refresh().
*/
def initialize()
{
refresh()
}
/*
parse
In a virtual world this should never be called.
*/
def parse(String description)
{
log.trace "Msg: Description is $description"
}
/*
refresh
Refreshes the device by requesting an update from the client hub.
*/
def refresh()
{
// The server will update status
parent.sendDeviceEvent(device.deviceNetworkId, "refresh")
}
/*
sync
Synchronizes the device details with the parent.
*/
def sync()
{
// The server will respond with updated status and details
parent.syncDevice(device.deviceNetworkId, "contact")
sendEvent([name: "version", value: "v${driverVersion.major}.${driverVersion.minor}.${driverVersion.build}"])
}
def getDriverVersion() {[platform: "Universal", major: 1, minor: 2, build: 1]}
I have limited (read non-existent) knowledge on how driver work, so I'm certain that I must be missing a small detail somewhere... 
@csteele I've got some time today and thinking of upgrading to 2.0 RC1. Are there any instructions to upgrade and incorporate the NodeJS server. I have node installed, just wondering where the config stuff is. I looked on the hubconnect.io site but couldnt find any specific instructions.
https://hubconnect.to/download/category/7/HubConnect-Server.html
https://hubconnect.hubitatcommunity.com/
Between those two you should have all the details.
There's a video plus a tool to build the config as well.
1 Like
Each Custom driver should be unique.
The Attribute Class Name should be unique.
1 Like
I am very excited about HubConnect and its capabilities! Will open up some cool integrations.
Can someone please point me in right direction for a clean install of 2.0 RC1 on 1 Hubitat hub (as server, remote) and 1 ST hub (as remote). No Node server as of yet.
I have been reading through the threads here... and I have watched the videos at https://hubconnect.hubitatcommunity.com/... but all the instructions and videos are based on upgrading from v1.6.4.
I tried to follow the v1.6.4 instructions, replacing the files with the 2.0 versions, but something is off. I am unable to get the Hubitat remote client to talk to the Hubitat server (connection refused). I am thinking I am either missing app or driver code... or my order of installation messed up the server instance creation.
Thanks in advance!
You'll have to create a free account.
It's the last link, at the bottom: HubConnect Support Website on that page with the Videos.
The New Install is very straightforward, I believe. You pick a Hubitat hub as "server" and if you only have one, that makes the choice easy.
You then install three pieces of code:
- HubConnect Server for Hubitat -- APP
- HubConnect Server Instance -- APP
- HubConnect Remote Hub -- DRIVER
On ST, you'll install two pieces of code:
- HubConnect Remote Client -- SmartApp
- HubConnect Remote Hub for SmartThings -- Device Handler.
Those are the minimum set of code installs. You can create a SmartThings Instance in HubConnect Server for Hubitat.
I've often tried to explain that HubConnect is like a highway.. there's the highway itself, then there's the cars and trucks that use the highway. Installing an configuring the minimum set of code above is the 'build a highway' portion. No cars or trucks allowed yet. 
For each type of device, you will need a matching Universal or SmartThings driver installed. Every device exists on either ST or Hubitat.. those devices use REAL drivers. But on the OTHER end, you'll need HubConnect drivers. Be certain to use the v2.0 drivers with v2.0 Code.
Once you have the HubConnect driver installed on the appropriate hub, you can begin to Select Devices to be 'mirrored'. There's a list of required drivers shown during the select process.. be certain you install them.
Thanks @csteele. I have created that account previously in order to download the new v2.0 files.
I will try these steps for a clean install now. Appreciate it.
Be certain you have the 'highway built' before struggling with 'cars and trucks' (devices).
hahaha. definitely! My first goal is to make sure hubitat can talk it itself! More of a rotary than a highway.
One set of installs is "left-to-right" in the sense that you can use specific words to identify a Hub. Such as "server" and "remote."
But the 'mirroring' has a bidirectional component to it. I'm forced to use words like "hub-with-the-real-device" and "connected hub" because device selection occurs on either (or both) ends of a connected hub pair. And which ever hub is selecting devices gives it an identity for a moment or two. The receiver of that selection is the 'other hub'...
It's a challenge to type out words and have it be well communicated.
1 Like
This is such a cool capability. I want to help simplify the clean install instructions for those going straight to v2.0.
Here's what I did thus far for a CLEAN INSTALL of v2.0:
Via the Hubitat web admin, I installed the following HubConnect v2.0 pieces of code:
- HubConnect Server for Hubitat -- APP (Downloads - HubConnect Apps) -- enabled OAUTH
- HubConnect Server Instance -- APP (Downloads - HubConnect Apps) -- enabled OAUTH
- HubConnect Remote Hub -- DRIVER (Downloads - HubConnect Apps)
Via the SmartThings web IDE, I installed the following HubConnect v2.0 pieces of code:
- HubConnect Remote Client for SmartThings -- SmartApp (Downloads - HubConnect Apps) -- enabled OAUTH, PUBLISH (For me)
- HubConnect Remote Hub for SmartThings -- Device Handler (Downloads - HubConnect Apps)
I then moved on to the app install.
HUBITAT WEB ADMIN PAGE:
- Go to APPS, ADD USER APP, select "HubConnect Server for Hubitat", click DONE.
- Now I am on the App List page. Click "HubConnect Server for Hubitat".
- Click "Connect a Hub".
- No hubs found. I entered the Private LAN IP Address of Client Hub -- which is my SmartThings local IPA (192.168.1.138).
- Select type = SmartThings
- Is there a SmartThings hub connected? I select YES.
- For Local Connection Type:, I selected SmartThings oAuth.
- I copy the server key and text it to my iPhone.
MOVE OVER TO THE SMARTTHINGS iPHONE APP:
- Go to SMARTAPPS. I select "HubConnect Remote Client".
- I click "Connect to Server Hub..."
- I paste the server hub's connection key...
- I hit DONE then NEXT.
- I now see the hubitat server details!!!! Hooray! It says Connected.
- I click NEXT then DONE a few times.
- In the SmartApps listing, I see my Hubitat hub listed as Online.
BACK TO THE HUBITAT WEBADMIN PAGE:
- Verify connection.
- It says connected!
- Name my SmartThings hub and click DONE.
Hopefully this will help others!
Now that they are talking, the next step is the cars and trucks. 
5 Likes
@csteele:
Could I ask for your opinion on the following approach:
I have one hub with real zwave and real zigbee devices (HUB A), being controlled by HUB B.
All my automations are on HUB B.
I'm getting a new c-7, and I'd like to move over my real zwave devices from HUB A to this new hub (HUB C). I'm planning on keeping all the same, exact names.
- Shut down Hub Connect temporarily.
- On an individual basis, exclude zwave device from Hub A, and include in Hub C.
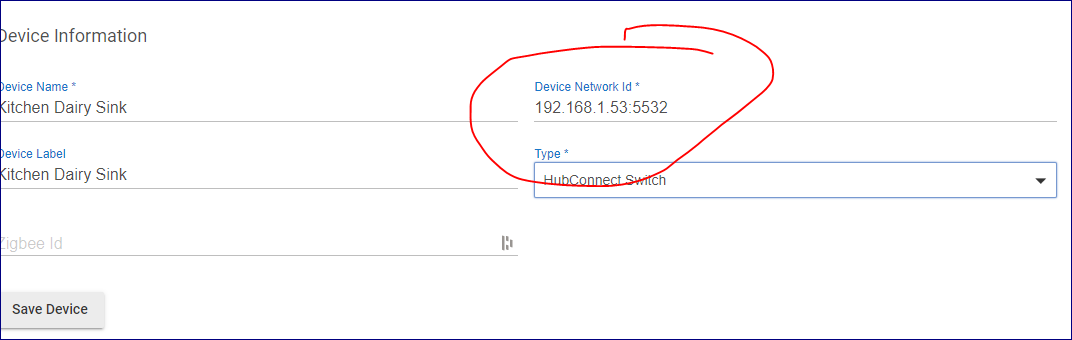
- On Hub B, edit the DNI to reflect the new Hub (C), and the new number of the device.
- restart Hubconnect.
Step #3: