Go ahead 
Let me know if you need help. I've written a few apps that have webhooks (including my own version of maker api).
Your URL's for local access vs cloud will be different.
Also some good documentation here with info...
https://docs.smartthings.com/en/latest/smartapp-web-services-developers-guide/tutorial-part1.html
I don't think this can be done in a driver though... I think its limited to apps.
3 Likes
There's not many examples of this anywhere, so I will post what I sent over PM yesterday for those that stumble over this in the future:
definition(
    name: "Test API",
    namespace: "markus-li",
    author: "Markus Liljergren (markus-li)",
    description: "None",
    category: "Convenience",
    installOnOpen: true,
    //TODO: Replace these icons???
    iconUrl:   "",
    iconX2Url: "",
    iconX3Url: "",
    documentationLink: ""
) {
}

preferences {
    page(name: "pageMain", title: "Main Page", install: true, uninstall: true)
    page(name: "pageEnableAPI")
    page(name: "pageDisableAPI")

    mappings {
        path("/device/:id/:status/") {
            action: [
            GET: "getDevice"
            ]
        }
    }
}

void installed() {
    initializeAPIEndpoint()
}

String initializeAPIEndpoint() {
    if(!state.accessToken) {
        if(createAccessToken() != null) {
            state.endpoint = getApiServerUrl()
            state.localAPIEndpoint = getFullLocalApiServerUrl()
            state.remoteAPIEndpoint = getFullApiServerUrl()
        }
    }
    return state.accessToken
}

/* Pages */
Map pageDisableAPI() {
    dynamicPage(name: "pageDisableAPI") {
        section() {
            if (state.accessToken != null) {
                state.accessToken = null
                state.endpoint = null
                paragraph("SUCCESS: API Access Token REVOKED! Tap Done to continue")
            }
        }
    }
}

Map pageEnableAPI() {
    dynamicPage(name: "pageEnableAPI", title: "") {
        section() {
            if(state.accessToken == null) {
                initializeAPIEndpoint()
            }
            if (state.accessToken == null){
                paragraph("FAILURE: API NOT Initialized!")
            } else {
                paragraph("SUCCESS: API Initialized! Tap Done to continue")
            }
        }
    }
}

Map pageMain() {
    dynamicPage(name: "pageMain") {
        section() {
            if(state.accessToken == null) {
                paragraph("API is not yet Initialized!")
                href(name: "hrefPageEnableAPI", title: "Enable API", description: "", page: "pageEnableAPI")
            } else {
                String localURL = "${state.localAPIEndpoint}/device/1234/active/?access_token=${state.accessToken}"
                String remoteURL = "${state.remoteAPIEndpoint}/device/1234/active/?access_token=${state.accessToken}"
                paragraph("LOCAL API (devices): <a href=\"$localURL\" target=\"_blank\">$localURL</a>")
                paragraph("REMOTE API: <a href=\"$remoteURL\" target=\"_blank\">$remoteURL</a>")
            }
        }
    }
}

Map getDevice() {
    log.debug("Running getDevice() $params")
}
3 Likes
Correct. True OAUTH endpoints can only be exposed and handled by an App, not a Driver.
A driver, with the correct device network ID can handle unsolicited LAN messages on port 39501. The DNI needs to be either the MAC address, or TCPIP address (in hex), of the sender so the platform knows which device’s parse() routine to call.
1 Like
This worked perfectly! Here's the log showing the parameter (just to briefly explain for anyone this is to differentiate motion types from a camera - motion, human, pet, vehicle, face)
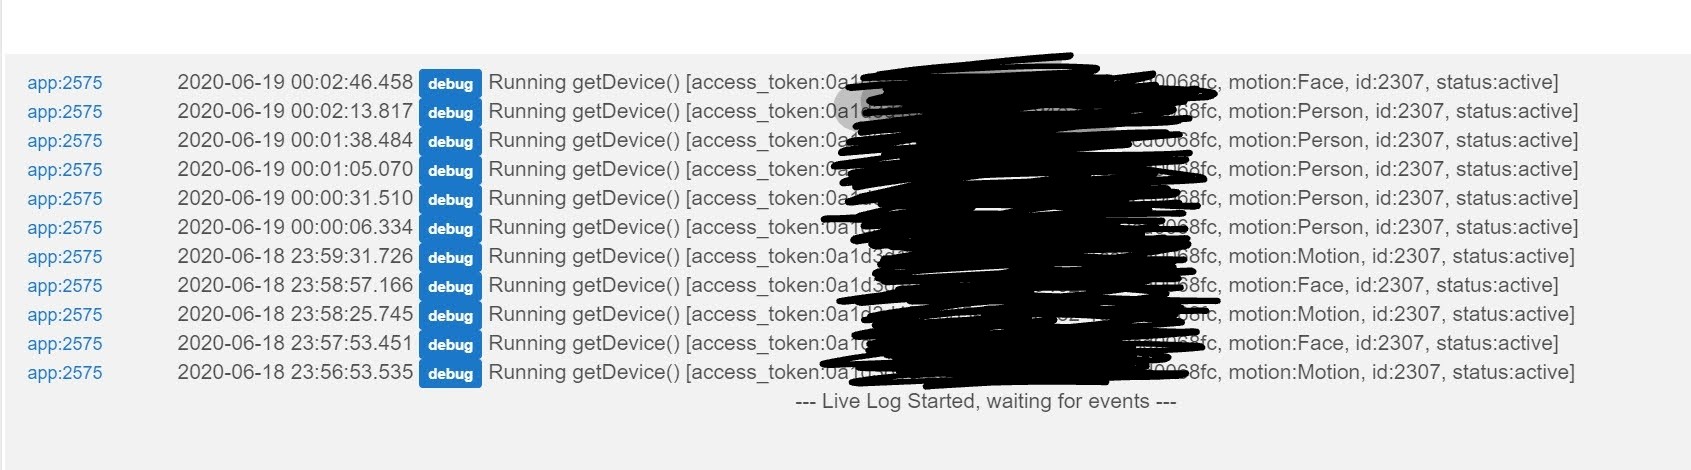
This was the log from last night's testing of @markus's fantastic script which reported me and the missus walking around the room.
Now I have to work out how to extend it to cover everything I need. Been trying to think through the best approach. What I'd ideally like is a way to create child apps - 1 for each camera. Each child app would create a set of virtual motion sensors for that camera depending on what the users chooses as sensible for that camera (eg. lounge_cam_motion, lounge_cam_pet, lounge_cam_human. But for a driveway cam, say: driveway_cam_motion, driveway_cam_vehicle, driveway_cam_pet, driveway_cam_human). And then the motion type parameter from that specific camera would activate the relevant virtual motion sensor with an auto off after a while.
The virtual motion sensors can then be used in RM automations (send a message vehicle arrived in driveway, or turn on sprinkler when pet on lawn  etc)
etc)
1 Like
In case anyone else wants to try this, put your cameras into the tinyCam app. The app covers a huge range of ip/web cams (including Arlo, Wyze etc).
Once you have your cams set up, go into the camera settings for each and activate motion sensing (which happens in the app, so no special camera functionality is needed - yes you can cancel your expensive motion recognition subscriptions now ). You can set up zones, adjust sensitivity etc.
You then get this panel allowing you to activate the various motion types and allowing a Webhook to be set up, near the bottom of the page (click the image to expand).
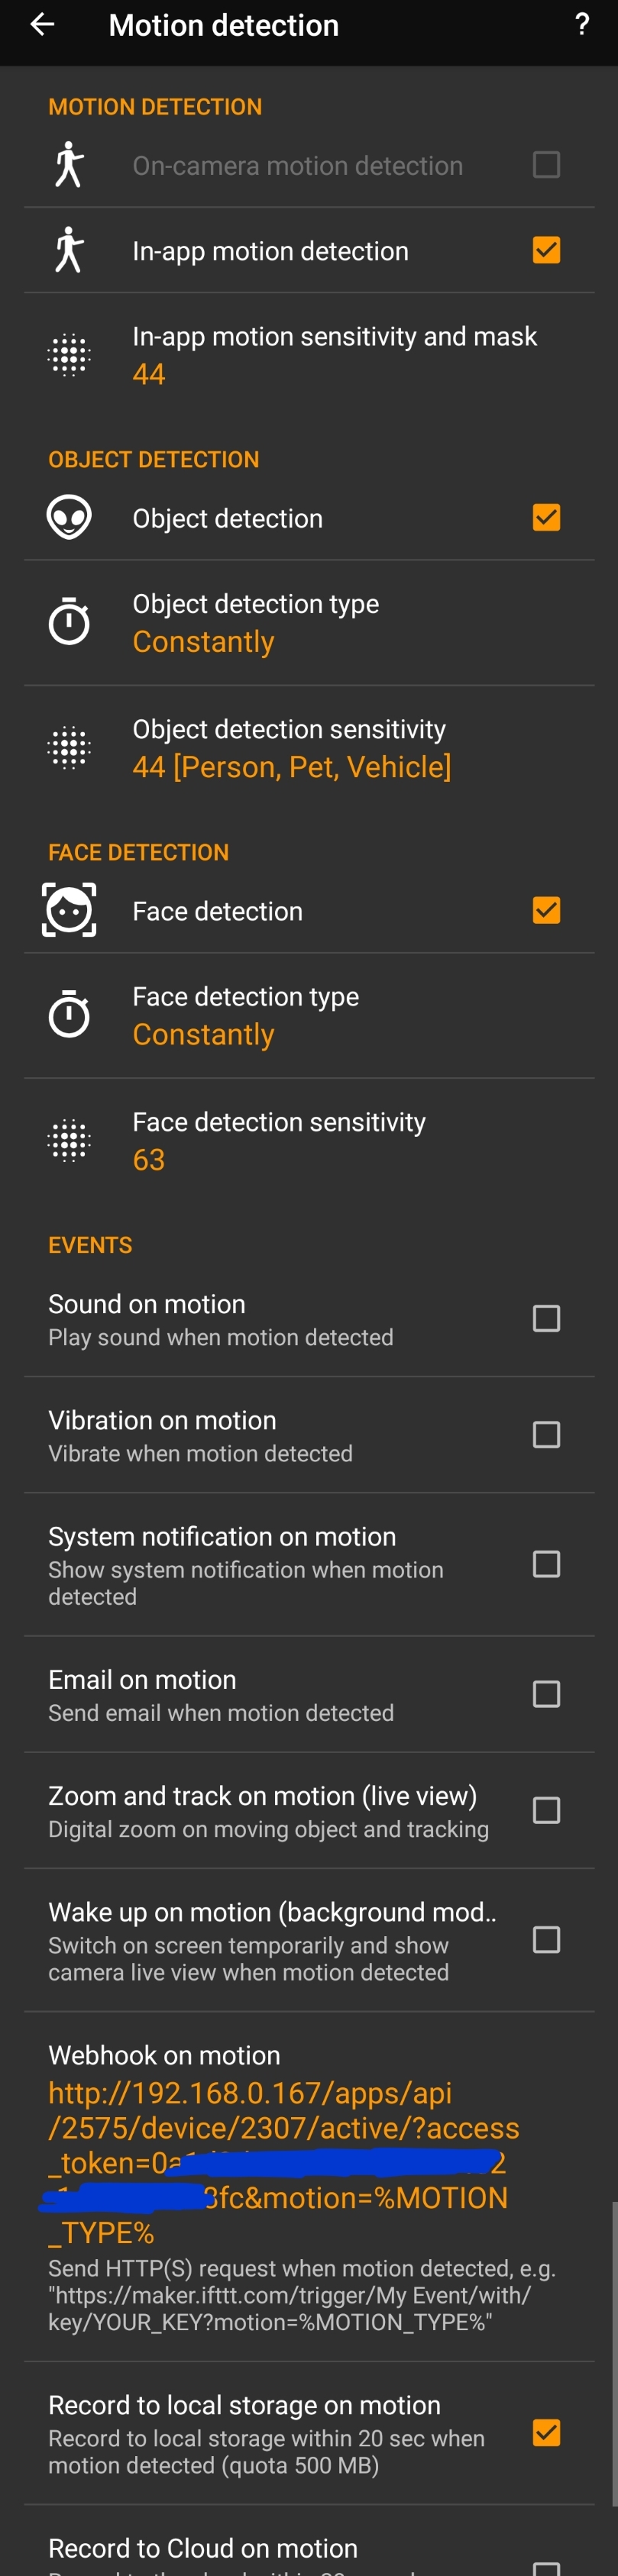
My example Webhook is shown in orange in the panel, and works with the test app that @markus put together (above in this thread). Put your own oauth token into the Webhook of course, once you've installed the app in HE.
Then open your log and see the reported motion type...
Very cool!
And thank you very much to Alex at tinyCam for responding to the request to add this additional functionality to the Webhook!
1 Like
We now have a working interface with tinyCam that enables all sorts of possibilities with camera motion/object sensing across a wide range of ip/web cams!

Some tweaks to the code to:
- allow virtual motion sensors to be selected for each motion type (motion, person, pet, vehicle face) - nb. face is non-specific/personal
- rename the app on-save (since you need an instance for each camera - a parent/child structure would be better, but not sure yet how to do this)
- drive the sensors to active when motion is sensed
- added some info at the top (trust this is appropriate)
@markus graciously suggested I put my name on this (he did all the work but it was my original app idea I guess ). Since I have little clue what I'm doing, thats very kind. I've also copied some formatting from @bptworld apps and intend to try to emulate his use of parent/child structure in the future too.
/**

   Hubitat App to allow ip/web cameras in tinyCam to drive Hubitat Virtual Motion Sensors

   tinyCam is an app available on Android/IOS/PC and can discriminate between different types of motion:
    - motion
    - person
    - pet
    - vehicle
    - face (non specific/personal)

   Set-Up:

   In tinyCam:
   - install the tinyCam Monitor Pro app (there is a free add-supported version)
   - add your cameras
   - in camera settings, motion detection, enable all the motion types
   - add a webhook http://[your_hub_ip/apps/api/XXXX/?access_token=YYYY&motion=%MOTION_TYPE%
     (where XXXX is the ID of this app once installed and YYYY is the access code reported in this app (remember to activate oath when installing)

   In Hubitat:
   - simply set-up virtual motion sensor devices (1 for each motion type)
   - then select these when you run the app
   - rename the app to be unique for your chosen camera (will move to Parent/Child format soon)
   - you can also use an html tile in a dashboard to view the live webcam (if you activate the webserver function in tinyCam)

 -----------------------------------------------------------------------------------------------------------------------------
   Licensed under the Apache License, Version 2.0 (the "License"); you may not use this file except
   in compliance with the License. You may obtain a copy of the License at:

       http://www.apache.org/licenses/LICENSE-2.0

   Unless required by applicable law or agreed to in writing, software distributed under the License is distributed
   on an "AS IS" BASIS, WITHOUT WARRANTIES OR CONDITIONS OF ANY KIND, either express or implied. See the License
   for the specific language governing permissions and limitations under the License.
 ------------------------------------------------------------------------------------------------------------------------------

   If modifying this project, please keep the above header intact and add your comments/credits below - Thank you!

 ------------------------------------------------------------------------------------------------------------------------------

  Changes:

  0.0.2 - 20th June 2020 - Added selection of virtual motion sensors, simplified url/params, code to activate motion sensors,
                           code to rename the app [Angus Marshall]
  0.0.1 - 18th June 2020 - Initial code [Markus Liljergren]

**/

def setVersion(){
    state.name = "tinyCam Connector"
	state.version = "0.0.2"
}

definition(
    name: "tinyCam Connector",
    namespace: "Angus_M",
    author: "Angus Marshall (Angus_M)",
    description: "set virtual motion sensors to active when http received from tinyCam (or other similar webcam app)",
    category: "Convenience",
    installOnOpen: true,
    //TODO: Replace these icons???
    iconUrl:   "",
    iconX2Url: "",
    iconX3Url: "",
    documentationLink: ""
) {
}

preferences {
    page(name: "pageMain", title: "Main Page", install: true, uninstall: true)
    page(name: "pageEnableAPI")
    page(name: "pageDisableAPI")

    mappings {
        path("/") {
            action: [
            GET: "getDevice"
            ]
        }
    }
}

void installed() {
    log.debug "Installed with settings: ${settings}"
    initializeAPIEndpoint()
}

def updated() {
    log.debug "Updated with settings: ${settings}"
    unsubscribe()
    initializeAPIEndpoint()
}

String initializeAPIEndpoint() {
    if(!state.accessToken) {
        if(createAccessToken() != null) {
            state.endpoint = getApiServerUrl()
            state.localAPIEndpoint = getFullLocalApiServerUrl()
            state.remoteAPIEndpoint = getFullApiServerUrl()
        }
    }
    return state.accessToken
}

/* Pages */
Map pageDisableAPI() {
    dynamicPage(name: "pageDisableAPI") {
        section() {
            if (state.accessToken != null) {
                state.accessToken = null
                state.endpoint = null
                paragraph("SUCCESS: API Access Token REVOKED! Tap Done to continue")
            }
        }
    }
}

Map pageEnableAPI() {
    dynamicPage(name: "pageEnableAPI", title: "") {
        section() {
            if(state.accessToken == null) {
                initializeAPIEndpoint()
            }
            if (state.accessToken == null){
                paragraph("FAILURE: API NOT Initialized!")
            } else {
                paragraph("SUCCESS: API Initialized! Tap Done to continue")
            }
        }
    }
}

Map pageMain() {
    dynamicPage(name: "pageMain") {
        section() {
            if(state.accessToken == null) {
                paragraph("API is not yet Initialized!")
                href(name: "hrefPageEnableAPI", title: "Enable API", description: "", page: "pageEnableAPI")
            } else {
                String localURL = "${state.localAPIEndpoint}/?access_token=${state.accessToken}"
                String remoteURL = "${state.remoteAPIEndpoint}/?access_token=${state.accessToken}"
                paragraph("LOCAL API (devices): <a href=\"$localURL\" target=\"_blank\">$localURL</a>")
                paragraph("REMOTE API: <a href=\"$remoteURL\" target=\"_blank\">$remoteURL</a>")

                input "motionDevice", "capability.motionSensor", title: "Motion: Which motion sensor to control?", multiple: false, required: true
                input "personDevice", "capability.motionSensor", title: "Person: Which motion sensor to control?", multiple: false
                input "petDevice", "capability.motionSensor", title: "Pet: Which motion sensor to control?", multiple: false
                input "vehicleDevice", "capability.motionSensor", title: "Vehicle: Which motion sensor to control?", multiple: false
                input "faceDevice", "capability.motionSensor", title: "Face: Which motion sensor to control?", multiple: false
                label title: "Enter a name for this app", required: false

            }
        }
    }
}

Map getDevice() {
    log.debug("Running getDevice() $params")

    if (params.motion == "Motion") {
        motionDevice.active()
    } else if (params.motion == "Person") {
        personDevice.active()
    } else if (params.motion == "Pet") {
        petDevice.active()
    } else if (params.motion == "Vehicle") {
        vehicleDevice.active()
    } else if (params.motion == "Face") {
        faceDevice.active()
    }

}
Still to do:
-
Move to a parent/child structure
-
Create the virtual motion sensor devices automatically instead of selecting them (probably makes sense and saves the user having to do this prior to running the app)
-
Put into HPM
Enjoy!
5 Likes
Changed thread title to reflect "alpha" release of the app 
1 Like
You know...this would be a good use case for MQTT. Then all those attributes could be sent....just sayin...
2 Likes
Interesting project, I look forward to seeing how it develops. Thanks for posting.
1 Like
Making some progress with this (by heavily leveraging @bptworld's work, namely parent/child layout and nice formatting). Trust this is ok and of course noted in the code. So now a child can be created for each camera. Use the URL generated for the webhook in tinyCam with the form:
http://hub_ip/apps/api/app_number_generated_by_child_app/?access_token=your_oauth_token_generated_by_the_child_app&motion=%MOTION_TYPE%
tinyCam will put the appropriate motion type into %MOTION_TYPE% for you (eg. Motion, Person, Vehicle, Pet, Face) and the child app will identify that and activate the selected virtual motion sensor for you (to use in whatever RM rule you want).
To do still:
- automatically create the virtual motion devices (although in a way its nicer I think to allow the user to select whichever devices they want (not all are necessarily necessary if the various AI-motion types are not all needed for a specific camera))
- put into HPM
Parent App:
/**
 *  ****************  tinyCam Connector  ****************
 *
 *  Description:
 *  Manage child apps which enable webhooks from tinyCam to drive virtual motion sensors in Hubitat.
 *
 *  Copyright 2020-> Angus Marshall (@Angus_M)
 *
 *  Thanks to Markus (@markus) for the original code and Bryan (@bptworld) for much of the code layout and child/parent structure
 *
 *  This App is free.  If you like and use this app, please be sure to mention it on the Hubitat forums!  Thanks.
 *
 *-------------------------------------------------------------------------------------------------------------------
 *  Licensed under the Apache License, Version 2.0 (the "License"); you may not use this file except
 *  in compliance with the License. You may obtain a copy of the License at:
 *
 *      http://www.apache.org/licenses/LICENSE-2.0
 *
 *  Unless required by applicable law or agreed to in writing, software distributed under the License is distributed
 *  on an "AS IS" BASIS, WITHOUT WARRANTIES OR CONDITIONS OF ANY KIND, either express or implied. See the License
 *  for the specific language governing permissions and limitations under the License.
 *
 * ------------------------------------------------------------------------------------------------------------------------------
 *
 *  If modifying this project, please keep the above header intact and add your comments/credits below - Thank you! -  @Angus_M
 *
 * ------------------------------------------------------------------------------------------------------------------------------
 *
 *  Changes:
 *
 *  0.0.1 - 27th June 2020 - Initial alpha release - Angus Marshall
 *
 */

def setVersion(){
    state.name = "tinyCam Connector"
	state.version = "0.0.1"
}

definition(
	name: "tinyCam Connector",
	namespace: "Angus_M",
	author: "Angus Marshall",
	description: "Manage child apps which enable webhooks from tinyCam to drive virtual motion sensors in Hubitat.",
	category: "Convenience",
	iconUrl: "",
	iconX2Url: "",
	iconX3Url: "",
)

preferences {
     page name: "mainPage", title: "", install: true, uninstall: true
}

def installed() {
    log.debug "Installed with settings: ${settings}"
    initialize()
}

def updated() {
    log.debug "Updated with settings: ${settings}"
    unsubscribe()
    initialize()
}

def initialize() {
    log.info "There are ${childApps.size()} child apps"
    childApps.each {child ->
    log.info "Child app: ${child.label}"
    }
}

def mainPage() {
    dynamicPage(name: "mainPage") {
    	installCheck()
		if(state.appInstalled == 'COMPLETE'){
			section("Instructions:", hideable: true, hidden: true) {
				paragraph "<b>Notes:</b>"
				paragraph "This app manages child apps, each of which can connect to a specific camera in tinyCam using the webhook generated by tinyCam."
                paragraph "Each child app will provide a url containing a unique oauth code. Put the url into the webhook for the camera, in the motion settings in tinyCam."
			}
  			section(getFormat("header-blue", "Child Apps")) {
				app(name: "anyOpenApp", appName: "tinyCam Connector Child", namespace: "Angus_M", title: "<b>Add a new 'tinyCam Connector' child</b>", multiple: true)
			}

			section(getFormat("header-blue", "General")) {
       			label title: "Enter a name for parent app (optional to change)", required: false
 			}
			display2()
		}
	}
}

def installCheck(){
    display()
	state.appInstalled = app.getInstallationState()
	if(state.appInstalled != 'COMPLETE'){
		section{paragraph "Please hit 'Done' to install '${app.label}' parent app "}
  	}
  	else{
    	log.info "Parent Installed OK"
  	}
}

def getFormat(type, myText="") {			// Modified from @Stephack Code
	if(type == "header-blue") return "<div style='color:#ffffff;font-weight: bold;background-color:#5da2c2;border: 1px solid;box-shadow: 2px 3px 5px 5px #5da2c2'>${myText}</div>"
    if(type == "line") return "<hr style='background-color:#5da2c2; height: 1px; border: 0;'>"
    if(type == "title") return "<h2 style='color:#5da2c2;font-weight: bold'>${myText}</h2>"
}

def display() {
    setVersion()
    getHeaderAndFooter()
    theName = app.label
    if(theName == null || theName == "") theName = "New Child App"
    section (getFormat("title", "${state.name} (${theName})")) {
        paragraph "${state.headerMessage}"
		paragraph getFormat("line")
	}
}

def display2() {
	section() {
		paragraph getFormat("line")
		paragraph "<div style='color:#5da2c2;text-align:center;font-size:20px;font-weight:bold'>${state.name} - ${state.version}</div>"
        paragraph "${state.footerMessage}"
	}
}

def getHeaderAndFooter() {
    if(logEnable) log.debug "In getHeaderAndFooter (${state.version})"
    def params = [
		timeout: 30
	]

    try {
        def result = null
        httpGet(params) { resp ->
            state.headerMessage = resp.data.headerMessage
            state.footerMessage = resp.data.footerMessage
        }
        if(logEnable) log.debug "In getHeaderAndFooter - headerMessage: ${state.headerMessage}"
        if(logEnable) log.debug "In getHeaderAndFooter - footerMessage: ${state.footerMessage}"
    }
    catch (e) {
        state.headerMessage = "<div style='color:#5da2c2'>@Angus_M Apps and Drivers</div>"
        state.footerMessage = "<div style='color:#5da2c2;text-align:center'>Angus Marshall<br><a href='https://paypal.me/angusmarshall' target='_blank'><img src='https://www.paypalobjects.com/webstatic/mktg/logo/pp_cc_mark_37x23.jpg' border='0' alt='PayPal Logo'><br>Paypal contributions welcome!</a></div>"
    }
}
Child App:
/**
Hubitat App to allow ip/web cameras in tinyCam to drive Hubitat Virtual Motion Sensors
tinyCam is an Androidapp that can discriminate between different types of motion:
- motion
- person
- pet
- vehicle
- face (non specific/personal)
Set-Up:
In tinyCam:
- install the tinyCam Monitor Pro app (there is a free add-supported version)
- add your cameras
- in camera settings, motion detection, enable all the motion types
- add a webhook http://[your_hub_ip/apps/api/XXXX/?access_token=YYYY&motion=%MOTION_TYPE%
(where XXXX is the ID of this app once installed and YYYY is the access code reported in this app (remember to activate oath when installing)
In Hubitat:
- simply set-up virtual motion sensor devices (1 for each motion type)
- then select these when you run the app
- you can also use an html tile in a dashboard to view the live webcam (if you activate the webserver function in tinyCam)
-----------------------------------------------------------------------------------------------------------------------------
Licensed under the Apache License, Version 2.0 (the "License"); you may not use this file except
in compliance with the License. You may obtain a copy of the License at:
http://www.apache.org/licenses/LICENSE-2.0
Unless required by applicable law or agreed to in writing, software distributed under the License is distributed
on an "AS IS" BASIS, WITHOUT WARRANTIES OR CONDITIONS OF ANY KIND, either express or implied. See the License
for the specific language governing permissions and limitations under the License.
------------------------------------------------------------------------------------------------------------------------------
If modifying this project, please keep the above header intact and add your comments/credits below - Thank you!
------------------------------------------------------------------------------------------------------------------------------
Changes:
0.0.3 - 27th June 2020 - Set up parent/child structure (heavily leveraging @bptworld's great work - thank you!) [Angus Marshall]
0.0.2 - 20th June 2020 - Added selection of virtual motion sensors, simplified url/params, code to activate motion sensors,
code to rename the app [Angus Marshall]
0.0.1 - 18th June 2020 - Initial code [Markus Liljergren]
**/
def setVersion(){
state.name = "tinyCam Connector"
state.version = "0.0.3"
}
definition(
name: "tinyCam Connector Child",
namespace: "Angus_M",
author: "Angus Marshall (Angus_M)",
description: "set virtual motion sensors to active when http received from tinyCam (or other similar webcam app)",
category: "Convenience",
parent: "Angus_M:tinyCam Connector",
iconUrl: "",
iconX2Url: "",
iconX3Url: "",
documentationLink: ""
) {
}
preferences {
page(name: "pageMain", title: "Main Page", install: true, uninstall: true)
page(name: "pageEnableAPI")
page(name: "pageDisableAPI")
mappings {
path("/") {
action: [
GET: "getDevice"
]
}
}
}
void installed() {
display()
log.debug "Installed with settings: ${settings}"
initializeAPIEndpoint()
}
def updated() {
display()
log.debug "Updated with settings: ${settings}"
unsubscribe()
initializeAPIEndpoint()
}
String initializeAPIEndpoint() {
if(!state.accessToken) {
if(createAccessToken() != null) {
state.endpoint = getApiServerUrl()
state.localAPIEndpoint = getFullLocalApiServerUrl()
state.remoteAPIEndpoint = getFullApiServerUrl()
}
}
return state.accessToken
}
/* Pages */
Map pageDisableAPI() {
dynamicPage(name: "pageDisableAPI") {
display()
section() {
if (state.accessToken != null) {
state.accessToken = null
state.endpoint = null
paragraph("SUCCESS: API Access Token REVOKED! Tap Done to continue")
}
}
}
}
Map pageEnableAPI() {
dynamicPage(name: "pageEnableAPI", title: "") {
display()
section() {
if(state.accessToken == null) {
initializeAPIEndpoint()
}
if (state.accessToken == null){
paragraph("FAILURE: API NOT Initialized!")
} else {
paragraph("SUCCESS: API Initialized! Tap Done to continue")
}
}
}
}
Map pageMain() {
dynamicPage(name: "pageMain") {
display()
section() {
if(state.accessToken == null) {
paragraph("API is not yet Initialized!")
href(name: "hrefPageEnableAPI", title: "Enable API", description: "", page: "pageEnableAPI")
} else {
section("Instructions:", hideable: true, hidden: true) {
paragraph("Put the following URL into the tinyCam webhook for motion on the selected camera. This app will read the webhook when transmitted by tinyCam and activate the virtual motion sensor selected below depending on the motion type (eg. simple motion, or AI-identified motion from Person, Vehicle, Pet, or (non-personal) face).")
}
section(getFormat("header-blue", "URLs")) {
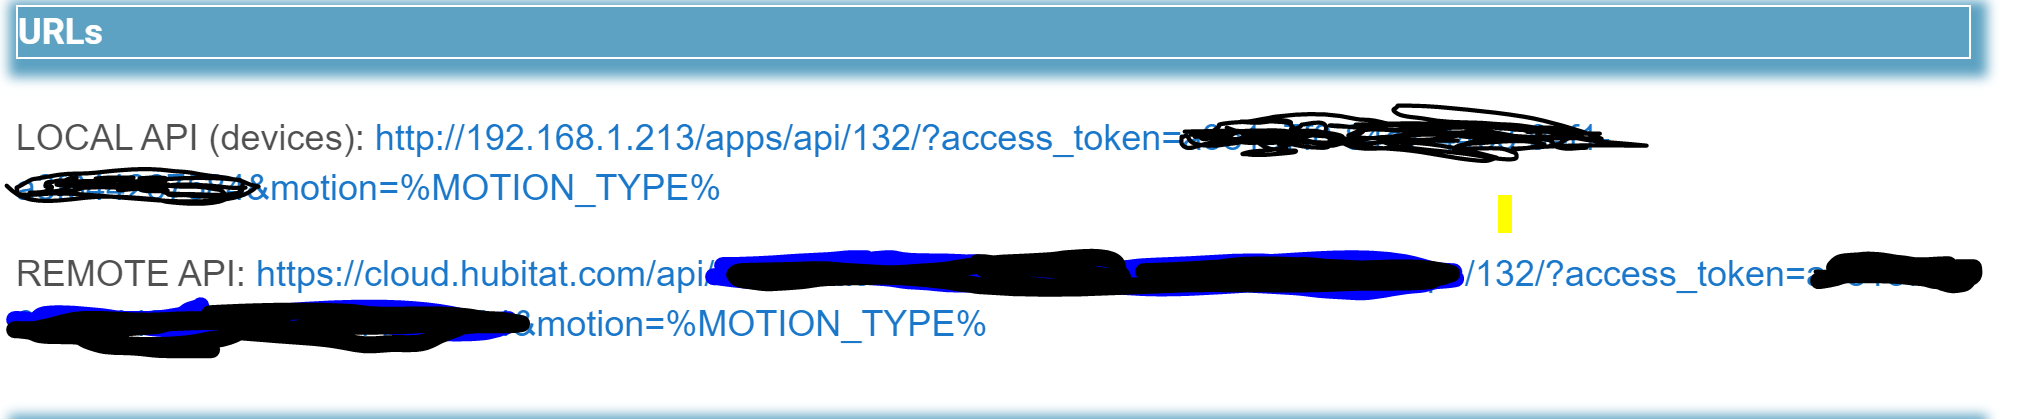
String localURL = "${state.localAPIEndpoint}/?access_token=${state.accessToken}&motion=%MOTION_TYPE%"
String remoteURL = "${state.remoteAPIEndpoint}/?access_token=${state.accessToken}&motion=%MOTION_TYPE%"
paragraph("LOCAL API (devices): <a href=\"$localURL\" target=\"_blank\">$localURL</a>")
paragraph("REMOTE API: <a href=\"$remoteURL\" target=\"_blank\">$remoteURL</a>")
}
section(getFormat("header-blue", "Virtual Motion Devices")) {
input "motionDevice", "capability.motionSensor", title: "Motion: Which motion sensor to control?", multiple: false, required: true
input "personDevice", "capability.motionSensor", title: "Person: Which motion sensor to control?", multiple: false
input "petDevice", "capability.motionSensor", title: "Pet: Which motion sensor to control?", multiple: false
input "vehicleDevice", "capability.motionSensor", title: "Vehicle: Which motion sensor to control?", multiple: false
input "faceDevice", "capability.motionSensor", title: "Face: Which motion sensor to control?", multiple: false
}
section(getFormat("header-blue", "Child App name (optional to change)")) {
label title: "Enter a name for this app", required: false
}
}
}
display2()
}
}
void getDevice() {
log.debug("Running getDevice() $params")
if (params.motion == "Motion") {
motionDevice.active()
} else if (params.motion == "Person") {
personDevice.active()
} else if (params.motion == "Pet") {
petDevice.active()
} else if (params.motion == "Vehicle") {
vehicleDevice.active()
} else if (params.motion == "Face") {
faceDevice.active()
}
}
def getFormat(type, myText="") { // Modified from @Stephack Code
if(type == "header-blue") return "<div style='color:#ffffff;font-weight: bold;background-color:#5da2c2;border: 1px solid;box-shadow: 2px 3px 5px 5px #5da2c2'>${myText}</div>"
if(type == "line") return "<hr style='background-color:#5da2c2; height: 1px; border: 0;'>"
if(type == "title") return "<h2 style='color:#5da2c2;font-weight: bold'>${myText}</h2>"
}
def display() {
setVersion()
getHeaderAndFooter()
theName = app.label
if(theName == null || theName == "") theName = "New Child App"
section (getFormat("title", "${state.name} (${theName})")) {
paragraph "${state.headerMessage}"
paragraph getFormat("line")
}
}
def display2() {
section() {
paragraph getFormat("line")
paragraph "<div style='color:#5da2c2;text-align:center;font-size:20px;font-weight:bold'>${state.name} - ${state.version}</div>"
paragraph "${state.footerMessage}"
}
}
def getHeaderAndFooter() {
if(logEnable) log.debug "In getHeaderAndFooter (${state.version})"
def params = [
timeout: 30
]
try {
def result = null
httpGet(params) { resp ->
state.headerMessage = resp.data.headerMessage
state.footerMessage = resp.data.footerMessage
}
if(logEnable) log.debug "In getHeaderAndFooter - headerMessage: ${state.headerMessage}"
if(logEnable) log.debug "In getHeaderAndFooter - footerMessage: ${state.footerMessage}"
}
catch (e) {
state.headerMessage = "<div style='color:#5da2c2'>@Angus_M Apps and Drivers</div>"
state.footerMessage = "<div style='color:#5da2c2;text-align:center'>Angus Marshall<br><a href='https://paypal.me/angusmarshall' target='_blank'><img src='https://www.paypalobjects.com/webstatic/mktg/logo/pp_cc_mark_37x23.jpg' border='0' alt='PayPal Logo'><br>Paypal contributions welcome!</a></div>"
}
}
Tip: I've found it best to set up the virtual motion sensors with an auto timeout - of, say, 30 seconds. tinyCam will continue to monitor for motion/objects and will retrigger every 30 seconds as needed. This means you can sit in a room, as an example use case, without moving and have the virtual motion sensor retrigger your lights as the AI finds a "person" or "face" (eg. in your rule, add the virtual motion sensor(s) to cancel auto-off lighting). It works!
(Please note I'm learning on this and by no means a coder, so proceed with caution and any feedback is very welcome  )
)
Enjoy!
2 Likes
I cannot get this to work with my virtual motion devices is there a special driver that I need for the motion sensor as they are not detecting motion? I have set up the following and have install TinyCam with the webhook? do I need to install any thing else? I use the parent and child version only app?
Nothing else is needed. Just the parent app and as many child apps as you have cameras to control. Standard virtual motion sensors. And tinyCam of course running on a pc/tablet/phone on your network. Did you put the local url provided by the child app into tinyCam Motion Webhook for the camera?
it should be something like this...
http://your_he_hub_ip/apps/api/1234/?access_token=blah-de-blah&motion=%MOTION_TYPE%
Make sure you have all the motion types you want activated in tinyCam by ticking the checkboxes in the camera settings, under motion detection (in-app motion detection, object detection, face detection).
Does tinyCam show the motion in its Live View ok? Pls show me the Webhook you are using (but delete out your token of course). Sorry if it's not working. I will try to help you get it set up!
A good way to test is to make sure tinyCam is showing the motion on the screen of the computer running tinyCam and then view the logs on HE on another device accessing your HE hub. You should see 2 logs on motion - first the webhook command and then your virtual motion sensor will fire (the one to fire will depend on whether tinyCam sees a person, face or just motion etc.). Make sure that you set up tinyCam background mode on the camera(s) if you want to run another app on that computer and are not keeping tinyCam live/to the front of your session.
I've suggested to Alex that he change the little red man in his live view that shows the motion to an icon that represents the motion type (eg. person, vehicle, pet, face, or just plain motion). He is considering it I think for a future release. I'm doing it like this on my custom dashboard...
this is motion:
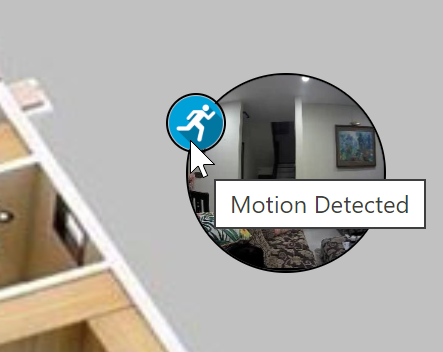
this is person:
etc....
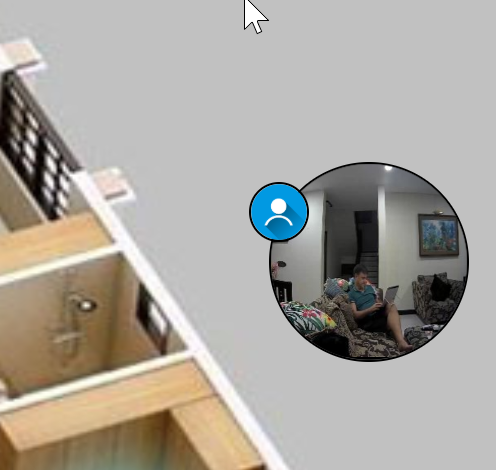
Here is my api etc and on my phone it is showing motion dectection by the picture come up and an icon of motion? Still no change on virtual devices??
do I have to use maker api? if so how would I set it up?
So you put the local url into tinyCam? Pls show me screen shot of the url in tinyCam camera motion settings.
Also remember if you are running tinyCam on your mobile phone to switch on the tinyCam background mode for that camera otherwise it will stop sending the motion notification webhook once you open another app (like a browser to work on HE) and tinyCam goes into the background. Click on background mode, select the camera and press the orange play icon. It will use a lot of battery/cpu and your phone may get warm. So it's best really to run the tinyCam app on a tablet or PC in the house ideally.
No need to set that up for this. The app does all the inbound processing needed.
@Angus_M I'm really intrigued by this and trying to figure out what components I need to make it work. Understanding the overall architecture is a little above my level. Ideally, I'd like to re-purpose an unused Android (Nexus 5) phone as a camera and host for tinyCam.
Might it be as simple as putting tinyCam on the phone and mounting it to give the phone camera the proper field of view; then install your HE app to receive the alerts to RM?
Thank you for putting this together.

