I wrote this driver and companion app to automate a 6x8 greenhouse, and unlike most of my custom automation apps, this is stand-alone enough for others to use, so I am sharing the code and the project for anyone interested. Code is at the end of this post.
My SO actually wanted the greenhouse to start her gardens, but what I saw after we got it built was a Hubitat automation opportunity.
The driver contains all the logic to run a greenhouse, essentially making the entire greenhouse a virtual device. The app feeds the greenhouse device data from the connected devices, and takes commands from the driver to change other device states.
It was built with the intention of making the dashboard be the front-end, to control everything directly from the dashboard:

I started using 3D backgrounds on my house dashboards, so my new dashboard for the greenhouse continues this by using Sweet Home 3D to create a top-down view of a greenhouse. The greenhouse background is an image tile, set to be behind all other icons.
Components:
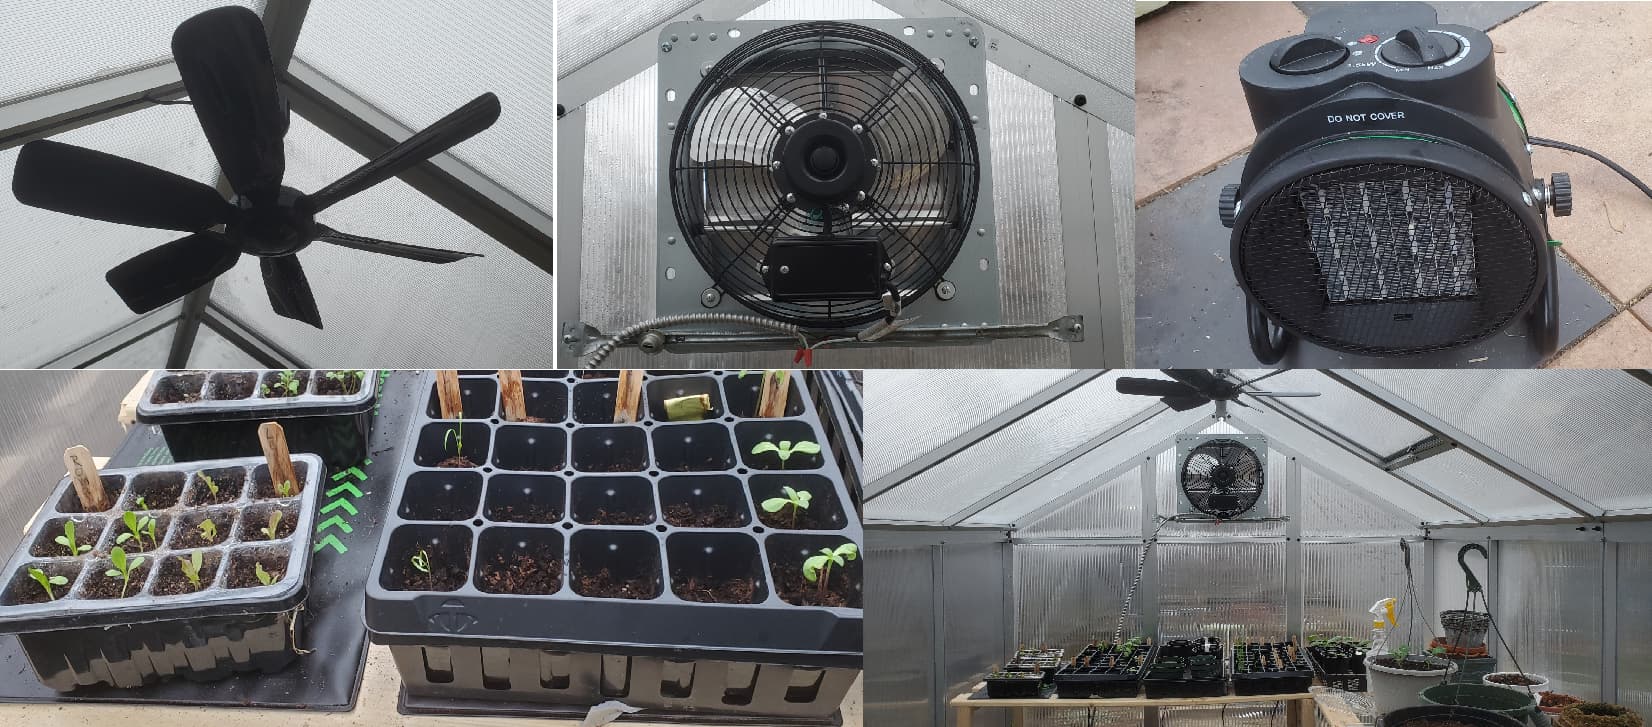
Electric Heater: Uses a power metering Zigbee outlet plug
Vent Fan: Uses a GE Zwave Fan Controller switch
Heating Pads: Use a Zigbee outlet plug
Circulator Fan: Uses a Zigbee outlet plug
Sensors:
Greenhouse Temp/Humidity Sensor: Sonoff SNZB-02D
Outside Temp/Humidity: Ecowitt Weather Station.
How it Works:
Heater: Has a heating setpoint, to run the heater to maintain temps at night
Vent Fan: Has a cooling setpoint to turn on to keep temps down during the day
Circulator Fan: Runs to circulate air around the plants. It has several settings.
Heat Pads: For starting seeds, they also have a setpoint to turn off above the set temp during the day.
Vent Fan:
This is a multi-speed fan using the GE fan controller. It can be run in manual mode, where it always uses one speed, or auto mode, where it will change speeds to only use as much venting as is needed just above setpoint. On Auto, it goes up a speed when temp rises, and down a speed when temps fall, when temps are above setpoint, and the temp is less the the threshold setting which is the difference between the temp and the setpoint. So, with a 2 degree setting for threshold, it will ramp up and down when venting for the first two degrees over setpoint. Once temps go beyond the threshold, the vent fan will stay on high, until temps go below the threshold again. So it ramps up to high speed as temps rise, and ramps down to low speed as temps fall back below the threshold and get closer to setpoint.
Heater:
Straight Forward, it turns on to maintain heat below setpoint, and off when it reaches setpoint.
Heating Pads:
Turn on when temp is under the pads temp setpoint, and they turn off above the setpoint.
Circulator Fan:
There are several settings for the circulator fan.
- Circulate with Vent (true/false setting): Will keep the circulator on when the vent fan comes on if true, or turn it off when vent is on if false. It will turn back on at idle.
- Circulate with Heat (true/false setting): Will turn on when the heat is on, but will turn off when idle.
- Circulator On Temp: The temp that the circulator will come on based on temperature, when greenhouse is idle. This is somewhere between heating setpoint and cooling setpoint.
Changing Settings from the Dashboard:
I hijacked the thermostat tile attributes to be able to use a thermostat tile to change heating setpoint, cooling(venting) setpoint, and to change the vent fan settings. The driver does not use the thermostat capability, I just use the attributes the tile uses to change settings. Using mode on the tile does not actually change the heat/cool modes, you just choose the mode you want to change the setpoint for with the mode button.
For other controls I have implemented the button capability, so buttons toggle settings:
Buttons:
1- Heater enable/disable
2- Heat Pads enable/disable
3- Vent Fan enable/disable
4- Circulator enable/disable
5- Heat Pads setpoint lower (layer button on top of heat pad setpoint display tile)
6- Heat Pads setpoint higher (layer button on top of heat pad setpoint display tile)
7. Toggle Circulate with Vent setting
8. Toggle the Circulate with Heat setting
The first four buttons enable or disable the components, to make them not run. These are the colored power buttons under each component on the dashboard. The enabled states are displayed in an attribute tile (upper right on dashboard)
The Heatpad setpoint change buttons are used to make a control on the dashboard. They are layered over the attribute tile that shows heat pad setpoint to make a dashboard control.
(left side of dashboard). There is a presence attribute that changes to present when heat pads are on, and not present when they are off. I use this to put an empty presence tile under the heat pad setpoint, just so that the tile changes colors when the heat pads are on, based on the dashboard template colors for presence.
The last two buttons change the settings for the circulator fan vent/heat settings.
The only control not done with buttons or the thermostat tile, is the circulator on temp, for that you can use the command entry tile.
Command Entry Tile
Using the variable capability allows for putting a Variable String tile on the dashboard, to be used like a "command line" input. All settings can be changed with commands entered into this tile in the format: command:value. The commands are documented in the driver. It turns the command string sent to the driver into a map, and then parses it out to change whatever settings were sent.
Example: csp:80 or coolsetpoint:80 will change the cooling setpoint to 80. Commands can be strung together comma separated: csp:80,hsp:55,hps:70,cot:60 -> will change the cooling setpoint, the heating setpoint, the heat pad setpoint, and circulator on temp, all in one shot. This is the only way to change circulator on temp from the dashboard.
The Dashboard:
All text displays on the dashboard are display attributes that are built by the driver (using html) that can be added to the dashboard. In preferences, you can set the font size for each of these displays.
There is lots of custom CSS in use here, to layer tiles, change titles, make tiles transparent and on/or on top, and to use the custom SVG icons. I also just recently started playing with CSS animations, so the main components are animated; the fans spin (to speed), the heater window flame flickers, and the the heat pad icons pulse:


The App:
The app just syncs devices to the driver. I only made the Vent Fan be a required input, so you can skip any of the other components. If you do not use all four components, the ones not used should be disabled in the driver, I didn't bother to make that happen automatically.
The app has an error correct option for the devices, in case they miss a command, which since my devices are outside the house, I found they do miss at times. With error correcting enabled in the app, it will check the state of the devices at each temp change to make sure they are in the state they should be based on the driver state attributes.
They app has an option to log to my google sheets, however this requires the sheets to be setup with the receiving scripts, and to use my log to google device. It can just be left disabled, unless you want to implement using google sheets.
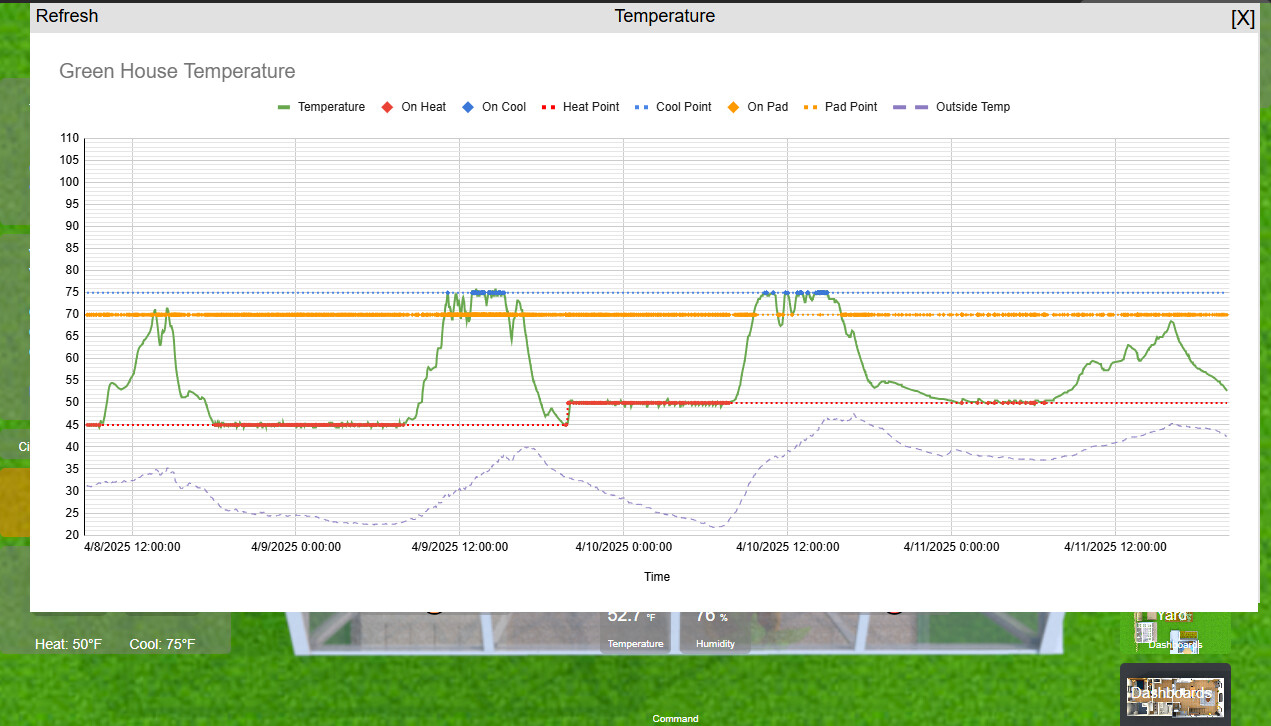
iFrames:
The data is logged to google for the purpose of making charts. The driver has the option to create two iframe attribute buttons to be put on a dashboard. This is what I use to make attribute buttons to pop my charts up on the dashboard. It can be used to pop up any html page, however. They are created on the driver commands page.
To Install:
Add the driver code to driver code, and add the app code to apps code. Install the app, and it will create the greenhouse device as a child device.
Here are the code links:
Greenhouse Controller App
Greenhouse Driver
Should you want to use any of my CSS hacks, here is a link (without URLs)
Dashboard CSS
I think I have most of the bugs out of it, but if anyone actually uses this thing and finds a bug, let me know here an I will fix it.
Thanks for reading! It has been a fun project for me to create this, and I'm looking forward to getting the plants in the garden, now that they will have a good head-start this year in the greenhouse.