Onkyo Receiver Custom Driver

Depending on how much functionality you need, you could totally do it yourself based on the example in this thread: Onkyo Receiver Custom Driver

If I was doing it, I'd make a setZone custom command to call to indicate the intended zone and then implement whichever operations you need for controlling the zones.

based on the example in this thread

I'm still new here, but did you mean to link back to this very discussion? :stuck_out_tongue:

1 Like

Yes, I meant this thread, quite literally. :wink:

The link was to some driver code that looked like a really good first start for someone that wanted to hack the additional functionality together.

I know for me, my biggest challehge is to be able to change volume on Zone 2 (outdoor speaks) without changing the primary input being used in the living room. So personally I wouldnt want to "change the zone", i'm looking for:

"I dont care whats happening just increase the Zone2 volume"

Yeah, I meant what you said. My wording might have been confusing.

I meant to have one set of commands like volume up, and then to have one command to indicate which zone to operate. That way you don't have to replicate all of the commands three times.

The API reference I found only called out two zones. Does yours really have three? Is that a common feature?

No, i only have 2. The "Zone 3" was a typo on my part.

I wonder if anyone here has thoughts on this thread?

[Onkyo AVR driver and Volume vs. Dimmer]

I'm not asking for or expecting HE to rework their factory driver... which looks like it's based on this work. I don't know how functional this code is or if's been abandoned?

Really all I want to do is combine volume and power in a tile so I reduce the tiles I need for each amp.

Maybe use a virtual switch and a rule to map over the volume to level and control power. Then at least you don't have to go writing your own driver to do what you want.

I thought of making a virtual dimmer and mirroring it to the onkyo volume. But I've got a c-4 running slower than snot most of the time and in similar situations just using dimmers I found the delay meant I was always chasing and overshooting. I'm in the process of building out a C-7 and want to do a better job with my rules so I don't loose my "poop".

Worth a try at least. Cheers.

For power you could have it turn on and off with your tv so you don't have to fiddle with power. I started doing this and it's worked great. I use to just leave it on all the time.

I control the power by the TV turning on or off.

image

I'm allergic to silence, so my amp is called on for both music and tv, but that backend logic is all sorted. I suppose my issue is really dashboard real-estate for ad-hoc adjustments to the environment. As I've got a dozen music players, nearly as many amps, all needing (wanting) power/volume. Which is a hard ask for a tiny little android ph screen unless you got a stylus. All the amp drivers I'm using respond to dimmer level/power, as do all the squeeze units, it's just the onkyo that's the outlier, hence the idea/question. But I hear ya and will likely pursue the mirror idea.

I've never really had time to explore @bangali's WATO app, tried a couple years ago and didn't get far before I realized my brain is too small.... I suspect it could do this in a flash if I could get past "huh?".... maybe I'll give it another go someday if I'm feeling lucky.

I've also been interested in giving smartly a go as a custom tile route, maybe this is my motivation.

Side question: you're just using a z-powerstrip on the TV with a power monitor like the zooz? That's working well to detect on/off quickly?

This is the one I use. It works well for powering on the receiver. I also have another rule to set the source to 1 when it comes on but that one is a little slower since it takes a few seconds for the receiver to fully power up and connect to the network.

image

I had to throw this in because guests always manager to flip sources somehow and cant figure out how to get it back. Especially when house sitting. Easier to just tell them to turn it off and back on again.

Any idea how i get to control the HDMI out? i have an TX-NR686 with 2x 4K HDMI outputs (one is connected to TV and the other to projector...
however the AV setting for "Both" doesnt work, it seems like the TV "wins" the output.. so i manually change to between "MAIN" and "SUB" with the Onkyo AVR app... i would really like to do it automatically from Hubitat...

it is this function (grabbed from yaml posted in this thread)

HDO:
name: hdmi-output-selector
description: HDMI Output Selector
values:
'00':
name: ['no', analog]
description: sets No, Analog
models: set1
'01':
name: ['yes', out]
description: sets Yes/Out Main, HDMI Main, HDMI
models: set1
'02':
name: [out-sub, sub, hdbaset]
description: sets Out Sub, HDMI Sub, HDBaseT
models: set1
'03':
name: [both, sub]
description: sets, Both, Main+Sub
models: set1
'04':
name: [both]
description: sets, Both(Main)
models: set1
'05':
name: [both]
description: sets, Both(Sub)
models: set1
UP:
name: up
description: sets HDMI Out Selector Wrap-Around Up
models: set1
QSTN:
name: query
description: gets The HDMI Out Selector
models: set1

Well.. i found out myself... very easy

@mike.maxwell could you implement HDMI output selection in the native driver? this is the only thing i miss... i have solved it now by having 2 virtual devices, one using the native Onkyo AVR driver, and a custom where i have switched to code to below to support switching the HDMI output from MAIN to SUB or BOTH, which is on newer Recievers

metadata {
definition (name: "Onkyo Receiver (Family Room)", namespace: "cdallum", author: "Carson Dallum") {
capability "Initialize"
capability "Telnet"
capability "Switch"
command "MAIN"
command "SUB"
command "BOTH"
}
main "switch"
details(["switch","MAIN","SUB","BOTH"])
}

def on() {
log.debug "Powering on receiver"
sendEvent(name: "switch", value: "on")
def msg = getEiscpMessage("PWR01")
return new hubitat.device.HubAction(msg,hubitat.device.Protocol.TELNET)
}

def off() {
log.debug "Powering off receiver"
sendEvent(name: "switch", value: "off")
def msg = getEiscpMessage("PWR00")
return new hubitat.device.HubAction(msg,hubitat.device.Protocol.TELNET)
}

def MAIN() {
log.debug "SET OUTPUT TO MAIN"
def msg = getEiscpMessage("HDO01")
return new hubitat.device.HubAction(msg,hubitat.device.Protocol.TELNET)
}

def SUB() {
log.debug "SET OUTPUT TO SUB"
def msg = getEiscpMessage("HDO02")
return new hubitat.device.HubAction(msg,hubitat.device.Protocol.TELNET)
}

def BOTH() {
log.debug "SET OUTPUT TO BOTH"
def msg = getEiscpMessage("HDO03")
return new hubitat.device.HubAction(msg,hubitat.device.Protocol.TELNET)
}

/* This is where I construct the entire message character by character. Each char is represented by a 2 disgit hex value */
def getEiscpMessage(command){
def sb = StringBuilder.newInstance()
def eiscpDataSize = command.length() + 3 // this is the eISCP data size
def eiscpMsgSize = eiscpDataSize + 1 + 16 // this is the size of the entire eISCP msg

sb.append("ISCP")
// the following are all in HEX representing one char

// 4 char Big Endian Header
sb.append((char)Integer.parseInt("00", 16))
sb.append((char)Integer.parseInt("10", 16))

// 4 char Big Endian data size
sb.append((char)Integer.parseInt("00", 16))
// the official ISCP docs say this is supposed to be just the data size (eiscpDataSize)
// ** BUT **
// It only works if you send the size of the entire Message size (eiscpMsgSize)
// Changing eiscpMsgSize to eiscpDataSize for testing
sb.append((char)Integer.parseInt(Integer.toHexString(eiscpDataSize), 16))
//sb.append((char)Integer.parseInt(Integer.toHexString(eiscpMsgSize), 16))

// eiscp_version = "01";
sb.append((char)Integer.parseInt("01", 16))

// 3 chars reserved = "00"+"00"+"00";
sb.append((char)Integer.parseInt("00", 16))

// eISCP data
// Start Character
sb.append("!")

// eISCP data - unittype char '1' is receiver
sb.append("1")

// eISCP data - 3 char command and param ie PWR01
sb.append(command)

// msg end - this can be a few different cahrs depending on your receiver
// my NR5008 works when I use 'EOF'
//OD is CR
//0A is LF
/*
[CR] Carriage Return ASCII Code 0x0D
[LF] Line Feed ASCII Code 0x0A
[EOF] End of File ASCII Code 0x1A
*/
//works with cr or crlf
sb.append((char)Integer.parseInt("0D", 16)) //cr

return sb.toString()
}

// General App Events
def initialize(){
telnetConnect("192.168.1.220", 60128, null, null)
log.debug "Opening telnet connection"
}

def installed(){
initialize()
}

def updated(){
initialize()
}

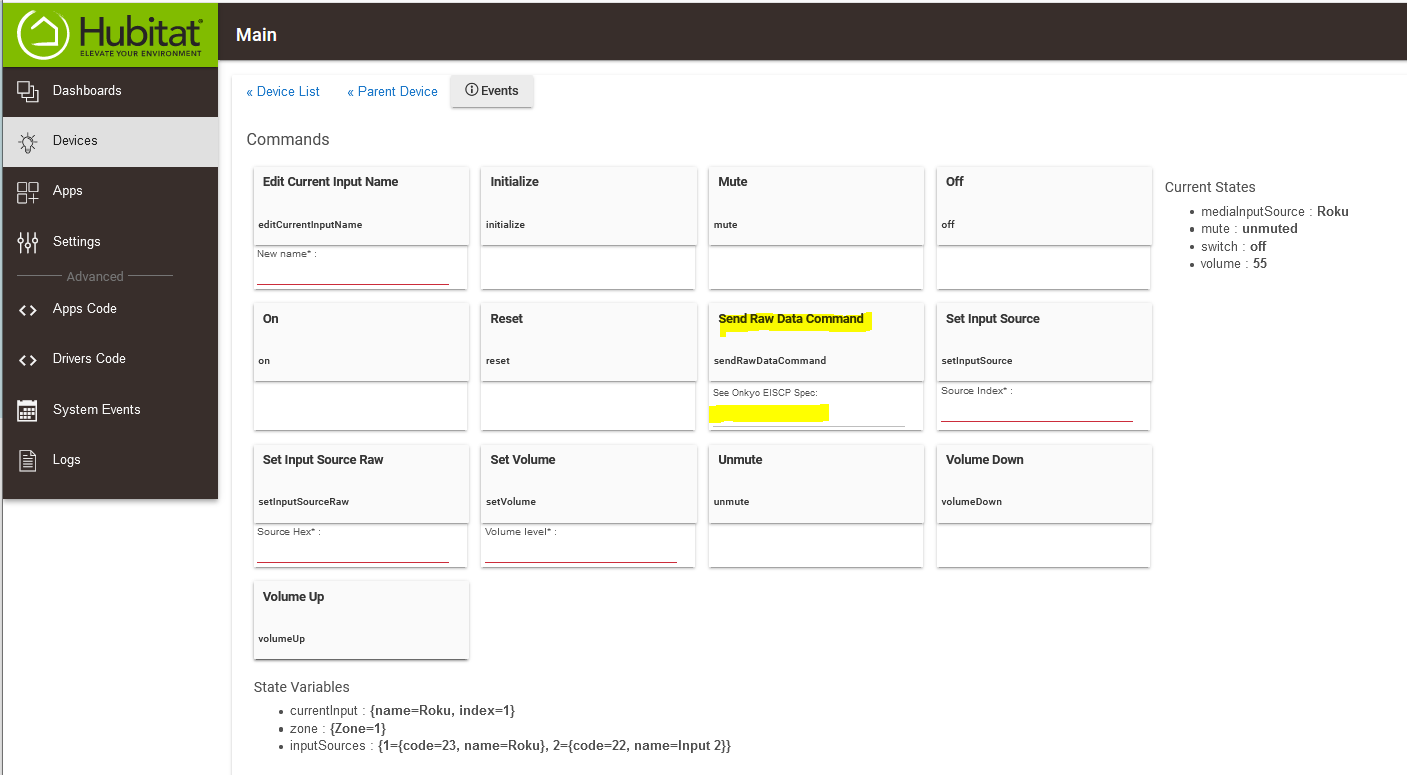
Have a look at this driver.

It allows you to send raw ISCP values to the receiver.

...and also supports multiple zones.

EDIT: include screen shot of send raw command UI

Turn off the power-saving stuff on the receiver.

image

When you control from the child devices do you see anything in the log?

image

A couple of users have reported that they needed to reboot the HE hub to get the telnet connection to the receiver to work.

Also, open the log in a separate browser tab, enable debug logging on the parent (DenAVR) and the child (Onkyo AVR Main) devices, then click the Initialize button on each device. Then check the log to see if there's anything telling in the debug output.

EDIT: looking at the screenshots it appears you're using the Onkyo Multi-Zone driver. You may want to look at this thread

just noticed today that something happen... the log is filled with 5 entries a second with this error:

parse() is applicable for argument types: (java.lang.String) values: [ISCP!1NTM00:01:03/00:05:28]
Possible solutions: main(java.lang.String), use([Ljava.lang.Object;), wait(), run(), run(), grep() (parse)

it seems this occurs when using the build in spotify... it seems it shows the timestamp of the current song, and runtime for that song.

any ideas what to change to get rid of this excessive error logging?