@fblackburn Have you installed Node Red 4.0 Beta to çonfirm there are not breaking changes to your node package. Hopefully there are not. The new Node Red release is supposed to happen in a few weeks.
1 Like
Congratulations!
1 Like
Thats funny. You are in your new norm ![]()
1 Like
That's awesome! Congrats!! ![]()
No, but I did ![]()
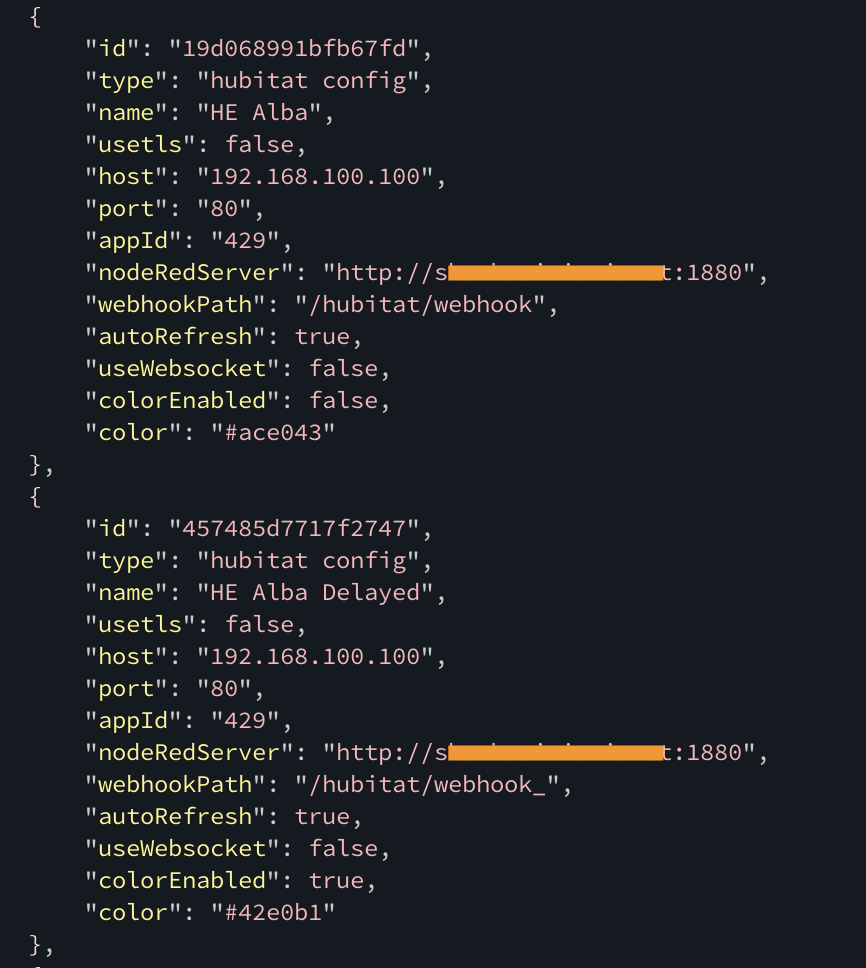
I didn't know it was possible to have multiple configuration nodes of the same type.
There is not a lot of documentation on configuration nodes, but after some time I have managed to create a new one (to have a delay) and apply it to the flows that need it.
The only remaining problem though is that the delay field of the configuration node is not saved.
If you set a delay value, click Update and right away open the configuration node again, the delay field is blank.
I have checked inside the JSON as well, it is not there:
EDIT 1:
It also seems that the delay itself is not being applied, comparing the new config.js with the one I'm forcing a delay:

EDIT 2:
Another problem I've found, but probably not related to the changes on this PR.
If a push button with send events marked is changed to the newer configuration node I've created, when pushing it nothing happens, if I connect it to a debug node, there is no output. Changing to the older configuration node solves the problem. That happened with all push buttons I had changed to the newer configuration node. ![]()
I just did some basic tests with beta3
Everything load correctly and basic flow seems OK.
Also the most important feature works - changing color of nodes ![]()
However, after the v4 release I'll try to update dependencies and look if there is new best practices for the code/node
1 Like
Ooops you are right. I pushed a new commit to fix it
I didn't implement the delay like this. The delay is in the command.js file
In my last commit, I also push a logger. So if you enable debug log, you should see:
[debug] [hubitat config:e0a1d7bdb42a3ba4] Setting maximum concurrent requests to 1
Which mean that commands will be sent sequentially (default is 4)
Oh, I should improve the documentation about multi configuration nodes. But you will need a new Maker API instance in hubitat and redo the configuration with a different endpoint to receive events (UI will add an underscore by default /hubitat/webhook_ if /hubitat/webhook is not available)
Edit: I have just tested it, but the problem remains.
Had restarted Node-RED but I forgot to reload the page, silly mistake.
Thanks for the explanation about the delay and config nodes!
I'll test and let you know how it goes.
1 Like
I spent a little time trying to track down the source of my problem. I am sure it is self-induced, but I have not been able to find it yet.
Here is my situation:
-
I have been using these nodes for a long time and they have been working in a very stable manner.
-
They are great for my needs.
-
Suddenly I they stopped working in 1 particular way. I am no longer receiving events from my event nodes in NR from my hubitat.
-
When I query using a device node I get a normal response.
Any guess what I changed in my configuration? I have used this so long successfully, that I am sure I accidentally broke it, but am not sure how. I certainly didn't make any intentional changes, but with multiple hubitats and multiple NR instances (I am in the midst of a bunch of migrations) I can't seem to figure out what I did.
Any feedback based on the symptoms would be appreciated. I am close to just restarting from scratch since it is easy enough to set up, but figured I would ask in case the symptom of device nodes working, but event nodes not sounds like a familiar problem indicating what to fix.
When you send command the communication is: NR --> HE
But when you receive an event, the direction is: HE --> NR
How it's done: Hubitat configure a webhook on its side and NR listen on a specific endpoint (hubitat/webhook)
So you must be sure that Hubitat can still contact the NR server (listed by probability):
- Verify the
URL to POST device events toon MakerAPI (IP, port, etc..) - re-read explanation from this post
- Verify that you didn't add firewall or network part that could block communication
- Be sure you don't have another configuration node that "steal" your events
- You can enable debug log in NR to see if message are received by NR (but I don't expect really more ...)
- (hope not) wireshark

edit: Is it only from your event node or from any device/event nodes?
1 Like
Oh ... well never seen that. The code is very simple on this part and all events going to device node should also go to the event node
I will look at your suggestions. I suspect that it is most likely the extra config node stealing events, but wanted to say thanks for the quick reply before working through your thoughts.
After the weekend testing, I can assure it is working very well. ![]()
![]()
Thank you so much for developing this feature!
From my side, the PR could be merged.
1 Like
@fblackburn One thought... And reject it if you disagree - no worries!
One of the things I really like in the Home Assistant node-red nodes is that events show a timestamp on the node (in addition to the current value). Is this something that you would consider adding (even if optional)?
Example:

It is very helpful for troubleshooting as it eliminates the need to add debug nodes in many cases to verify that the event "fired".
6 Likes
As I suspected it has nothing to do with your fine work. It turns out that the url I put for the webhook had an IP address that was not my Node Red installation. The funny (weird? stupid?) thing is that I have everything in the house assigned a specific IP address by my DHCP server and as far as I can tell, nothing has ever been assigned to the IP address that I had in the URL. It was in the range that could have been used, but I must have pasted it in at the moment I broke the connection, but can't imagine why I did it.
2 Likes
@fblackburn: Thank you very much for this integration. It is fantastic. I've been using it for years and have never taken a moment to thank you. In fact, do you have a Venmo or something where folks can donate to you for your efforts?
3 Likes
So I've got a device that requires two arguments instead of just one. To date, I've only ever used a node-red command node to pass a single argument... And it appears that is the maximum it can handle...
Does anyone know how to pass 2 arguments to hubitat via a node-red command node?
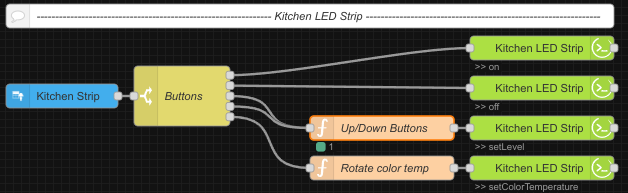
Use a function node to construct the message like this:
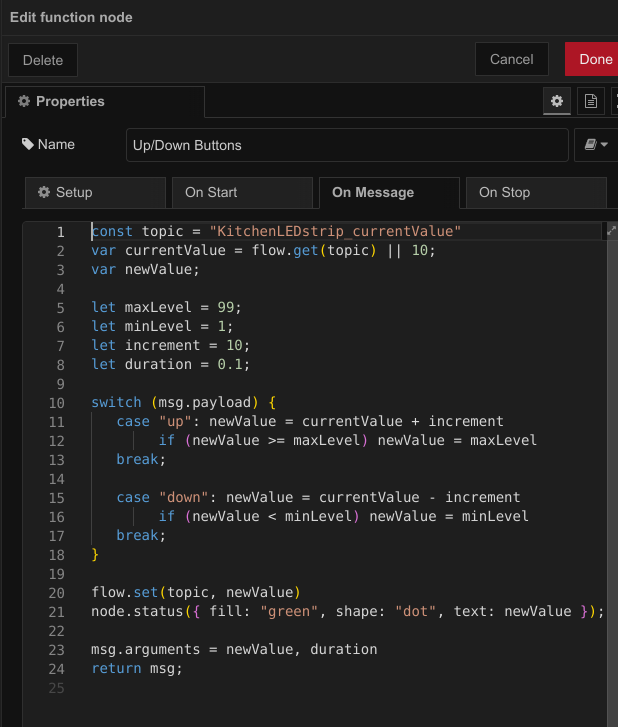
That is the upper function node in this flow:
1 Like
Thanks for the assist. For some reason it isn't working for me. Here is a simple flow:

In the function 3 node I have this:
msg.arguments = "change_sound_volume", 100
return msg;
But when I run it, it doesn't actually change the sound volume. However if I use the Hubitat device page, it does work:
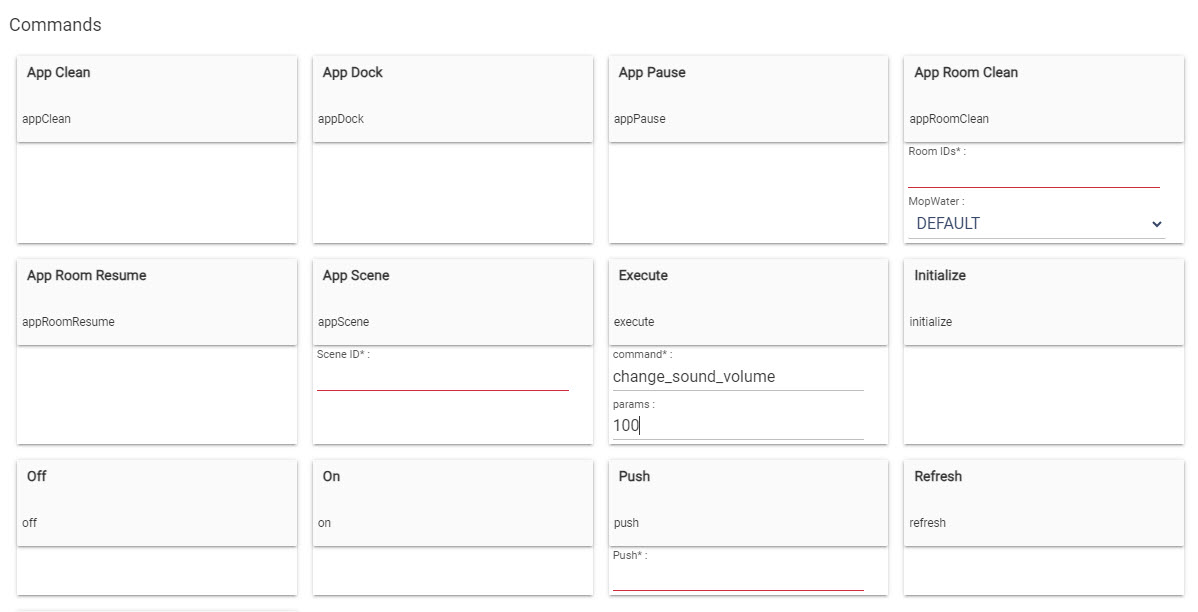
What am I missing?
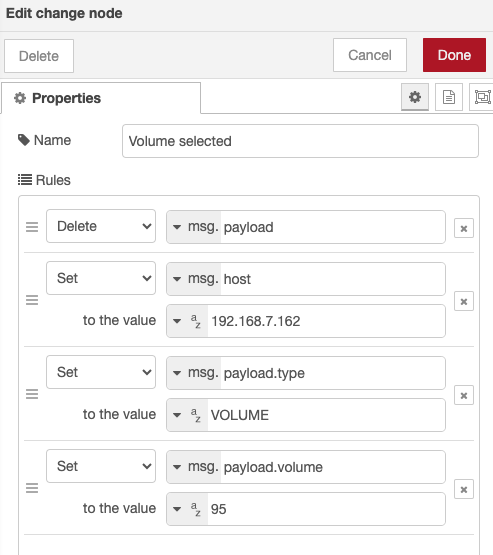
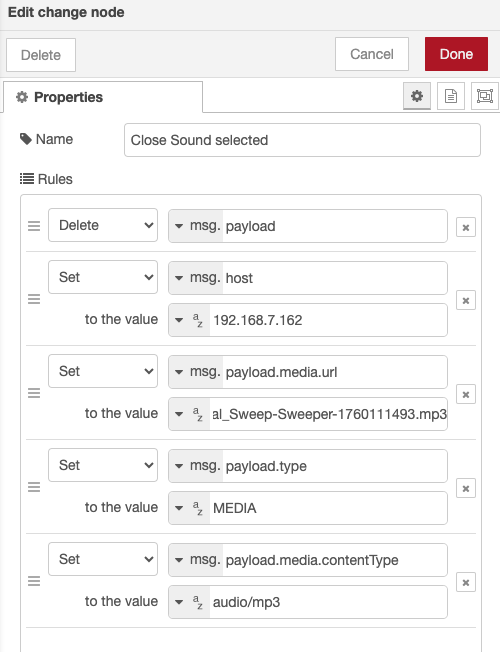
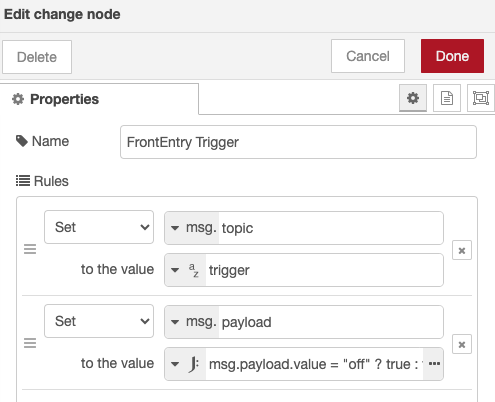
Just to be thorough, here are the actual nodes in the flow I included as a picture.
[
    {
        "id": "5dab55ee6f48f190",
        "type": "hubitat command",
        "z": "eac59b0f4df01c97",
        "deviceLabel": "Main Floor Vac",
        "name": "Main Floor Vac Set Volume",
        "server": "c7d9a99f.71a5e8",
        "deviceId": "324",
        "command": "execute",
        "commandArgs": "",
        "x": 1500,
        "y": 1740,
        "wires": [
            [
                "3c068525ab4804c0"
            ]
        ]
    },
    {
        "id": "a6065b9d93bfed52",
        "type": "function",
        "z": "eac59b0f4df01c97",
        "name": "function 3",
        "func": "msg.arguments = \"change_sound_volume\", 100\nreturn msg;",
        "outputs": 1,
        "timeout": 0,
        "noerr": 0,
        "initialize": "",
        "finalize": "",
        "libs": [],
        "x": 1280,
        "y": 1740,
        "wires": [
            [
                "5dab55ee6f48f190"
            ]
        ]
    },
    {
        "id": "dd2ccf95d10b0281",
        "type": "inject",
        "z": "eac59b0f4df01c97",
        "name": "",
        "props": [
            {
                "p": "payload"
            },
            {
                "p": "topic",
                "vt": "str"
            }
        ],
        "repeat": "",
        "crontab": "",
        "once": false,
        "onceDelay": 0.1,
        "topic": "",
        "payload": "",
        "payloadType": "date",
        "x": 1120,
        "y": 1740,
        "wires": [
            [
                "a6065b9d93bfed52"
            ]
        ]
    },
    {
        "id": "3c068525ab4804c0",
        "type": "debug",
        "z": "eac59b0f4df01c97",
        "name": "response",
        "active": true,
        "tosidebar": true,
        "console": false,
        "tostatus": false,
        "complete": "true",
        "targetType": "full",
        "statusVal": "",
        "statusType": "auto",
        "x": 1700,
        "y": 1740,
        "wires": []
    },
    {
        "id": "c7d9a99f.71a5e8",
        "type": "hubitat config",
        "name": "Hubitat E",
        "usetls": false,
        "host": "hube.theerrors.com",
        "port": "80",
        "appId": "234",
        "nodeRedServer": "http://**********@jarvis2.theerrors.com:1880",
        "webhookPath": "/hubitat/webhook_E",
        "autoRefresh": true,
        "useWebsocket": false,
        "colorEnabled": false,
        "color": "#000000"
    }
]
Thank you @csteele. But I don't see how the examples you gave will actually pass multiple arguments to a Hubitat command node.

