I gave each of the device nodes a unique name based on the attribute being reported. So msg.topic will work.
I'd love to attribute that choice to foresight, instead of dumb luck ![]()
I gave each of the device nodes a unique name based on the attribute being reported. So msg.topic will work.
I'd love to attribute that choice to foresight, instead of dumb luck ![]()
Could always use msg.payload.name, too, if coming from the same device name into the join block.
In any case, maybe someone else will have an easier idea. That is just my 1st thought off the top of my head.
@fblackburn Found a function impairing bug.
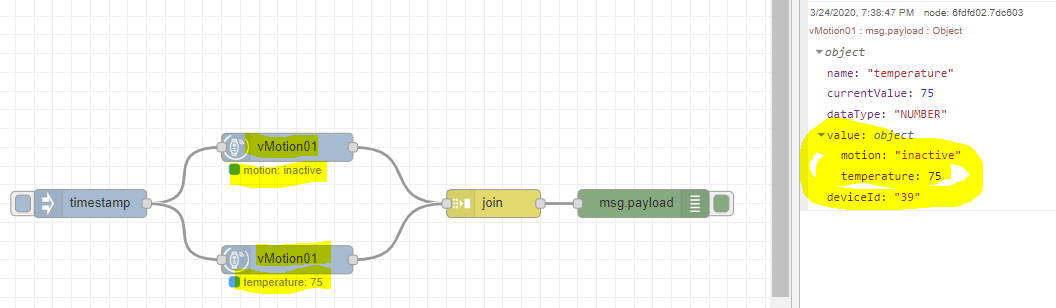
Here's the scenario. Simple test flow that sends two different attributes from the same device into a join node that makes a key/pair combination, then to a debug node.
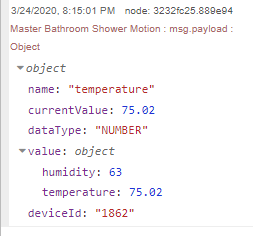
What I find is that if I click the inject once, everything works fine. I get a combined payload.value as expected as seen below (notice payload.value has a humidity and temperature value).
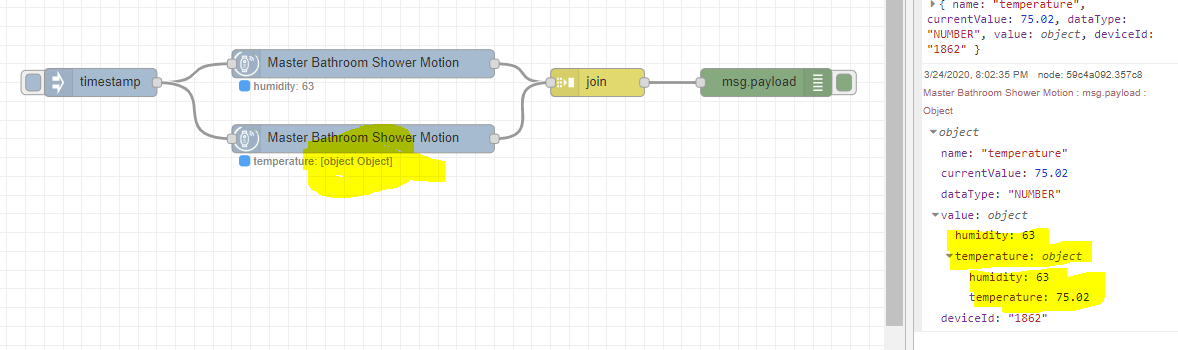
If I click inject a 2nd time, though, the 2nd device node converts from an attribute/value into an object with both values!!!
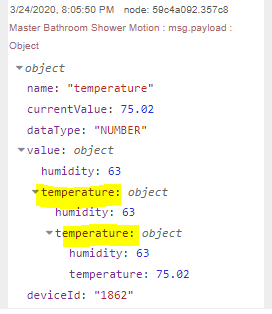
If I click inject a 3rd time, the 2nd node 'object' gets another layer deeper. And etc for each additional time the inject node is clicked:
The only way to fix that 2nd node is to edit it specifying a different attribute and click done, or reboot node-red.
And here is what the msg.payload looks like coming straight out of the 2nd "messed up" device node. Notice the payload.value is now an object, as shown above - and has both humidity and temperature values in it!
First real bug I've found in the nodes in quite some time! +1 for me!
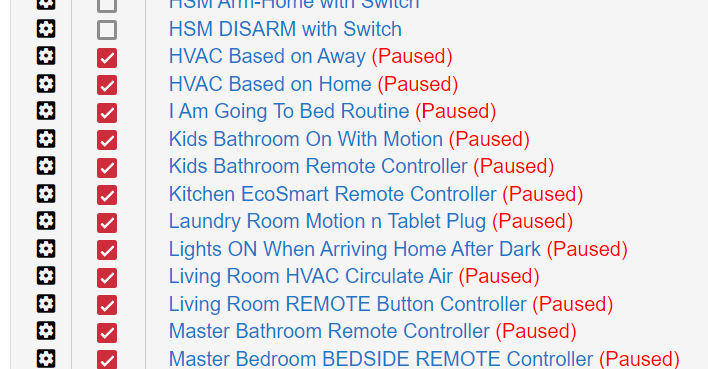
How come none of you guys told me this when I mentioned that I have paused all of my rules after recreating in Node Red?!?!?!? hahahaha All rules are now disabled because I am afraid to remove the safety net.
Eh, an event triggering then immediately existing isn't a big deal. But, you're right, disabling it is even less load/things running on the hub.
I already deleted all of mine. ![]()
My wife is sheltering in place at her parents and has been since I finished the transition to Node Red. I need her back home and using all of the home automation equipment without issue before I can do that.
Now that San Antonio is on 24/7 stay at home, I am going to torture my family with all kinds of rule (and system) changes over the next few weeks. Muhahaha
Hey a fellow Texan!! I am in Grand Prairie between D & FW in Tarrant County. Dallas County went Shelter-In-Place a couple of days ago and Tarrant County does at 11:59 tonite. It will be interesting when wife gets back because I have added a couple of Shelly 1s, 4 more each of Wyze Sense contact & motion sensors, and replaced 2 Z-Wave switches with Z-Wave+ switches and then moved the Z-Wave switches to places that had dumb switches. In summary, I am going to be in trouble.
But I digress. Back to these great Hubitat nodes in Node Red.
Yup. A few of us on here. I lived in Dallas (well, Plano) for a number of years, and Houston, but am in San Antonio now.
Is there even a way to disable a rule nowadays? If you can't disable it, then the difference doesn't matter ![]()
I just set up my unRaid this past weekend. I replaced a deprecated WHS2011 and I am loving unRaid. I have a couple of docker instances running, Plex and Hoobs homebridge. I am going to try out the node red next!
It's a pretty nice all-in-one solution. I've been very happy with it so far.
A few minor gripes/wishes here and there, but overall very pleased.
I use it for all of my docker and VM needs now, in addition as a file server.
I've run into this before with something like this: How the heck does one get access to those checkboxes?
Uggghh, found it. How unintuitive
https://docs.hubitat.com/index.php?title=Apps#Disable_Apps
.
Complete side rant to no one in particular but related to my frustration with the UI:
Sorry HE fans, the UI of Hubitat is a train wreck. There should never be an icon that doesn't tell you what it does by mousing over it and there should never be important functionality like this that is obscured. I'll be glad when the day comes where HE is nothing more than a way to get my devices talking to NR and that's it.
And why not put a simple JavaScript "onbeforeunload" event on the Rule Machine edit page so if one just happens to accidentally navigate off the current page they don't lose all they've been putting together? I've wanted to throw my HE in the trash and spin up the old SmartThings hub more than a few times over that.
/rant
I was a complete NR newbie on Feb 15th, and I'm 70-80% moved over to it now. This thread has been really instructional. The learning curve is a little steep, but well worth the effort.
You mean that you didn't see this super-faded "X" that gives no clue what it is for?
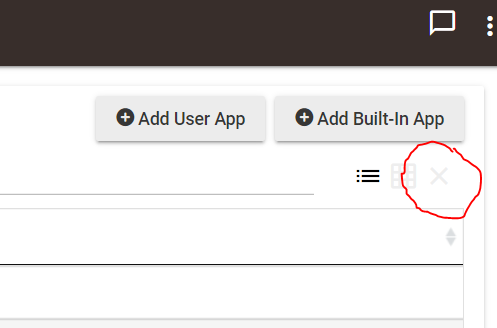
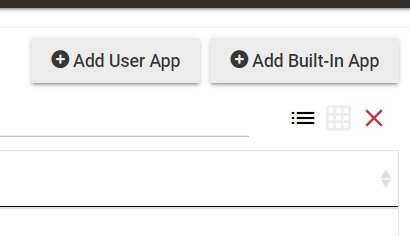
When you click on it, you get the checkboxes and the "X" turns bright red.
You must not have watched the Hubitat Live stream tonight. ![]() They mentioned it and that reminded me. That's when I searched the difference between Pause and Disable and learned Disable is less (probably negligible) load on hub. It's also an option on the Devices page so you can disable devices w/out unpairing/deleting.
They mentioned it and that reminded me. That's when I searched the difference between Pause and Disable and learned Disable is less (probably negligible) load on hub. It's also an option on the Devices page so you can disable devices w/out unpairing/deleting.
So, im looking to join the NodeRed rabbit hole and thought I woul ddip my toes in
Ive read through the topic, but something tells me it going to take a few reads!!
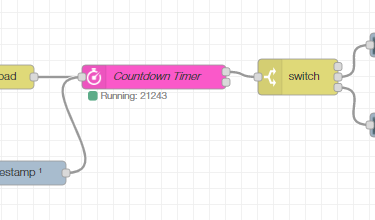
Just wanted to know if i was on the path with what i have created - Simple motion sensor to turn fibaro switch on, the off after x seconds
It works, but dont know if there are better ways - or that's it!
Cheers
I am curious if this works exactly as you want. I am still relatively new to Node Red but it would seem that since you split your sequence after active/inactive, you could have you motion sensor go active, then inactive, then immediately (less time than your delay) go active again while the bottom leg is in a delay and the result will be light turning off while the sensor is still active.
This is by no means the best way but is the way I do it:
There are definitely experts in this thread who might have better, more efficient & prettier solutions.
I don't think you need the final Device Node unless you are going to continue the sequence to do something else when the MasterBed light changes. Devices update automatically from Hubitat on a change.
Good luck & keep the questions coming! There is a great range of Node Red experts and newbies on this thread.
Download the Hubitat app