I spent several days trying to figure out how to add control of my Yamaha receiver to Hubitat. There are guides out there that assume a lot of knowledge that I didn't have as a NEWB. So I will try to give step by step directions of how I added and made use of a Yamaha receiver driver to my Hubitat. Experts are more than welcome to constructively critique my methods and correct/enhance upon the information I present.
- I found 2 Yamaha .groovy files in GitHub.
a) Driver for Yamaha receiver: Yamaha-NVR-Hubitat/YamahaNetworkReceiver.groovy at main · CreatureOfHubitat/Yamaha-NVR-Hubitat · GitHub
b) Driver for Yamaha zone: Yamaha-NVR-Hubitat/YamahaZonesDriver.groovy at main · CreatureOfHubitat/Yamaha-NVR-Hubitat · GitHub
Neither of these two .groovy drivers allowed this newb to do anything with my receiver. I ended up having to combine the two drivers then delete the duplicated functions. This is my merge of the Yamaha Receiver .groovy and the Yamaha Zone .groovy files that I use in this thread.
/**
 *  Hubitat Driver: Yamaha Network Receiver
 *
 *  Author: Ben Rimmasch
 *  Derived from redloro@gmail.com's ST work for Yamaha Receivers
 *
 *  Licensed under the Apache License, Version 2.0 (the "License"); you may not use this file except
 *  in compliance with the License. You may obtain a copy of the License at:
 *
 *      http://www.apache.org/licenses/LICENSE-2.0
 *
 *  Unless required by applicable law or agreed to in writing, software distributed under the License is distributed
 *  on an "AS IS" BASIS, WITHOUT WARRANTIES OR CONDITIONS OF ANY KIND, either express or implied. See the License
 *  for the specific language governing permissions and limitations under the License.
 *
 *  https://github.com/PSeitz/yamaha-nodejs
 *  http://<RECEIVER_IP_ADDRESS>/YamahaRemoteControl/desc.xml
 */
import groovy.util.XmlSlurper

metadata {
  definition(name: "Yamaha Receiver", namespace: "codahq-hubitat", author: "Ben Rimmasch") {

  }

  preferences {
    section("Yamaha Receiver") {
      //input name: "receiverName", type: "text", title: "Name", required: true, defaultValue: "Yamaha"
      input name: "receiverIp", type: "text", title: "IP", required: true
      input name: "receiverZones", type: "enum", title: "Zones", required: true, multiple: true, options: ["Main_Zone", "Zone_B", "Zone_2", "Zone_3", "Zone_4"]
      input name: "descriptionTextEnable", type: "bool", title: "Enable descriptionText logging", defaultValue: false
      input name: "logEnable", type: "bool", title: "Enable debug logging", defaultValue: false
      input name: "traceLogEnable", type: "bool", title: "Enable trace logging", defaultValue: false
    }
  }
}

private logInfo(msg) {
  if (descriptionTextEnable) log.info msg
}

def logDebug(msg) {
  if (logEnable) log.debug msg
}

def logTrace(msg) {
  if (traceLogEnable) log.trace msg
}

def updated() {
  updateDNI()
  //removeChildDevices()
  addChildDevices()
}

def uninstalled() {
  removeChildDevices()
}

def parse(String description) {
  def map = parseLanMessage(description)

  def body = getHttpBody(map.body);
  logTrace "Headers: ${map.headers}"
  logTrace "Body: ${body}"

  updateZoneDevices(body.children()[0])
}

private updateZoneDevices(evt) {
  logDebug "updateZoneDevices: ${evt.toString()}"
  if (evt.name() == "System") {
    logDebug "Update all zones"
    childDevices *.zone(evt)
    return
  }

  def zonedevice = getChildDevice(getDeviceId(evt.name()))
  if (zonedevice) {
    zonedevice.zone(evt)
  }

  //check for Zone_B
  zonedevice = getChildDevice(getDeviceId("Zone_B"))
  if (zonedevice && evt.name() == "Main_Zone") {
    zonedevice.zone(evt)
  }
}

private addChildDevices() {
  // add yamaha zone device(s)

  //temporary workaround to add Strings to lists
  def selectedZones = []
  if (settings.receiverZones instanceof java.lang.String) {
    selectedZones = [settings.receiverZones]
  }
  else {
    selectedZones = settings.receiverZones
  }
  selectedZones.each {
    def deviceId = getDeviceId(it)
    if (!getChildDevice(deviceId)) {
      addChildDevice("codahq-hubitat", "Yamaha Zone", deviceId, [name: "Yamaha Zone ${it}", label: "${device.name} - Zone ${it}", isComponent: false])
      logInfo "Added Yamaha zone: ${deviceId}"
    }
  }

  childDevices *.refresh()
}

private removeChildDevices() {
  getChildDevices().each {
    log.warn "deleting ${it}"
    deleteChildDevice(it.deviceNetworkId)
  }
}

private sendCommand(body) {
  logDebug "Yamaha Network Receiver send command: ${groovy.xml.XmlUtil.escapeXml(body)}"

  def hubAction = new hubitat.device.HubAction(
    headers: [HOST: getReceiverAddress()],
    method: "POST",
    path: "/YamahaRemoteControl/ctrl",
    body: body
  )
  sendHubCommand(hubAction)
}

private getHttpHeaders(headers) {
  def obj = [: ]
  new String(headers.decodeBase64()).split("\r\n").each { param ->
      def nameAndValue = param.split(":")
    obj[nameAndValue[0]] = (nameAndValue.length == 1) ? "" : nameAndValue[1].trim()
  }
  return obj
}

private getHttpBody(body) {
  def obj = null;
  if (body) {
    obj = new XmlSlurper().parseText(new String(body))
  }
  return obj
}

private getDeviceId(zone) {
  return "yamaha|${settings.receiverIp}|${zone}".toString()
}

private getReceiverAddress() {
  return settings.receiverIp + ":80"
}

private String convertIPtoHex(ipAddress) {
  return ipAddress.tokenize('.').collect { String.format('%02x', it.toInteger()) }.join().toUpperCase()
}

private String convertPortToHex(port) {
  return port.toString().format('%04x', port.toInteger()).toUpperCase()
}

/*
private setDeviceNetworkId(ip, port = null){
    def myDNI
    if (port == null) {
        myDNI = ip
    } else {
  	    def iphex = convertIPtoHex(ip)
  	    def porthex = convertPortToHex(port)

        myDNI = "$iphex:$porthex"
    }
    log.debug "Device Network Id set to ${myDNI}"
    return myDNI
}
*/

private updateDNI() {
  //if (state.dni != null && state.dni != "" && device.deviceNetworkId != state.dni) {
  //   device.deviceNetworkId = state.dni
  //}
  def dni = convertIPtoHex(settings.receiverIp)
  if (dni != device.deviceNetworkId) {
    device.deviceNetworkId = dni
  }
}

private getHostAddress() {
  if (getDeviceDataByName("ip") && getDeviceDataByName("port")) {
    return "${getDeviceDataByName("ip")}:${getDeviceDataByName("port")}"
  }
  else {
    return "${ip}:80"
  }
}
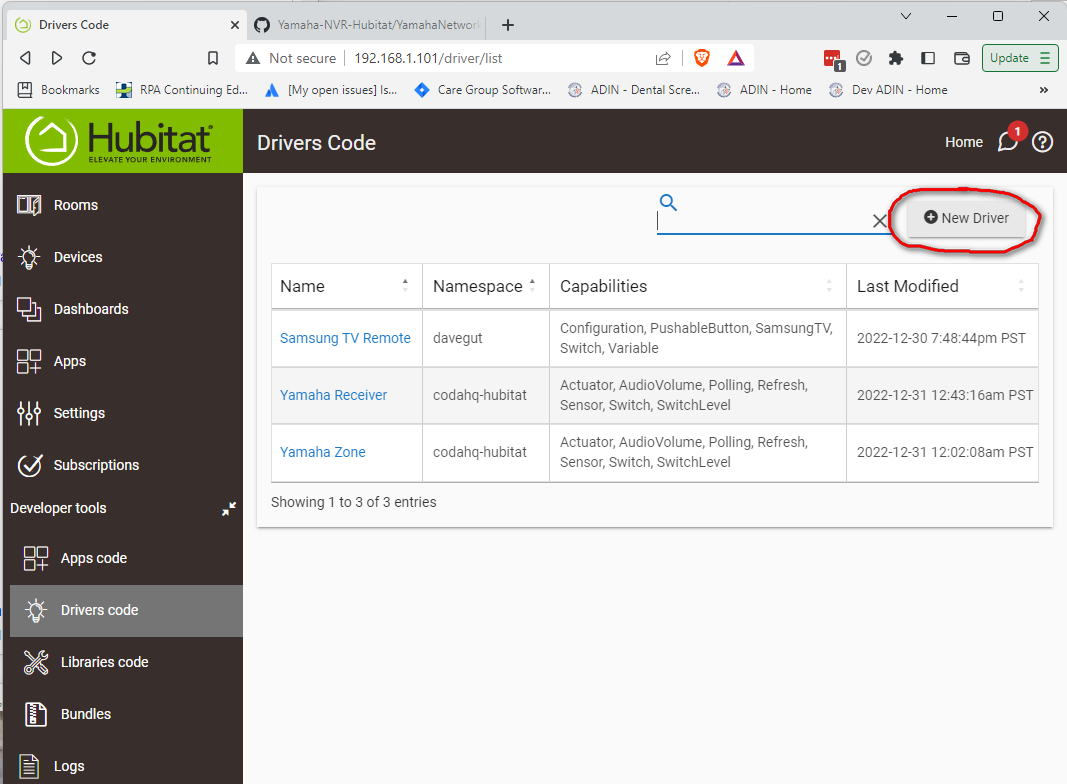
I went to the "Drivers section in my Hubitat and selected "New Driver":
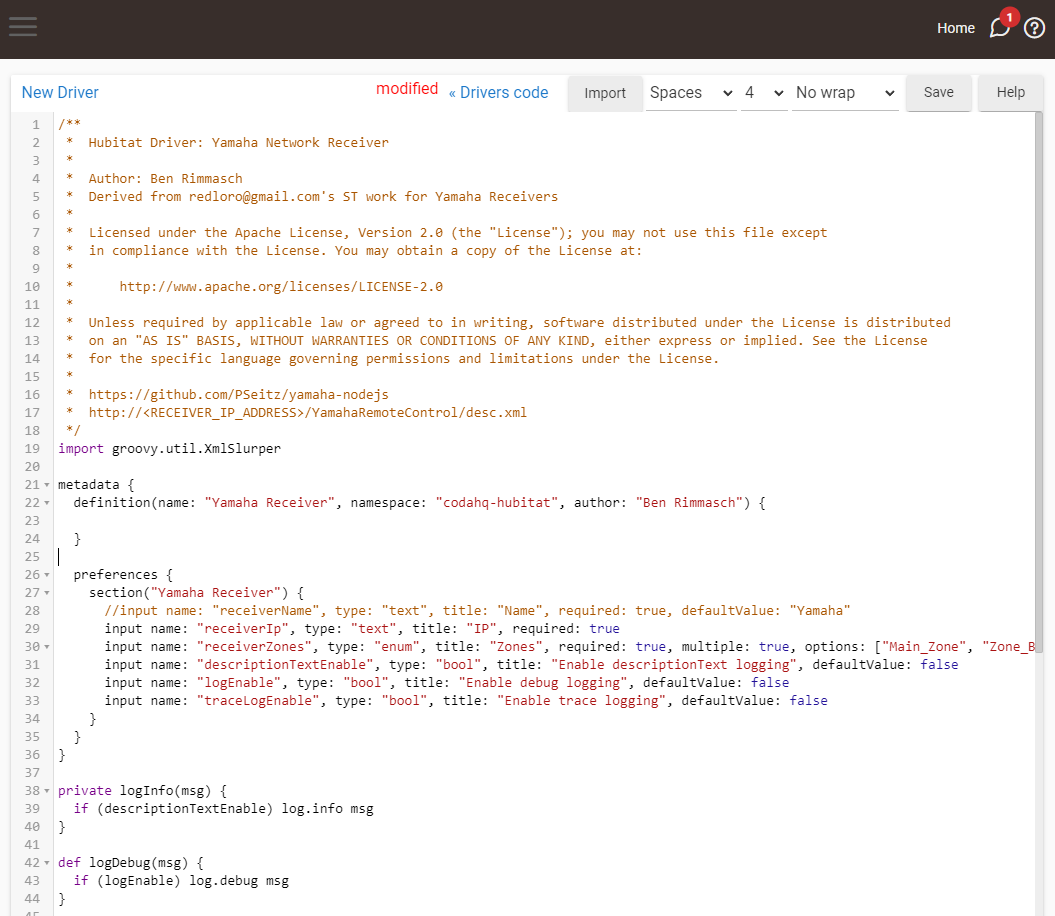
I pasted the code (shown above) into the new driver text window:
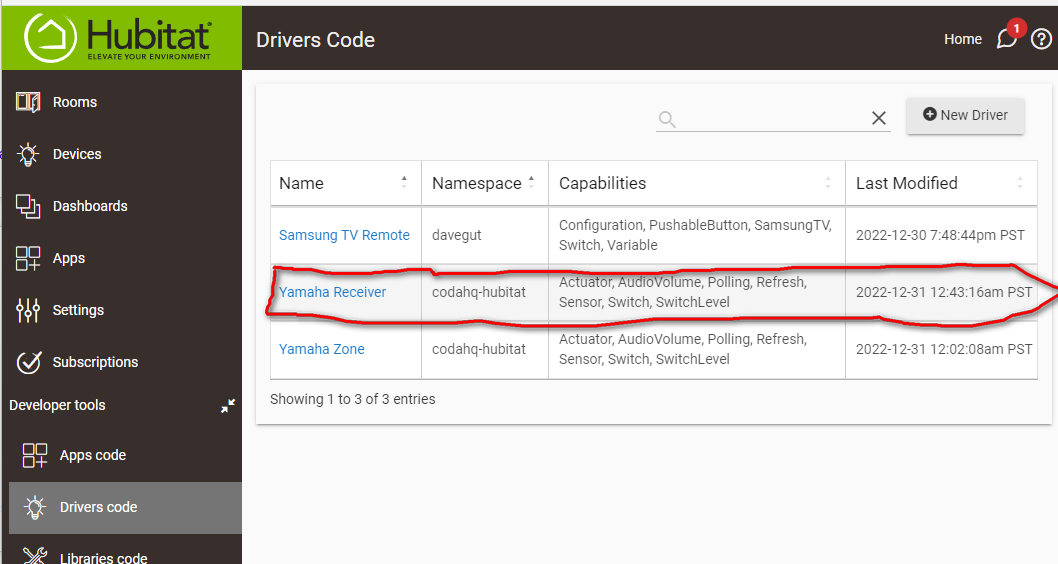
After clicking "save" I then had the driver registered with hubitat:
I checked my modem/router/firewall DHCP leases and found the IP address of my Yamaha receiver. On "MY" router I can click on the MAC address and it will show me info on the device associated with the lease:
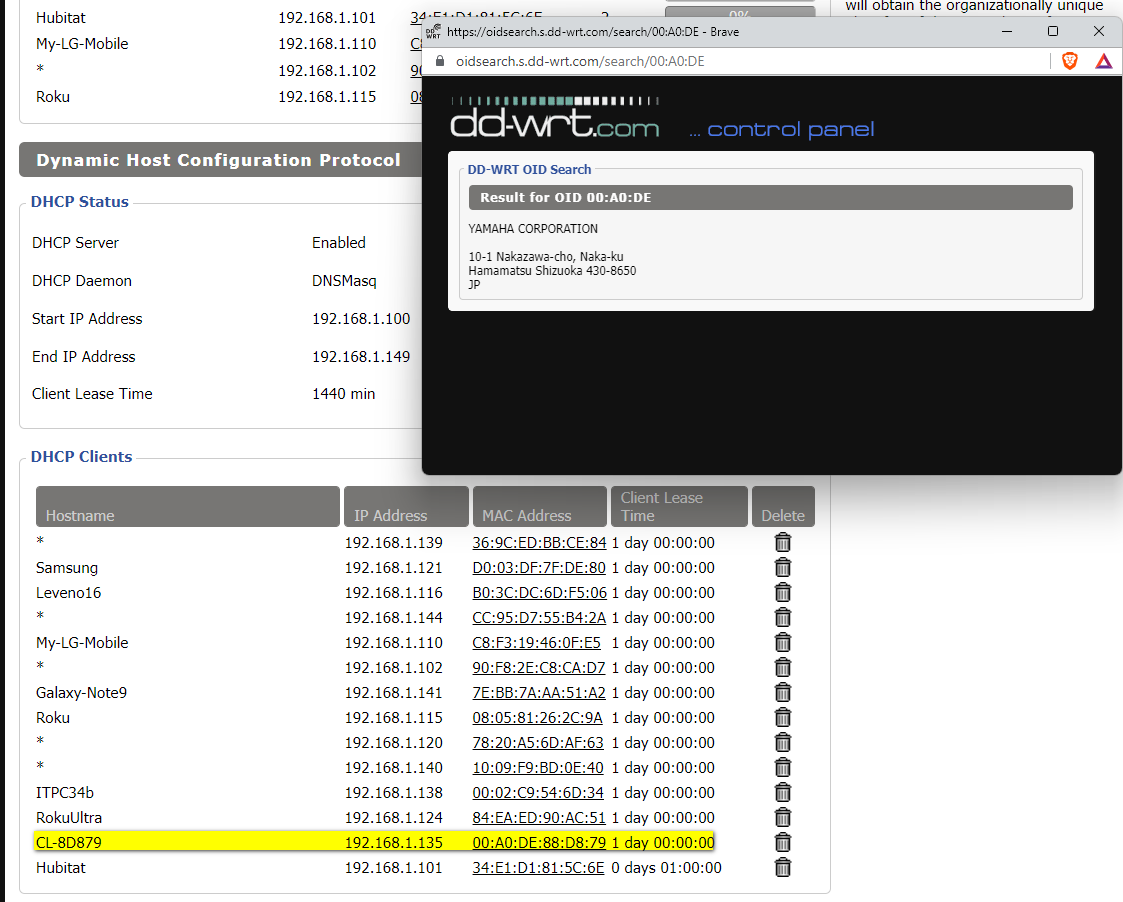
I should add static DHCP address leases to my router for all of these devices so they always come up on the same IP address but that is a different tutorial which is specific to your specific router.
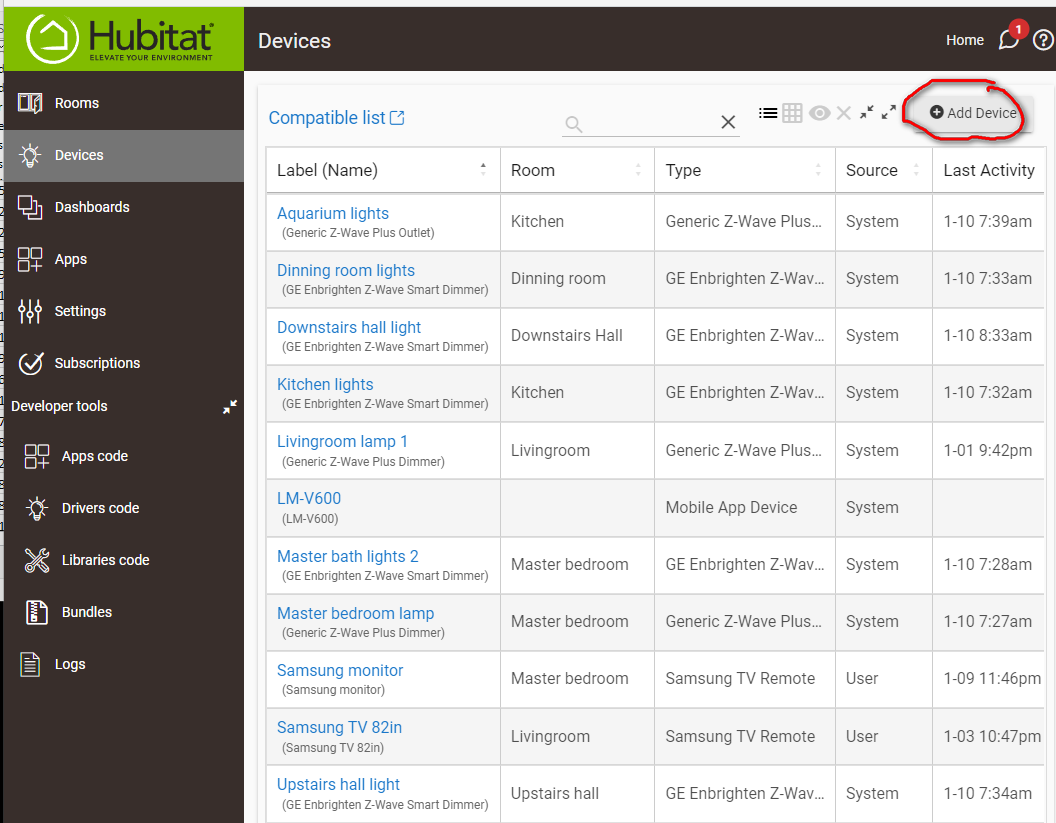
Next I go into the Devices section on Hubitat and select "Add device":
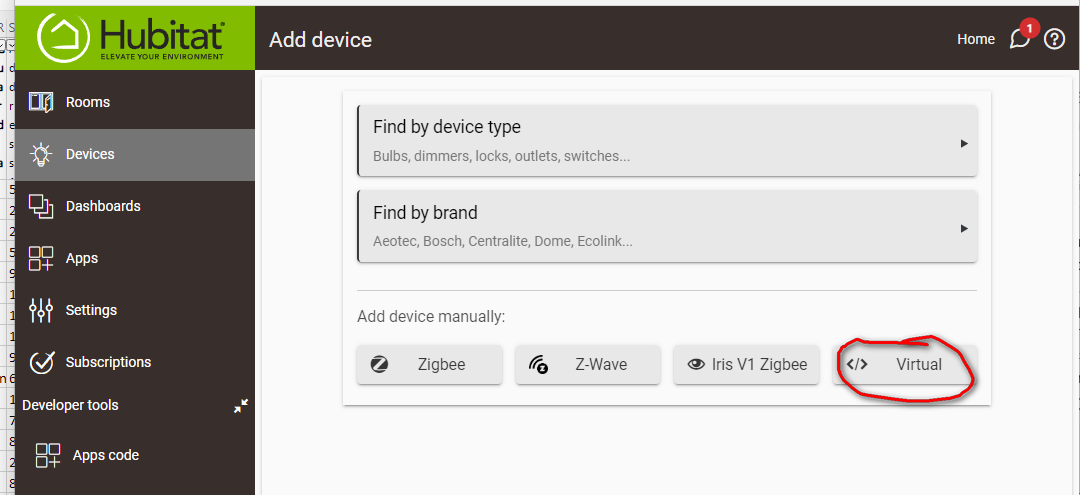
I select "Virtual Device":
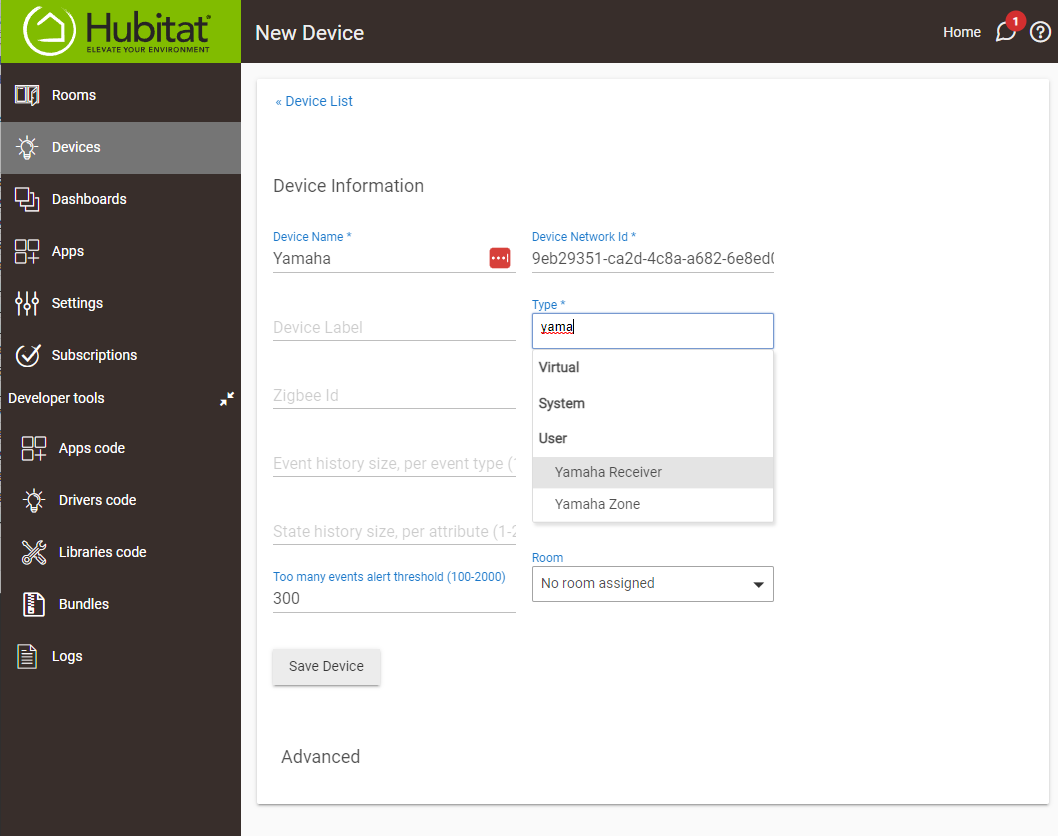
After searching for "Yama", selecting "Yamaha Receiver" and giving the device a name I click save:
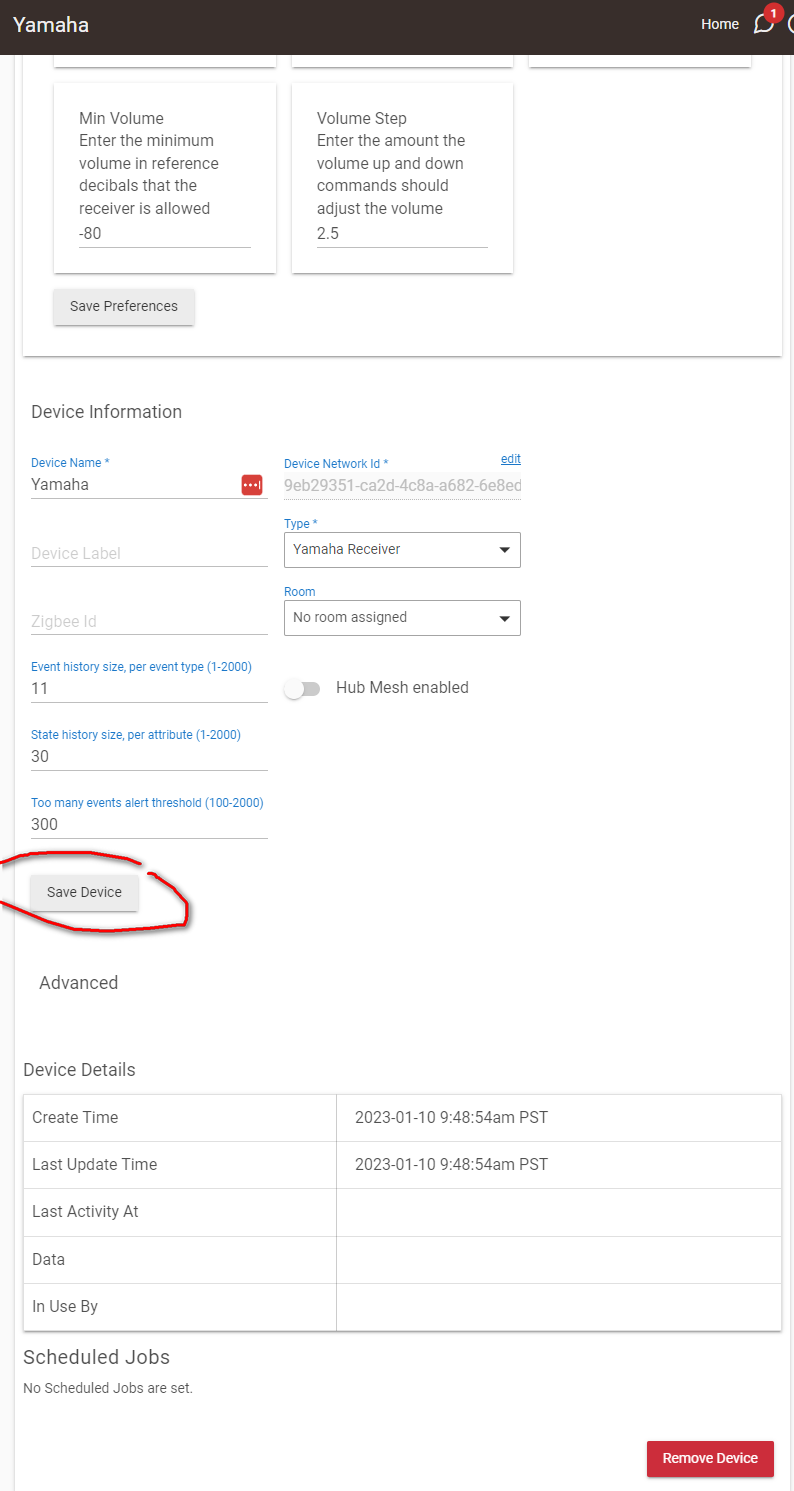
Which takes me to the device config page. Note the name of the Volume Down button is "volumeDown", this will be used later when adding a button to a Dashboard.

I add the IP address of the Yamaha receiver and select "Main Zone" which is the only Yamaha receiver zone I have speakers connected to. Down at the bottom of the Device Config page I click "Save Device":
At this point I can open the device and control it with the buttons in the device config page.
After which the device appears in my list of devices:
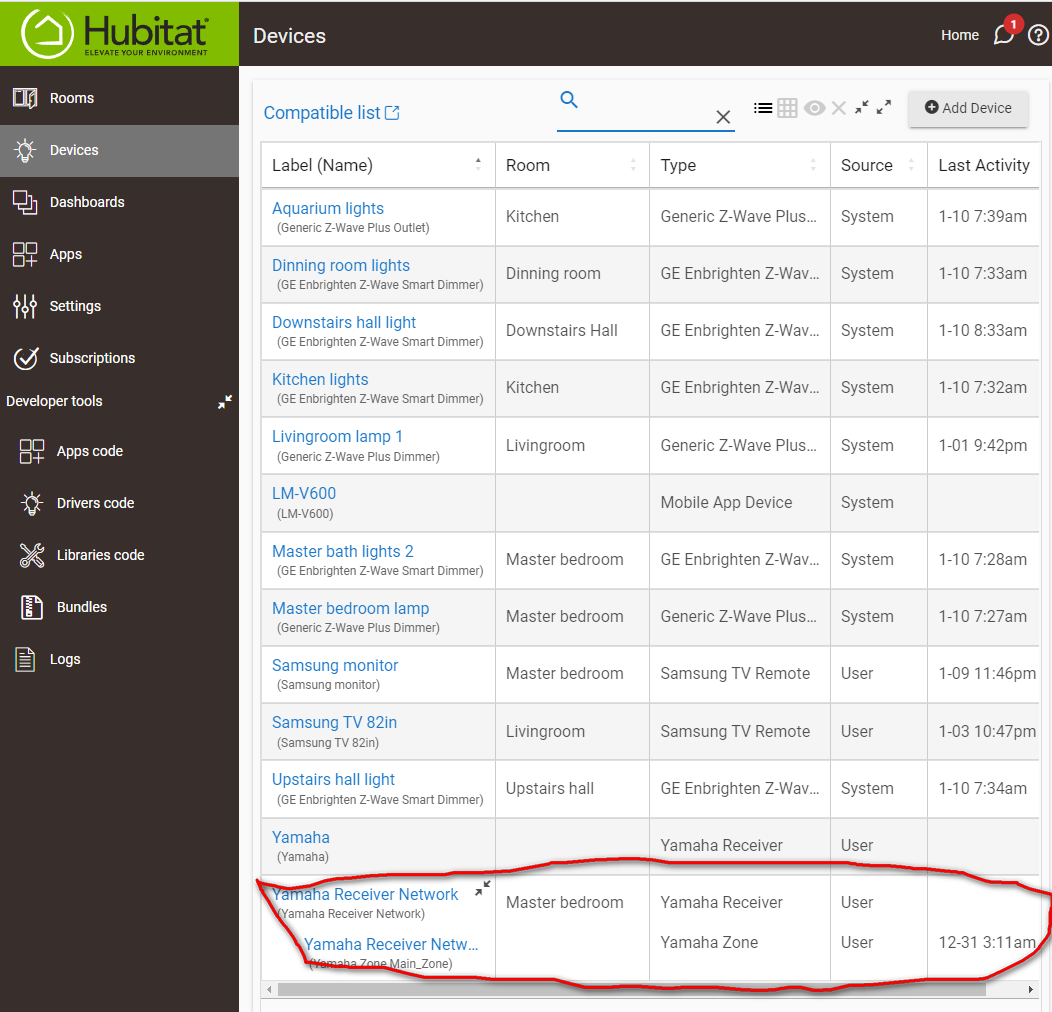
Then I go into one of my Dashboards and add the Yamaha device:
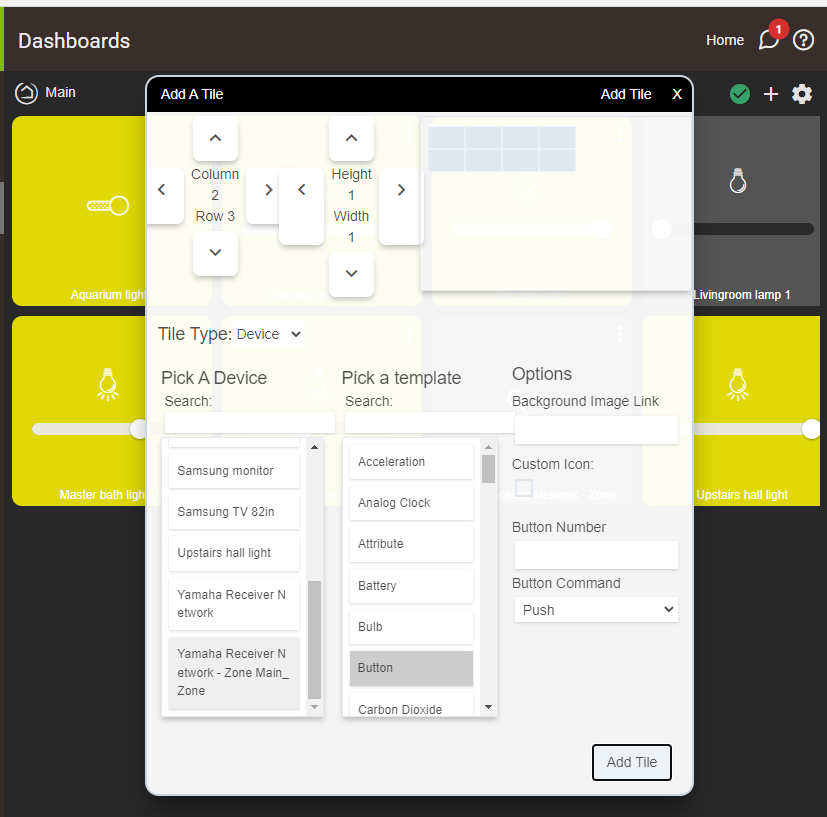
Unfortunately I have not figured out how to create/configure buttons for virtual devices in a dashboard that will actually do anything yet. I will post more when I have had a chance to sit down and work through this. Or maybe someone can give me some direction here?

