After a week, of migration and testing I am fully operational on my HE C-7. I must say, that after a bit of a learning curve, HE is absolutely spot on PERFECT. If you migrate from SmartThings to HE, you will find that the most work is in excluding all of your Z-wave devices and pairing them to the new hub. The HE pairing tool totally ROCKS compared to ST. The Zigbee pairing is less painful but still a time sink. Realize that you have to have to dig up the documentation for all of your Z-Wave and your Zigbee and understand the cryptic exclude and pair process for each. That's really the extent of the pain. I had one or two wall switches that took me hours to exclude.
Add these devices back in over a couple days. Both Z-wave and Zigbee are mesh networks. They take awhile to learn their adjacent nodes and who is the best repeater. Adding devices quickly will only break things. Sit back, chill and repeat.
I know that the trend today is to do everything in mobile apps. I have always hated that and my number one love about HE is the masterful web interface. Now that I have migrated all of my Smart Home devices from my SmartThings V1 Hub to Hubitat Elevation I had a chance to get rid of all the old and unused devices from installations over the last five years. My system is nice and organized now. I LOVE being able to configure everything in a web instance. After everything was cleaned up, I ended up with 121 devices. No one wants to configure 121 devices in a mobile app. Is Samsung listening? Kudos to HE.
The bottom line in this migration was that I was able to migrate all devices except for one of my two Go Control Linear Z-Wave sirens model #WA105DBZ.
The WA105DBZ that migrated (after a lot of Z-wave exclusion and pairing headaches) was the siren I have in the house. The other siren of this type was in the attic over the garage and intended as an outside siren. The WA105DBZ is an indoor siren and for that reason, I had installed it inside the attic protected from the elements. Ultimately, although the actual siren functioned, I was unsuccessful in either excluding or re-pairing it with the HE. I conclude that perhaps the electronics fried in the attic heat.
I had only one automation that I could not successfully move. That was my "Return" command for Alexa. I use Harmony Hubs for my Entertainment systems. This is a rather advanced automation. I know you will all appreciate this. Here is what it does:
-
Watch a TV source on the Family Room Entertainment Center (OTA TV, Fire TV 4k, Roku, or PS3).
-
Voice command Alexa to display one of the cameras outside the house or cast a phone to the TV using the Google Chromecast Ultra.
-
The Samsung 8 Series 4K UHD TV can control its inputs independently using HDMI-CEC.
-
HDMI-CEC will automatically change the TV input to where it sees the request. An example would be the Alexa camera request would change the input to the HDMI input hosting the FireTV 4K and the casting request would change the HDMI input to the one hosting the Fire TV 4k.
-
This input change could be from any of the (OTA TV, Fire TV 4k, Roku, or PS3) inputs.
-
The Logitech Harmony Hub will not have changed the input that it thinks that it is on. The input would only have been changed by HDMI-CEC.
-
The Harmony Connect SmartApp is able to handle both querying what it thinks the current activity on the hub is and also able to switch to a new activity.
-
Harmony connect can start, end or power off activities. Harmony connect cannot issue device commands like "change input". That is where the Harmony API comes in. You can enable the Harmony API on a Harmony Hub.
-
In order to use the Harmony API, you must run a server on the local network which can communicate to the API on the LAN. Jonmaddox/harmony-api docker instance. Docker Hub. Simply install and run this Docker instance on your LAN. I run harmony-api on Container Station on my QNAP NAS. You could easily run this on a Raspberry Pi as well.
-
A SmartApp called KuKuHarmony by turlvo GitHub - turlvo/KuKuHarmony: SmartApp allowing you to control each 'Device' in Logitech Harmony Hub using Harmony-API allows defining individual keypress commands for devices that run activities. The Github link documents how to use the API.
-
When HDMI-CEC steals the input away from the Harmony Hub and I am done watching the camera or using the Chromecast, I simply say, "Alexa, Return". That is an Alexa routine that turns on a virtual switch which in turn triggers a Webcore piston.
-
The Webcore piston finds out which HDMI input the TV is supposed to be on based on the current Harmony Activity and switches it back to that input.
-
Here's the Webcore Piston:
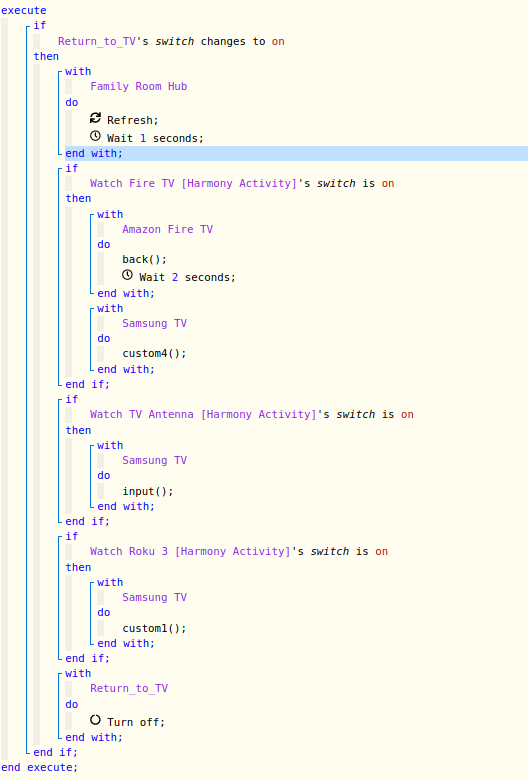
This works flawlessly. Although I found an equivalent of Harmony Connect for the HE, I was only able to switch to activities which were presented as switches. The missing part of the puzzle was I was not able to use the code to query which activity was in progress using Webcore on HE. I also found someone that did work on porting KuKu Harmony to HE. I installed and tested it, but found out that I could create my Amazon Fire TV device with all the key definitions perfectly. When I tried to add my Samsung TV, it replaced, rather than added a new definition. As you can see from the code above, I need both the Samsung TV and the Amazon Fire TV Stick to be defined on KuKu Harmony.
So for right now, I have left only an instance of Webcore and KuKu Harmony on my old SmartThings V1 Hub. Everything else is migrated and working perfectly.
I ended up implementing some of my automations with Rule Machine 4.0 on HE and after I got the hang of it, I am very pleased. My more complex automations are running in Webcore on the HE. I also rely heavily on Echo Speaks and it is running perfectly on HE as well.
I was also able to configure MyQ Chamberlain Garage Door SmartApp in HE and it works perfectly which was one of my concerns.
My obscure button controllers also worked well. Someone in the community had written an interface for my BOND Ceiling Fan remote RF controller and it works great. I use Alexa to control all of my devices and the Alexa skill works perfectly. I enabled Chromecast Integration but I am not entirely sure what that gives me. The Sonos Integration is perfect. I created a dashboard for every room plus an environmental dashboard. I use the OpenWeatherMap API for weather and it is awesome.

I configured Lock Code Manager and Mode Manager to help me with HSM. The HSM presence monitor for mobile phones works great, unlike the ST predecessor. I use the Philips Hue connect to handle my 28 Philips Hue bulbs and it works great too.
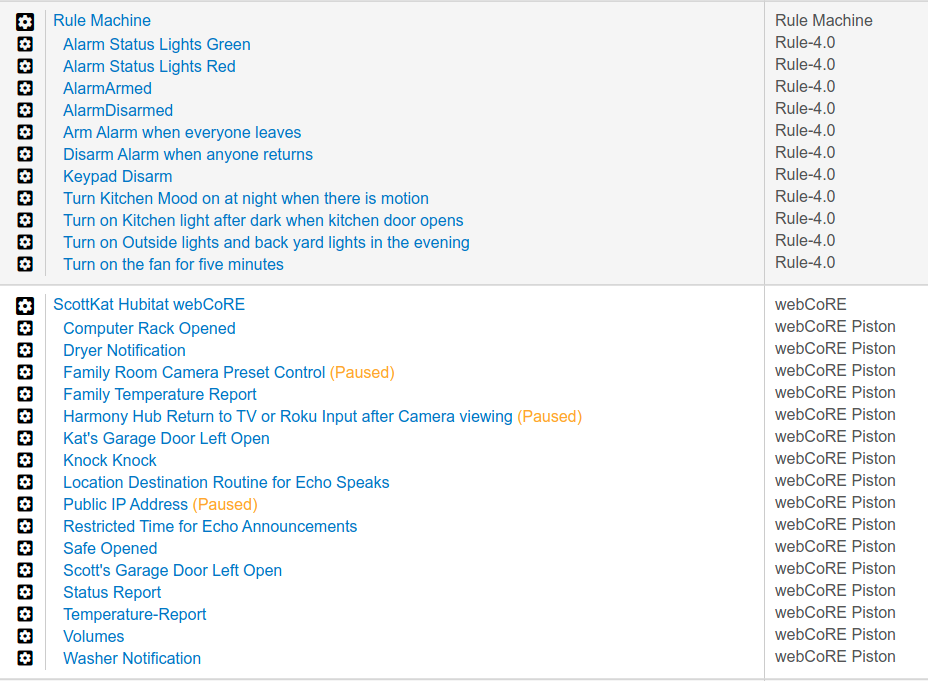
Here's my list of automations as they stand now.
Bottom line, this is great. Kudos to the HE team and all the community posters.

